Miking guitar amps is one of the easiest studio tasks. With decent gear and a solid performance, it can take real effort to screw up. Acoustic guitars are tougher. They have far greater dynamic and frequency ranges, and unlike amps, they have a nasty tendency to move around mid-recording.
There’s plenty of info out there about recording acoustics, but it’s usually presented from the engineer’s perspective: Where do you put the mics after you’ve parked the guitarist in a chair? But what if you’re the poor schmo setting up the mics, sitting in the chair, and pressing record? Let’s look at a single-mic method that almost always works.
Mic choice. To most ears, condenser mics do the best job capturing the full range of acoustic guitar. (Sadly, the inexpensive Shure SM57 that sounds killer on your amp tends to make acoustics sounds harsh and thin.) Ribbon mics can also work great, especially relatively bright-toned ones like the Royer R-121.
Here’s one guitar (a small-bodied 1941 Martin 00-17) recorded through four different mics: a Neumann TLM 103 (a large-diaphragm condenser), an Ear Trumpet Edna (a small-diaphragm condenser), a Royer R-121 ribbon, and a Shure SM57 dynamic. These are raw recordings, with no EQ, compression, or effects. Draw your own conclusions.
Sadly, ribbon and condenser mics cost more than dynamic mics. The most coveted models can cost thousands. But as with guitars, you can find Asian knockoffs that yield surprisingly good results at a fraction of the price.
Small-diaphragm condensers are probably the most popular option among engineers, though countless classic recordings have been made with large-diaphragm models. Some say small diaphragm mics are better at capturing airy highs. Try before you buy.
Mic position. If you’ve ever recorded an acoustic, you probably realized that aiming the mic at the soundhole yields boomy, bottom-heavy tones. Instead, aim for the junction of the body and neck, around the 14th fret. This spot tends to provide a good balance of highs and lows, though the perfect position may vary between guitars, players, and parts. Even tiny adjustments of angle and distance can dramatically alter the sound.
That’s why I always record acoustic guitar while wearing headphones—it’s the only way to accurately gauge how slight position changes alter your tone. Careful, though—if the headphone cable brushes the guitar body, you’ll hear it through the mic. (I usually secure the cable under my butt—sorry if that’s TMI.) Also, listening on phones tends to yield tighter performances in band tracks. (Hint: Focus on the drummer’s hi-hat.)
The pivot principle. Six to eight inches between guitar and mic is a good starting distance. From there, pivot your body and guitar to varying angles in relation to the mic while listening on headphones (Photo 1). You’ll hear subtle differences in phasing and bass-to-treble balance, and one spot will probably sound best. If you’re overdubbing onto other tracks, listen to them while finding your position—certain balances work better in context. With practice, you may find yourself “playing to the mic” the way skilled singers do, altering your position slightly to bring out the best sound for each section.
Consider the space. Many engineers emphasize the importance of capturing room ambience when recording acoustic guitar. But those folks are working in rooms designed for recording. If you’re in a funky home studio, a tight, close-miked sound may be your best bet. If your mic has switchable pickup patterns, the cardioid setting (which deemphasizes room reflections from the back and the sides) is probably a good call.
But even a closely positioned cardioid mic picks up the room, so experiment with different spots in your recording space. (If you’re working alone, you may be glued to a chair within reach of your computer keyboard.) Many players and engineers swear by recording on a hardwood floor.
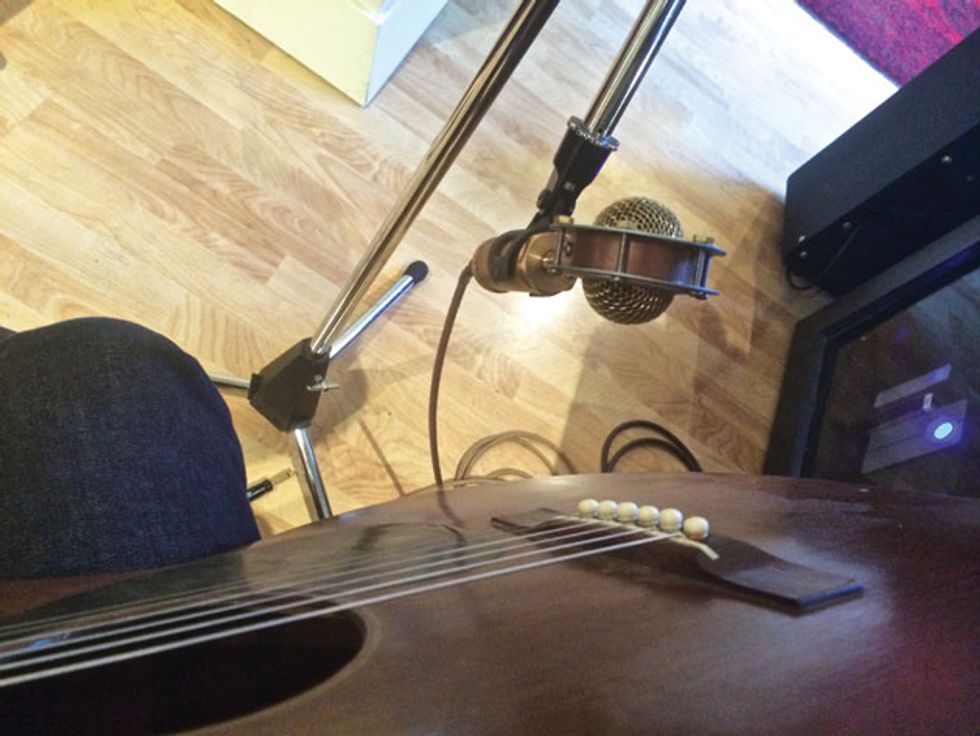
Photo 2: Recording behind the bridge is a good option for players who bump into the mic while strumming.
Distance yourself. Obviously, the further the mic, the greater the room ambience. If your room sounds great, some distance can be a good thing. Many classical guitar recordings, for example, are made in concert halls with no close-miking.
Here are clips of the Martin recorded through the small-diaphragm Edna mic at varying distances. (Again, these are raw files.) Clip 1 (six inches) sounds nice. The lows are a little unruly, but nothing a little EQ couldn’t fix. Backing off the mic to 18 inches (Clip 2) produces a tone with less bass and perhaps a better balance. At three feet (Clip 3), you definitely hear the sound of my room, with its reflective wood-veneer floors. It’s not an amazing-sounding space, and the highs clatter unpleasantly. Conversely, at a distance of three inches (Clip 4), the sound is too boomy, and it would be worse if I were playing a large-bodied guitar. On the other hand, you hear nice finger-on-string detail, so this position might work with some bass-cutting EQ. You can also adjust the bass content by shifting the guitar in your lap so the bass strings are slightly farther from the mic than the treble strings.
may be your best bet.
Meanwhile, Clip 5 features the mic positioned behind the bridge, another popular one-mic strategy, especially when recording undisciplined players who whack the mic while playing (Photo 2). Here the vertical position makes a huge difference—a mic parallel to the fifth string yields a far bassier sound than one parallel to the second string. Behind-the-bridge miking tends to sound thicker and more midrange-y that the 14th-fret method, though it can work great in some band contexts.
What about stereo? Yup, many engineers record acoustic guitars with a pair of mics in various configurations for increased spaciousness. In fact, recent Premier Guitar video featuring Nashville session aces Bryan Clark and Adam Fluhrer (“DIY: How to Mic Your Acoustic Like a Pro,” June 2014) skillfully explains several stereo techniques. Check it out!
I almost always go mono, especially when recording myself, and not just because there aren’t always two matching condenser mics on hand. Mono is easier to manage. It can sound as good as stereo, or better. It’s easy to stereoize a mono signal with reverb and delay, or create an over-the-top stereo image by doubling a part and panning the tracks wide. My two cents: Learn to capture good sounds with a single mic before stepping up to stereo.