Hi Jeff,
I own a Fender Blues Junior and recently had to replace a fuse because it blew and the amp wasn’t powering up. A replacement fixed that problem, but another arose. When I max all the controls I can barely get any volume out of the amp. The speaker is good. I removed the verb tank because it was bad. I also put the tubes from my AC15 in it—they are the same tube types and correctly placed. Not too long after turning the amp on, the tubes get really hot and I get a little burning smell. The amp barely puts out any power—maybe .2 watts. What could be the problem?
Thanks,
Micah
Hi Micah,
Often when a fuse blows in an amp, there’s some sort of failure associated with it. Occasionally one may blow due to a problem with the mains voltage, such as a power outage while the amp is on followed by an immediate return of voltage. This could be a whole neighborhood power outage or just some practical joker turning your power strip off and then on again. (“Hey, thanks dude!”) But usually there is some other cause for the failure.
The first major cause of a fuse blowing is an output tube that shorts. Sometimes the tube can remain shorted, and other times, once a replacement fuse is installed, the bad tube can begin working, only to fail again at some point. The best way to ascertain if you have an intermittent output tube is to run the amp for a while sans output tubes. If it doesn’t blow the fuse, reinstall the tubes and see if it blows the fuse again. If so, at least one of your output tubes is intermittently shorting and they need to be replaced. This method is not foolproof, but may help you determine if you need new output tubes. Assuming that your fuse is no longer failing and you already substituted output tubes, we’ll move on.
The next user-serviceable item I would normally check would be the preamp tubes, but you’ve done good substitutions here as well, so we know it’s not a tube issue. What else could it be? Well, my next point of inspection would be the speaker. And while you mentioned that the speaker is good, I have to ask how you checked it. Did you measure the resistance of the speaker with a meter? Was the speaker connected to the amp while you did this? If so, that’s incorrect. A speaker always needs to be disconnected before measuring across its terminals.
If the speaker was connected to the amp and you measured a typical 6 to 7 ohms of resistance, this tells me one of two things: Either the output transformer secondary is open (because you should be measuring a very low resistance, in the area of 1 or 2 ohms) or the speaker cable itself is open. The best way to check to see if a speaker and speaker cable are good is to first disconnect the speaker cable from the amp and then disconnect at least one lead of the cable from the speaker. Once you do this, measure the speaker itself. If the measurement is good, reconnect the cable to the speaker.
Next, check the resistance at the speaker cable plug. If it reads correctly, then the speaker and cable are okay. If you get an open (infinity) reading, the cable is open. If you read close to zero, the cable is shorted. Because of the nature of the molded-end combo speaker cables I’ve seen used on amps over the years, I strongly recommend you follow through with these tests. I have seen my share of open or shorted cables, and either scenario would cause the amp to have little or no output and cause the output tubes to be overly stressed. If all checks out with the speaker and cable, we’ll need to explore a few other possibilities.
Note: While you may be able to verify a problem using the following info, unless you are familiar with working on tube amps—and circuit boards in particular—you may need to have the amp serviced by an experienced tech. If you have any doubts at all, seek out professional help.

Photo 1
A recurring problem with amps of this particular design has to do with the small wires in the ribbon cables breaking. Closely inspect all the ribbon cables (Photo 1) and make sure that none of the conductors has broken where it enters the circuit board. If you’re careful, you should be able to measure continuity using a multimeter. If this all checks out, it’s time to start checking some voltages.
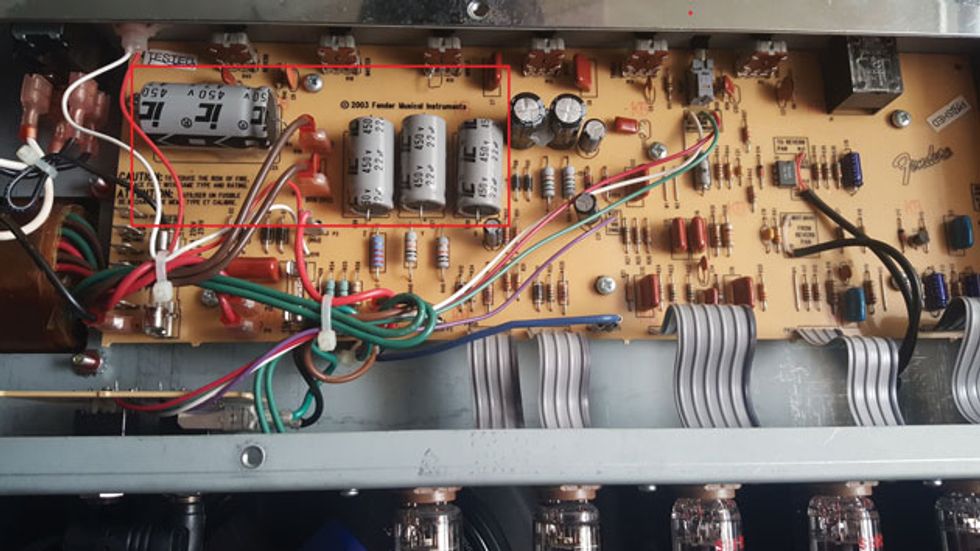
Photo 2
Because you mentioned the amp has some output, albeit very low, I’m going to assume that the high voltage power supply is working. You can quickly verify this by connecting the negative lead of your meter to the chassis and measuring the voltages on the + side of the four large 450V caps (Photo 2). These voltages should range from approximately 400 to 250 volts. If this is good, we’re going to move on to the low voltage supply, as this could actually tie together a couple of problems.

Photo 3
You mentioned you removed the reverb pan because it was bad, but do you know for sure that it’s actually the pan that’s bad? The low voltage supply in the amp not only provides the bias voltage to the output tubes, but also supplies the plus and minus 15V that powers the reverb IC chip. First you need to check the voltage on pin 2 of the output tubes. This would be the second pin counting clockwise in the space on the socket. It can also be measured on the circuit board at the 1.5k grid resistors (Photo 3). This should read approximately -10VDC. If this is not present, check the voltages at the 750-ohm resistors in the low voltage supply (Photo 4).
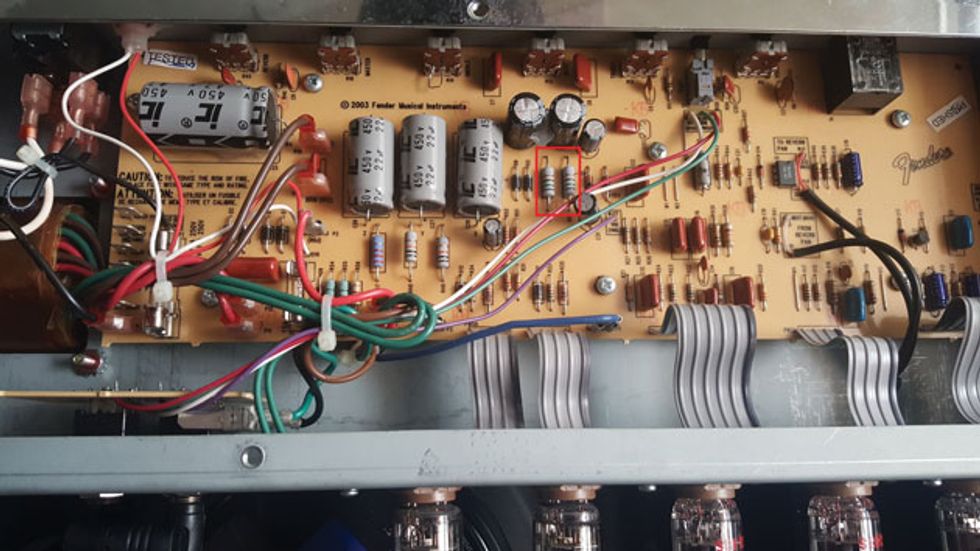
Photo 4
Each side of each of these resistors should read +15 and -15 volts respectively. If not, repairing the cause of the failure may very well fix both the output and reverb problems with the amp.
I hope this helps breathe life back into Junior.