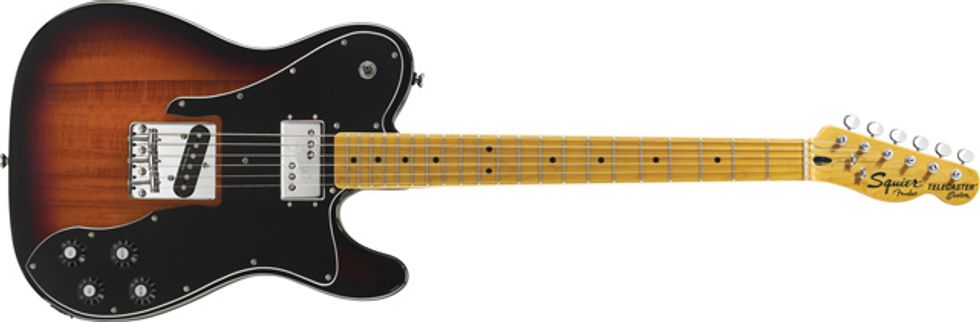
The Squier Vintage Modified
Tele Custom comes stock with
a humbucker in a Wide Rangestyle
housing and a Duncan
Designed bridge pickup.
Photo courtesy of FMIC
Premier Guitar’s editor in chief, Shawn Hammond, is a huge fan of taking well-built, affordable guitars and customizing them to sound as good as axes many times their price. He’s already had me do work on a Squier Classic Vibe Telecaster ’50s, which he upgraded with Fender Custom Shop Jim Campilongo pickups. This time around, he’s asked me to really go to town on a surprisingly great, brand-spankin’- new Squier Vintage Modified Telecaster Custom, which has a street price of $299. We’re going to turn this Tele into a head-turning, twang-bangin’ monster!
The Vision
When Shawn first bought this
Squier, it was mainly so he’d
have at least two Teles on hand
in case one died or had a string
bust during a gig. What Shawn
wanted to see when I was done
with it was a guitar that sounds
and looks great. He’s not concerned
about knee-jerk reactions
that other players might
have to the headstock decal. In
fact, he hopes to maybe help
a few players out there realize
it’s not the price or the brand
name that matters, but knowing
which things to change to get a
fantastic-sounding guitar for a
very reasonable price.
To that end, the first no-brainer upgrade for almost any guitar this affordable is new pickups. Shawn wanted authentic Telecaster twang—sparkly, complex tones with some spank—from the bridge pickup, so he went with a handwound Curtis Novak TEL-V. The more he thought about the project, though, the more he wanted to have some fun with it.
Shawn’s also a big Bigsby fan, and given that Teles with Bigsbys are pretty rare on the whole—let alone at a low price point—he added that to the upgrade list, too. He was also intrigued by Tele-forum talk of keeping the ashtray bridge rather than using the standard Bigsby Telecaster kit (which requires replacing the ashtray assembly with a chromed pickup surround that has a Mustang-style bridge attached to it), so he asked me to mod the ashtray bridge to work with the B5. He also wanted to replace the Squier’s original steel saddles with compensated brass ones that would facilitate better intonation while maintaining old-school tones.
Because Shawn usually prefers single-coils and often finds neck pickups too bass-y for his band’s original “indie-twang-punk” tunes—and because he still hasn’t been able to add a Jazzmaster to his collection—Shawn decided to swap the Tele Custom’s stock humbucker with a Jazzmaster-style pickup. “I want to be able to get that hollowed-out, ghostly twang without having to pick way back by the saddles,” he told me. Having heard great audio samples online, he decided to go with Novak’s JM-V, which is based on the pickup in the builder’s own 1963 Jazzmaster. The pickup is narrower and has different screw placement than a Wide Range-style humbucker, so this also required a new pickguard. Shawn chose a visually striking gold-anodized aluminum model from Tone-Guard.com. He also wanted the guitar set up to play with .011–.052 string sets.
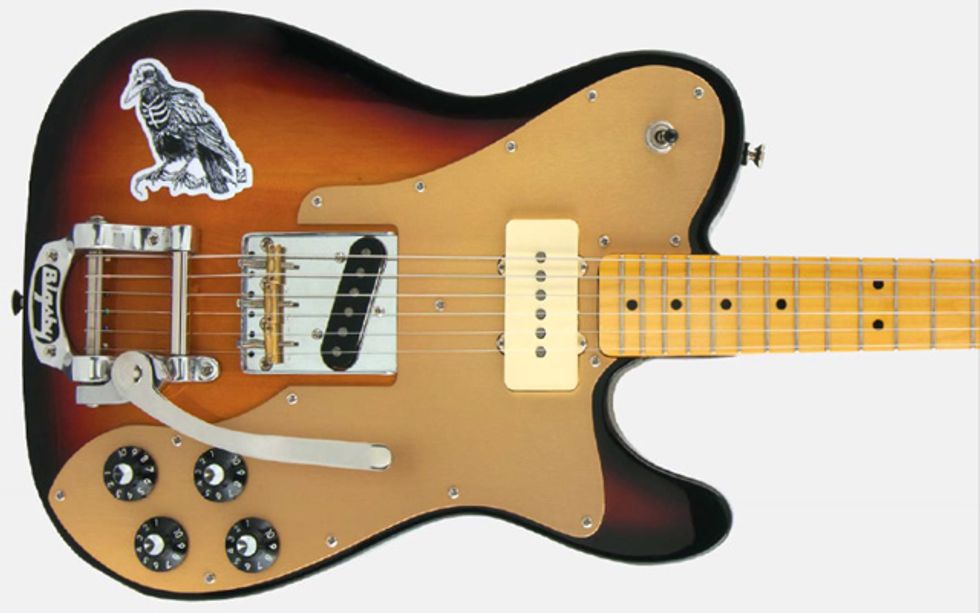
The completed project
features Curtis Novak
JM-V (neck) and TEL-V
pickups, a Tone-Guard
anodized-aluminum
pickguard, a Bigsby
B5 vibrato, compensated
brass saddles,
and upgraded pots,
output jack, tone-pot
capacitor, and knobs.
Exploration and
Brainstorming
Although I knew what Shawn
wanted from the final product
when he dropped off the guitar
and the main parts, I still needed
to give the Squier a thorough
exam to see if there were any
other issues to address in the
process. When I did, I found
that it has a good, solid feel and
really nice fretwork for its price.
But once it was on my workbench
I noticed the neck angle
was slightly crooked—the low
E was almost off the edge of the
neck near the body (Photo 1).
Luckily, when I took the neck
off to see what was causing the
misalignment, I found that it
was due to a bit of sawdust and
polishing compound wedged
in the pocket. Cleaning that
out allowed me to remount the
neck at the proper angle.
When I plugged the Squier in, I was surprised by the quality of the pickups. The neck pickup looks like the Wide Range unit used in the first Telecaster Customs from 1972, but it sounds like a very generic stock humbucking pickup. Shawn told me before dropping off the guitar that he was surprised how good the Duncan Designed bridge pickup sounded. “It’s a little thin sounding,” he admitted, “but it does have that essential Tele character.” I plugged it in to hear for myself and found that the bridge pickup indeed had a lot of that classic Tele twang. It also had decent output and balance after some height adjustment.
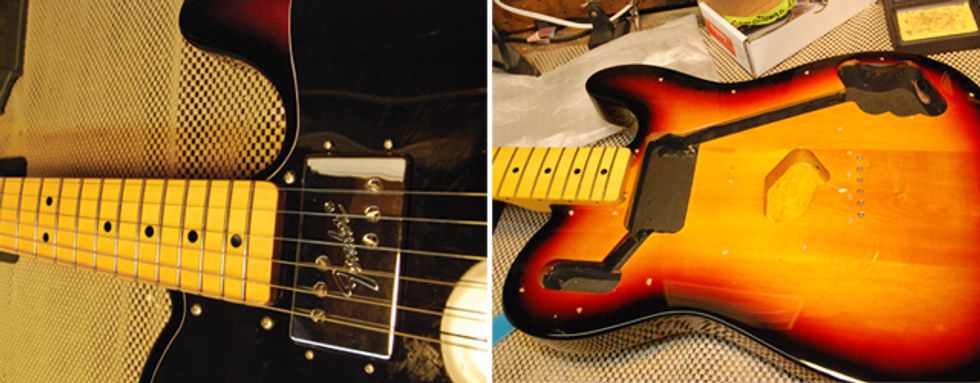
LEFT: Photo 1. The Squier’s low E was originally misaligned, but cleaning excess
sawdust and polishing compound out of the neck pocket remedied the issue.
RIGHT: Photo 2. The Tele’s interior was nicely shielded and grounded straight
from the factory.
Moving on, I noted that the volume and tone potentiometers had a slightly loose but smooth feel, but most of their taper was all at one end of the rotation—and every now and then the bridge-pickup volume pot shorted out when I turned it up all the way. Gotta fix that! The knob and switch placement were comfortable, but though I liked the look of the press-on, amp-style knobs, they felt a little less than robust. I decided to replace them, too. Lastly, I love the simplicity of the Tele output jack, but I knew from experience that it will eventually come loose and either require annoying tightening every time someone plays the guitar, or possibly fail at a critical moment. For that reason, I suggested to Shawn that we install an Electrosocket jack mount, which screws directly into the body to prevent loosening of the jack. I also figured I might as well install a sturdier output jack and drop in some more reliable CTS pots and different capacitors while I had the Squier in pieces.
After finishing the external exploration, I moved on to looking at the guts of the Vintage Modified Tele. First, I had to lose the strings. Next up, I removed the 16—yes, 16—screws that keep this kitchen table of a pickguard on! Once they were off, I saw that the guitar was clean inside. There’s shielding paint and it’s fully grounded (Photo 2)—nice work. When I saw the Alpha mini pots, I worried about whether the full-size CTS pots would fit in the existing body route, but first things first. Although I wasn’t going to start with the electronics, I removed the bridge, desoldered and pulled the output jack and ground wires, and clipped the leads on the bridge pickup. Voilà—a clean slate to work from.
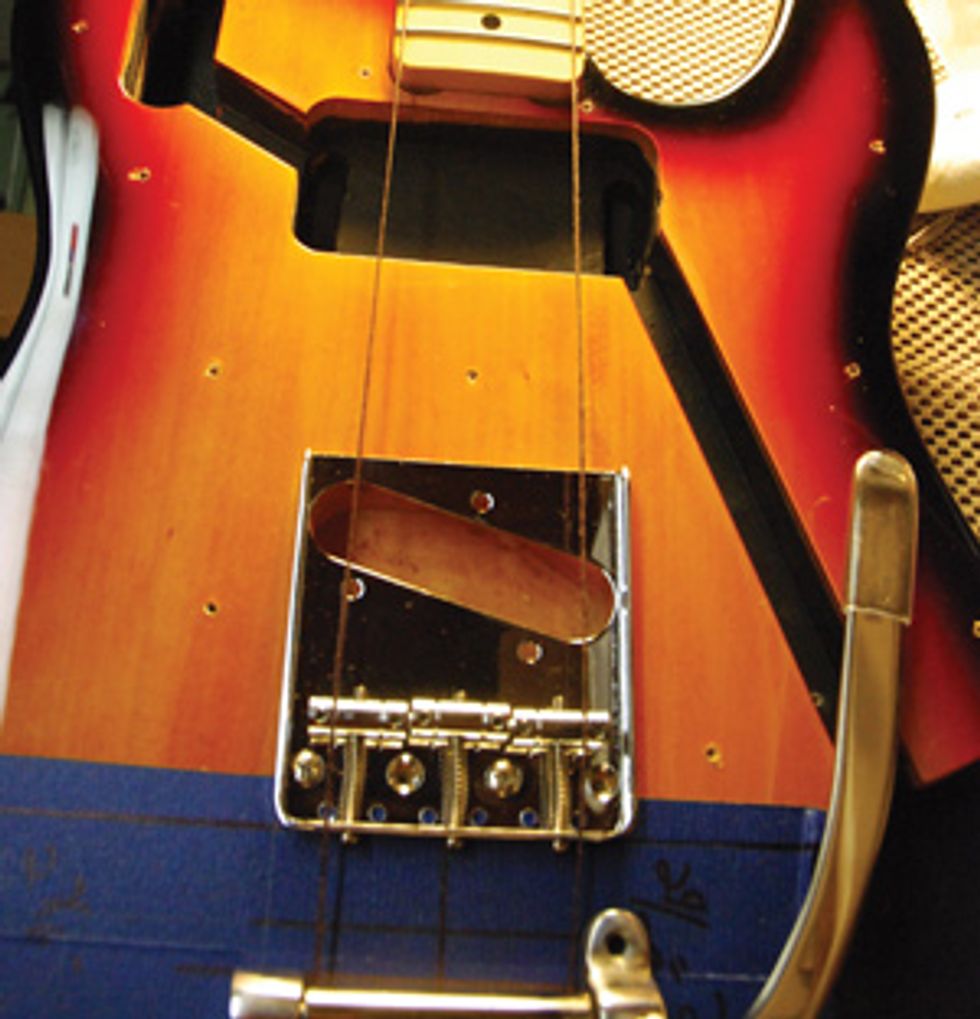
Photo 3. When I first placed the ashtray bridge and Bigsby, I worried that the string width was too wide from the saddles to the vibrato, but it ended up fitting just right.
Installing the Bigsby
I decided to start with the new
vibrato first, so I covered the
adjacent area on the guitar’s top
with blue painter’s tape both
to protect it from scratches
and to give me a place to write
notes with impunity. I put the
bridge back on and took some
measurements to start my layout.
I needed a centerline and
some horizontal lines to keep
everything nice and square, and
the 3-saddle ashtray tailpiece
proved to be great for finding
center locations. It has a hole in
the center of the back, so I used
that as a reference and used a T
square positioned at the edge of
the body to mark a centerline to
work from.
To get an idea how the strings would lay out as they passed over the saddles, I mocked up the Bigsby and used a string to estimate where the strings will fall when I’m done. Based on pictures I’d seen online of other Bigsby-fied Teles, I already knew they wouldn’t clear the back of the ashtray, but at first glance I also wondered whether the overall spacing of the six strings would be too wide to fit the Bigsby’s roller guide (Photo 3). Fortunately, once I put strings in both E positions, I could see that there was just enough width in the roller guide to facilitate straight string pull from the saddles to the Bigsby’s axle pin (where the ball ends will be anchored). I could also clearly see where I’d need to cut away material from the back of the ashtray bridge to allow the strings to pass through (Photo 4). At this point, I took the bridge back off and set it aside.
Going back to the taped-up guitar body, I drew perpendicular lines to mark where I wanted the Bigsby’s roller guide and forward screw to be located. The exact locations are a bit arbitrary, so I chose them based on appearance and— more importantly—the spot that gave me the greatest break angle over the saddles with the limited space available. I used my centerline and perpendicular lines to get the Bigsby in position, and then I drilled mounting holes using a 3/32" bit. (Photo 5)
Next, I disassembled it so I could mill string channels in the back. To keep it absolutely still, I mounted it in a vise and then put the sanding-drum bit into my Dremel, threw on some safety goggles (a must when using any power tools), and created six gently arced pathways that are approximately 1/16" from the original top edge at their deepest point (Photo 6). When the rough cuts for all the channels were done, I switched to a polishing bit to make them both smooth to the touch and attractive to the eye.
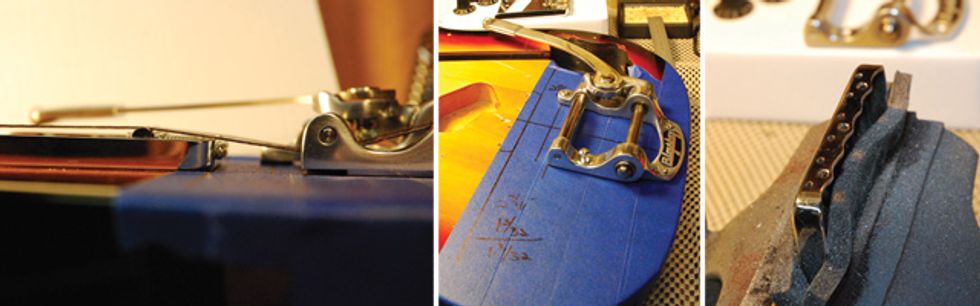
LEFT: Photo 4. Stringing the new Bigsby and viewing the bridge from the side
revealed how much metal I needed to remove from the ashtray bridge. MIDDLE: Photo 5. Painter’s tape gave me a
canvas for measurements and guides. RIGHT: Photo 6. Foam protected the bridge
from vise marks while I milled channels.
With that done, I installed the new brass compensated saddles—making sure I positioned them as shown (Photo 7) so that the guitar will intonate a little better than it would with standard Tele saddles. To test how the Bigsby and saddles work together, I needed to reassemble the rest of the bridge. I mounted the Curtis Novak bridge pickup in the ashtray, fed its wires through their channels, screwed the bridge and Bigsby to the guitar, and then strung it up.
When I played the guitar, I noticed two things right away. First, the strings were moving the saddles around and producing an unpleasant chattering sound. Second, the strings were creeping toward the center of the bridge, creating a narrower spacing than I wanted (Photo 8). I realized then that I needed to notch the saddles to make the strings stay at their proper spacing. So I slid the strings around, measured to find the proper location for each string, and then gave each string a good knock with a small mallet make an indentation where I need to create some deeper notches. I used gauged files to cut grooves in the saddles to keep the strings where I want them and give them a smooth, flat surface to slide over. I had to remove the bridge again in order to get at the saddles the way I wanted to (Photo 9). I cut the notches a little wide, but the strings still chattered when the Bigsby was wiggled to the extreme so I applied a little lip balm in the grooves. Plain white lip balm is a fantastic, nontoxic lubricant that helps the strings slide like glass! You can apply it with a toothpick or just wipe it on the saddles (it works great on the nut, too).
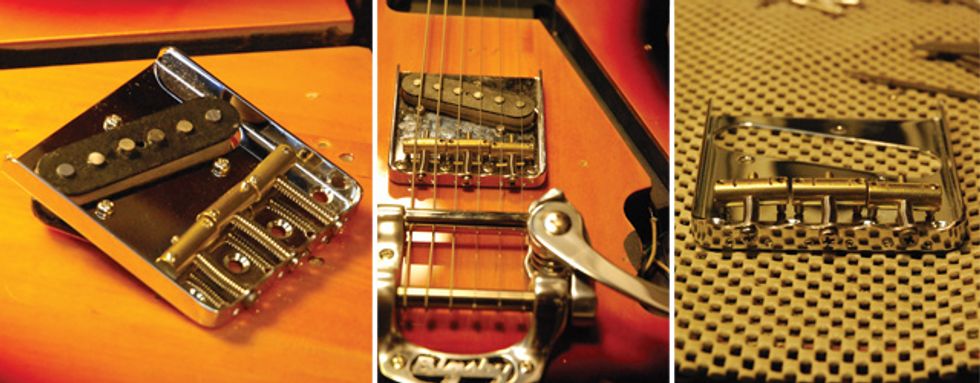
LEFT: Photo 7. Properly positioned compensated
brass saddles. MIDDLE: Photo 8. The Bigsby initially causes string
spacing that’s too narrow. RIGHT: Photo 9. Notching the saddles prevents inward
string creep.
While I had my gauged files out, I decided to cut the nut slots to fit the heavier strings I’ll be installing. The Squier shipped with a nut that accommodates .009–.042 sets, so the .011–.052 set Shawn prefers will definitely bind up in the narrower slots. At this point, though, I only cut to get the right width for the strings to travel without binding up. I’ll cut them for depth later, when I’m ready to adjust the action.
Electronics Time
One of the fantastic things
about the Vintage Modified
Tele is that everything is
mounted on one big pickguard—
all the parts are in
one spot. But it is kind of
cumbersome to work with. If
you recall, my first worry upon
peering inside the control cavity
was that the new, full-size CTS
pots wouldn’t fit. To find out
for sure, I mounted them to
the anodized-aluminum Tone-
Guard pickguard (Photo 10).
They fit—barely—but I had
to turn them all different ways
to make sure they didn’t touch
anything and short out. I chose
250k CTS pots because they’re
dependable and sound good in
Teles and the solid shaft will
work great with the new Fender
amp knobs, which have threaded
bushings.
On to the pickups. The handwound Curtis Novak JM-V (neck) and TEL-V (bridge) pickups are fantastic, two-wire vintage reproductions, so wiring them up is pretty straightforward. I was pleased that the JM-V dropped right into the Tele’s humbucker route, and I mounted it with a set of P-bass pickup screws I had handy. Although I wired everything up to the same pot terminals as the stock pickups, I swapped the original tone-pot capacitor with a .022 μF polyester cap. After I added the Switchcraft output jack and mounted the Electrosocket in the jack cavity, it was time to put it all back together, string it up, test the electronics, and adjust the pickup heights. I start by setting the neck pickup 1/16" and the bridge 3/32" from the strings, and then balance their volume against each other by playing the guitar and switching back and forth between the two. Some people like a little boost on one pickup, so let your ear be the judge.
Final Setup
No matter how good your
upgraded parts are, they’re not
going to sound their best if
your guitar isn’t set up well, and
this was especially true because
the Squier had a new vibrato,
notched bridge saddles, and different
string gauges. I started with
the neck, adjusting the truss rod
so that it was pretty straight, but
with a little relief. Next, I adjusted
the saddles. I love 3-saddle
bridges for setups: They make it
easy to match the fretboard radius
(9.5", in this case), and these
new saddles’ compensated design
enables you to get the intonation
spot-on for the D and G strings
(thank you, Danny Gatton!).
Having the Bigsby right behind the ashtray does make it a challenge to get to the intonation-adjustment screws, though, so an offset, Z-shaped screwdriver is a big help there (flexible-shaft screwdrivers also work). I set the overall height of the strings first, matching the fretboard radius by measuring the string height at the 12th fret across all the strings (Photo 11). That gave me an even height to start from, and I could then raise or lower each saddle as needed to make sure they were all the same height off the fretboard.
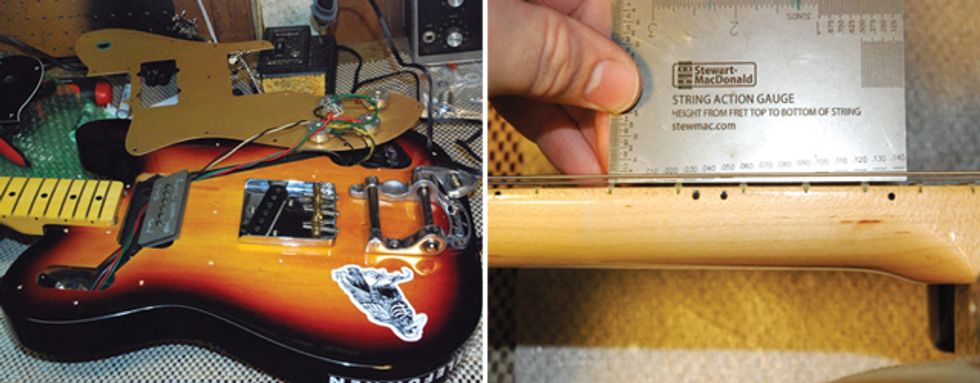
LEFT: Photo 10. Fortunately, strategic twisting enables the new CTS pots to fit
where mini pots used to be. RIGHT: Photo 11. Match string height to fretboard radius at the 12th fret.
To set the intonation, I started by using a tuner to make sure both the 12th-fret harmonic and the open string notes registered the same note. Then I adjusted the saddles to intonate the string at the 4th and 16th frets. This usually keeps the intonation spot on across the whole neck. I checked string height once more after I’d set intonation, and then adjusted intonation again to be extra sure notes were in tune across the entire neck.
The New Parts
• Bigsby B5 vibrato
• Stewart-McDonald compensated
brass saddles (item no. 5167)
• Curtis Novak JM-V and TEL-V pickups
• Tone-Guard gold-anodized-aluminum pickguard
• Switchcraft output jack
• Electrosocket jack mount
• CTS 250k solid-shaft potentiometers (4)
• Fender amp knobs (4)
• .022 μF polyester tone capacitor
• D’Addario EXL 116 strings
The Tools
• Sharpie marker
• Phillips-head screwdriver
• Small mallet
• Gauged nut files
• 40-watt soldering iron
• Blue painter’s tape
• Hand drill
• 3/32" drill bit
• T-square
• Safety goggles
• Dremel rotary tool with course
sanding-drum and polishing bits
• Stick of lip balm
After that, I cut the nut slots for depth—which takes some special tools (gauged nut files) and a bit of finesse. I start this process by pressing each string down at the 3rd fret to check how high the string is off the 1st fret (Photo 12). There are a lot of different preferences for string height (aka “action”)—players who have a light touch and want to play speedy, fleet-fingered passages tend to like action as low as possible without getting string buzz, while those who play with a very aggressive attack often need the action higher—but as a general rule, you should be able to barely slip a business card between the 1st fret and the string while holding the string down at the 2nd fret. When you’re adjusting action via nut-slot filing, remember that it’s better to err on the cautious side and do a little at a time, because after you file away nut material, it’s gone for good and you’ll have to install a new nut. Since I’m starting with a nut that’s already slotted, I use a file that’s the same gauge as the string for that slot. I’m cutting for depth—enough to keep about a third of the string thickness in the slot—so I don’t need to take much off. I mark the slots with a pencil in the bottom so that, as I remove material, I can see where I’m cutting and keep the same “ramp” angle. I want the neck side of the nut to be the top tip of the ramp, and I use long steady strokes to keep the channel nice and smooth. Cut a little, then put the string back to check it. Go slow and be precise, it’s easier to cut than to fill.

Photo 12. Press each string at the third fret to measure how much action
to adjust at the nut.
Twang On!
There you have it folks—we’ve
taken a few upgraded parts
and some simple tools, and we
turned a decent bedroom rocker
into a dependable, boutique-toned
instrument with a killer
look! Just remember that when
you’re contemplating a project
like this, you want to start with
a guitar that feels right in your
hands. The fit and finish have to
be there for it to be worth any
hot-rodding—and this Squier
Vintage Modified Telecaster
Custom certainly fit the bill in
that regard.