 |
|
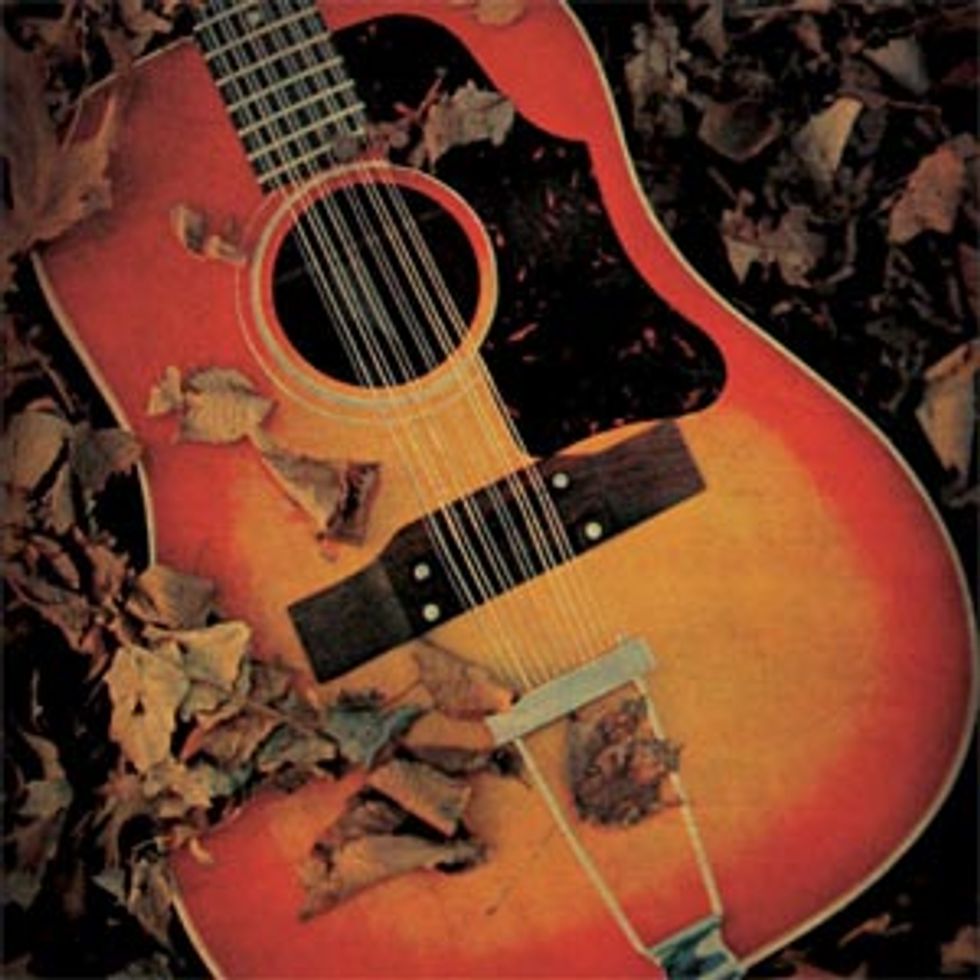
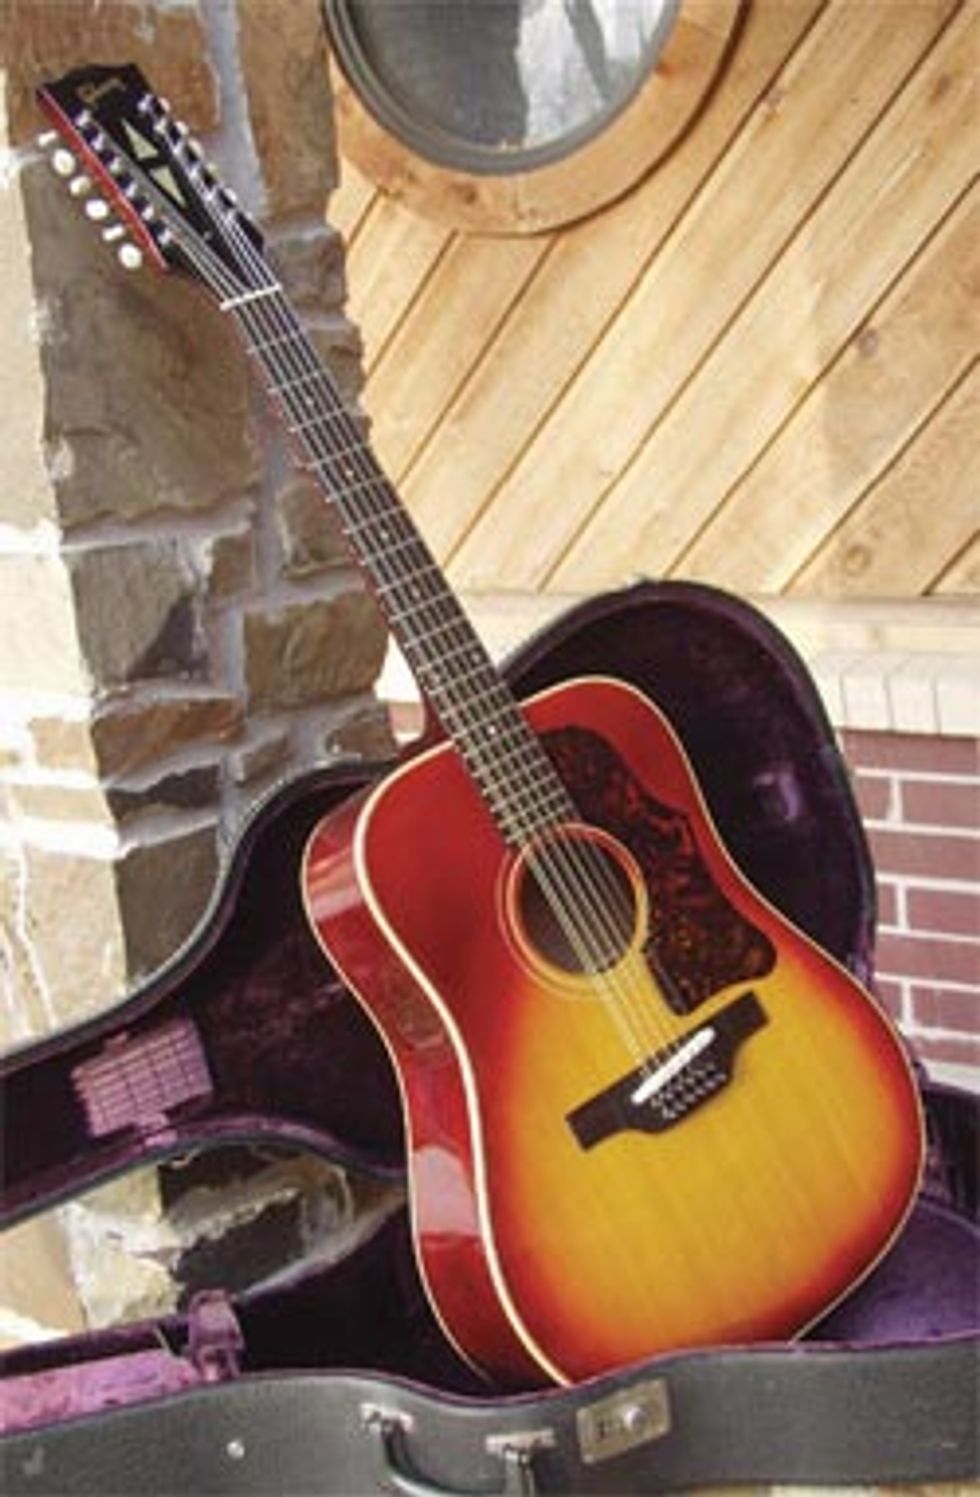
This adventure started out innocently enough. I had always wanted a Gibson 12-string with a Cherry Sunburst finish. I had cruised eBay for months, looking for the best combination of color, condition and the dubious option of an adjustable bridge. I found a nice pin bridge model, but the owner wanted $2500 for it and wouldn’t budge on the price. A price guide said maybe $2200 at the top-end and an inquiry to a well known authority on vintage guitars said that the value was, in fact, diminishing annually on vintage Gibson 12-strings. This gave me cause for concern, but I persevered.
Finally I came across a trapeze tailpiece model that had literally been under a guy’s bed for 35 years. The color was primo and the guitar had no major issues except for the dreaded, original adjustable bridge. I had read the book Gibson’s Fabulous Flat-Top Guitars by Eldon Whitford, David Vinopal and Dan Erlewine; in the section on the B-45 12-string they go into detail about how the early-sixties pin bridge models had the light top bracing of the late-fifties designs. This lighter bracing allowed for more top “flutter,” providing more projection and tone, but with the dainty bracing came the problem of structural instability. Most of the early pin bridge models selfdestructed, especially when tuned to standard pitch. They alluded to a few hardcore fans who had converted trapeze tailpiece models to the pin bridge versions – this was possible because the interior bracing was still the same as Gibson’s previous pin bridge model.
Not to be dissuaded from a Cherry Sunburst 12-string, I made a deal with “Jimmy the sound guy,” with each of us agreeing to drive 400 miles and meet in the middle in Saint Louis, Missouri to do the deal – $1500 for his rare Gibson B-45 12-string.
Not surprisingly, the sound of a guitar played over a cell phone is not a good representation of the actual box. After six hours of driving, when Jimmy proudly pulled the little jewel out of its case, my eyes lit up. Unfortunately, after the first strum, my heart sank. I had never heard such a pathetic sounding guitar in my life – a cigar box with strings stretched across it would have had better tone! But Jimmy drove four hours and I drove six and the darned thing was pretty. I had some experience in voicing the bracing under guitar tops, as I had put a solid bone saddle on my 1967 J-45 with good results. So reluctantly, with a good-sport-smile on my face and a sense of dread in my heart, I headed home with possibly the worst sounding guitar I had ever heard, much less purchased.
After arriving home, I called my friend and fellow luthier, Greg Krochman at Classic Axe in Nashville to regroup and appraise my situation. He advised me that if he were repairing the guitar he would make a pin bridge and add a “Bridge Doctor.” The JLD Bridge Doctor is made in Roswell, New Mexico, by my new best friend Don Kendall. It is essentially a threaded dowel through a wooden base that has two contact points under the bridge of a guitar; one contact point is under the saddle and the other is screwed into the underside of the ebony or rosewood bridge top and covered with a pearl dot or wooden plug. Once in place the dowel is threaded up against the block at the bottom inside of the guitar.
When Don learned of my plight, he was more than helpful. We tossed ideas back and forth and he sent me a Bridge Doctor which unfortunately didn’t fit under the cluster of 12 bridge pins. I must say his design has merit and is simple and easy to apply in most situations.
If my guitar hadn’t produced a promising “thump” on the top when I hit it with the side of my thumb, I likely would have just given up and sold it. It wasn’t until my friend Mark Hanna said, “You are the only hope this guitar will ever have,” that I became determined to save it.
Preparations
 |
|
|
 |
|
|
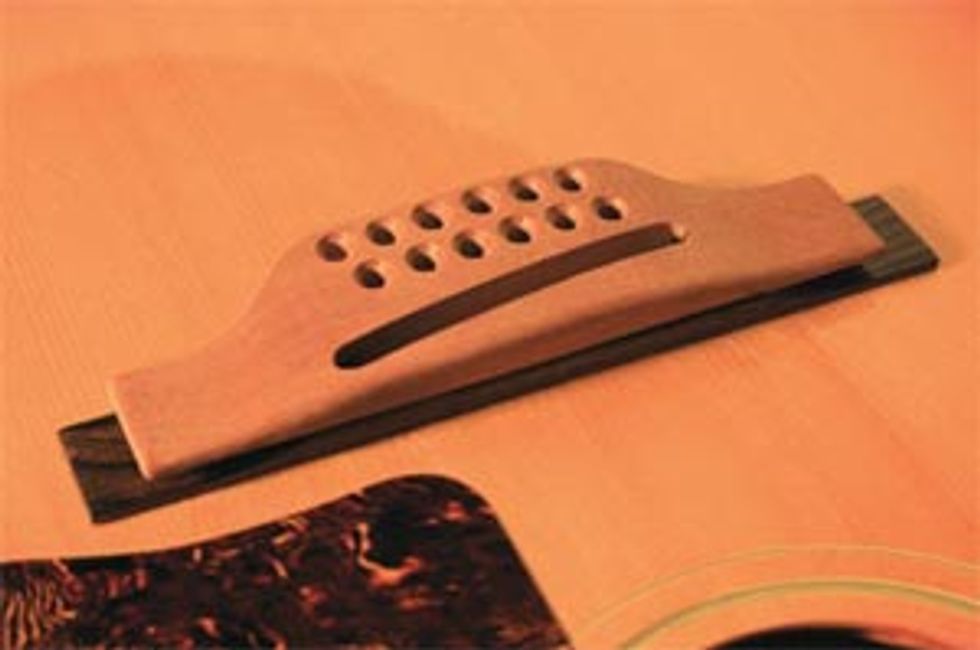
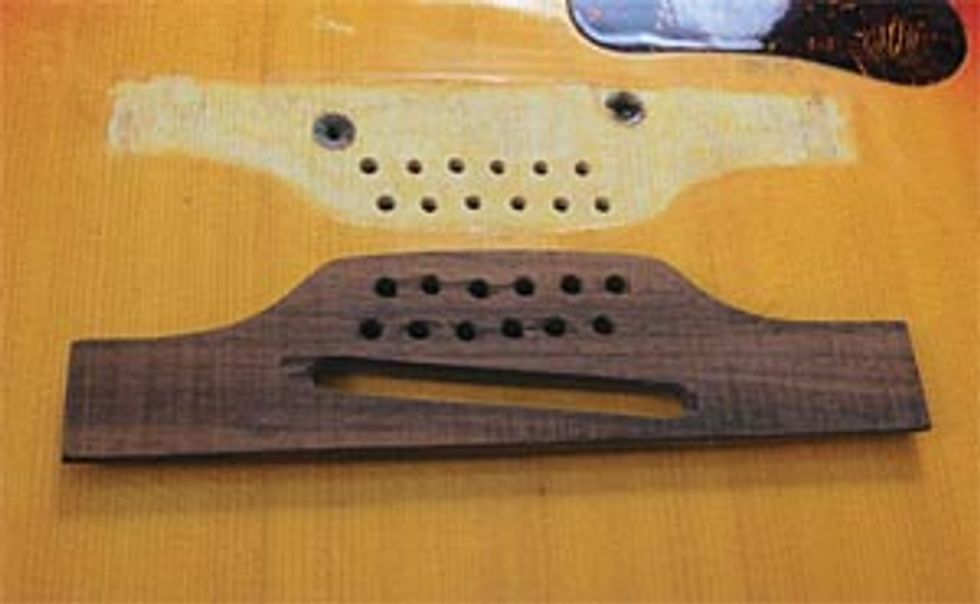
The next step was to make a new bridge out of rosewood. Since I had decided to keep the adjustable bridge option, I needed a template for the exact shape and measurement of the adjustable bridge saddle, too. For this template I turned to an old friend: Silly Putty. After removing the adjustable ebony saddle, I placed the Silly Putty inside the hole and pressed down, working it into the hole [Photo 3]. After carefully removing the putty I could measure the length and width of the cavity.
I then went in search of a large piece of solid bone for the saddle. After making a trip to my local butcher, I returned home with my trophy. I carefully boiled the bone in salt water, then baked it in the oven at 350 degrees for the better part of an hour. Unfortunately the inner and outer layer of bone separated while cooling, so I called my buddy Greg at Classic Axe again and gave him my needed dimensions. He then sent me the biggest piece he had, along with some laminated material to fill in the inner curve.
 |
|
|
At this point in my adventure I began considering the following conundrum: do I restore the guitar to original condition or do I alter the rascal from its original, poorly designed specifications? I can still imagine some worker at Gibson going to his superior and saying, “You know, if we just altered the top bracing a little and added a little more to the bridge plate, we might be able to still use the pin bridge and make a better sounding instrument.” In my imaginary scenario I can hear the supervisor reply, “We don’t do it that way. We’ve had so many warranty repairs for that pin bridge that my boss wants it done this way.” Not working for Gibson four decades ago, I press onward.
Bridgeplay
I then enlarged my X-ray photo of the guitar’s top so that the image of the bridge measured exactly 7 1/2” from side to side. I made three 16”×20” prints, varying the contrast and exposure between them. When dry, I had an exact, 1:1 ratio photo of the top with the bracing structure revealed. This trick needs to be done with black and white film and an enlarger so you can tweak the enlargement proportions. In case you’re wondering, I’ve been a professional photographer since the seventies. I’m the guy who took Clapton’s photo in the Tulsa Jail, but I called Dick Sims’ mom to get him sprung (perhaps another story for another time).
I positioned my new-old-stock Gibson pin bridge over the photo of the existing bridge and determined that I would need an additional bridge plate underneath to both strengthen my new bridge and allow for a base for the new bridge pins to snuggle into. I started with a corrugated cardboard template cut out with a razor blade and carefully shaped it to fit between the existing bridge plate and the cross braces underneath. After staring at the mahogany bridge placed on top of the photo of the old bridge, I determined that I needed to add two small additional braces going top to bottom underneath the ends of the bridge saddle and joining the existing lateral cross-brace under the top. I remembered the words of my friend, the late Stewart Mossman, “Nothing is stronger in top bracing than the triangle.” I gazed with delight at how I had created three additional triangles under the top at the end of the bridge with the addition of my two braces glued to the lateral brace. I imagined my luthier friend from Kalamazoo up in heaven giving me a big “OK” with his right hand.
 |
|
|
Afterwards I began cutting out my new bridge blank by hand with a hacksaw and a coping saw. Mechanical saws move too fast for this delicate process, although it took many hours to hand-file and sand the new rosewood bridge to shape, plus another four hours to fit the new bone saddle into not only the new bridge base but the old one as well, in case I reinstall the adjustable ebony saddle at a later date. Luthier Don Teter once told me to dig out the bridge adjustment nuts in the top and take out the old bridge plate; since the bridge adjustment nuts in this instrument were sunk slightly below the top, I decided against both courses of action and chose to leave the nuts in place and keep the existing bridge pad. I cut a solid piece of maple for an extension of the bridge pad underneath to match my cardboard template and saved the bridge adjustment nuts in case I needed them in the future.
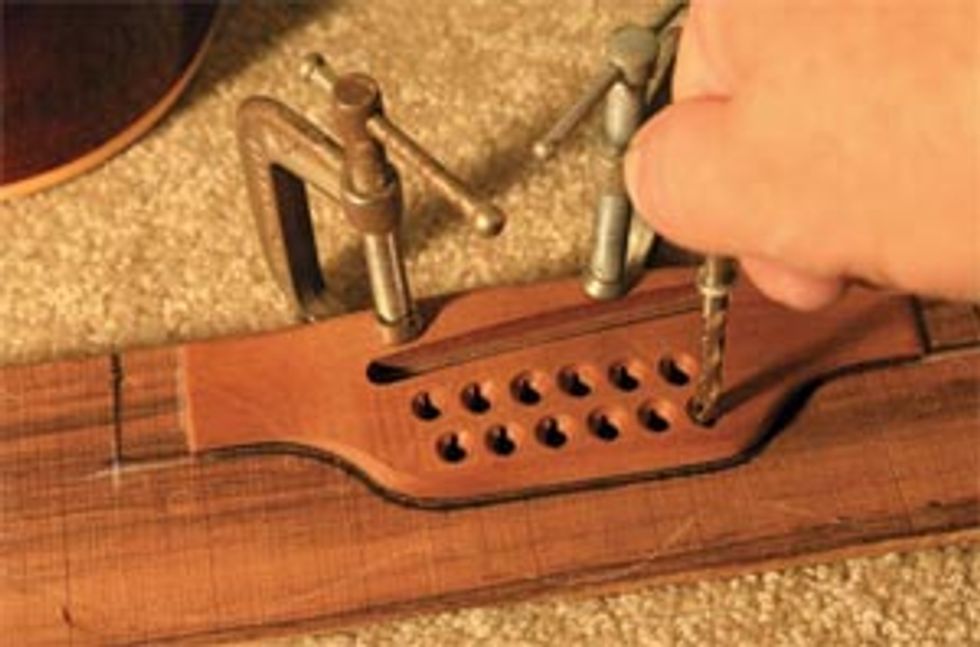
I began volleying ideas back and forth with Don Kendall of Bridge Doctor fame. I had returned my Bridge Doctor after deciding it wouldn’t work under the cluster of 12 bridge pins [Photo 5]. Initially, I thought of making my own modified Bridge Doctor with two dowels going down to the guitar’s butt and a suspension strap at the end of the dowels to keep the pressure transferred to the endblock inside the guitar. This seemed to work, but I had to carefully countersink the “all-thread” into the outer edge of my new bridge without coming through the top, since I had determined that the feng shui of the bridge would be unbalanced if I had inlaid rosewood or pearl dots over the new bolts. I thought about the same bolts going through my soon-to-be-added spruce top braces for additional strength and then began thinking about what this would do to the flutter capacity of the top.
 |
|
|
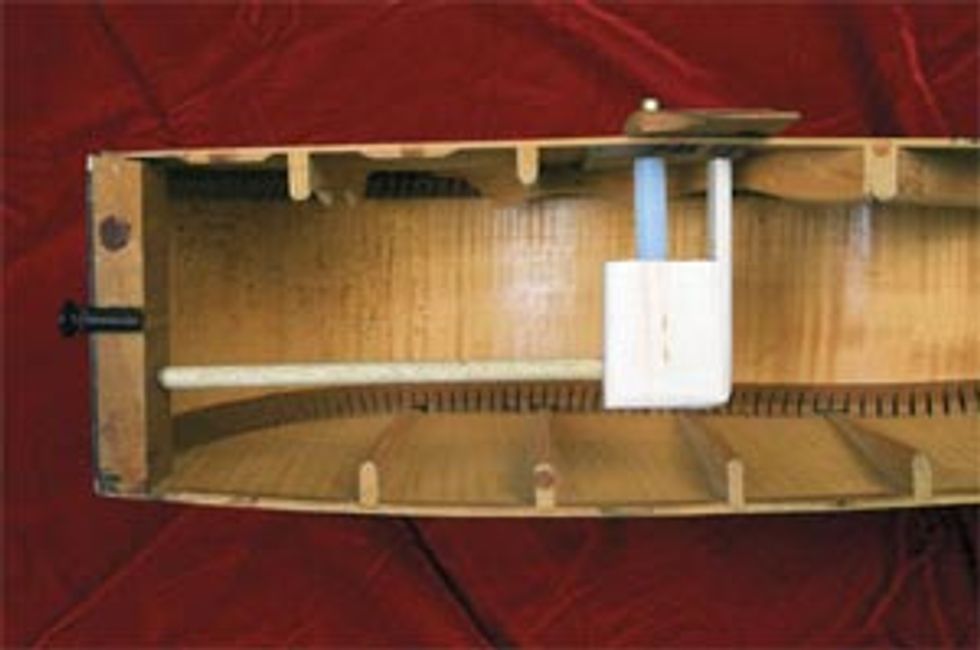
I eventually felt like the above mentioned screw-it-down method would stiffen the top in a critical area of the bridge, giving me some reservations. I also had second thoughts about trying to countersink the all-thread under my new bridge and into the top at just the right point, and again into my “Double Bridge Doctor” at just the right point. I shaped my bridge plate and two new braces while pondering this Bridge Doctor point, and then arranged the new plate, braces and bridge [Photo 6]. I then glued the new bridge plate under the top after much sanding and re-fitting inside the soundhole. I wanted the plane to be uniform so that when I glued my braces in place they would fit snugly. I used 5 Minute Epoxy for this process so I could hold the pieces in place until they set, negating the need for clamps.
This was make-or-break time. The old bridge had to come off and the new one had to go on. For this process I elected to go to another local repairman, Steve Hickerson at Tulsa Guitar and Electronics. He had a special malleable heat iron used to slowly heat the old bridge from side to side while gently wedging a piece of wood under it.
It was finally time to put my new bridge on the top. I began by reinstalling the old adjustable bridge saddle, which just happened to line up my new bridge. Once the new bridge was in place, I outlined the contour of the new footprint with a sharp scribe. A Q-tip and some acetone helped to soften the finish under the new bridge pattern; I then scraped the old lacquer off with a small chisel [Photo 7]. This took about an hour and a half.
 |
|
|
 |
|
|
The next day I began fitting the bridge pins into their new digs. I found that I needed a larger hole that would allow my pins to seat with the strings in place. My #7 drill bit was a touch small, but the next size up was too big. I went to my local hardware shop and discovered that I needed a special drill bit – they had it stashed upstairs, as it was evidently not for regular public use. The new drill bit proved to be perfect and I was able to fit all the pins and strings in place. For the first time I was able to hear the new guitar. It opened up, sounding 30-40 percent louder and richer.
Compensations
It was time to tackle the last obstacle of the project; the bone bridge needed to be compensated so all of the strings would stay tuned in unison as it is played up the fretboard, to the 12th fret and hopefully beyond.
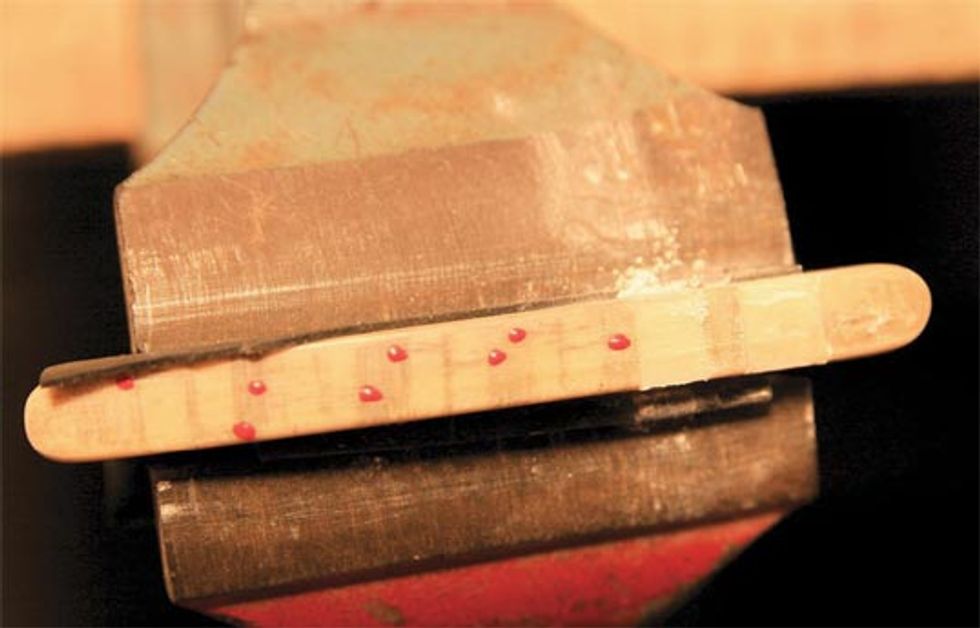
For this step, the bone saddle was put in place and the strings were tensioned one at a time. I decided to use a trick from Don Teter’s book; a round toothpick is inserted under the string at the middle of the bridge and the string is brought to pitch. Then the octave harmonic is plucked above the 12th fret and compared with the fretted 12th fret pitch. If the fretted note is sharper than the harmonic the toothpick is moved back toward the butt or bottom of the instrument slowly and the harmonic is again compared with the sound from the fretted 12th fret. Once the pitches are the same, a line is scribed with a sharp pencil lead on either side of the toothpick. Once this process has been completed for all the strings, the bridge is colored in dark with the pencil to differentiate which areas are to be filed and which are left alone. A red dot was placed to the right of my intonation line, just in case the line was accidentally filed off. A set of fine jeweler’s files works well for this process [Photo 9].
 |
|
|
Another peculiar problem I encountered with this 12-string was that the string heights need to vary from string to string both at the bridge and at the nut. At the bridge you want all strings to have the same approximate height so they can be strummed equally. In order to do this you need to sink the bigger strings – the E, A, D and G – farther into the bridge so that the tops of the strings are uniform with the tops of the matching octave strings. At the bridge, the big strings are sunk down into the saddle more than their octave mates, but at the nut the opposite is true – the smaller strings need to be sunk down to the approximate bottom of the bigger strings next to them so they hit the first fret at the same time when pushed down. That means 24 height adjustments, each taking six to twelve filing and testing excursions.
For cutting the nut, I alternated between the side of my fine jeweler’s file and a broken piece of a jeweler’s saw with masking tape for a handle. Be sure you point the slope of your string trough down towards the end of the headstock, so your point of contact is highest at the front, or fingerboard side of the nut. Without this slope, your strings will sound thuddy. It’s the same for the bridge; be sure to slope the bridge back toward the pin holes, so the string passes your compensation at the highest peak and goes down from there on both sides of the peak. This will insure that you have a lively sound to your strings, not mud.
Cosmetology
We’re almost done, but two cosmetic concerns need to be addressed: the three holes in the butt of the guitar from the tailpiece screws and the indentation on the top from the tailpiece.
For the tailpiece indentation I used an old trick for wood swelling my dad taught me years ago. Place a large drop of water in a wood dent, making sure that the surface is level. Also be sure to have your close-up glasses on and a steady hand. Heat up a soldering iron and steady the iron at the top of the water drop you placed in the indented trough. The water will sizzle, but continue holding the iron steady – don’t lower it into the drop or you can burn the top. It will stop sizzling when the swelling is completed. Remove the iron and wipe the surface with a paper towel. Repeat this procedure across the length of the indentation. If there is still an indent, get some Sherwin-Williams nitrocellulose lacquer and drop-fill the trough, waiting a day or two between applications.
When your level has risen above the top of the surrounding surface, stop and wait a week before sanding it down, as it can continue to shrink. Mask off the top next to your drop-fill and wet sand with 320 grit paper. Slowly sand and wipe the fill using a light bulb reflection to inspect your progress after every three or four sanding swipes. When you are about there, go to 400 paper and do the same thing, then 600, 1000, 1500 and finally 2000 grit paper before removing your masking tape.
 |
|
|
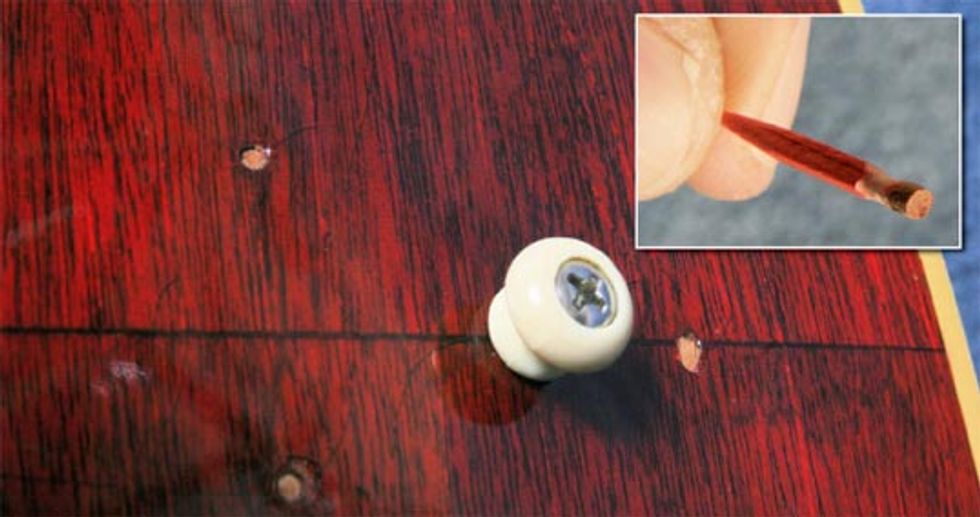
The final visual detail is filling the screw holes. Mahogany doesn’t come in toothpick sizes since it tends to splinter and fall apart in small pieces, so a tedious plan B is required. First cut some small slivers of mahogany into tiny squares and glue them to the cut-off end of a toothpick with Super Glue [Photo 16]. Once it has set up, the entire mahogany plug is soaked in Super Glue to form a bonding agent in the wood and keep it from splintering when shaped in the next step – have some Super Glue remover handy for this part.
Once the mahogany plugs are dry, a Dremel tool with a small, circular, fine-grained surface wheel was used. I placed the Dremel in its router holder and clamped it to a workbench, then used a rheostat to slow down the speed of the Dremel, slowly spinning the toothpicks and grinding them in either circular or oval profiles while comparing them to the holes needing to be filled [inset photo]. Leave the plugs slightly too large and gently tap them into place – I used the chuck side of a drill bit to drive the plugs in with a small hammer. Be sure to send the plug in far enough so that it’s flush with the original wood under the finish, and try to have the grain in the plug going in the same direction as the original wood [Photo 10].
Once the plug is installed, turn the guitar on end, add a drop of Super Glue into the hole and let it set for a few hours. I like to tape the guitar to the table with masking tape and put a piece of carpet under the headstock on the floor. Use aniline dye mixed with some lacquer thinner to match the color of the finish. If you have trouble finding aniline dye powder, try International Luthier Supply in Tulsa, Oklahoma. Try to achieve your color in the lower layers, then when dry, drop-fill the clear over the top. Again, get the little bump above the surface and wait a week to complete your sanding and polishing.
A New Sound
Although I had added enough extra bracing and a bridge plate to do what I considered an adequate job, I was still determined to stabilize the bridge, à la the Bridge Doctor. If you think about anything long enough before you start, a solution will usually present itself. It eventually occurred to me that I already had two bridge nuts ready, willing and able to accept some matching all-threads from top or bottom. All-thread is just that, a 20” threaded rod with no head, generally cut to the desired length. A plan was then hatched to make my own version of the Bridge Doctor. I returned to the hardware store and procured some nuts, lock-nuts and washers for my allthread, and two nylon bushings or washers to inlay inside my spruce span. I also picked up two square 6/32” nuts for inlaying into my spruce span so I could adjust my allthread inlaid dowel.
It took care of my structural problems and bridge pull, and for that I give it high marks. As for the tone of the guitar, the sustain is markedly improved and the midrange is enhanced and louder. But as I suspected, the top flutter is inhibited to some extent, so bass response is slightly diminished – perhaps just 10-12 percent, but enough to be audible.
 |
|
|
I should note that after a month of string tension, my epoxied bridge rose up. I slowly removed the bridge with heat again and used a lightbulb at close proximity to soften the epoxy, which I then scraped off and sanded. I re-sanded my top and re-glued the bridge using Franklin Titebond. I clamped the bridge in three places, continuously wiping off the weeping glue with a damp paper towel. I am happy to report that the bridge now holds firm and sounds even better.
This guitar is certainly happier now that it can be used for performing again. When compared side-byside to a new Martin D-28 12-string, the old Gibson is louder, has better bottom- end and more richness – something that left me rather surprised. The sheer age of this instrument must make up for the traditional shortcomings of a mahogany guitar – perhaps because these ribboned Brazillian mahogany bodies started with 20-year-old wood, they may have some extraordinary tonal mojo.
Would I recommend performing this conversion on any mid-sixties Gibson B-45 12? It was way too much work but ultimately the guitar was worth it. This guitar – previously banished to a closet because of its disappointing sound – now sings.
| John Southern is a professional photographer, musician and luthier from Tulsa, Oklahoma. You can reach John at johnsguitarshop@aol.com. |