Chops: Intermediate
Theory: Intermediate
Lesson Overview:
• Develop fretting-finger
independence.
• Learn how to anchor one note
while moving others around it.
• Polish your picking patterns.
• Explore oblique and contrary
motion.
Welcome to the second lesson in our series on building fingerstyle technique. Last month, we explored exercises designed to strengthen the ring finger and include it in a variety of fingerpicking patterns [“Picking on the Ring Finger,”November 2011]. As promised, this month we’ll look at another aspect of fingerstyle technique—one that’s often overlooked when discussing fingerpicking—and that’s fretting-finger independence.
One benefit of fingerstyle technique is that it gives you the ability to simultaneously play multiple lines. This can be as simple as arpeggiating a chord while playing descending or ascending lines, or it can be as involved as juggling phrases that move in opposite directions. Whatever the situation, fingerpicking demands digital dexterity in both hands, and often it’s the fretting hand that actually has the toughest gig.
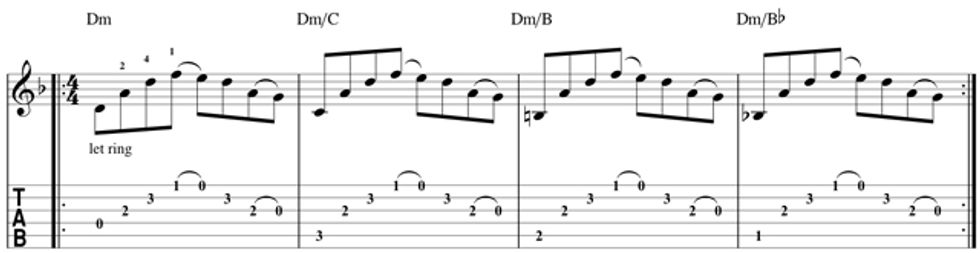
With that in mind, let’s look at ways to increase independence between the fretting hand fingers in the context of fingerpicking. We’ll dive right in with the Robert Johnson inspired blues turnaround shown in Fig. 1. In measure 1, use your 4th finger to hold the high D as you lower a major sixth chromatically on the 2nd and 4th strings. Your thumb (p), index (i), and middle (m) fingers pluck the 4th, 2nd, and 1st strings, respectively.

Measure 2 offers the same musical motif, but this time you’re holding A on the 2nd string (use your 4th finger again) and the major sixth descends on strings 3 and 5. That last five-fret stretch (beat 4) can be a bear, so ease into it gently. If you have trouble making the final Dm-to-A move, practice it slowly by itself a few times, and then rewind and try measure 2 in its entirety.
Incidentally, this example illustrates a type of counterpoint called oblique motion, in which one or more lines move against a fixed note or interval. This “anchor-some-notes-while-moving-others” approach gets to the heart of fingerstyle guitar.
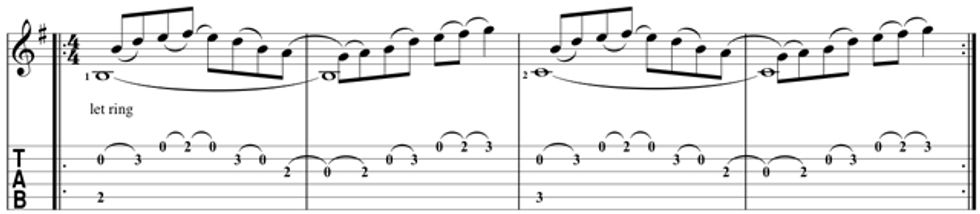
We encounter oblique motion again in Fig. 2, but this time, we’re arpeggiating a chord (Dm) above a descending bass line (D–C–B–Bb). There’s more to this slash-chord passage than meets the eye, as you have to shift your fingers around to hold the Dm chord while executing the bass line. Start with the fretting fingering as shown. Then as you sort out the subsequent moves, notice how the 4th finger is the only digit that doesn’t swap places with its mates sometime during this four measure passage. Pluck the bass line with your thumb and use your index finger on the 3rd string, your middle on the 2nd, and ring on the 1st.
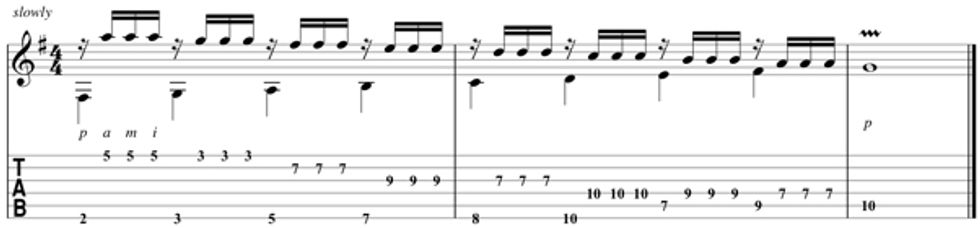
So far, we’ve parked the 4th fretting-hand finger and practiced moving the others around it. In Fig. 3, we flip the process and hold a sustaining bass note while playing a melodic phrase above it. Notice how the bass note changes every two measures, yet the melodic figure repeats. Use the same picking finger assignment as in the previous example.
FYI: Slash Chords
Sheet music and songbooks often
show chord symbols that contain
a slash mark. These “slash
chords” indicate specific voicings
that are crucial to the song
or piece, and they occur when
a chord’s lowest note is not the
root. The chord name is at the
left of the slash mark. The second
element—to the right of the
slash—indicates the lowest tone
in the voicing. For example, A/C#
specifies an A triad with a C# in the
bass. (To a bandmate, you’d say
“A over C#.”) Slash chords typically
occur when an arranger wants to
flag a bass line that moves through
a progression.
This passage sounds cool—once you decode all the subtle hammer-ons and pull-offs—but it’s a bear in terms of finger independence, so go slowly. When working out tricky independence exercises, it’s easy to overdo it and strain your finger muscles, and that’s not the goal. Regular, relaxed workouts are the key to better technique. By the way, this repeating passage sounds great through a flanger.
One of the most compelling sounds you can make on a guitar involves contrary motion, in which a melody and bass line move in opposite directions. Though it’s a creative challenge to compose music using contrary motion, it’s very easy to craft exercises to develop this technique. Here’s one: Simply select a scale and simultaneously ascend and descend through it. (This makes a great parlor trick, by the way, when you want to impress your guitar-playing buddies.)
Fig. 4 shows a humble G major scale that simultaneously moves in two directions. Using quarter-notes, the bottom line ascends starting on a low F# (the seventh degree of the G major scale), while the top 16th-note line descends starting on A (the second degree). Ultimately both lines converge on G—the root. Pretty cool, huh? Use your thumb to pluck the quarter-notes and your ring, middle, and index fingers to attack the 16ths.
You can fret some of Fig. 4’s notes on different strings, so as an experiment, see if you can find an alternative way to play this example. Then for mega bonus points, select another scale and figure out how to ascend and descend through it using a similar picking-hand pattern.
Next month, we’ll continue expanding our fingerstyle chops by dipping into some basic bossa nova rhythms.
 Andy Ellis A veteran guitar journalist and senior editor at
PG, Andy is based in Nashville, where he backs
singer-songwriters on the baritone guitar. He
also hosts The Guitar Show, a weekly on-air and
online broadcast. For the schedule and links to
audio streams and archived audio interviews
with inspiring players, visit theguitarshow.com.
Andy Ellis A veteran guitar journalist and senior editor at
PG, Andy is based in Nashville, where he backs
singer-songwriters on the baritone guitar. He
also hosts The Guitar Show, a weekly on-air and
online broadcast. For the schedule and links to
audio streams and archived audio interviews
with inspiring players, visit theguitarshow.com.Beloved by hot-rod country
and rock guitarists alike,
hybrid picking combines the
power and speed of flatpicking
with some benefits of a purely
fingerstyle approach, such as
being able to weave arpeggios
across non-adjacent strings or
simultaneously strike chord tones
for a piano-like sound. (For
details on this versatile technique,
see “Hybrid Picking 101” on page 2.) But compared
to a four-digit classical or jazz
fingerstyle technique, hybrid
picking has several limitations.
The most obvious is that when
playing chords, this pick-plus-two-
fingers system lets you attack
only three notes at a time.
Most guitarists who use
hybrid picking shift between
a full-on flatpick and a pick-and-fingers approach on the fly.
While this offers a huge timbral
palette, it can be tough to balance
the big, chimey sound of
strummed five- and six-string
chords with the thinner tone of
plucked three-string chords. One
way to beef up the latter is to
use special three-note voicings
that are spread out across a wider
range than the typical triads you
might otherwise grab. It’s easy
to generate “hybrid-friendly”
chords, once you know the
process.
We’ll begin by modifying
standard root-3rd-5th triads,
which always occupy a single
octave. To make these triads
sound bigger, we simply move
the middle note—the 3rd (or
in the case of a minor triad, the b3rd)—down or up an octave,
while leaving the root and 5th in
the same register. In this lesson,
we’ll discover what happens when
we drop the 3rd an octave lower.
Next time around, we’ll focus on
raising the 3rd one octave higher.
Either way, the resulting open
triads span more than an octave.
Download Example Audio 1...
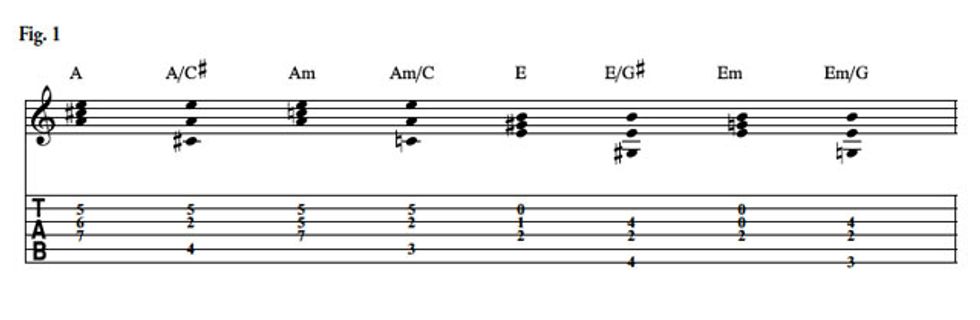
Fig. 1 illustrates the process, beginning with a root-3rd-5th A triad in the 5th position. First, strum A on strings 4, 3, and 2 as written. Next, using hybrid picking, pluck the A/C#—the second chord in our example. Musically, only one thing has changed: We’ve dropped the middle note, our 3 (C#), down an octave. But to fret this new chord, we’ve had to refinger the voicing. In this instance, the root migrates from the 4th to the 3rd string. Though the root has moved, its pitch hasn’t changed.
Incidentally, when a chord’s lowest note is not the root, the harmony is typically written as a slash chord with the chord name on the left and the special bass note on the right. Most slash chords have the 3rd (or b3rd) in the bass, but the 5th and other chord tones can show up here too. (You can even have nonchord tones in the bass, but that’s a topic for another column.)
Now, repeat the process for the second pair of chords in this example, Am and Am/C. Here, we’re pulling the b3rd (C) from inside Am and dropping it down an octave. As you play both chords, listen carefully and compare their relative sonic “weight.” With its expanded range, Am/C sounds bigger than its more compact sibling, although without the root as the lowest note, it can also sound more ambiguous. It’s good to keep these qualities in mind when arranging music with slash chords.
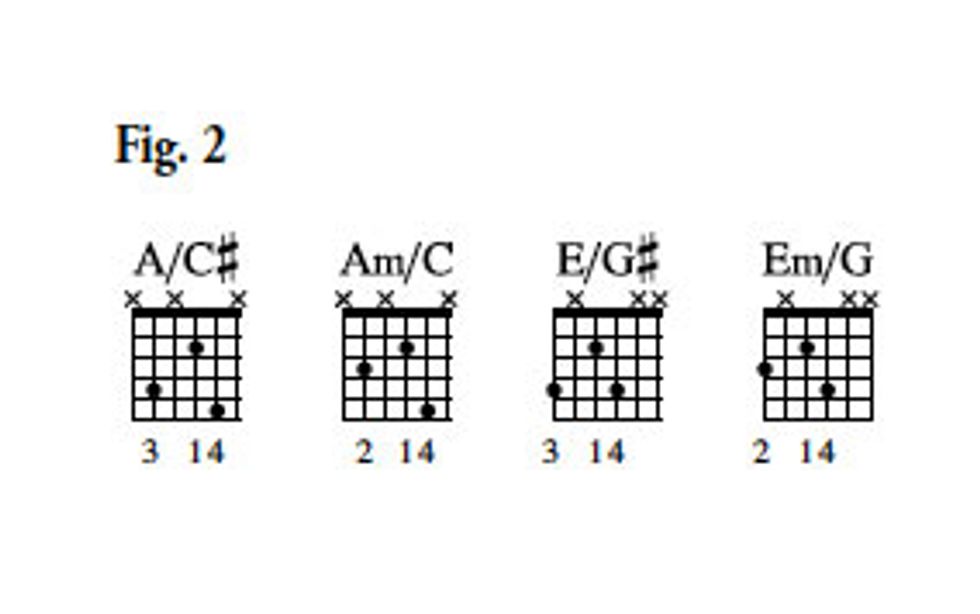
Pushing on, we tackle E and Em, pulling out G# and G (the 3rd and b3rd, respectively) and dropping them an octave to create E/G# and Em/G voicings.
Fig. 2 gives us an alternative visual perspective on the four new voicings we’ve created. We can clearly see that the only difference between A/C# and Am/C, or E/G# and Em/G is the half-step shift that results from moving the 3rd to the b3rd. Perhaps you’ve played these chords before. If not, take a minute to chase them up and down the fretboard, and then hop back and forth between the grips on string sets 5–3–2 and 6–4–3.
Download Example Audio 2...
Now, let’s put our chords to work. Fig. 3 contains strummed four- and five-note chords (A2, D2, and the Aadd2 at the end), as well as plucked three-note voicings. Pay attention to the picking-hand markings for A/C#, D/F#, and G2. In bar 3, we get a piano-like effect by simultaneously plucking the notes in G2 and D/F#. It’s a sound you can’t get using a flatpick alone. As you play through this example, notice the variety of picking-hand textures: full strums, arpeggios, and piano stabs. Also, in bars 1 and 2, notice how the lowest note in each slash chord lies a half-step below the root of the subsequent chord and how strongly one leads to the other.
Download Example Audio 3...
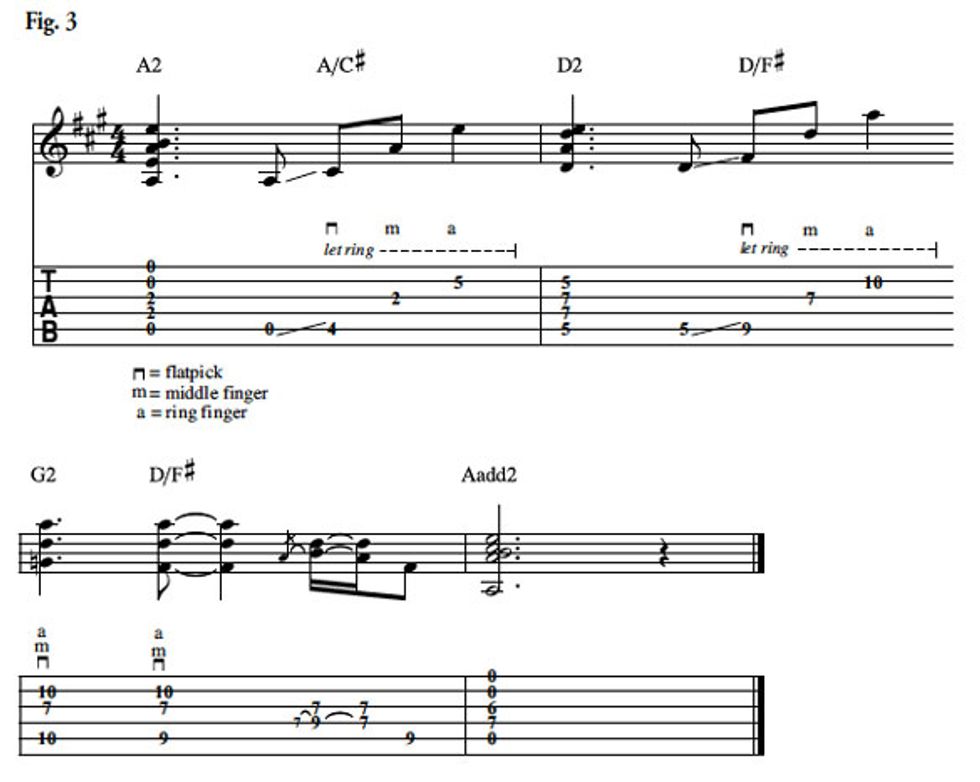
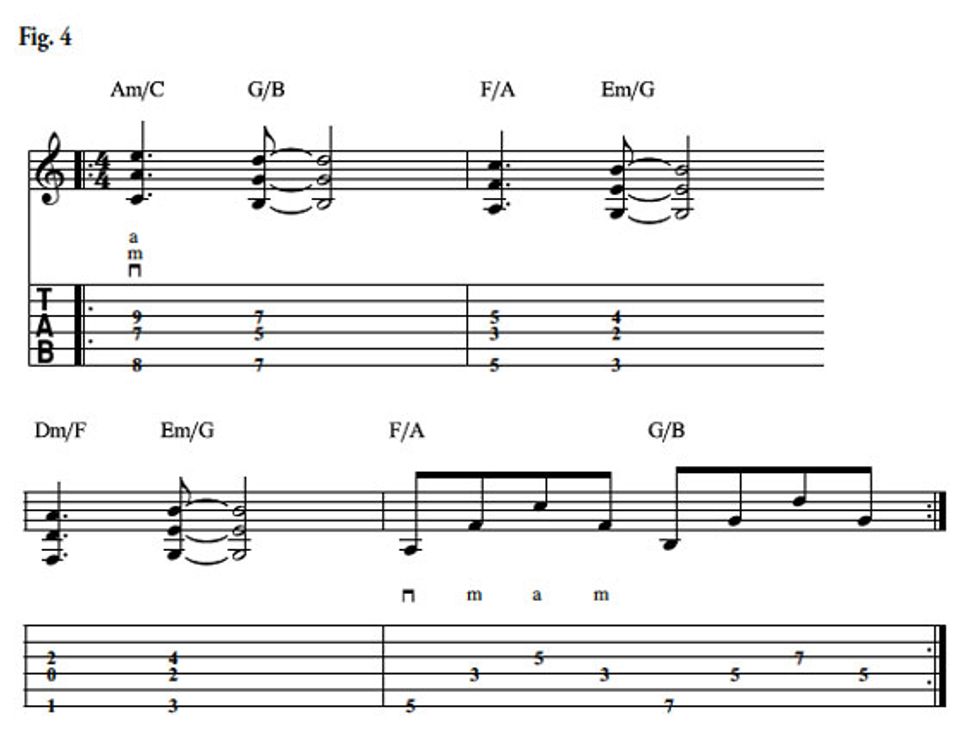
Fig. 4 consists entirely of hybrid-friendly slash chords voiced on strings 6, 4, and 3. To accentuate the root in any of these chords, simply yank the 4th string a little harder—that will do the trick. Try this progression with some slow flanging or modulated delay.
Download Example Audio 4...
In this lesson, we’ve created new voicings by dropping the middle note of a root-3rd-5th triad down an octave. Next month, we’ll see what happens when we push the middle note up an octave. Meanwhile, use these chords to create some progressions of your own.
Hybrid Picking 101
A marriage of fingerpicking and flatpicking, hybrid picking offers elements of both techniques, but replaces neither. Photo 1 shows the basic hybrid picking hand position, which involves attacking the strings using a flatpick plus middle and ring fingers. Here, my pick is hitting the 5th string, and my middle and ring fingers are plucking the 3rd and 2nd strings.
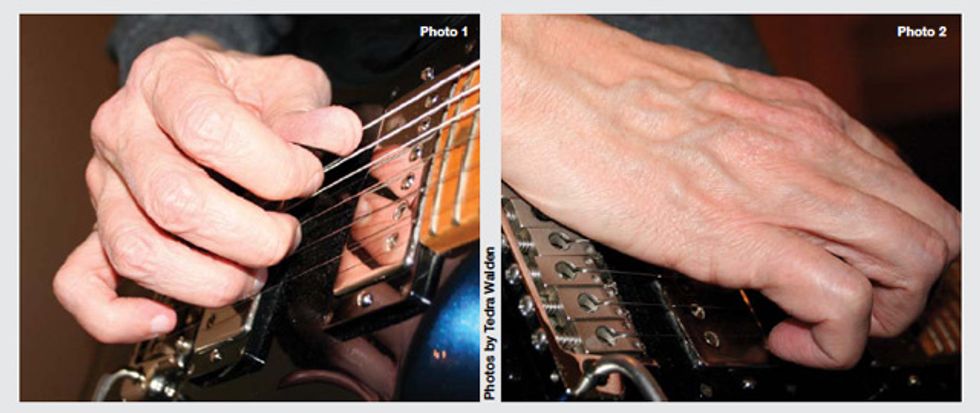
With a classical or jazz fingerstyle technique, your wrist is arched, your hand is open, and your picking fingers are relaxed and extended. With hybrid picking, however, your wrist is flat, your hand rides low, and your middle and ring fingers are tightly curled as they engage the strings. It’s the flatpick that determines this close-in hand position. Curled like this, your picking fingers pull up on the strings, rather than stroking across them (as they would in more traditional fingerpicking). This pulling creates a snappy, popping tone that’s at the heart of country, rockabilly, and other twangy styles.
For a percussive effect, use the back edge of your picking hand to mute the bass strings as you flatpick them (Photo 2). Palm-muting also helps you prevent unwanted open strings from ringing out as you dig into the notes you’re aiming for. When muting, rest your hand lightly on the bridge, so you’ll be able to scoot quickly and easily along the saddles as your lines move from bass to treble strings and back again. Two more benefits: A light touch is better for your tendons and allows your guitar to resonate more freely for maximum sustain.
Rules of Engagement
The concept—which, incidentally, we’re
borrowing from choral, horn, and string arranging—is to have the notes in one chord move by
either a half-step or whole-step to the notes
in the subsequent chord. Occasionally, we
interrupt this stepwise motion with a leap
of a minor third (three half-steps), but that’s
the largest move we make. Sometimes, one
of the notes remains the same as we switch
chords. This common tone acts as sonic
glue, binding adjacent voicings, even as
they change.
It’s fun to visualize this process as moving beads on wires. In other words, imagine each chord tone is a bead that either stays put or shifts up or down on its string by one, two, or three frets (a half-step, whole-step, and minor third, respectively) to morph into the next voicing. It’s a game: Can you play a progression without breaking these strict rules?
Warming Up
So we can clearly picture the note-to-note
movement, let’s keep things simple and
stick with three-note voicings on the top
three strings. Most of the chords we’ll play
in this lesson contain four or more notes in
their full form, but we’re going to cherry-pick
three that allow us to follow our bead
game rules.
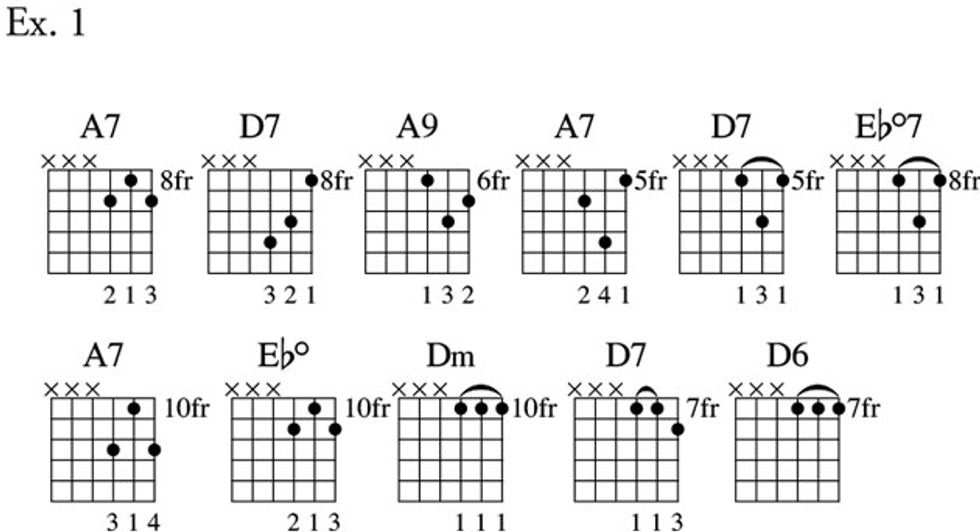
For starters, play through the voicings in Ex. 1 to loosen up your hands and get familiar with the fingerings we’ll soon stitch into a progression. Many of these will be old friends, but some—D7 and A9, for example, in grids 2 and 3—might be new.
As you fret each of these chords, notice how three do double duty, depending on where they’re positioned: A7 and Ebdim (grids 1 and 8), D7 and Ebdim7 (grids 5 and 6), and Dm and D6 (grids 9 and 11). This “shared shape” phenomenon happens because we’re selecting a subset of a chord’s available tones. (If we were to fret the chords in their entirety, we’d spot their physical differences.) Expert rhythm guitarists routinely use multi-purpose fingerings to craft their parts. It takes time to master such musical sleight of hand, but the payoff is huge.
Click here for Ex. 2
Let the Games Begin
Now it’s time to put our rules into action by
playing Ex. 2, a 12-bar blues progression
in the key of A. As you change the first two
chords, watch those beads shift when you
move from A7 to D7. Check it out: On the
1st string, the top note, C#, drops a fret to
C. On the 2nd and 3rd strings, each note
moves up two frets, (G–A and E–F#, respectively).
Excellent! We’ve created contrary
motion, which serves to draw listeners into
this chord change.
If you peer closely at the A7–A9–A7 changes in measures 3 and 4, you’ll see common tones (for instance, the 2nd-string G occurs in all three voicings), two whole-step moves, and a minor-third leap. Nice and tight—so far, so good.
The A7–D7 shift (measures 4 and 5) is very economical, consisting of a common tone and two half-step drops. Conversely, the D7–Ebdim7 change incorporates three upward, minor-third leaps. This parallel movement is immediately balanced by the contrary motion in the Ebdim7–A7 change across measures 6 and 7.
At this point, you’ve seen enough to know how the bead game works. As you complete the progression, take a moment to evaluate each chord change and track its note-to-note movement. You’ll find that right through the end of measure 12, every change consists of common tones and half-step, whole-step, or minor-third moves. The only exception is when we reach the end of measure 12 and jump back to the top to repeat the progression. Because measure 12’s E7 and measure 1’s A7 share the same fingering, try sliding from E7 to A7 for a dramatic break from our otherwise frugal motion.
By the way, the A7–Ebdim–Dm–A7 move in measure 8 makes a dandy turnaround or intro. With little effort, you’ll be able to insert it into a blues or even a fingerpicked folk song.
Pressing On
The next step is to incorporate the bead
game concept into your playing. We’ll be
using this technique in upcoming lessons,
but to really own it, you’ll need to explore
it yourself. One way to get started is to
transpose this lesson’s progression down an
octave, placing it on lower strings. Though
the chord shapes will look different—and
you’ll find more than one place to fret
them—the common tones and half-step,
whole-step, and minor-third moves will all
remain the same.
Next month, we’ll look at a trick for generating voicings that are tailor-made for a hybrid, plectrum-and-fingers picking technique.
Ah-ha!
Stepwise motion. When a melodic line moves up or down in half- or whole-steps (distances of one or two frets, respectively), it employs stepwise motion.
Contrary motion. When two lines move in opposite directions—one ascending while the other descends—they produce contrary motion. This can also occur during a chord change when one voice moves up as another moves down.
Diminished triads and diminished 7 chords. Every chord type has a formula that’s derived from a major scale. (For more details on scale and chord formulas, see the November 2010 Rhythm & Grooves.) The formula for a diminished triad is 1–b3–b5, or the first, lowered third, and lowered fifth tones of a major scale. We add a fourth note to generate a diminished 7 chord, which has a formula of 1–b3–b5–bb7.
To identify the notes in a diminished chord, simply apply the appropriate formula to a parallel major scale. For example, to unpack a Cdim or Cdim7, we start with a C major scale (C–D–E–F–G–A–B–C) and then run the corresponding formulas. This yields C–Eb–Gb (Cdim) and C–Eb–Gb–Bbb (Cdim7). Sonically, a bb7 note is the same as a 6, so many musicians choose the latter as a kind of shorthand when spelling a diminished 7 chord. Using this informal approach, we’d identify Cdim7’s component notes as C–Eb–Gb–A. When two notes sound the same but are named differently—such as A and Bbb—they’re considered enharmonic equivalents.