It seems as if almost all of our clients have at one time or another, purchased something online. Often a funky old guitar or amp that was acquired at, what seemed to be at the time, a decent price. We hear the same words uttered over and over again. I just got an amazing deal on this at e…(rhymes with hey) but I think it needs a bit of work. Often, the amount of work required to transform the instrument into something playable makes the “great deal” now seem like a thorough hosing. Sometimes items come with a trial period in which the buyer can return it if doesn’t meet his/her expectations. Other times the piece may be salvaged or kept, though unusable, simply because it has a certain amount of character that makes it worth having if only for a wall hanger.
This month we’ll be taking a look at one such project. It involves a Magnatone lap steel and amp set.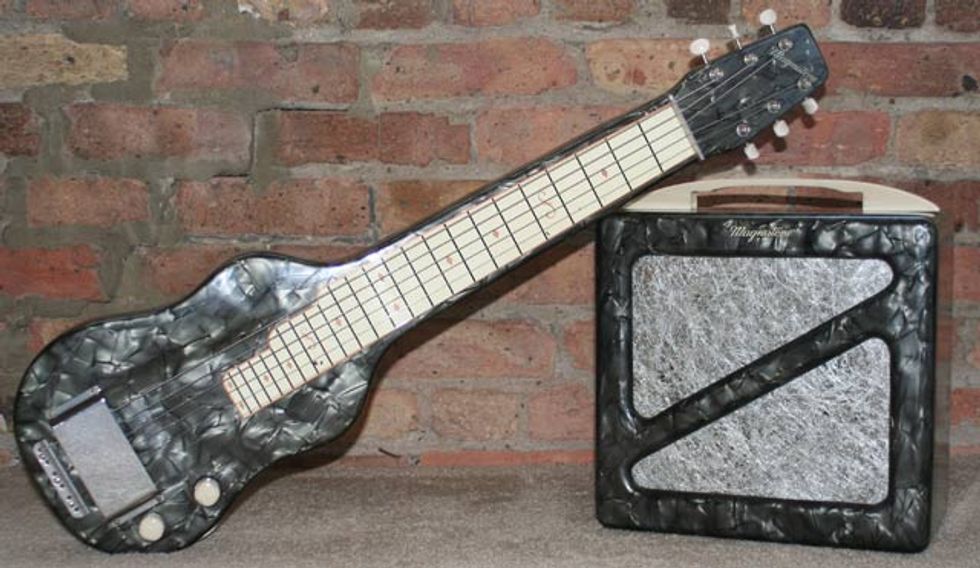
A client purchased a beautiful (and very early) Magnatone lap steel and amp set. They were brought into our shop to have a basic “check and clean” done to the amp and to have the lap steel repaired/restored. The lap steel needed to have the tuning machines replaced as the buttons had deteriorated to the point that they were now little ratty stubs that needed a pair of pliers to aid in the tuning process. A similarly styled set of Tone Pros 3-on-a-strip tuners were installed, scratchy pots were salvaged with a bit of electronics cleaner and some minor setup work was done to level the string heights at the nut.
The amplifier was powered on to see if it was working and to listen for any nasty noises that would need to be addressed in our “check and clean” procedure. Surprisingly, the amp sounded pretty darn good. It had a very unique character to the break up as the amp was pushed into distortion. The amp was then disassembled to check for leaky caps and resistors that may have drifted out of spec that would cause the voltages to swing to unsafe/improper levels. First I tried to locate the power transformer to get my bearings. Hmmmm, strange I thought, no power transformer! Then it dawned on me. This amp is running on pure AC!
While this isn’t that unusual in very early amps and it certainly contributes to its unique tone, it’s also very dangerous. One leg of the AC is tied to the chassis as a buss in the same way a ground would be in a more modern design. This would almost be okay if the instrument being played through it had the strings isolated from the electronics (though it's still present on the metal chassis). However, in most modern guitars, the strings are attached to the ground. In this instance it means that the player now has one leg of the AC on his/her strings! This puts me in a rather precarious position. As the tech and owner of the shop, there are some obvious liability issues associated with this project.
The client was consulted and told of the dangers that lurked within this design. As he loved the look and character of the box, he gave me the go ahead to build a simple and more “modern” (late-'50s) design into the existing chassis. A promising schematic was found (a Valco of some sort) that used a 6SL7 octal preamp tube a 6V6 and a 5Y3 rectifier. This design was chosen simply because of its funky character, which was thought to be in keeping with the original design.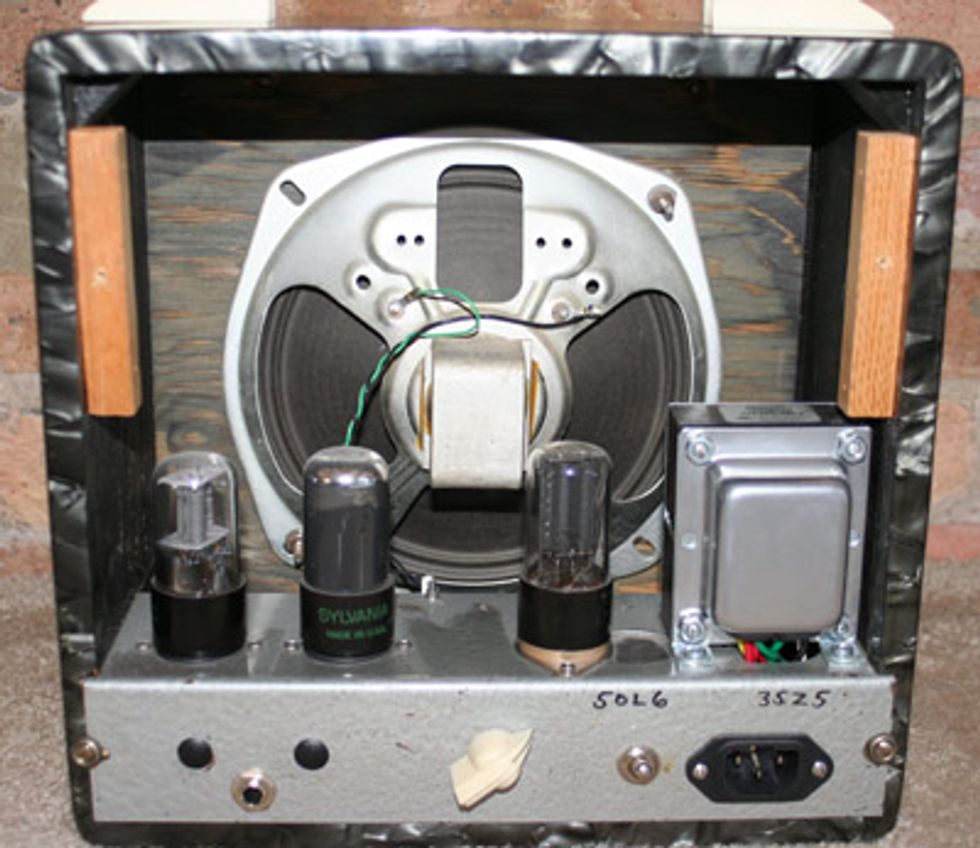 The build was a bit tricky as the amps chassis was quite small and was never made to carry the bulk of a power tranny. Every component was stripped off and the task of figuring out a layout that was physically possible, considering the tight space, begun. It was necessary to make a metal plate to cover a hole left by one of the tube sockets that had to be relocated to make room for the new Mercury power tranny. The output transformer had to be located inside the chassis due to lack of room caused by the speaker's magnet protruding into the optimal space. New holes had to be drilled/punched for the input jack, transformers, IEC style AC socket and tube socket.
It’s freeing being charged with the task of simply making something funky that works. Certain liberties can be taken in component selection that wouldn’t necessarily be considered when shooting for a dead silent recording amp or a rock solid touring amp for example. I was able to use some really neat Soviet-era paper in oil caps that I found while traveling in Bulgaria last year as well as some interesting carbon comp resistors acquired at the same time. Fortunately, the original speaker was still in good shape and was reused.
Mission accomplished. The end result was a marriage between over-the-top vintage form and functionality. The amp was transformed into a safe and usable conversation piece and I’m told, gets many hours of use a week. While this project may not have been the most economical way to go about getting a small practice amp, it did end up salvaging a very cool set and making it safe and enjoyable for the proud and happy owner.
When I first received the box containing the new Peavey Studio Special, I thought there was some kind of mistake. I was originally informed that a new amplifier from the Peavey Custom Shop was being sent to me for review, yet I thought the box was too small and too light to be an amp. I figured maybe I was sent something else, like an effects unit. I opened the box and to my surprise and amazement, it was indeed the Peavey amp!
Peavey is expanding its USA-based, award-winning Peavey 19th Street Custom Shop to include custom-built amplifiers. This series of amps are built to spec, based on point-to-point, handwired models, and they range from a single watt to a 50-watt, in a head or combo configuration. The first three to be unveiled are the Masterpiece, the Sensation and the one I just received— the Studio Special.
Small Package
The new 1.5-watt amp is ideal for recording studios and small rooms, and is available as a head only. The Studio Special allows players to achieve those “cranked up” amp tones, but at a decent volume level that won’t annoy your neighbors or loved ones. It is a straightforward, single-channel design with controls for Volume, Treble, Middle and Bass. There is also a Fat switch to boost the midrange. The warm and fuzzy distortion appears courtesy of two 12AX7 preamp tubes, and one 12AU7 tube in the output stage, which is configured in Class AB (a 6CG7 output configuration is optional).![]()
Download Example 1
British Rock tone - Charvel neck pickup. Setting on Amp: Bass – 10, Middle – 5, Treble – 7, Master Volume – 10, Amp Switch set to Normal![]()
Download Example 2
Bluesy Rock Tone - Charvel neck pickup. Setting on Amp : Bass – 10, Middle – 4, Treble – 7, Master Volume – 5, Amp Switch set to Normal![]()
Download Example 3
Funk Tone - Charvel neck pickup. Setting on Amp : Bass – 6, Middle – 10, Treble – 3, Master Volume – 3, Amp Switch set to Fat ![]()
Download Example 4
Funky Blues tone with Single Coil pickup - Single Coil neck pickup on Fender VG Strat. Setting on Amp : Bass – 5, Middle – 5, Treble – 5, Master Volume – 5, Amp Switch set to Fat![]()
Download Example 5
Alternative Rock Tone - Charvel bridge pickup. Setting on Amp : Bass – 10, Middle – 2, Treble – 6, Master Volume – 10, Amp Switch set to FatUnless otherwise noted, all clips were recorded with a Charvel So-Cal guitar with Seymour Duncan pickups into the Peavey Studio Special into a Peavey Windsor cab and mic’d with a Shure SM57. The mic signal went directly into Digidesign Pro Tools.
It’s a fairly small amp, measuring only 8”x16”x8”. With an amp as straight-forward as this one, you definitely don’t need a bigger box. Besides the controls, there is one input, one speaker output and a power switch—it can’t get any more basic that that. Since this is from the Custom Shop, you can choose from a variety of Tolex covers to really personalize your amp.
Good Stuff
This little amp has been referred to as “Billy Gibbons in a box,” so I was looking forward to plugging it in and firing it up. I naturally hooked it up to a Peavey Windsor speaker cabinet first and was quickly surrounded by warm, smooth tube distortion and plenty of gain with my Charvel So-Cal guitar. You won’t find clean headroom on this amp, but you’ll definitely want to crank this amp up to 10 and rock out with it! It’s easy to achieve a variety of rock tones with only the three parameters you have to work with—everything from that warm British tube tone to fizzy, gritty fuzz. The distorted tones stay nice and tight when you crank up the power section. There is plenty of gain to please every player, except for maybe the extreme metal guitarist, who will definitely want to add an extra distortion pedal to the mix to achieve that high-gain tone they’re looking for.
I then plugged in my Strat, put the pickup in the neck position and dialed all the knobs to 12 o’clock. It was a thick, warm tone and great for bringing out those bluesy, single-coil sounds. When switching from Normal to Fat on the amp, it kicked in extra gain that was great for soloing.
The Final Mojo
It’s definitely a great amp for recording, and I found it to be really responsive and dynamic. In a live situation, the amp may be hard to hear over a loud drummer and would probably need to be mic’d to be heard properly. But it is called a Studio Special after all, so that’s where this amp will really shine. With Peavey’s 44 years of amplifier design and building experience, it seems only natural that they would now offer amps through their Custom Shop that buyers can design themselves. Different components and cosmetics can be custom designed from preselected options, or they can be specified on a per-project basis. Take a small amp that can be customized, add in Peavey’s reputation for producing reliable, great-sounding amps, and you have a winning combination with the Studio Special.
Buy if...
you'd like a USA-made handwired custom amp that won't take up a lot of space.
Skip if...
you prefer a combo amp with more than one channel for recording and practicing.
Rating...
Street $1000 - Peavey Custom Shop - peaveycustomshop.com |