Chops: Beginner
Theory: Beginner
Lesson Overview:
• Beef up your single-note lines by adding simple octaves.
• Understand how to play octaves all over the fretboard.
• Discover how to get more mileage out of your stock blues licks.
Click here to download a printable PDF of this lesson's notation.
For the last few months we’ve been learning how to approach the minor chord from a modal perspective to create different types of minor moods. This time out, let’s explore how octaves can spice up your improvising.
An octave is the distance between two notes of the same name, when one is vibrating twice as fast (if it’s an octave higher) or half as fast (an octave lower) as the other. The notes have the same name, but they’re different pitches. For example, if you play a C on the 1st fret of the 2nd string and then move up 12 frets to the C on the 13th fret, those two notes are an octave apart. You could argue that an octave is the most neutral sounding of all intervals, except for a unison.
Octaves form a huge part of the improvising style of many guitarists, especially those who’ve been influenced by the jazz scene and the legendary Wes Montgomery, who made it part of his style. You’ll hear octave ideas being used by George Benson, Ronny Jordan, Eric Johnson, Lee Ritenour, Richard Smith, and more. But why?
The idea is that an octave doesn’t create any extra musical information. It thickens up the sound of the note you’re playing without changing or filling out the harmony, so it’s a tool you can use for textural effect. It’s well documented that Wes played with his thumb because his wife wanted him to keep the volume down, but by playing octaves he could thicken up his archtop tone and sound much bigger than if he were to twang away on single notes.
On a technical note, it’s worth talking about how we play an octave. Both octave shapes we’ll use in this lesson contain an unplayed single string that sits between the notes we pluck. We want to keep this middle string quiet, so lightly rest the first finger of your fretting hand against the adjacent “silent” string to dampen it when you strum the other two notes.
Also, it’s worth noting the difference between playing these with a pick or your thumb. In the first two examples I’ve alternated between these techniques so you can hear the difference for yourself. The pick delivers a defined, bright attack and makes the notes jump out, while the fleshy thumb gives you a darker, smooth sound.
Fig. 1 deals with moving across strings. It’s a good idea to spend some time on this, as it will help you get used to the fingering change that occurs when you shift to the top string sets.
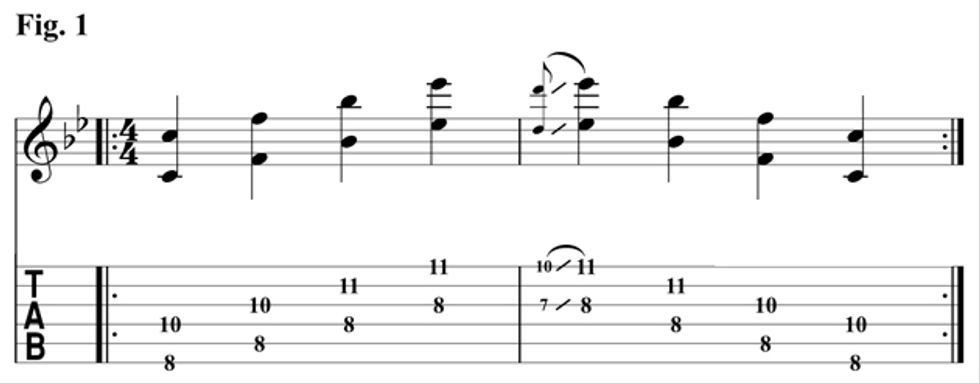
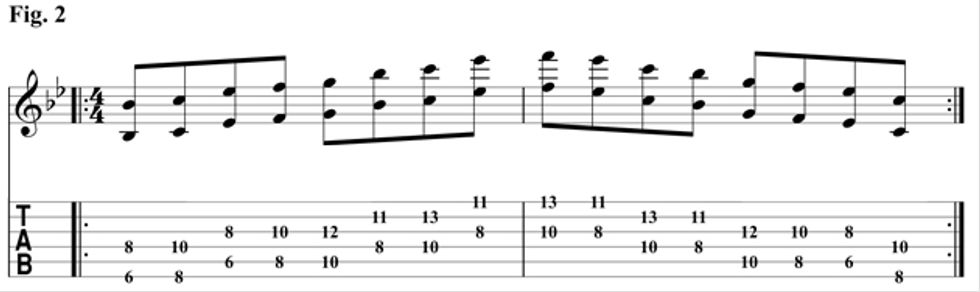
Fig. 2 shows one possible way to play the C minor pentatonic (C–Eb–F–G–Bb) scale in octaves. This example highlights one of the more frustrating aspects of playing in octaves, and you’ll soon realize that to play musical phrases with this technique, you’ll be moving your hand around quite a lot.
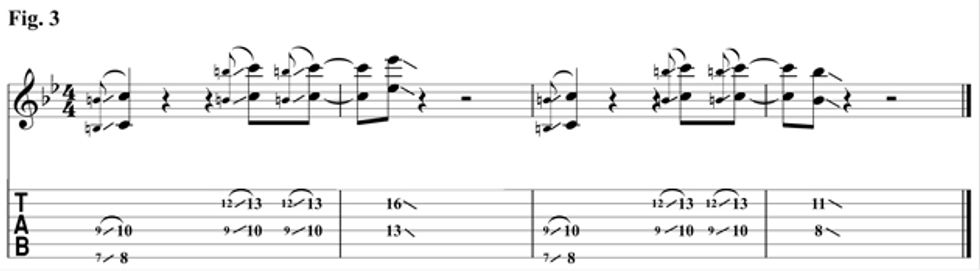
In our next example (Fig. 3), I’ve highlighted how you can use octaves to create rhythmic punches with a band. You could think of this as a riff, but octaves sound a little more sophisticated than when you hammer out an idea like this with single notes.
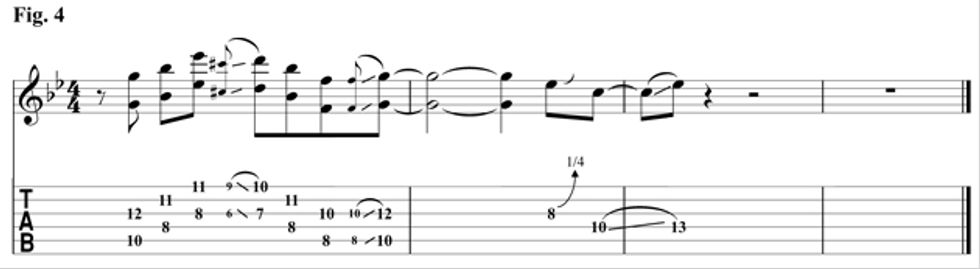
The next example includes a pickup bar that leads into the backing track (Fig. 4). Having a bit more sound coming out of the instrument makes a phrase more powerful when the guitar is exposed. To finish the phrase, I’ve gone back to a single-note blues cliché, which shows how nice it can be to mix and match these techniques.
We’re really mixing and matching to show the full effect of the octave in Fig. 5. We start by playing a melody in single-note form (a question), then answer it with octaves. The octave melody is virtually the same as we played previously, but with a slightly different ending. When you play this in isolation, it’s clear the power you can bring in with octaves.
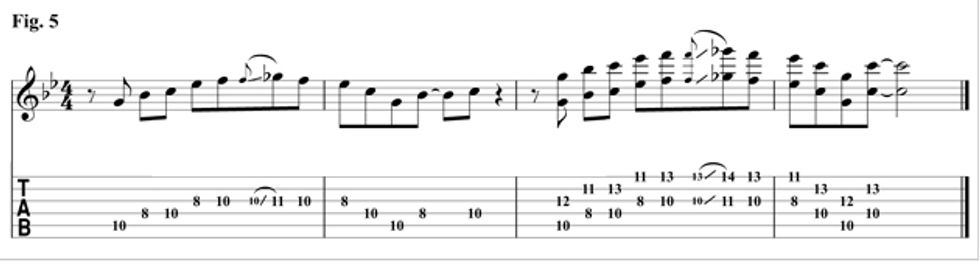
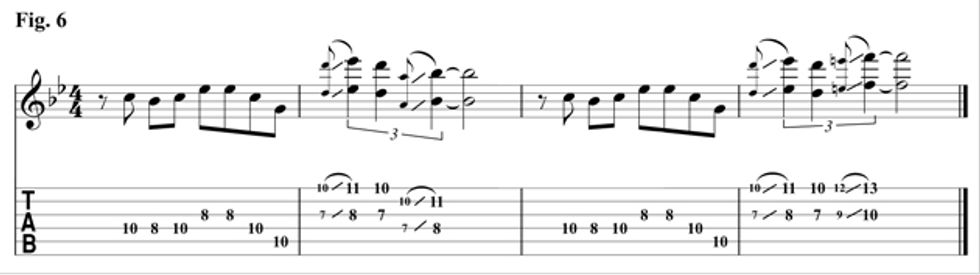
Fig. 6 takes that question-and-answer idea up a notch by playing a melody in the lower register, then answering it with a more lyrical phrase and a more laid-back rhythm in octaves higher up the neck. When you think like this, everything starts to sound a little more musical—and that’s a good thing!
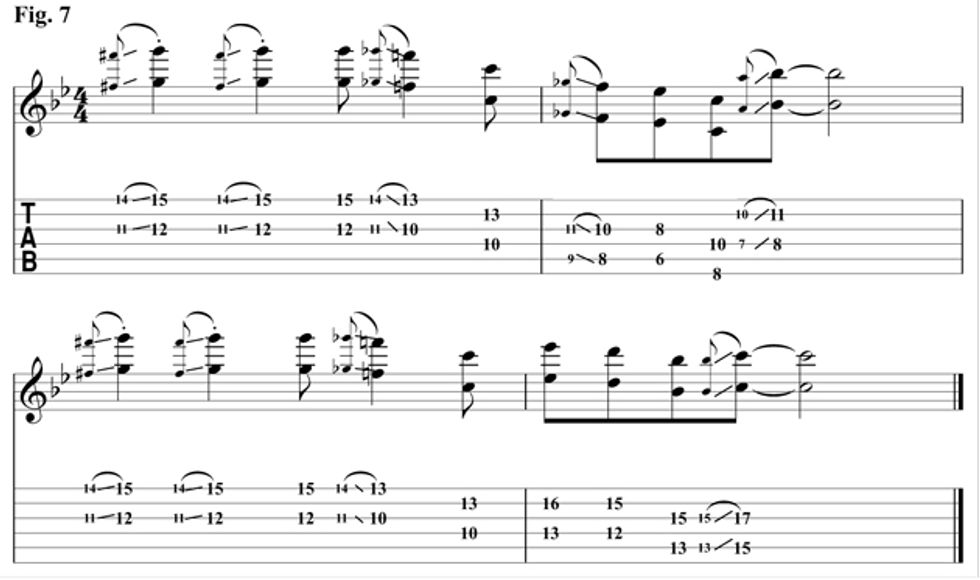
Our final example in Fig. 7 is a tricky one: We’re throwing everything at this with some slides in and out on the b5, syncopated phrasing, and rapid position shifts.
When you play a figure like this as a single-note line (using either the low note or the high note), you’ll likely find some familiar phrase, but the octave interpretation makes it a little harder to execute. This is a typical jazz/blues phrase but with a twist, so pay careful attention to those position jumps. They trip me up most of the time too!
Lastly, we have our backing track to try all these ideas over. It’s a repeating Cm7–C7sus vamp with a bit of an acid jazz vibe to it. See what you can do with these examples, and try writing some of your own using the C blues scale. You never know, you might discover something that becomes part of your lick bag. Let us know what you come up with!