In our never-ending quest to become better players, it sometimes makes sense to put down the guitar and pick up another instrument. I’m not talking about detouring into the world of oboe or harpsichord—got a decade or two to spare?—but rather exploring guitar’s close cousin, the lap steel.
If you’re a “steel-curious” guitarist or bassist (FYI, John Paul Jones plays wicked lap steel) looking for a reason to take the first step, this lesson is for you. We’ll cover the essentials of bar control and muting, grapple with playing in tune, drill down on slurs and vibrato, and even try some slant-bar techniques. You’ll hear each example demonstrated on an early-’50s Fender Deluxe 6, and you can download a PDF of the music to work on at your leisure.
Whether you use it as a source of spooky colors in the studio or drag it onstage for wailing solos, adding lap steel to your arsenal can yield huge musical dividends. It doesn’t cost a lot to take the plunge (check out “Got Steel?”), and no other new gear is required—your pedals and amps will sound as awesome with lap steel as they do with your guitar.
Keep It Simple
Non-pedal steel guitars have either six or eight strings that are played in a mind-boggling number of tunings, and some lap steels even have two or three necks to accommodate multiple tunings. Although those multi-neck creatures are a ball to play, we’ll keep things straightforward in this lesson and focus exclusively on the most basic of all steel guitars: a single-neck 6-string.
Choosing a tuning is tricky because it often comes down to what style of music you decide to play. For example, most Western swing players use C6 on a 6-string neck, while Hawaiian players may prefer an A6 tuning. Open E tuning is a favorite among blues and rock steelers (as well as such bottleneck greats as Derek Trucks), and that’s what we’ll explore in this lesson.
But don’t stress about specific tunings in the early stages of your steel development. The key is to start somewhere and branch out with other tunings as you gain confidence. The essential techniques we’ll cover here will serve you well on any steel in any tuning—even if you eventually wind up behind a behemoth doubleneck 10-string pedal steel.
Open E Tuning
Before we begin grappling with bar control, muting, and intonation drills, let’s tune up. From low to high, open E tuning is E–B–E–G#–B–E. You’ll notice that in open E, the 6th, 2nd, and 1st strings are identical to standard guitar. A-ha! This 50-percent common ground will help you navigate the neck if you’ve never played in open E before.
Tip: If you have a tuner that offers alternatives to equal temperament, try tuning to open E using just intonation (aka JI). Some steel guitarists swear by JI for playing fretless in an open tuning.
Get a Grip
Steel guitar is all about the tonebar, which is also known as simply a “bar” or sometimes a “steel.” Bars come in different sizes and materials, but traditionally steelers use a metal cylinder with a rounded tip or “bullet nose.” Most modern bars have a concave thumb grip on the butt end, and you’ll see how handy that is when you try slant-bar moves later in the lesson.

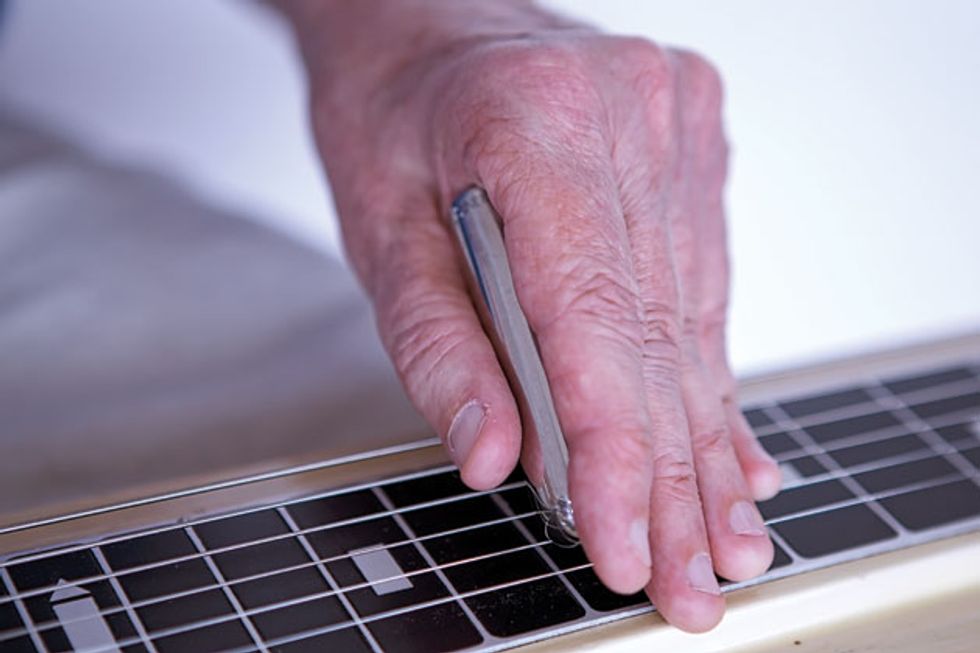
The basic grip: The bar sits in your left-hand palm, nestled between the first and second
fingers and supported by the thumb.
Hold the bar in your open left-hand palm, nestled between your first and second fingers and supported by your thumb. Cupping the bar with these three digits, turn your hand over and place the bar gently but firmly on the strings, perpendicular to them and parallel to the fret markers (Photo 1). These markers map the locations of chromatic notes up and down each string—no mystery here, if you play guitar or bass.
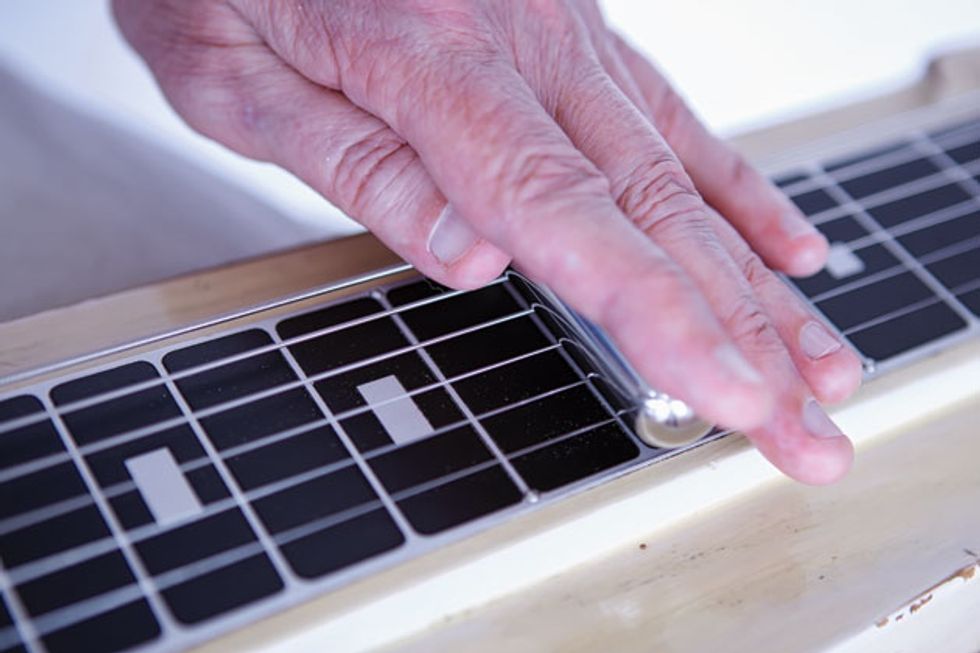
Photo 1
The bar gets supported in three ways: By your thumb, which rides up off the strings while gently squeezing the front side of the bar, your index finger which rests on top of the bar, and by your pinky, ring, and middle fingers that sit lightly on the strings behind the bar and provide back pressure against your thumb.
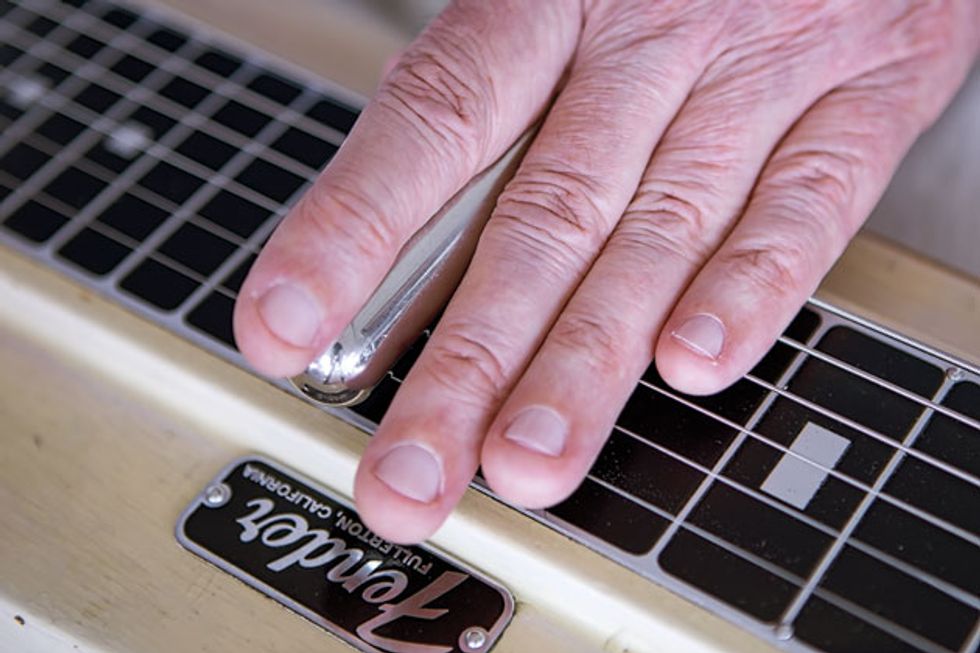
Here’s our basic bar grip as seen from the headstock side of the neck. Notice how three digits trail behind the bar, resting lightly on the strings. In addition to providing extra bar support, they dampen unwanted noises as you move
along the strings.
Though they’re handy visual references, fret markers don’t tell the whole story. Because your viewing angle shifts as you move the bar up or down the strings, you can’t really see where its miniscule contact point sits relative to the fret marker. Experienced steelers play by ear, not by sight. (Learning to trust your ears to guide your left hand while executing split-second moves is a skill you can bring back to guitar.)
Muting—the Key to Steel Bliss
When you first start running a tonebar along the strings, things can sound pretty gnarly, but that’s where muting comes in. No, let me describe it differently: Muting is crucial to mastering steel, and each hand plays an important and unique role.
In our basic grip, three digits trail behind the bar, and they do double duty. In addition to providing bar support, they glide lightly along the strings dampening unwanted noises as you move around the neck.
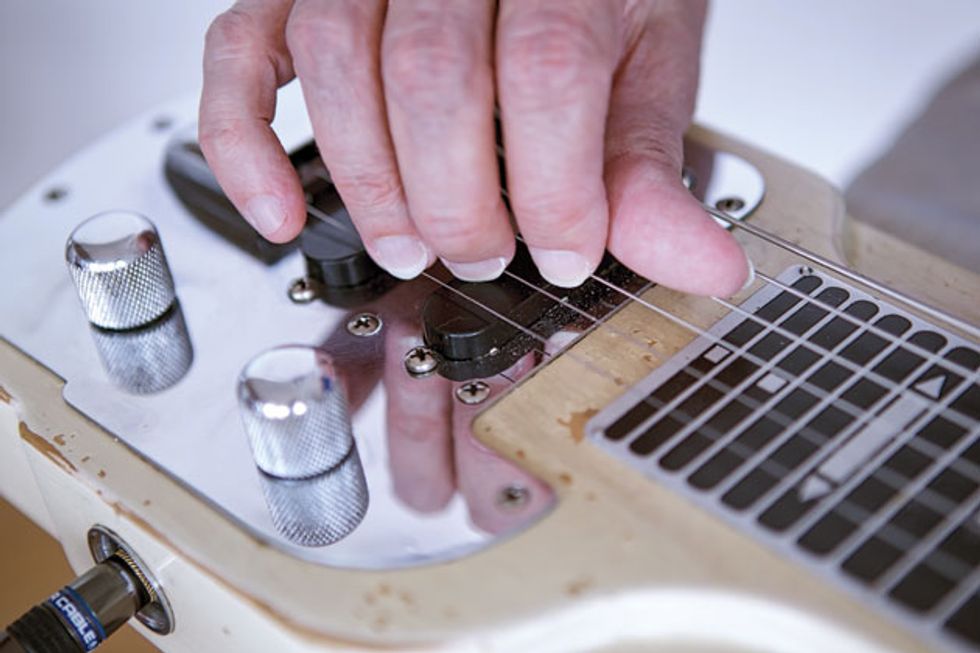
Photo 2
Though the left hand is actively involved in muting, it’s the right hand—the picking hand—that does the lion’s share. Steel is a fingerstyle instrument. Whether you play with a plastic thumbpick and metal fingerpicks on your index and middle digits (the traditional approach), bare fingertips, or even classical-style nails, every part of your right hand—from the “karate chop” edge, to the heel of your palm, to the underside of your thumb, to any finger that’s not engaged in plucking—will be called on at some point to keep the peace.
Photo 2 shows what I call the “all-notes-off” clamp. This grip literally imprisons all the strings in some part of your right hand. Here, the ring, middle, and index fingertips mute strings 1, 2, and 3, respectively. The bottom three strings are held silent by the underside of the thumb.
Playing steel often requires simultaneous muting and picking. Here the index finger plucks the 4th string while the other fingers clamp down on adjacent strings to keep them from ringing.
Another all-notes-off approach uses the palm heel and karate edge to clamp down on the strings. Called “palm blocking,” this method is often used by pedal steelers who play 10- and 12-string instruments and need to have more meat available to span all those wires. Palm blocking is the classic pedal steel approach, but some contemporary pedal steelers rely instead on “pick blocking,” a more recent development based on fingertip control.
However you mute the strings—using some combination of fingertips and base of your hand—this is your primary playing pose. From here, you selectively pluck strings while holding others quiet. This requires a high degree of finger independence (another skill that translates to guitar). Once you start moving the tonebar to play riffs, you’ll understand why it’s important to simultaneously attack and mute the strings.
And speaking of riffs, let’s dive in.
Slur, Slide, and Wobble
Though Ex. 1 is only two measures long, it illustrates five techniques we’ll be using again and again in this lesson: pull-offs, hammer-ons, ascending and descending slides, and vibrato. Let’s break it down.
On steel, pulls and hammers consist of alternating a bar note with an open string. Beat 1 illustrates a pull-off on the 3rd string. Simply place the bar over the 1st fret marker, pluck A, and lift the bar off the string. If you raise the bar cleanly, the open 3rd string will ring out nice and loud. One attack, two notes.
We reverse the process going between the 2nd and 3rd beats: Pluck the open 5th string (and of beat 2) and briskly drop the bar onto it (beat 3’s downbeat). But rather than landing directly over the 3rd fret marker, slide toward it from below, as indicated in the notation. This “hammer-slide” is a quintessential steel move, as is its mirror image, the “slide-pull” you’ll encounter in beat 4.
The phrase ends on a long sustained note treated with singing vibrato—another signature steel sound. Just like on guitar, vibrato is a very personal and expressive technique. Though speed and width is a matter of taste (in the audio example, I use a moderately fast vibrato with a narrow pitch deviation), the hallmark of a strong vibrato is consistency. You want to hit your target note and then roll back and forth above and below it using the same amount of variation and a steady pulse. In other words, go sharp and flat in equal amounts at a fixed speed. This takes practice, but—wow—it’s so much fun to hit a fat, snarling note on a steel and then make it scream with vibrato.
Click here for Ex. 1
Bluesy Double-Stops
There’s a magic interval—a minor third consisting of the 5 and b7 of whatever key you’re in—that adds a soulful cry to any blues riff, and all the greats from Howlin’ Wolf to Kenny Burrell to Billy Gibbons have repeatedly leaned on it to make their enduring music. Guess what? In open E tuning, this interval lies in a straight line across the 3rd and 2nd strings, allowing us to easily work it with the bar.
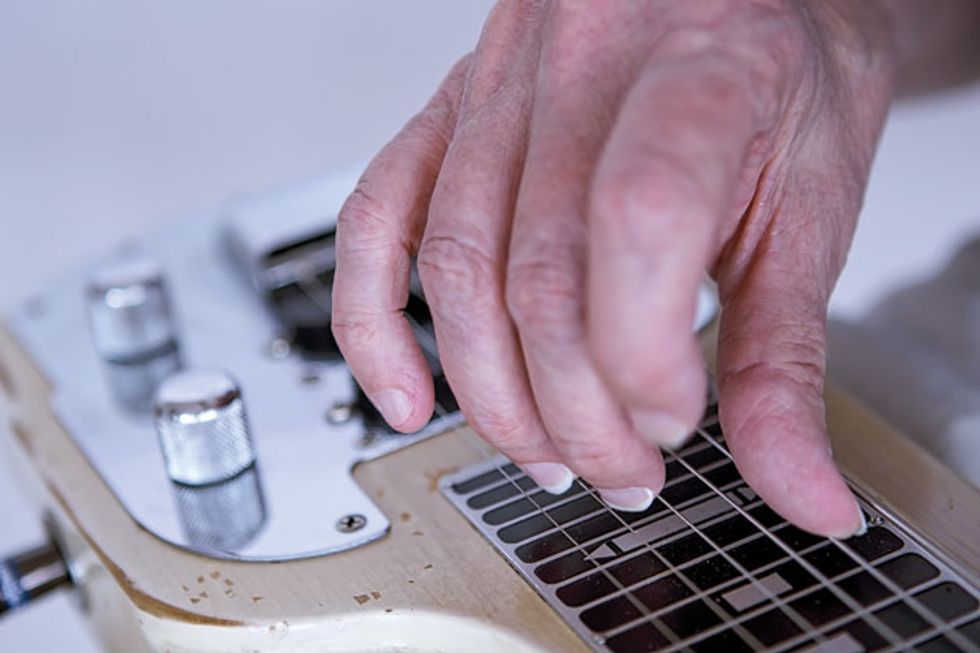
We’re in the key of E again for Ex. 2, so our magic minor third is B–D, and we make a real meal of it in the first measure. When playing single-note passages—especially on the higher strings, as in measure two, beat 4—it helps to tip the bar up on its nose. This way you’re not dragging it across any unused lower strings, creating extra friction and scraping sounds. While playing off the tip like this, continue to mute the inactive strings with your trailing left-hand fingers.
Click here for Ex. 2
Let It Rip and Ring
Essentially a block of wood equipped with a pickup, lap steel sustains like crazy, and Ex. 3 is all about exploring this sonic attribute. Long notes give you a chance to work on vibrato control, so we’re also taking advantage of that. When you hit each of the four sustained moments of vibrato, listen carefully: Is your center pitch focused? Pulse steady?
In contrast to the long, sustaining notes, we suddenly get busy in the last measure. When executing those last two pull-offs, pop the bar off the strings with a quick flick of your wrist.
Here’s another cool thing about steel: It’s very responsive to where you’re picking the strings. As you’ll hear in the audio example, the first time I play the double-stops in measure three, they have a thick, throaty tone because I’m attacking the strings in the middle of the neck, close to the bar. On the repeat, I pluck closer to the bridge for more bite. It’s only a few inches one way or the other, but the timbral change can be dramatic.
Click here for Ex. 3
Intonation Drills
As you start to play higher up the neck, you’re quickly reminded that the notes are closer together than when you’re playing down by the nut. Because we don’t have physical frets to do the dirty work for us, we have to intuitively make intonation adjustments by hand, on the fly—often at quick tempos.
The best way to come to terms with the expanding and contracting distances is to play scales or chromatic passages along one string, as in Ex. 4. Notice how once we get rolling, we’re alternating between the open string and the next bar tone. (I like to think of this as yodeling.) The repeating open string provides a pitch reference against which to play the bar notes. It’s a great way to get your bar hand in sync with your ear, and you can apply this yodeling drill to any string and any scale.
Click here for Ex. 4
Bar Control to Major Tom
Though it’s easy to coax legato tones from the steel, playing staccato notes takes practice, so that’s what we’ll tackle in Ex. 5. The idea here is to repeat the same ascending and descending phrase while alternating between crisp, short tones and long, juicy ones.
Here’s how to produce a staccato articulation on steel: After attacking a note, quickly lift the bar off the string—just a small distance—but keep the trailing left-hand fingers on the strings to mute them.
In measure one, ascend through the scale attacking every note and giving it a staccato articulation. Then in measure two, descend through the same scale giving it a legato treatment: Each string gets an initial attack and all subsequent notes are slurred. In measures three and four, reverse the articulation while ascending and descending through the same scale sequence.
This alternating between short and long tones puts your bar control and muting to the test. Once you get that down, try randomly shuffling the one-measure “cells” and articulation you apply to them: ascend staccato, ascend legato, descend legato, descend staccato, and so on. Finally, try a game suggested by PG’s Jason Shadrick: As you ascend and descend through the scale, randomly switch between staccato and legato articulation each time you move to a different string.
For music theory buffs: The scale we’re playing in this example is used in flamenco music, and also found throughout Eastern Europe, the Middle East, and India. It goes by many names, but we’ll call it Phrygian dominant (1–b2–3–4–5–b6–b7). In this case, we’re playing F# Phrygian dominant (F#–G–A#–B–C#–D–E), which is the fifth mode of B harmonic minor (B–C#–D–E–F#–G–A#).
Click here for Ex. 5
Blues Power
A lap steel lesson would feel incomplete if we didn’t explore the blues scale (1–b3–4–b5–5–b7). In Ex. 6, we first ascend through the A blues scale (A–C–D–Eb–E–G) starting in the 5th position, and then cut loose with some greasy licks using those notes.
With its mix of staccato notes and legato slides, this example offers plenty of opportunity to work on bar control. Measure three has two sneaky moves that illustrate how to slip in and out of notes with your tonebar. Both occur in beat 3: The first is the grace note that lets us nail C from a whole-step above; the second is the sassy exit that’s equivalent to a quarter-tone bend on regular guitar.
Click here for Ex. 6
Playing Changes
It can be a challenge to coax minor harmony from a major open-chord tuning, which is why we need to work on arpeggios. Ex. 7 mixes major and minor arpeggios in the context of a I–IIIm–bVII–IIm progression. (You might recall Dylan’s “Lay Lady Lay” from Nashville Skyline. This is the same verse harmony, played at a slower tempo.)
We’re in the key of A, so we’re outlining A, C#m, G, and Bm using a combination of staccato notes and legato slurs. Each chord change requires a quick position shift, which is always demanding on a fretless instrument. The trick is to familiarize yourself with the individual arpeggios before you attempt to string them together.
The closing IV-I cadence is pretty slick—a classic “weeping” steel move inspired by 1950s honky tonk ballads. In the second ending, beat 4, slow down as you work through the descending D arpeggio. After plucking D on the 4th string, simply slide down to A for the downbeat of the final measure. As you arrive at this low A, strum an A triad above it on strings 3, 2, and 1.
Click here for Ex. 7
Driving Sideways
So far, we’ve been using the tonebar in two ways: placed straight across several strings at a right angle to them, or rolled onto its tip in the “bullet nose” position. Now it’s time to try placing the bar on the strings at more of a 45-degree angle—this is known as “slant bar” technique.
When playing rapid single-note passages, it helps to tip the bar up on its nose.
Although you can play slants on adjacent strings, for this lesson we’ll stick to slant positions that cross three strings and span an area of two frets, with the middle string muted and one note plucked on each adjacent string. And there are two possible orientations for the slant: The bar tip can point either toward the bridge or toward the nut. We’ll call the first position a forward slant and the latter a reverse slant.
Photo 3 shows a reverse slant. In this instance, the target notes are on the 5th and 3rd strings and the 4th string is muted. Ex. 8 puts reverse slants to work in a V–IV–I progression in the key of E. In measure one, we shift from B (the V) to E, before morphing back to B. The same move repeats a whole-step lower in measure two, yielding an A–D–A sound.

Photo 3
In both cases, the reverse slant transitions smoothly to a straight bar position. The attack happens on the reverse slant; this is followed by the tonebar rolling back into a perpendicular orientation to the strings while the notes sustain. The top note slides down a half-step, while the bottom note drops a whole-step. It’s a difficult maneuver, but once you get the hang of it, you’ll be able to conjure pedal steel (which provides mechanical “changers” to accomplish the same move).
We stretch out in measure three with a handy riff you can use for comping in blues, soul, gospel, and even some jazz, and then wrap up with a cool E7 lick in measure four. That last little flurry contains some ear-grabbing contrary motion: The minor third slides down four frets to sustain below the high E that comes in above it on beat 4.
Click here for Ex. 8
Photo 4 illustrates a forward slant on strings 3 and 1. As before, the string between these two target notes gets muted. Ex. 9 reveals how easy it is to outline diatonic triads on strings 3 and 1 using a combination of forward slants and straight bar positions. Okay—it’s not exactly easy to play these major and minor sixths, but you’ll turn heads with these moves when you master them. Once again, we’re manually emulating pedal steel.

Photo 4
One shift that really captures the honky tonk spirit happens in measure one, beats 3 and 4. Here, we’re transitioning from a forward slant (Bm) across frets 6 and 7 to a straight bar (A) across fret 5, but on the way down—while still holding the slant—we overshoot the 5th-fret destination to hover above frets 3 and 4 before sweeping up into A.
Click here for Ex. 9
Tear it Down, Build it Up
Many guitarists get frustrated at some point when learning steel because they experience a level of ineptitude they haven’t felt in a long, long time. If you find yourself gnashing your teeth over some technical hurdle, just think back to the days when a barre chord—or even a simple folk D chord—was hard to play without buzzing. But you triumphed then, and you can do it again. The key is to get over the “I suck” hump and not give up.
A good way to approach steel is to find moves and phrases that sound good to you and then repurpose them in different keys, tempos, rhythms, and songs. It comes down to playing a lot—it’s the only way to learn how to hold the tonebar without dropping it and play in tune up and down the neck. Jamming with your favorite albums works well too because you can lay back and play fills, and not be so completely focused on your own skills (or lack thereof).
And just to reiterate, steel technique is universal. Once you develop some basic chops, you can apply them to any style of music—Hawaiian, Western swing, honky tonk, blues, Brian Eno-inspired soundtracks, whatever. Don’t be surprised if the steel takes you in musical directions you wouldn’t have considered in pre-tonebar days. And because learning lap steel places such intense demands on your coordination and pitch acuity, don’t be surprised if your guitar playing improves too.
Got Steel?
If you don’t already have a steel but are interested in giving it a go, you have many options. Rogue sells an imported 6-string starter model for under $100, and Morrell Music offers a lap steel for $150 that’s made in Bristol, Tennessee. Epiphone and Gretsch have 6-string models priced between $250 and $500, and you can score vintage Fender, Gibson, Rickenbacker, Gretsch, National, Supro, and Valco models in pawnshops or on eBay or Reverb for a fraction of what you’d pay for an electric guitar from the same era.
If you’re drawn to high-end instruments, such boutique builders as Asher and Duesenberg make stunning steels using premium tonewoods, hardware, electronics, and pickups. Alternatively, you can convert a standard guitar to play like a lap steel. For a step-by-step description of the simple conversion process, check out “Lap It Up.” If you take this route, be aware that the open E tuning we’re using in this lesson is intended for actual lap steel guitars, which typically have a shorter scale in the range of 22" to 23". On a converted guitar, particularly an acoustic, it’s a good idea to take open E down a whole-step to open D because the instrument’s scale will be in the 25" range, and this longer scale generates greater tension for the same gauge of strings.
YouTube It
In his insanely cool 3-minute intro to “Mercury Blues,” David Lindley lays out everything you need to know about playing ripping lap steel onstage. Timeless footage from his El Rayo-X era.
Shot at 2015’s Bonnaroo festival, this 9-minute multi-cam video shows Ben Harper diving headfirst into the wild side of his Asher 6-string.
Steel through a Marshall stack—who knew? John Paul Jones gets loud on his lap steel in this live version of Zep’s classic. Lots of power chords and blues licks ... plus Paul Gilbert playing beautiful rhythm guitar.