Recently, a storied late-’90s Taylor 914 showed up at my shop. The first time I worked on this guitar was back in the ’90s after I moved my repair operation to Nashville’s Music Row. At the time it was built, this was one of Taylor’s premium Grand Auditorium models.
This particular 914 has a fascinating history. It belongs to one of my first customers, Nathan Paul Chapman, who is a two-time Grammy-winning producer and guitarist. Chapman has produced records for many top artists, including Taylor Swift, Lionel Richie, Shania Twain, Sara Evans, The Band Perry, and the Invite. This was Nathan’s first “real” acoustic guitar, and he used it as his workhorse for Taylor Swift’s 2006 multi-platinum, self-titled debut. Not on a few songs, but throughout the entire album.
Over the years, this 914 has logged many miles and been featured on countless sessions, and generally has had the living daylights played out of it. When Chapman noticed the guitar wasn’t performing as well as it once did, he brought it in to see if we could coax it back into tip-top shape. To have the guitar return to my bench after over a decade was cool, but I knew it would need some work.
Getting the Lay of the Land
Before I do anything, I ask my clients several
important questions to help me dial in the guitar
to the player. Since technique differs from one
guitarist to another, this background information
is crucial for properly setting up a guitar after I’ve
completed any repairs or modifications.
These are the questions I ask: What tuning do you use? Do you use a flatpick? If so, what size and thickness? How hard do you pick and strum the guitar, and do you play with a light, medium, or heavy fretting-hand touch? If you play fingerstyle, do you attack the strings with your nails, fingerpicks, or fingertips? What styles of music do you play? What gauge strings do you use? Do you use a capo?
Though I was familiar with Chapman’s playing, I ran these questions by him to be sure I understood how he planned to use this 914. Armed with the information he gave me, I was ready to start work on the guitar.
The Video
Watch John and Andy take the 914 through the entire process on video below, or click to the next page for detailed step-by-step instructions and photos.
Preliminary Evaluation
Always begin any project by taking essential measurements.
This information serves as a baseline
for any adjustments and also helps pinpoint any
problems. Write these measurements down, so
you can refer to them at any time during the
setup process.
Here are the four preliminary measurements:
1. Action at the 12th fret.
2. Neck relief.
3. Action at the 1st fret.
4. Intonation.
Let’s go through these measuring procedures, one at a time.
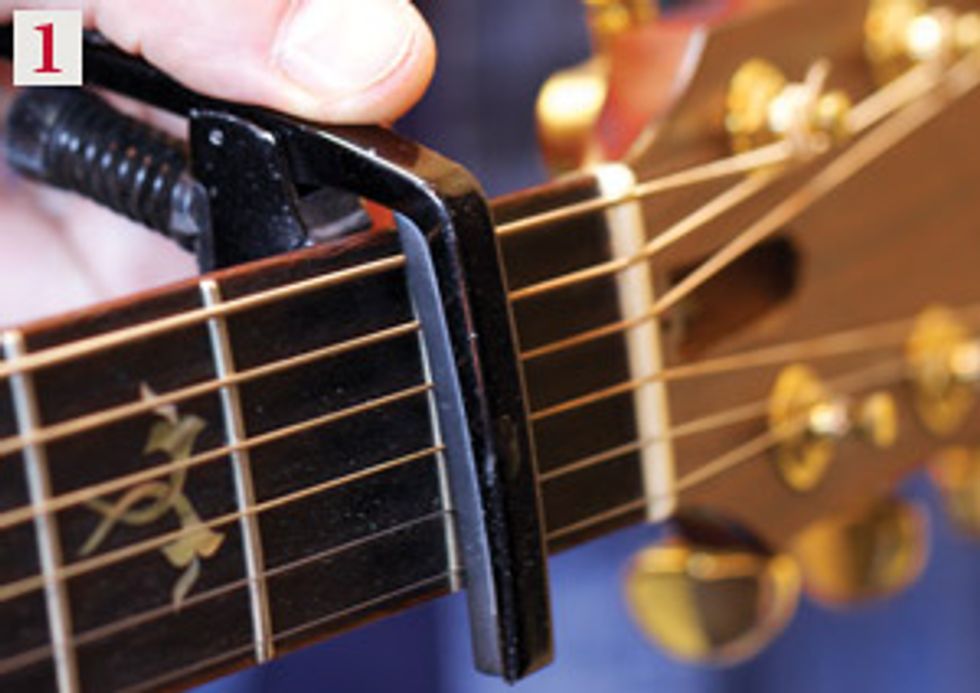
Before measuring the action, clamp a capo directly on top of the 1st fret.
Step 1
Measure the Action
A guitar’s action—how far the strings sit above the fretboard—determines its playability.
Our journey begins here:
1. Tune the guitar to concert pitch. If the strings are totally shot, restring first.
2. Clamp a capo on top of (not behind) the 1st fret (Photo 1). By doing this, you create a “zero” fret and temporarily remove the nut from the action equation. This allows you to initially focus on saddle height and neck relief.
3. Use an action gauge (or precision ruler) to measure the string height at the 12th fret. Measure from the bottom of the string to the top of the fret.
On Chapman’s 914, the height was 6/64" on the 1st string and 7/64" on the 6th string. This is very high action!
Measuring neck relief with an action gauge.
Step 2
Measure the Neck Relief
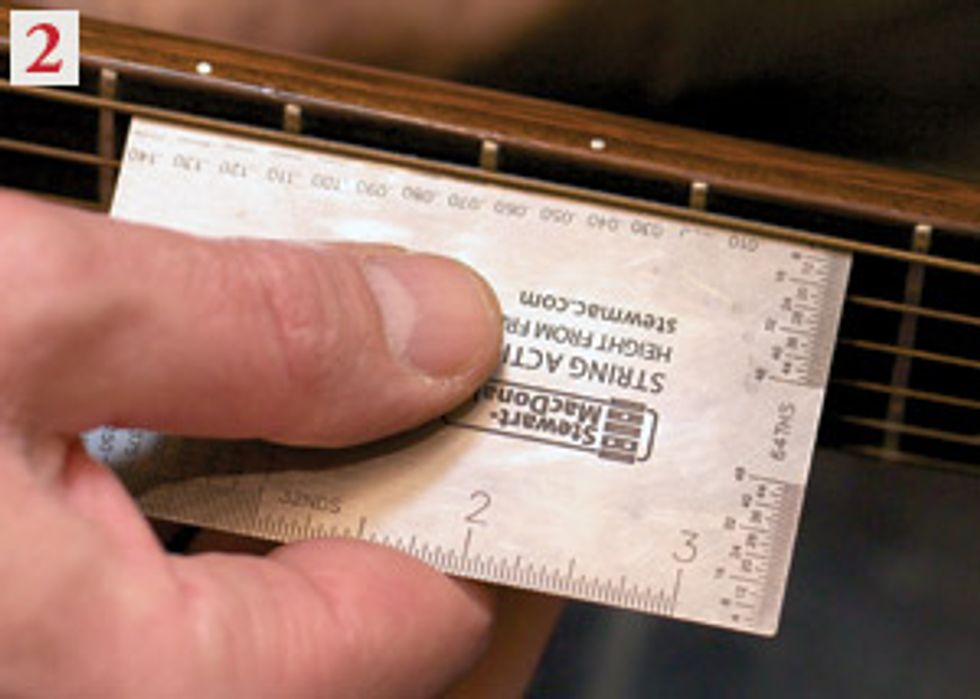
1. With the capo still clamped on top of the 1st fret, hold down the 6th string at the 14th fret.
2. Measure the greatest distance between the bottom of the string and the top of the frets (Photo 2). The largest gap typically occurs somewhere between the 7th and 9th frets—essentially in the middle of the neck.
The relief was .022" on this 914, which meant the neck had a little more forward bow than necessary. Given Chapman’s precise playing style, I knew I could reduce the relief and make the guitar easier to fret up and down the neck.
Step 3
Measure the Action at
the 1st Fret
Another factor in playability is
how high the strings sit in their
nut slots. If the strings are too
high, the guitar feels stiff. If they
sit too low, you’ll get a buzz
when you play the open strings.
1. Remove the capo and measure the distance between the bottom of the 1st string and the top of the 1st fret.
2. Repeat the process for all six strings. When the guitar is set up properly, the gap should incrementally increase from the 1st to the 6th string to accommodate their progressively thicker gauges.
At the 914’s 1st fret, the 1st string was 2/64" above the fret and the 6th string measured just over 2/64". Again, this is rather high, especially on the treble strings.
Step 4
Check the Intonation
Next, I use a strobe tuner to
check the intonation. Here’s
how it works:
1. Tune each string with the strobe using 12th-fret harmonics.
2. Starting with the 1st string, play the 12th-fret harmonic as a reference and then fret the same note. The goal is to have the fretted note match the harmonic. If the fretted note is sharp or flat, write down how many cents (plus or minus) it deviates from the reference harmonic.
3. Repeat the process for strings 2-6. Double-check the tuning of each reference harmonic as you work your way across the fretboard.
On Chapman’s guitar, I found most of the strings were sharp when played at the 12th fret, and the amount varied from +2 to +6 cents.
Step 5
Adjust the Relief
Once you have your measurements, you’re ready to begin
the process of changing the action.
1. Remove the truss rod cover at the headstock. (On some flattops, you access the truss rod through the soundhole.)
2. Adjust the truss rod. Turn the wrench clockwise to tighten the rod and reduce forward bow, or counterclockwise to loosen the rod and reduce back bow. Go slowly, making very small adjustments and checking the results each time you move the rod.
By tightening the 914’s truss rod, I reduced the relief from .022" to .015". This is the proper amount of relief for Chapman’s playing style. Any less relief and the strings would be likely to rattle against the frets.Tip: If you have any doubts about how to adjust a truss rod, get a guitar repair book or study the manual that came with your instrument. Many manufacturers offer free online instructions for adjusting the truss rods on their guitars.

3. Using a gauge to determine the fretboard’s radius or curvature. 4. Sanding the saddle blank to fit in the saddle
slot. 5. Frequently check the thickness of the saddle blank as you sand it down. It should fit snugly in the saddle
slot, but don’t force it in. 6. Rolling the ends of the saddle blank to round them off. 7. Checking the rounded ends
of the saddle blank against the curved slot ends. 8. Using 80-grit self-adhesive sandpaper and a radius block that
matches your fretboard radius, sand down the top of the saddle to the line you traced on the bone blank. This allows
you to reach the desired height while maintaining the correct radius.
Step 6
Carve a New Bridge Saddle
Though it had been played hard for years, Chapman’s guitar
was in great overall condition. But the bridge saddle was worn
and rather than spend time trying to intonate it, I decided to
carve a new one instead. With a new saddle, I could simultaneously
address the guitar’s action and intonation problems.
I chose a bone saddle blank because bone sounds great and is easy to shape with a file. (Important: Saddle slots are typically either 3/32" or 1/8" wide. Before buying a saddle blank, you need to measure your guitar to determine which thickness is required.) To carve the new saddle:
1. Remove the strings and the old bridge saddle.
2. Measure the fretboard radius (Photo 3). It’s very important to get this right, so you need to use a precision radius gauge. A multiradius tool or sets of individual radius gauges are available from such luthier supply companies as Stewart- MacDonald and Luthiers Mercantile.
3. Place your old saddle against the new blank. Using a mechanical pencil, trace the contour of the old saddle onto the new saddle blank. This will serve as a basic template for shaping the replacement saddle.Note: If your original saddle was too tall, you’ll have an opportunity later to remove the extra material from the new blank. However, if your original saddle was too low, you’ll need to factor in additional height as you trace the contour onto the new saddle. To do this, simply slide the old saddle up a little higher against the blank before tracing its contour.
Tip: You can always sand the saddle lower, but you can’t add height back. When in doubt, err on the side of having your blank a bit too tall initially.
4. Check the line you just traced on the new saddle blank with the radius gauge to confirm the radius is correct.
5. Sand the new saddle blank to match the old one. When sanding the new saddle, it’s imperative that its thickness, height, and length are correct. Getting this right is harder than it sounds and requires frequent checking against the original saddle.
Using 80- and 400-grit sandpaper adhered to a flat surface, sand the thickness of the new saddle so it fits snugly into the saddle slot (Photo 4). Sand off just enough thickness that you don’t have to force the saddle in, but keep the fit snug enough that the saddle doesn’t rock inside the slot. Check your progress by trying to insert the new saddle into the slot (Photo 5).
Part of this process involves rounding the saddle’s left and right edges so they fit into the ends of the slot. An easy way to do this is to gently roll the end of the saddle blank as you sand it on a flat surface (Photo 6). The goal is to have each end of the saddle match the curved end of the bridge slot (Photo 7). The ends of the saddle shouldn’t bind or have any room to move from side to side.
6. Once the blank fits correctly into the saddle slot, use a radius block equipped with 80-grit selfadhesive sandpaper to sand the top of the saddle down to the line you traced onto the blank (Photo 8). This operation sets the basic saddle height while making sure the saddle follows the fretboard curve. Matching this radius ensures that the string height will be consistent across the fretboard. If you don’t do this, you may end up with some strings too low and others too high, making the guitar difficult to play.
I have several wooden blocks that are carved to various radii. The 914’s fretboard has a 14" radius, so I used the corresponding block and 80-grit sandpaper to sand the new saddle to the proper height.Tip: I recommend placing the radius block in a vise and sanding the saddle blank upside down. If you attempt to sand the saddle blank while it’s in the bridge, you can easily slip and damage the bridge or the guitar’s top.
Lower the saddle height by sanding from the bottom of the blank—not the radiused top. Here I’m using 80-grit sandpaper attached to a flat wood block. To keep the bottom flat and square, I apply even pressure across the entire saddle.
Step 7
Adjust the Saddle Height
With the top of the saddle sanded to match the fretboard radius,
it’s time to fine-tune the action.
1. Put the old strings back on, tune them to concert pitch, and measure the action. At the 12th fret, my target is to have the action measure 4/64" for the 1st string and 5/64" for the 6th string. If you use the correct radius block to shape the top of the saddle, the strings will consistently graduate in height from the 1st to the 6th string.
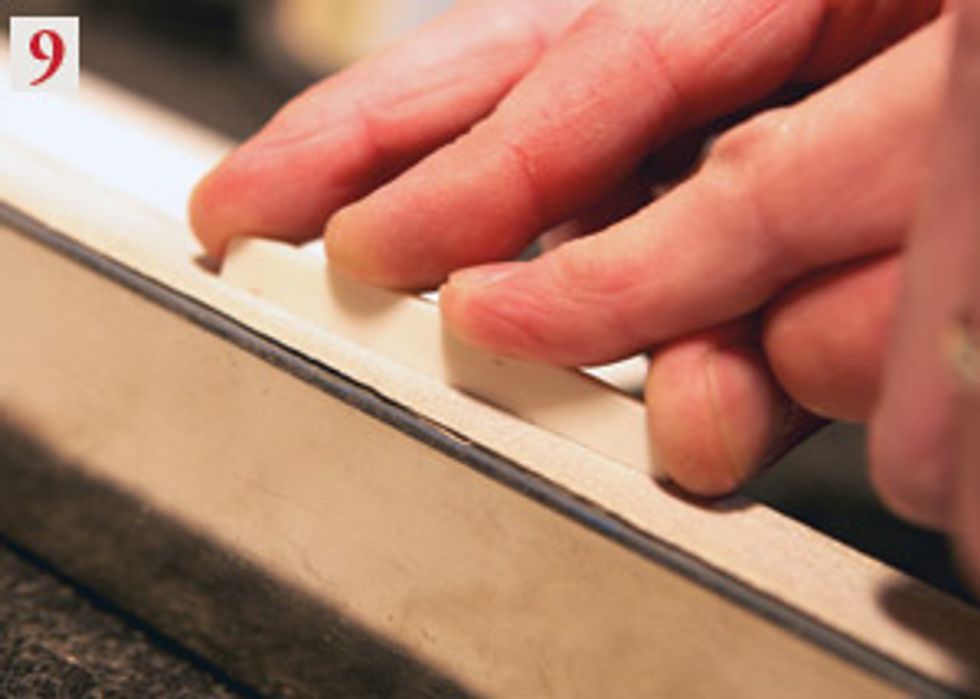
2. If the action is too high, loosen the strings, remove them from the bridge, and gently pry out the saddle. Using a mechanical pencil, mark a straight line along the bottom of the saddle corresponding to the height you want to remove.
Carefully sand off this amount from the bottom of the saddle (Photo 9).
On Chapman’s 914, the action was about 1/64" too high when I first strung it up. Following the procedure above, I sanded off that amount from the bottom of the saddle. Finally, I got the height right where I wanted it.Tip: When sanding off material from the bottom of the saddle blank, use straight strokes and move in only one direction. It’s easier to keep the bottom of the saddle flat—which is what you want for the best sonic transfer—when you sand in one direction.
Step 8
Check String Height at the Nut
There was one more issue to resolve before I could finish the
new saddle for this 914. The action at the 1st fret was still a
little too high, so I needed to re-cut the string slots to correct
this. Here’s the process:
1. Using gauged nut slotting files (one for each string), cut each string slot to the proper depth. Begin with the 1st string, which should measure 1/64" above the 1st fret.
2. Continue to measure and, if necessary, cut the nut slots for strings 2-6. Each string gradually increases in height from the 1st to the 6th, which should sit 2/64" above the 1st fret.
Once the action at the 1st fret is correct, you’re ready to begin the final and most challenging phase of this project— intonating the guitar.
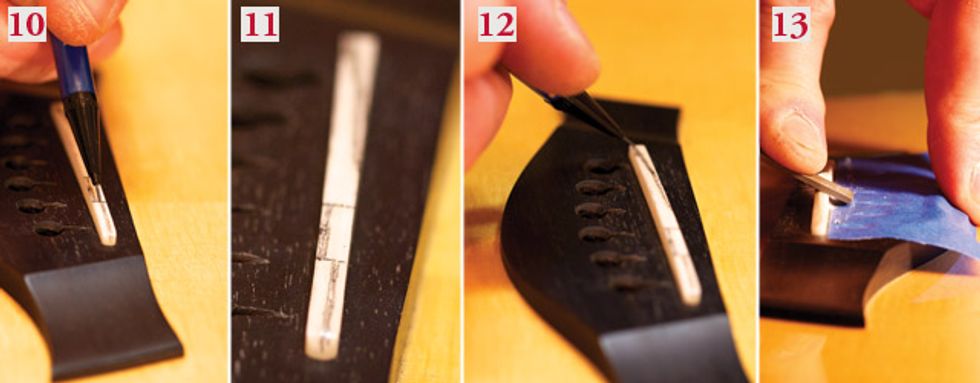
10. Marking lines on the saddle to indicate the new contact points to be filed
for each string. Here you can see the compensation marks for the high-E and
B strings. 11. The B string’s new contact point will be at the rear of the saddle.
12. The contact points for the G, D, A, and low-E strings form a diagonal
line, with the G close to the front edge of the saddle and the low-E 1/32" from
the rear. 13. Filing away the excess bone behind the new contact points for
the low-E, A, D, and G strings. The G string sits forward—it’s closest to the
soundhole—while the low-E string sits at the rear edge by the pin holes.
Step 9
Compensate the New Saddle
Intonating a guitar involves adjusting the length of each string
so it will play in tune along the entire fretboard. Conceptually,
it’s simple, but the process can be complicated—particularly
on a flattop that doesn’t have individually adjustable saddles.
Before we begin carving the saddle to subtly adjust the vibrating
length of each string, it’s good to step back and look at all
the elements that affect a guitar’s intonation.
The location and condition of the string nut, frets, and bridge saddle each play a role. For example, if the nut is too far or too close to the first fret, the guitar will never intonate properly. Also, if the string slots in the nut are worn, this will also prevent accurate intonation. This is why it’s a good idea to check the slots and make sure the nut doesn’t need to be replaced.
Frets also play a big part. When the frets begin to wear, they flatten out and change their point of contact with the strings, and this also affects the intonation along the fretboard. Recently, I had a guitar on my bench that had heavy wear on the first five frets. When I checked the intonation, those were the only notes that were out of tune. So if your guitar isn’t playing in tune, it could be some frets causing the problem.
Sometimes I come across a bridge saddle slot that’s in the wrong location on the bridge. When that’s the case, even after compensating the saddle, the strings still fret too sharp or too flat. In this case, you have to relocate the saddle or fill the old slot and route a new one.
Relocating the nut or saddle, or doing fretwork is beyond the scope of this article. However, if you have a guitar that’s built correctly—like Chapman’s Taylor 914—all you need to do now is carve the intonation points on the bridge saddle. This is called “compensating” the saddle.
Essentially, instead of having all the strings cross over the
top of the saddle at its center, you’re going to create a unique
resting point for each string. Some of these points will be
closer to the soundhole, others closer to the bridge pins.
Here’s how I do it:
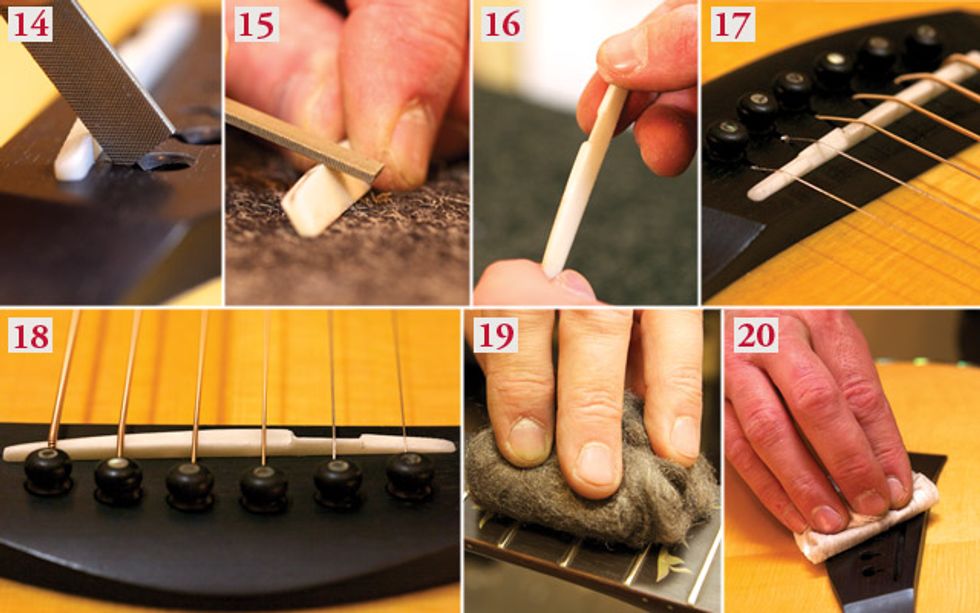
14. Checking the trailing angle for the low-E string as it comes off the saddle. The distance between the pin hole
and the saddle determines this angle, and it’s important to file it correctly for each string. 15. Filing the B-string
compensation after removing the bridge from the saddle. The mark you made earlier indicates how far into the
saddle you need to file. 16. The B-string “notch.” 17. The B-string notch seen from the front of the saddle. 18.
Check the trailing edge of each string to confirm there are no sharp edges and each string sits on a correctly
angled surface for optimal volume and sustain. This saddle is now ready to be removed and given a final polish
with 600-grit sandpaper and then a buffing cloth. 19. Cleaning the fretboard with ultra-fine #0000 steel wool. Yay,
shiny frets! 20. Treating the bridge with a soft cloth sprayed with Planet Wave’s Hydrate.
1. Mask the bridge area around the saddle with strips of low-tack blue painter’s tape. This will shield the wood from any slip-ups from your file.
2. With a mechanical pencil, mark a line as described below to indicate where each string will cross the top of the saddle. This line will guide you as you file (Photo 10).
For the high-E string, place the line halfway across the saddle. For the B string, mark a line almost at the rear (pin side) edge of the saddle (Photo 11). The G string has its contact point close to the front (soundhole) edge of the saddle, so make its mark there. For the low E, mark a line 1/32" from the rear edge. The A and D contact points form a diagonal line between the low E and G contact points (Photo 12). The D will be just a bit back from the G, and the A will sit slightly forward from the low-E string.
3. With the saddle in the slot, gently begin to file the bone material away on either side of the high-E pencil mark to create a narrow ridge. This ridge will be the contact point for the high-E string. For now, keep it about 1/16" wide (this will give you some room to finetune the intonation point after you’ve completed the basic compensation). As you file, stop periodically to check the rear angle— you want it to match the angle of the high E as it comes out of the pin hole.
4. Repeat the process for each string except the B string, which you’ll carve separately after removing the saddle from the bridge.
Remember, the G string’s contact point is at the front edge of the saddle; from this point, the saddle will slope back down toward the G’s pin hole. The low E will only make contact at the rear of the saddle—1/32" from its edge. The A and D strings fall in line between the low E and G (Photo 13). Once you’ve removed the appropriate material from the rear of the saddle for these strings, file off any excess material from the front side of their contact points. Giving the strings a clean leading edge allows them to vibrate freely.Tip: Each string will rise from the pin hole to the saddle at a different angle. You can easily determine this angle by turning your file on its narrow edge and laying it between the pin hole and the saddle (Photo 14).
5. Remove the saddle and file the compensation point for the B string, which will be just on the pin side of the saddle. In this case, you’ll remove material from the front (soundhole side) of the saddle to create a ridge at the rear. Using a small flat file, carve away the excess material from the front of the saddle (Photos 15 and 16). Essentially, this creates a notch in the blank.
8. Put the saddle back in its slot, install a fresh set of strings on the guitar, and tune it to concert pitch.
7. Look at the saddle to check your compensation. If you’ve done the carving correctly, the high E rides at the center of the saddle, the B sits on the rear edge (Photo 17), the G sits on the front edge, the low E sits close to the rear edge, and the A and D contact points form a line between the low E and G.
Now examine the saddle from the rear: Do all the strings come off the saddle and angle smoothly to their respective pin holes? To minimize string breakage, you don’t want any sharp edges here. Also, by having each string supported at the correct angle as it descends into its pin hole, you get maximum transfer of string vibration into the bridge (Photo 18).
8. Finally, when the saddle looks right from the front and rear, check the intonation again. If a string needs adjustment, file its contact point forward or backward accordingly.
9. Remove the saddle and polish it with 600-grit sandpaper and a cloth. While you’re at it, clean the fretboard with ultrafine #0000 steel wool (safe for fretboards, but don’t let it touch the finish) and then treat the fretboard and bridge with lemon oil or a lubricant like Planet Wave’s Hydrate (Photos 19 and 20). Reinstall the saddle, string up, tune to concert pitch, and you’re good to go.
The Wrap
There we have it. To get Chapman’s wellloved
Taylor back in pro playing condition,
I adjusted the truss rod, tweaked the action
at the nut and saddle, and carved a
compensated bone saddle to give the guitar
a big sound and sweet intonation. This 914
turned out great, and I look forward to hearing
it on more hit records!