Chops: Intermediate
Theory: Beginner
Lesson Overview:
• Build up strength in your fretting hand.
• Learn how to use geometric shapes across the fretboard..
• Understand how to play with more dynamics.
Click here to download a printable PDF of this lesson's notation.
Honestly, I never realized I had a legato technique until others pointed it out. I was only trying to compensate for my weak alternate picking abilities. But here I am, a legato player. Now, I’d never suggest that a specific style is correct or incorrect, but I will say that having a variety of techniques at your disposal will only expand your sonic palette and musical vocabulary—and that’s a good thing.
I’ve found that using a legato approach can offer more dynamics than simply picking every note with the same velocity. And legato techniques can seamlessly integrate with flatpick or fingerstyle picking.
Due to my rather soft picking touch, most of my tone is created with my fretting hand. In this lesson, I’ll offer some examples that will not only build up specific muscles required for playing legato lines, but also give you better control over your tone.
We’ll stick to the A Dorian (A–B–C–D–E–F#–G) scale for these examples, but I encourage you to try these exercises in different keys and to experiment with different fretboard locations.
The first thing to get the legato concept in your head (and hands) is to play your well-practiced major scale fingerings, but only pick the first note on each string and try to generate enough tone by slurring the rest. We want to create simple ideas that convey that legato sound.
The main point here is the motif—that geometric shape your fretting hand will generate—not any particular scale or lick. As a rule, only pick when moving to a new string and concentrate on keeping the time even and steady. You’ll notice immediately how this technique can navigate you around the fretboard with several patterns.
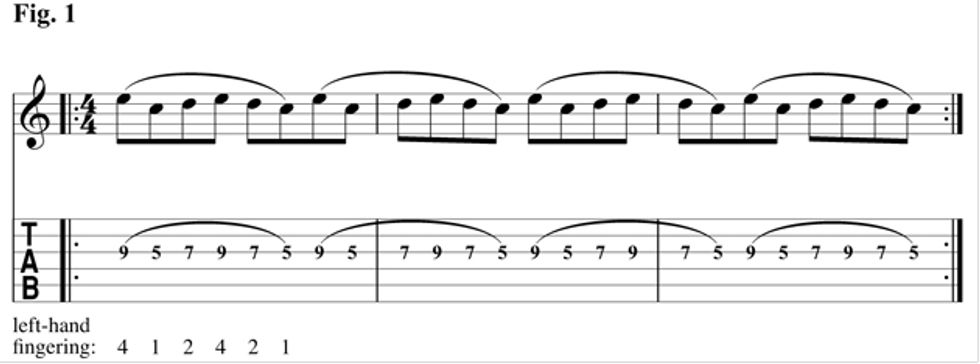
Let’s start with Fig. 1. Although it might look easy, keeping the time even and giving each note it’s proper due can be deceptively difficult. It’s a bit of a stretch moving from the 5th to the 9th fret, but this will not only get your pinky in shape, but also give you a better understanding of what it takes to make your tone sound even. Some of these patterns are easier to play at faster tempos, but we want to build enough strength in our hands to make them sing at a slower tempo. For variety, I’m creating a triplet feel with accents, but staying strict with the eighth-note pulse.
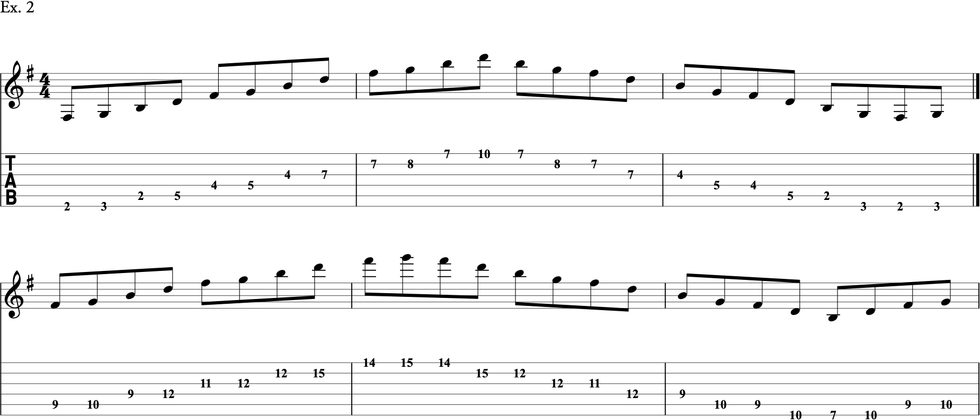
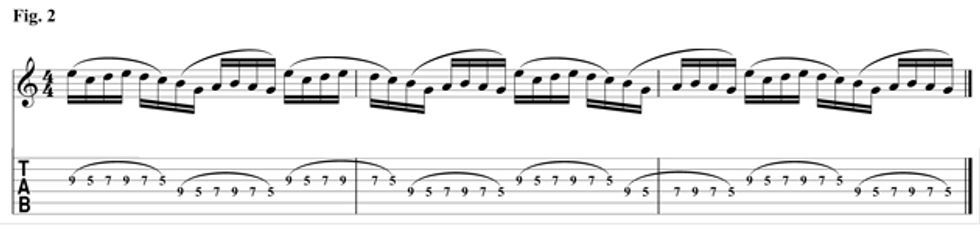
Remember what I mentioned about geometric shapes? Well, in Fig. 2 we take the same shape from the previous example and alternate between two adjacent strings. It’s not about speed or licks (yet), it’s about building strength and creating an extremely even sound and feel. You want to make the picked and non-picked notes sound exactly the same.
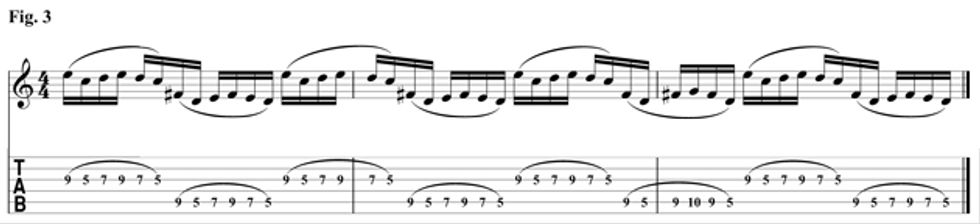
We take things a bit further in Fig. 3. Again, we keep the same shapes but now we are adding a string-skipping element to the mix. One slight variation on this will be to start with Fig. 1 and move to Fig. 2 and then to Fig. 3 without stopping.
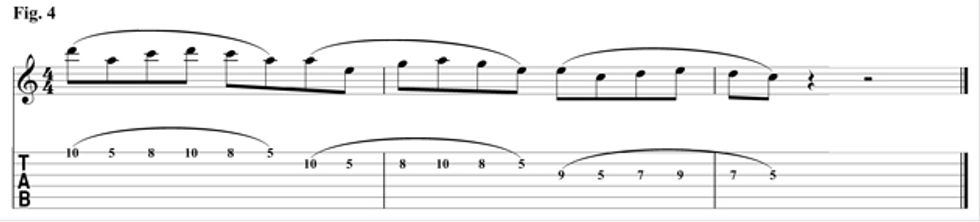
The lick in Fig. 4 really helped me stretch out my fretting hand. Check out how the notes repeat when moving from one string to the next. This is a valuable perk to becoming comfortable with stretching your patterns out. The doubling effect emulates the false-fingering techniques a saxophonist might use.
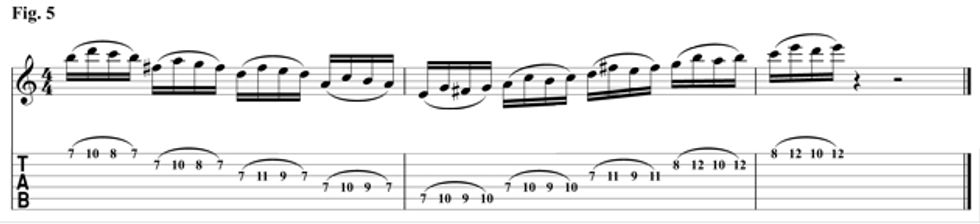
The phrase in Fig. 5 is based on a pattern you probably are already familiar with. The main point here is to focus on the fingerings. You’ll notice that now we’re using all four fingers as we move across the neck. As always, this example is probably harder to play at slower tempos. I have many students who can rip through this lick at a frantic pace, but we want to milk every bit out of each note. Practice it over slower grooves to build up strength and control.
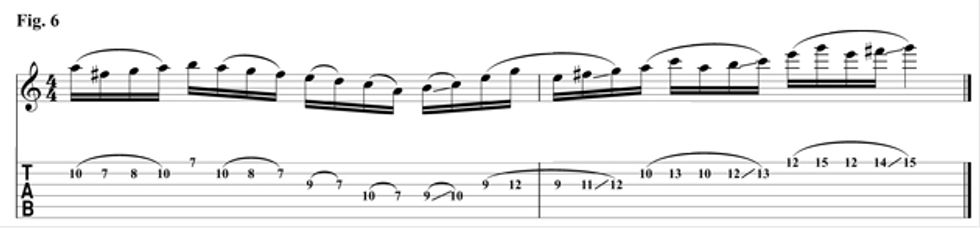
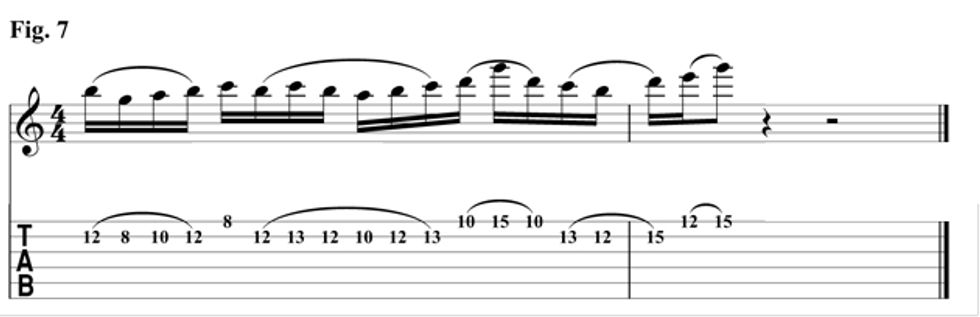
We incorporate some slides into the mix in Fig. 6. For this example, we’ll use the middle finger for all the slides. Each one will move you into a new position. Finally, we have Fig. 7, which is a little more involved.
Pay special attention and experiment with different fingerings—this can be the key to getting your legato phrasing to sound right. Be curious and creative when you practice and don’t be afraid to change the rhythm or accent different notes in the phrase in order to get more mileage out of these examples. They can open many doors to creatively maneuver around the fretboard.