Chops: Intermediate
Theory: Intermediate
Lesson Overview:
• Gain finger independence to make chords easier to grip and change.
• Practice hammer-ons and pull-offs to strengthen left-hand fingers.
• Use legato techniques to play fluid lines that don't require picking every note.
Click here to download MP3s plus a printable PDF of this lesson's notation.
Everyone talks about right-hand picking technique, but without a robust left hand, you’re not going to get very far. In this lesson, we’re going to talk about left-hand technique, how to build and develop better chops, and some amazing ways that your left hand can define your sound. We’re going to focus on finger independence to make switching between chords easier, and hammer-ons and pull-offs to strengthen your left hand and make you sound more fluid at the same time. Let’s start by talking about what your left hand does.
Role of the Left Hand
It’s safe to say that most of us take our left hands for granted—I know I did. I never purposely worked on my left hand until I got to college, and then I realized what a mess my fretting technique was. I studied classical guitar in college, and I was sure that my right hand would occupy most of my practice time, especially considering how different a classical guitarist’s right-hand technique is from playing with a pick. My first few months of lessons were dedicated to my left hand, and I had no idea how weak it was. Your left hand is really important, and I learned very quickly that my left hand was making it very hard for me to play the guitar; I just hadn’t really understood it until then.
Your left hand is in charge of fretting notes, as well as moving from note to note and string to string. When you break down what your left hand does, it’s much more complicated than your picking hand. Your picking hand has two motions: up and down. Add in the lateral movement to change strings and you’re done.
On the other hand (no pun intended), the left hand has to do a few very unnatural things. First, it has to strike individual fingers at different times. If you think back to our evolution, humans were basically hunter-gatherers: We gripped things with all of our fingers and our opposing thumbs allowed us a few new tricks. But for most folks, fingers are far from equal, and most fingers are weak. Across a single string, all four left-hand fingers can be in a line, but once you start playing chords, each finger can occupy a different string, and each finger has to move in a different direction. Take Fig. 1 for example, a simple movement of a C major chord to a D major chord.
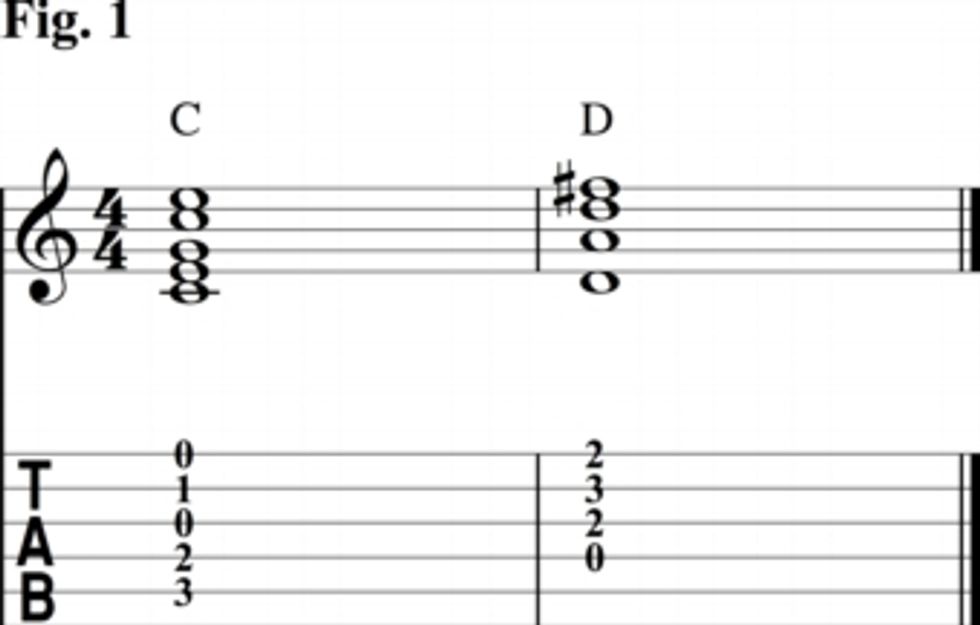
This is probably something you learned early on, and for many people, this is a hard chord change. If you sit down and look at it, it’s easy to see why. Let’s break it into pieces: In a C major chord, your fingers are fairly evenly distributed. The third finger is lowest down, grabbing C on the 5th string, while your second finger grabs E on the 4th string. We skip a string and let your first finger grab the C on the 2nd string. The shape is natural and pretty diagonal, and it follows the natural curve of the hand. For beginning students, this is tricky because in order to have the 3rd string sound, you have to get your second finger arched up enough to not mute the open 3rd string. Because C is a common chord, we play it enough times that it just sort of works. Now take the D major chord. Where does each finger go? Let’s look at the transitions:
Third finger: From the 5th string 3rd fret to the 2nd string
3rd fret
Second
finger: From the 4th string 2nd fret to the 1st string
2nd fret
First finger: From
the 2nd string 1st fret to the 3rd string 2nd fret
Your fingers are doing some amazing things by moving in a very unnatural way to get to the D chord. Most of us can do this move quickly without error, but it’s an amazing feat. We’re crossing our fingers vertically into a pretty unnatural shape. But we learn it by repetition and don’t think too much about it. We learn enough tunes with enough open chords and we get pretty good at switching, but it is quite unnatural.
So, what is natural for the left hand? Grab a tennis ball, or other palm-sized round object, and grip it with your left hand. Take a note of the shape. When I do it, my fingertips are largely in line with each other, and my thumb is across from the second finger. That’s a natural left-hand position, and that rarely happens when you play the guitar. To get our hands used to doing these new things, we can do some drills to help make the basic guitar movements easier, and make everything we play better.
Finger Independence
The first example (Fig. 1) was a great way to look at finger independence, which is our first left-hand technique. Having your fingers do independent things is one of the most challenging aspects of playing the guitar. If you had trouble changing chords fast enough when you started playing guitar, you were dealing with finger independence issues. It turns out that out hands aren’t built equally. There’s an individual tendon for each of your individual fingers, except the ring finger and pinky. Those unfortunate digits have to share one, and now you know why most guitar players only use three fingers on their left hand: The pinky is a bit weak, short, and it’s sharing a tendon with the ring finger.
For a great example of this, place your fingertips on a table and make them all touch at the same time. Now, try to lift up just your third finger, making sure your pinky stays down. Hard, isn’t it? Have no fear—while the pinky may be weak and muscularly challenged, it can be beefed up! Fig. 2 is the first of our “spider” exercises. I learned these in college and when you do it fast enough, you look like a tarantula walking across the fretboard. It’s creepy and awesome at the same time.
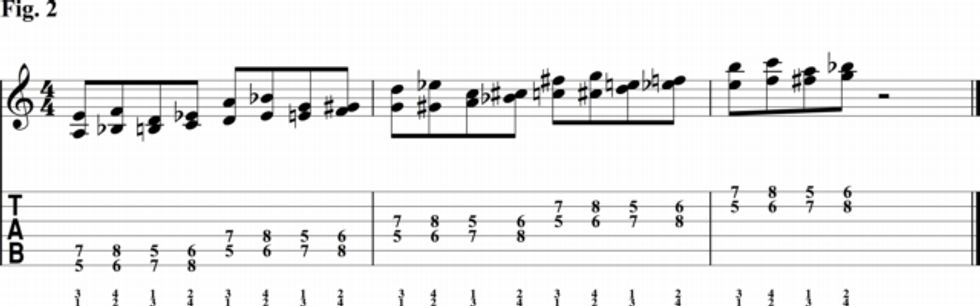
Fig. 2 is all about pairs of fingers: first and third, and second and fourth. By moving them together, first in parallel, and then in opposing motion, you’re making sure that each finger can work independently from each other. While the exercise sounds pedantic, the motion is just what you need to get from chord to chord with ease. In the audio example, I’m keeping my fingers down as long as I can, forcing the other fingers to work independently.
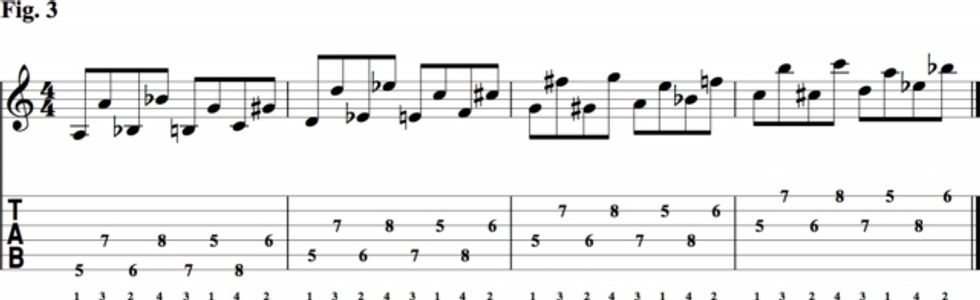
If we break up the fingers and play them one by one, we get Fig. 3, which proves that you can apply finger independence drills to enhance your lead playing as well. I’ve added a string skip to each finger pair to make it a little more challenging.
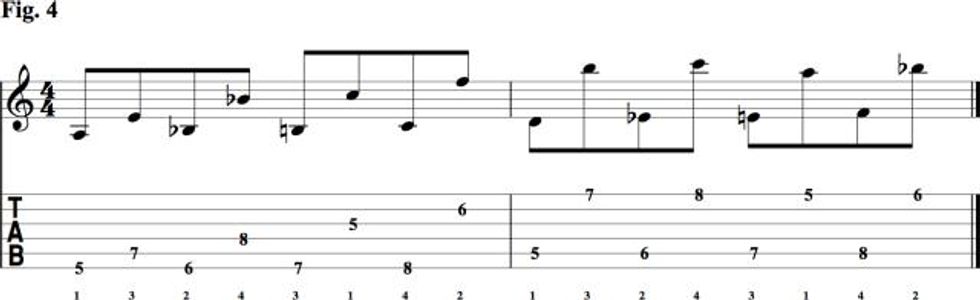
I’ll do one last exercise based on the spider drill with Fig. 4. This time, I’m adding a string skip each time I use all four fingers. This one is tricky, but it really shows how wimpy most people’s fingers are.
Now let’s take the finger independence idea and make all four fingers play at the same time—you know, like you do with chords. These shapes are called mirrors because they are mirror images of each other. Much like Fig. 1, I’m intentionally making the fingers do something pretty unnatural here in Fig. 5.
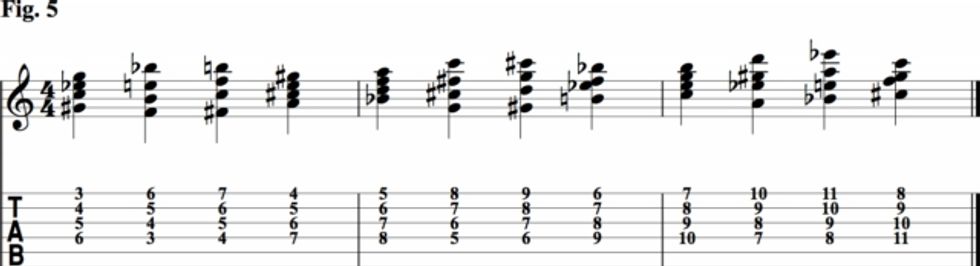
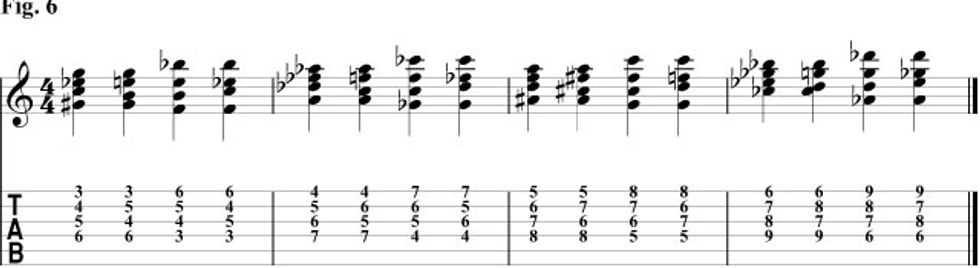
Fig. 5 clearly sounds like gibberish, and that’s the point—it’s a pure exercise that you can do unplugged while watching the game. You can take it and really go to town with it by adding string skips between any of the fingers, or moving it to different strings. Fig. 6 ups the ante by only changing the two middle fingers every other chord. This one is really difficult!
Now that we’ve explored finger independence, let’s look at an example of a guitarist who has clearly mastered this, British fusion legend, Allan Holdsworth. Check out the video below for an example of his staggering chordal work and look at how effortlessly he switches between difficult chord shapes.
Now, don’t feel bad, he has huge hands, and can stretch them farther than most, but if you study the video (with the sound off if jazz isn’t your thing), you’ll see that Allan is exceptionally fluid and in complete control of his left hand. There’s no tension between chord switches and his fingers just glide to the next note. That’s the goal here, fluidity and control.
Here’s another example of fast moving chords and finger independence, this time from the classical guitar literature. Check out the playing in this clip:
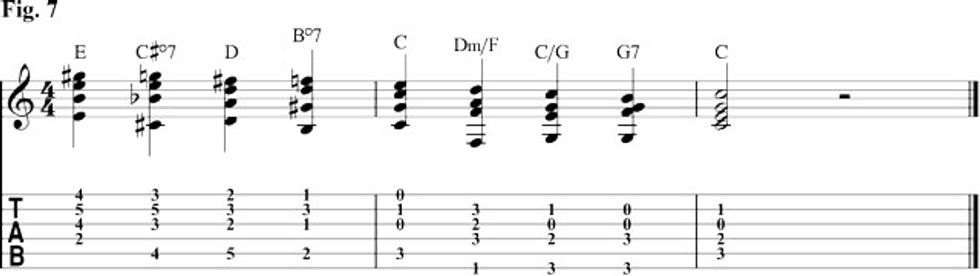
This is an example etude (Opus 31, no. 20) by Fernando Sor, a guitarist/composer who lived from 1778-1839. He was a monster player and wrote great exercises. This one is specifically to work on changing chords rapidly. I’ll pull out a few chords for Fig. 7 so you have some real music to chew on.
Hammer-ons and pull-offs
The next important aspect of playing the guitar is pressing individual fingers down. We do this when we play scales and licks, and a great way to strengthen your left hand is to work on hammer-ons. A hammer-on is the action where you pick the first note, but not the second. Instead, your left-hand finger presses down into the fret with enough force to make the note sound. It requires some skill and strength, but you end up with a different sound because instead of a pick plucking the string near the bridge, you’re going to generate the sound from the fret itself. To illustrate this, Fig. 8 takes the basic pentatonic scale and uses a hammer-on for the second note on each string.
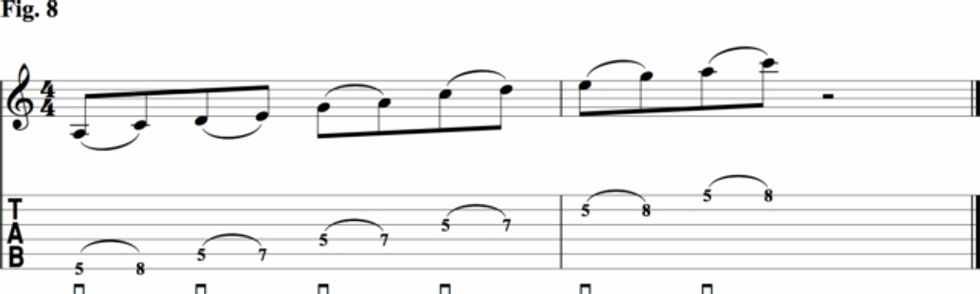
Not only does this sound different, but it can enable you to play faster than you normally would because you don’t have to worry about your pick following along, since it only has to strike the string every other note. Now, I’d really love you to use the fourth finger in Fig. 8. It’s so easy to play pentatonic scales with your third finger stretched out for both the three- and four-fret spans, but the goal here is to make your hands work better, and you need to involve the fourth finger. You’ll thank me for it.
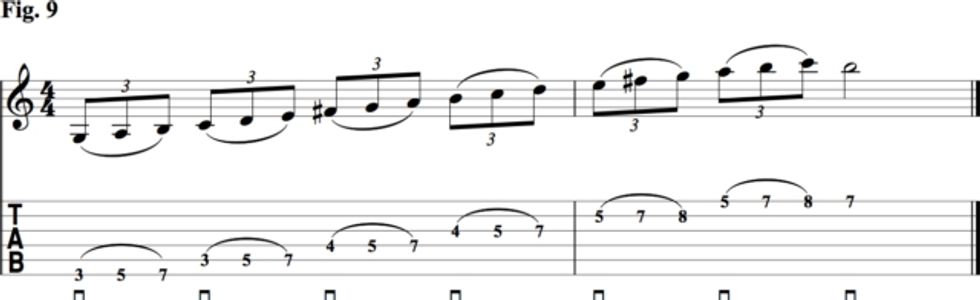
Fig. 9 takes the same idea and applies it to a 3-note-per-string G major scale shape. It’s a nice fluid way to ascend the strings and because you don’t have the hard attack of the pick, it sounds much smoother.
The key to getting a good, clean hammer-on is striking the string just hard enough to make it sound. There’s no need to hit it too hard, as it won’t make it any louder or clearer. Experiment a bit and see if you can control your left hand to hit only as hard as you need. Note: You’ll find that the more distortion you have on, the easier you can hammer and still get a good sounding note.
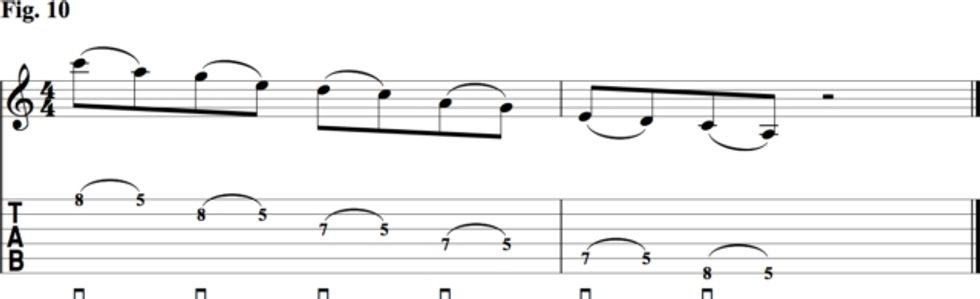
The opposite of a hammer-on is a pull-off, where you pick the first note, but then pull-off from a higher finger to a lower finger. Hammer-ons are for ascending notes, and pull-offs are for descending notes. With that in mind, we can apply this to a pentatonic scale and get the sister lick to Fig. 8 as we descend the pentatonic scale in Fig. 10.
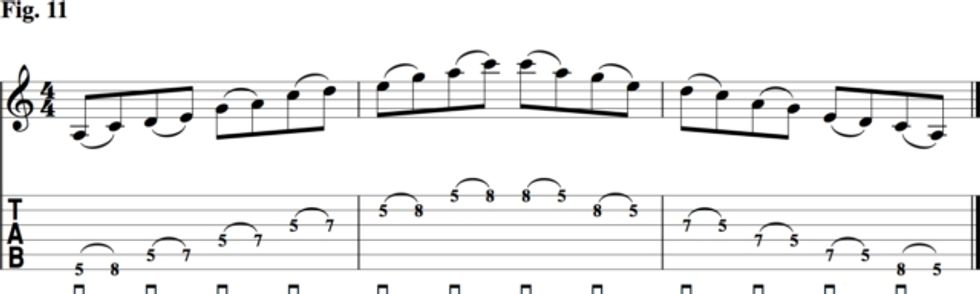
Now, it you combine the two, you can flow up an A minor pentatonic with hammer-ons and down it with pull-offs, like in Fig. 11.
The key to getting a good pull-off is to use an anchor finger. In order to make a pull-of sound good, you’re essentially using the higher finger to pull the note and release it with a snap. The snap is enough to make the note sound, because you’re essentially plucking the string with the higher finger. In order to really get a good snap, your lower finger has to hold the string tightly. It’s impossible to get a good pull-off unless the lower finger (also called the anchor finger) isn’t holding the string down hard enough to stop it from moving. If the top finger doesn’t have a taught or tight string to snap against, you’re not going to get a good sound. Make sure that as you practice pulling-off, you do it with a tight anchor finger.
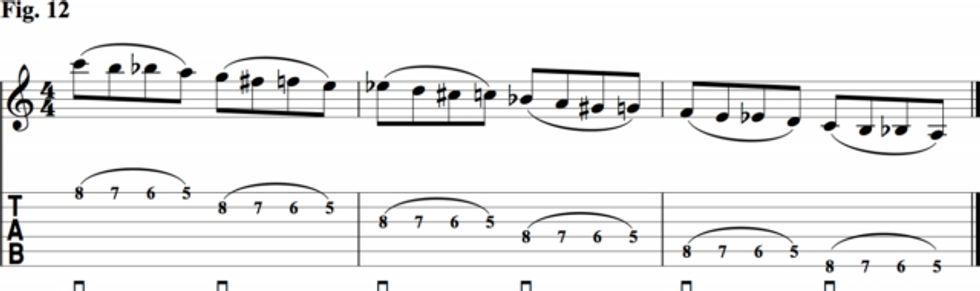
In Fig. 12 each finger gets to be an anchor finger (except the fourth). When pulling off the fourth, the third finger is the anchor, when the third finger pulls off, the second finger is the anchor, and so on. The example looks easy on paper, but it’s harder than it looks. Just like hammering-on, pulling-off uses your pick less often, and has a unique sound that’s more fluid.
Legato Playing
Legato playing combines hammer-ons and pull-offs to create a more connected, smoother sound. Since you’re picking less often than usual, legato playing is all in your left hand. A great legato player is Joe Satriani. Check out this clip:
Check out the amazing legato run starting at 1:38. Watch it a few times and pay attention to each hand. His right hand isn’t doing much other than striking the string occasionally to add some accents. The real magic is in the left hand. He’s hammering-on and pulling-off strongly enough that he doesn’t really need to pick at all. Granted, having Joe’s perfect chops helps, as does rich sustaining distortion, but the net effect is a smooth, linear line that’s not broken up by harsh pick attacks. It’s an amazing sound, and it’s all in the left hand.
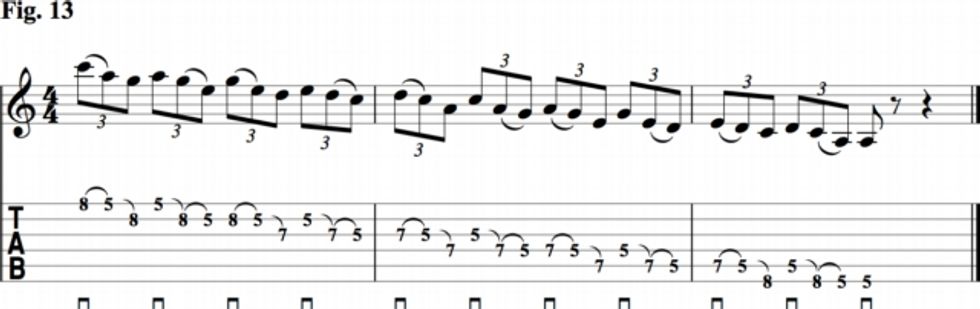
Fig. 13 is one of my favorite show off-licks, because it sounds more difficult than it is. All I’m doing is playing a descending pentatonic scale in a sequence of three-note groupings. I only pick every third note, and that allows me to speed up the left hand faster than I normally would be able to if I had to pick every single note.
We’ve gone over a few really important concepts in this lesson—concepts that should really help your left hand get stronger and more fluid. If you focus on the basic elements that make up left-hand playing, you’ll find it so much easier to work on your strengths and weaknesses. I hope this helps you switch chords more easily, and play more fluid single lines.
Recommended Listening
Allan Holdsworth: When it comes to legato playing and amazing chordal playing, few can top Allan Holdsworth. The track “Devil Take the Hindmost” from 1993’s Metal Fatigue is one of the most amazing displays of guitar playing I’ve ever heard. Rumor has it that Allan deliberately made his picking technique so light that it matched the volume of his hammer-ons and pull-offs, making it so you can’t hear any attack. It’s a flowing sea of notes you can get lost in.
Joe Satriani: Joe can play anything he wants, but most of the time when he hits the gas, he plays legato style, as it’s more fluid. Check out the album Flying in a Blue Dream for some amazing legato playing throughout the album, especially on the title track and on “Mystical Potato Head Groove Thing” at 1:33 into the track for some impressive left-hand prowess.
Stevie Ray Vaughan: Most folks don’t think of SRV as a technician because he’s so amazingly soulful, but he has it when he needs it. Check out his playing on “Little Wing” from Stevie Ray Vaughan and Double Trouble: Greatest Hits, particularly the run at 3:35 for some breathtaking open-position hammers and pulls.
Leo Brouwer: I’ll throw in some classical guitar since it makes such great use of left-hand technique. Cuban composer Leo Brouwer’s 20 “Estudio Sencillos” or “Simple Studies” often sound more like rock music than classical guitar music. It’s no wonder that Randy Rhoads borrowed some themes from Brouwer for some classic Ozzy riffs. Guitarist Ricardo Cobo has a great recording of all 20 studies on an album called Brouwer: Guitar Music Vol. 1. Check out study VII for some rapid-fire left-hand legato playing, study XVIII for some haunting music peppered with hammer-ons and pull-offs, and study XIX for a great finger-independence exercise.
 Marc Schonbrun
Marc Schonbrun graduated magna cum laude from the Crane School of Music in New York. He is an active educator, writer, and performer in the San Francisco area, and has an eclectic performing background that includes classical concertos, jazz trios, and rock bands. An active lecturer, Schonbrun frequently tours the country explaining music technology to players and teachers. Visit marcschonbrun.com for more info.