Chops: Intermediate
Theory: Beginner
Lesson Overview:
• Create simple and meaningful blues phrases in the style of B.B. King.
• Understand how to emphasize chord tones over a blues progression.
• Learn how to use repetition to build tension in your solos.
Click here to download a printable PDF of this lesson's notation.
To my ears, string bending is what defines the sound and expressiveness of the electric guitar. I’ll take any chance I get to bend, pre-bend, or release a note. While I’ve always liked hearing a whammy bar in action, I strangely never enjoyed using it myself. I wasn’t able to develop a taste for the whammy bar early on, mostly because of a frustrating introduction to it on my first real electric guitar, which was equipped with a bar and a locking-nut system, but also came with many tuning and string breakage issues. I quickly unscrewed the bar and gave it up altogether.
As years went by and I started playing professionally, I stuck to my stubborn decision to just not use it unless I absolutely had to—in recording sessions for a really specific sound like dive bombs or over-the-top vibratos. But in recent years, I’ve been working on a few Broadway musicals where the guitar books would require the use of the whammy bar, whether for a slight “rock flavor” or for a full-out “rock-God” effect. While experimenting with the bar during soundchecks, I’ve come to enjoy some of its more subtle, bend-like qualities ... so much so that I’ve started emulating those sounds on my whammy-free guitars. I’ve been incorporating these new techniques in more creative, improvisational situations, and they have become part of my guitar vocabulary now. They offer interesting, alternative ways of using traditional bending techniques.
To this day, I opt not to screw the bar into any of my floating bridge guitars, and this has prompted me to discover new tricks for faking my favorite bar effects.
Here’s what I‘ve come up with.
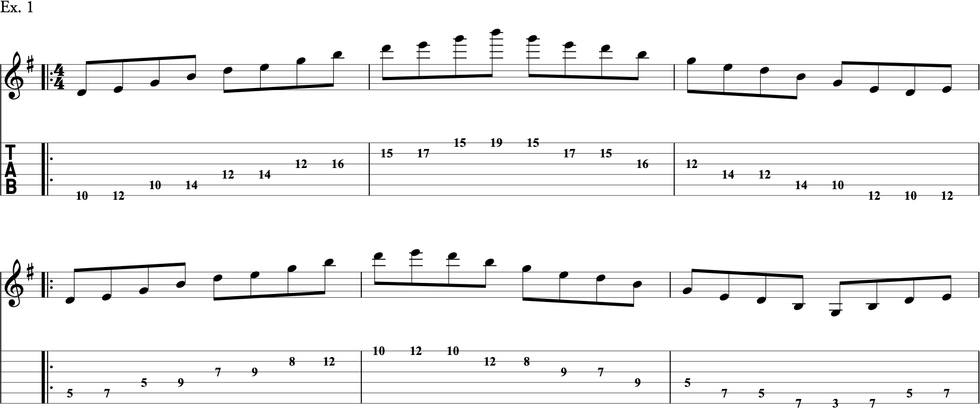
First, get familiar with bending using your first finger, or rather, pre-bending, as most of the concept is based around that technique. Also, get familiar with identifying the closest note below the one you want to hit. In other words, know which note you will be pre-bending from. You’ll notice that the pre-bend doesn’t have to be strict—aim for a sound that is in between bending and pre-bending. Ex. 1 will help you with those ideas, going up a C major scale (C–D–E–F–G–A–B) on the 3rd string.
Click here for Ex. 1
The following lick (Ex. 2) builds on the note repetition that’s present in the previous exercise, an effect that gives the phrase almost a stuttering quality. It introduces a technique you’ll find in subsequent examples, which requires pre-bending (still with your first finger) immediately from the note you’re pulling-off to, then releasing. It’s a quick, but effective combination. Check it out!
Click here for Ex. 2
Let’s take the same idea, but move the bend around to different strings (Ex. 3).
Click here for Ex. 3
In Ex. 4, we mix and match by implementing half-step pre-bends, whole-step pre-bends, and note repetition on different strings. This works great in blues situations.
Click here for Ex. 4
Now that you have a good grip on the technique and the sound in your head, let’s look at another emulation of the bar that’s going to require some sliding before the pre-bending. It usually works great to slide dramatically and create a phrase with wide intervals. Additionally, you won’t have to use your first finger for bending, as this is closer to a traditional bending technique. I favor bending with the third finger, with the second finger right behind it for support and extra strength. Ex. 5 uses an ascending slide before pre-bending three half-steps, releasing it, then sliding up some more to a whole-step pre-bend and release.
Click here for Ex. 5
Ex. 6 includes a descending slide with a whole-step pre-bend and release, and then throws in a final first finger pull-off/pre-bend/release for good measure.
Click here for Ex. 6
For the grand finale, here’s a mashup of all the approaches we’ve discussed wrapped into one gigantic lick.
Click here for Ex. 7
Limitations are often inspiring, and these techniques are a prime example of hearing a sound and reproducing it with only the tools you have—or the tools you allow. I predict that your first finger is going to suffer a bit initially while you build new calluses, particularly if you use heavier string gauges. (I play an .011-.052 set, and I still have to earn it.) Have fun exploring those new territories, and try to incorporate these tricks into your playing. Maybe they’ll inspire you to search for other roundabout ways to replicate interesting sounds.
And no, I still don’t own a guitar with a Floyd Rose.


