In last month’s column [“Building a Mix,” December 2013], we focused on the prep work for building a mix in our DAW. We discussed organizing tracks, setting up some basic busing, color-coding tracks, and establishing a “ground zero” mix state (meaning all the faders are pulled down to zero and the pan controls centered). This month, let’s continue to get our mix ready for prime time.
Stop the Bleeding
When the mix is basically prepped, I like to listen to all the tracks individually and check them out for things that may become problematic later in the mix process. I’ll usually start with the drums and bring up the kick drum first. I want to evaluate the quality of the recording by looking for things like noise, clipping, and distortion. If there is a lot of noise or bleed from other instruments on the kick drum, I may go into the edit window at this point and start to “clean” the track, meaning cutting out the large spaces between kick-drum hits where unwanted sounds are apparent.
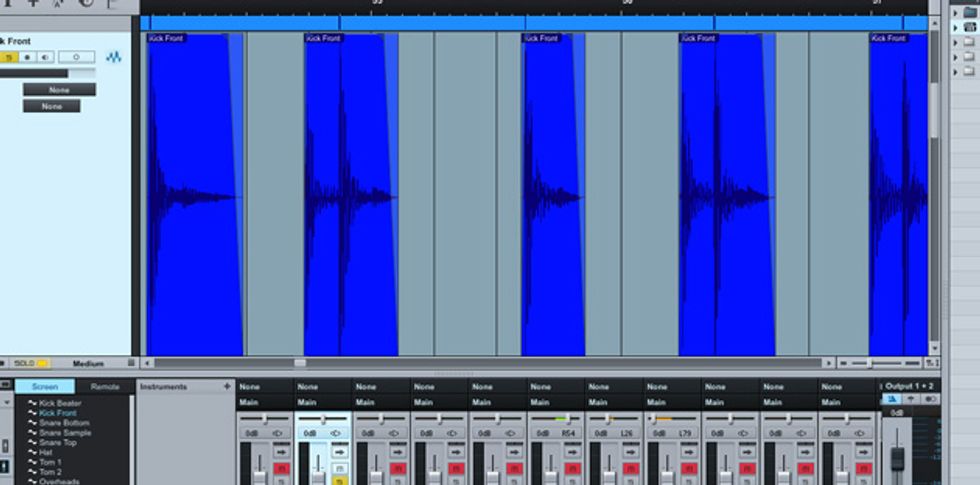
Fig. 1 shows a kick-drum track, where the microphone was placed in front of the kick. The tall waveforms are the drum hits. The shorter hits between the tall hits are bleed from the snare, toms, hi-hat, and cymbals. In this case, the bleed is pretty significant and may be interfering with the overall sound of the kit. Such bleed can create phase-cancellation issues and change the tone of the other drums.
Fig. 2. This shows the same kick-drum track after “cleaning” the unwanted bleed from
other drums between the kick-drum hits.
To help clean this up, I simply used the track-editing tools in my DAW to cut out the bleed between the kick drum hits as shown in Fig. 2. This may be a slow process for you at first because you have to be careful not to cut away desired portions of the kick with overzealous editing, but you’ll get better with practice. Keep in mind you don’t have to cut out every single bit of bleed: Let the kick drum ring out and cut away the bleed that falls in the empty portions of the track between kick hits.
When there is significant bleed, I’ll typically do this sort of cleaning on the tracks for the kick, snare, and toms. I usually don’t clean the hi-hat, overhead, or room mics (if there are any) in this way. The hi-hat often plays too constantly to effectively clean, and the overhead and room mics are supposed to capture the overall kit, so it really doesn’t make sense to cut particular parts out of them in this way.
Do you have to do this sort of editing? Absolutely not. But you should evaluate your tracks, determine how they’re intended to sound, the amount of bleed present, and if there are phase or other problems resulting from the bleed. When done properly, this sort of cleaning can greatly enhance the clarity of drum tracks. Also keep in mind that there can be other instruments bleeding into the track if you’re tracking multiple players at once without isolation between them. You may find that the bass guitar is getting into all the drum tracks, electric guitar is getting into some tracks, and so on.
Helpful Track Cleanup Tips
- Solo the track that you are editing so it’s the only one you’re hearing. This helps you focus.
- Listen back to your work frequently to ensure that you aren’t overdoing it and cutting away desired material.
- It might be wise to make a copy of the track before you start to edit. This way you can A/B and make sure you’re actually making things better with your edits. (Sometimes things will sound more natural with no cleaning.)
- Add a very short fade-in and short fade-out to each edited region on the track (sometimes called a clip, depending on the DAW). This will prevent small but audible clicks and pops during playback.
Filtering for Cleanliness
If other instruments are getting into your track, filters can help clean things up too, whether it’s the bass or guitar bleeding into drums, or even cymbals bleeding into the snare or kick tracks. There are two types that are used for this purpose: low-pass (sometimes called “high-cut”) filters, which allow everything below a certain frequency to pass, and high-pass (sometimes called “low-cut”) filters, which allow everything above a certain frequency to pass. To cut out cymbal bleed, use a low-pass filter. To cut bass bleed out, use a high-pass filter. The trick here is to set the filter frequency properly. You want it low or high enough (depending on the filter type) to allow the desired material to pass through unaffected, but also set so that unwanted material is filtered out.
You can usually find low-pass or high-pass filter settings in EQ plug-ins. By listening carefully as you dial in a filter setting, you can remove a large amount of unwanted frequencies without affecting the desired material.
Next month, we’ll continue our quest for a great mix. See you then!


