Chops: Intermediate
Theory: Beginner
Lesson Overview:
• Understand how to create and
develop musical phrases.
• Learn the difference between
a concept and a motif.
• Create a large phrase vocabulary
to use when the spotlight
is on.
Click here to download sound clips from this lesson's notation.
Every guitarist should know the importance of a large vocabulary. You want to emote—you want to “speak” through your guitar in any given situation. That takes a vast, memorized database of licks that you’ve accumulated and rehearsed a million times. Or does it?
I’m a big advocate for preparedness, so I say “Yes!” You should be writing at least one lick a day, playing it all over the neck in various keys and grooves, and—most importantly— working it into your improvisations. Did that lick “stick?” When you write a lick tomorrow will you remember this one? I hope so, but realistically, I doubt it.
You see, we simply don’t remember most of the licks we write. My suggestion would be to record them and classify them by genre and revisit them as situations arise. Every lick you write is progress and some of them inherently will stick, but most won’t. So how do we avoid the following all-too common situation?
You’ve got a gig. You’ve rehearsed plenty. All your friends are there. The hot chick in the front row is giving you “you’re a rock god” eyes (assuming you’re not playing an instrumental gig). Your amps are finally fired up to the level they’re supposed to be. The downbeat drops and whoosh! Crickets. What little vocabulary you mastered is seemingly gone with the wind like the sound guy’s burrito from last night. Ugh!
We’ve all been there. But how do we avoid this situation while working on our vocabulary? We develop methods to deliver creative, stylish, and musical ideas on the fly as if these ideas have been part of our vocabulary for years. How do we do this seeming miracle of musical mastery? Remain calm. It’s not that hard. The answer is two fold: concepts and motifs.
Concepts
For our purposes, we’ll define a “concept”
as a combined execution of technique,
rhythm, phrasing, and dynamics. These are
the basic building blocks of anything cool
and stylish in music. We can further define
these concepts by adding in direction of play
using patterns, shapes, or linear lines.
Simply put, here’s how to build a concept: Think of a technique, throw some appropriate rhythm and phrasing (musical punctuation) on it, then add in “feel” through the use of dynamics. Easy enough right? It should be. But it’s these basic musical elements that we seem to forget when we step into that performance situation. It’s not a bad idea to write down “concept = technique, rhythm, phrasing, dynamics” and keep that in front of you just as a reminder to stay musical! Now that we understand what a concept is and how to keep it in mind, let’s hand some to the audience on a silver platter through the use of motifs.
Motifs
A motif is a repeated concept. Simple as
that. How do you create a motif? Take your
concept, repeat it at different parts of a scale
via patterns, shapes, or directions (linear,
diagonal, cross-fret), and voilà! You’re playing
a lovely, creative, musical line that wasn’t
pre-meditated but still sounds “vocab.”
All we need to have in our minds (in real time) are those creative concepts. That’s it. Then, through the wonderful and often overlooked power of repetition, we link those concepts to create as long a musical line as we want. Think of building a chain. The concepts are the links. You can add (repeat) links as much as you want to build as long a chain (motif ) as desired. Our minds aren’t filled with those specific, memorized licks, only the concepts. That’s how we can create awesome lines on the fly and why our improv can get better in no time!
Okay, enough chit-chat: Let’s put hand to fretboard and bring this all to life.
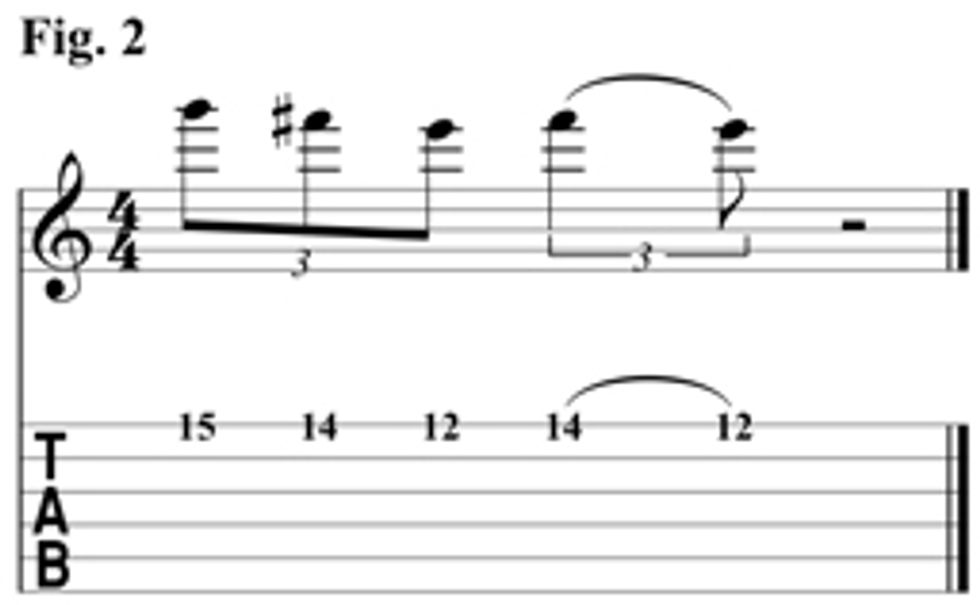
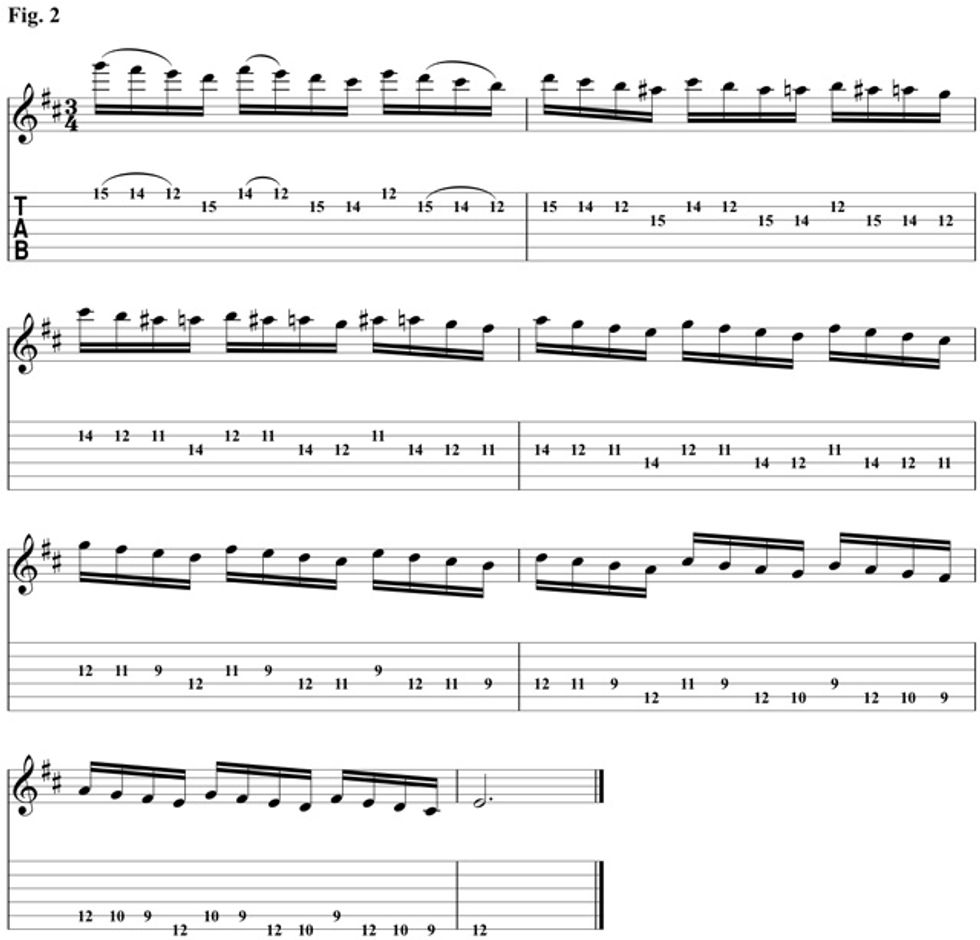
First, let’s think of a concept. Let’s pick some details, like key and quality. How about G major (Fig. 1). We’ll pair a tripletphrased rhythm with alternate picking and a pull-off. We’ll play with three notes per string, but repeat them in our phrase, thus having five total attacks on that string. It’ll sound something like Fig. 2.
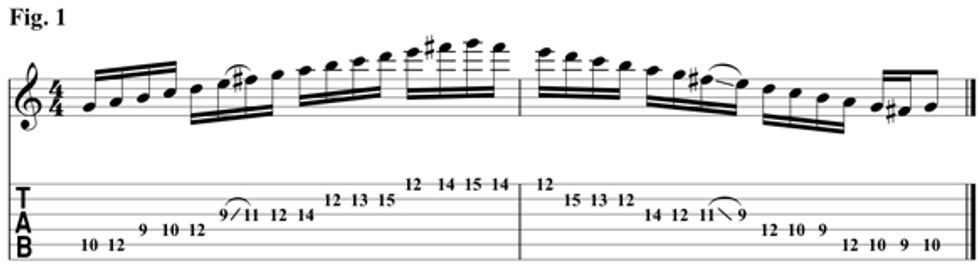
Let’s further define the concept by simply choosing a direction or path to play on. You can use the shape of a favorite pattern, a linear line up and down a string, a diagonal path, or any combination thereof. Let’s play down a diagonal path that will start on the 15th fret on the 1st string and go as low as the 9th fret on the 5th string.
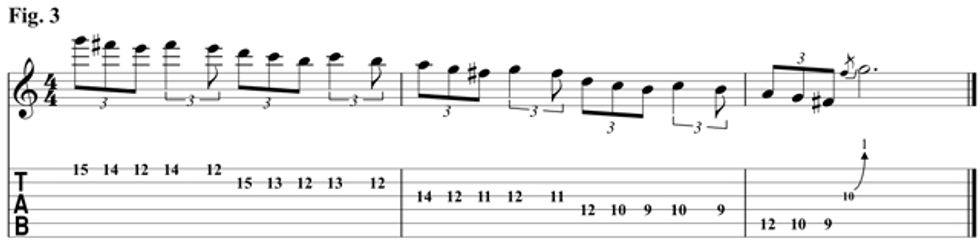
Now all we do is play the concept on the path, and we’re playing our motif. This divine musical combo produces our onthe- fly, creative, musical line that seems like something out of a practiced vocabulary. Woo-hoo! For our purposes today, I’m going to keep things diatonic (all in the key of G major). Here’s the final result in Fig. 3. You’ll notice the bend to finish the line. Something different is always nice to break up the repetition of a motif.
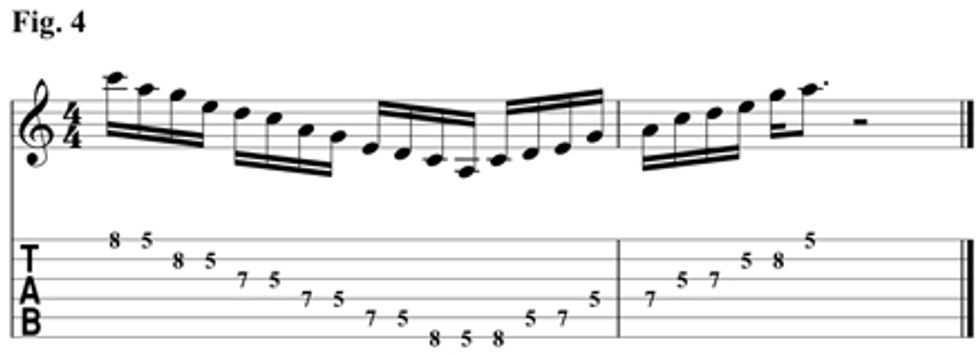
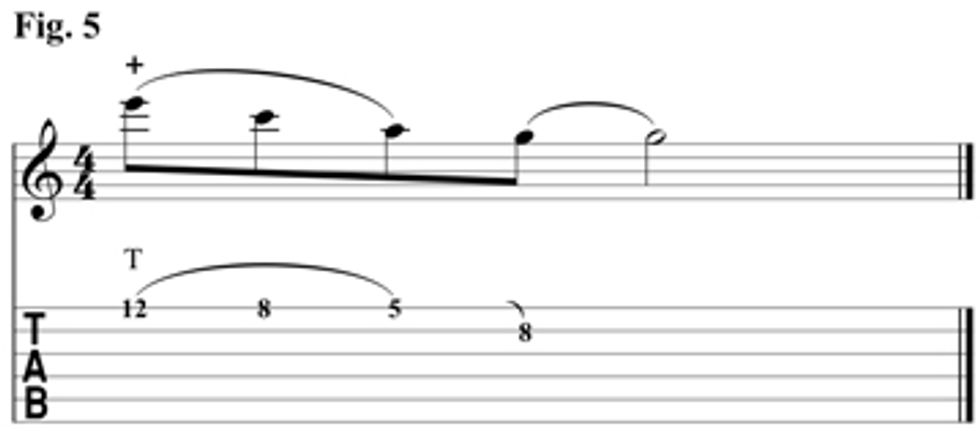
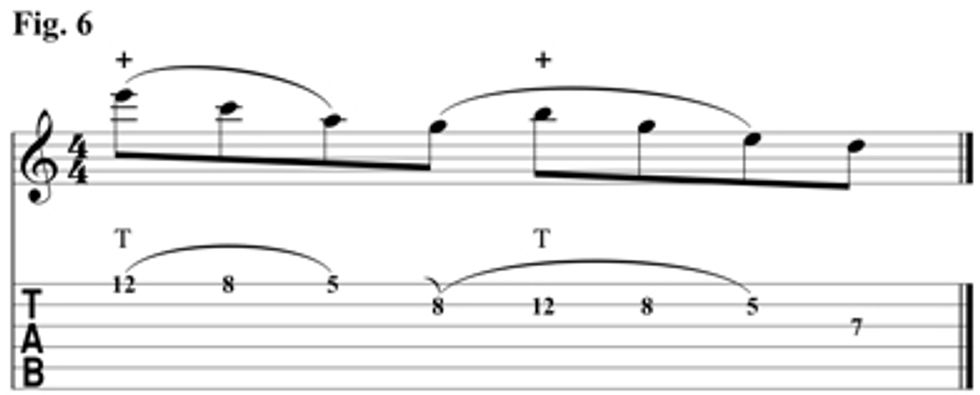
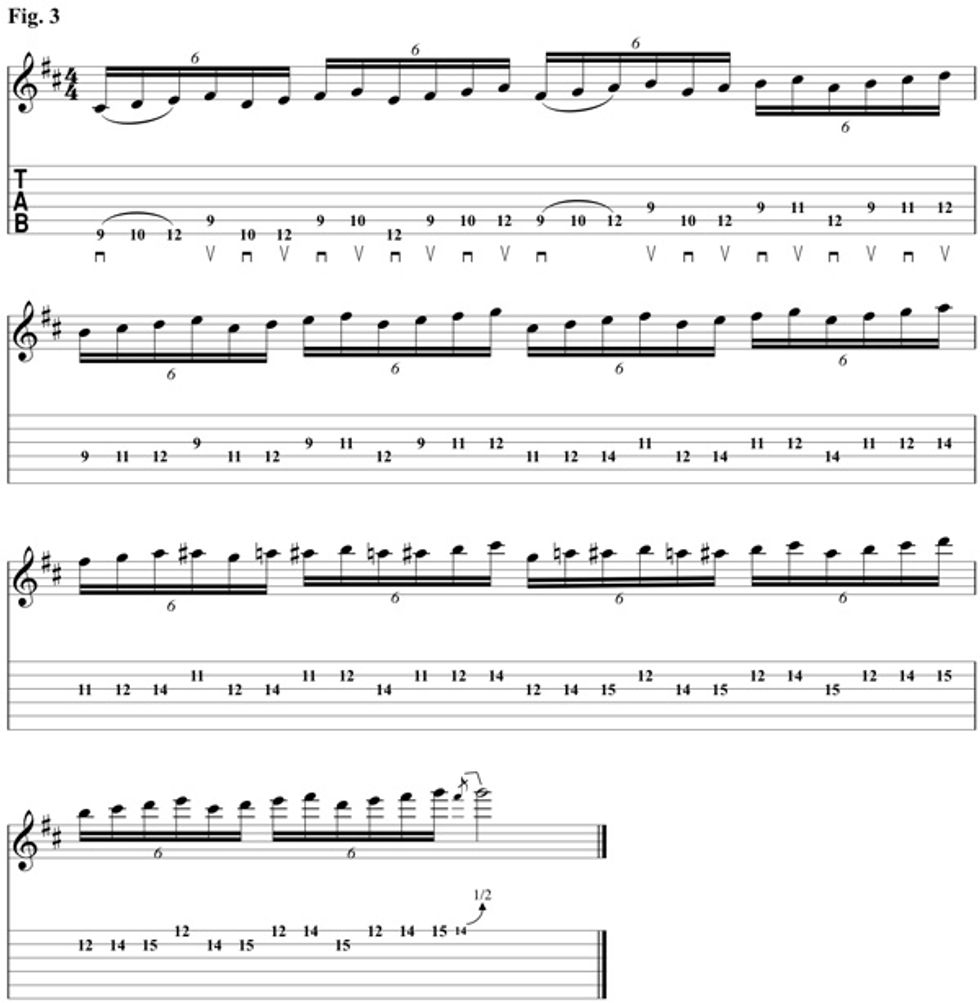
Let’s do one more example. Again, first create a concept. For this one, we’ll use A minor pentatonic as our key and tonal quality. Check out Fig. 4, otherwise known as the “E” shape from the CAGED system. Let’s pick tapping as our technique and we’ll play it with a simple 16th-note rhythm. Now let’s add direction. Our fretting hand is going to play the pattern across the neck from high E to low E. Our tapping hand is going to tap straight across the 12th fret in the same manner.
Now let’s phrase it. We’ll tap on E, pulloff to C, pull-off again to A, and then use a “hammer-on from nowhere” to tap on the G found on the 8th fret of the 2nd string (Fig. 5). That’s our complete concept. Now, we’re going to simply take that concept and move it down one adjacent string at a time, remembering to play in the pattern with our fretting hand and straight across the 12th fret with our tapping hand. Let’s add the adjacent string and we get Fig. 6. If we keep adding on adjacent strings, we get our motif in full (Fig. 7), again creating a great, musical line developed on the fly by just thinking of one cool concept and then repeating it.

So there you have it. We know a vocabulary is essential, but being able to improvise and create lines in real time is paramount. The truth is that in a performance, it’s about 30 percent vocab and 70 percent on-the-fly ideas. Yes, 70 percent is a big number but hopefully, with the methods I presented today, filling your 70 percent will become creative, musical and fun.
 Dave Weiner has spent the last
13 years touring the world with Steve Vai. He
also teaches at Musician’s Institute (where he
was once a student) and is the creator of Riff
of the Week, one of the premier online guitar
education websites. For more information,
visit daveweiner.com.
Dave Weiner has spent the last
13 years touring the world with Steve Vai. He
also teaches at Musician’s Institute (where he
was once a student) and is the creator of Riff
of the Week, one of the premier online guitar
education websites. For more information,
visit daveweiner.com.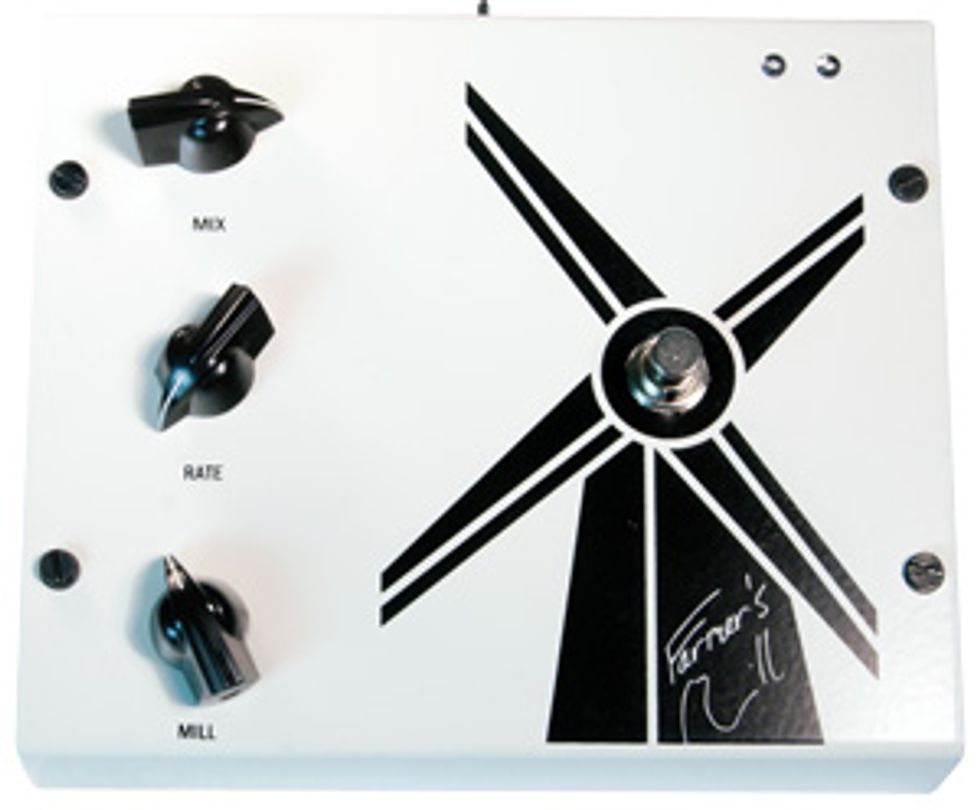
Sometimes, in the quest for buttery, singing, and perfect diamond-like tones, you can forget about the twisted potential of stompboxes, how beautifully demented their creators can be, and what a delightfully varied art form music is in the first place.
Consider the Crushsound Farmer’s Mill. This is a stompbox born of motivations most traditional guitarists would consider bizarre. It unapologetically exists—in part—to create the sound of your cable or jack crapping out. And if at first that sounds like a waste of your hard-earned cash, few would fault you. But the Farmer’s Mill is a thoughtfully executed and wellbuilt piece of gear that digs deep into the artistic notion of creation through destruction. And no matter where you stand on that particular aesthetic gesture, for musicians that live comfortably outside convention and willingly incorporate more chaotic sounds into their playing, the Farmers Mill can be a surprisingly powerful musical tool.
Set to Destruct, Indestructible
The Farmer’s Mill is a very cool, thoughtful,
and downright lovely piece of stompbox
design, which is no surprise given that
architect Jedrzej Lewandowski (check out
his “House on the Water” super-villain lair/
fantasy pad) is a part of the brain trust that
conceived the pedal. The thing is a rock—
built with thick, unbending steel that rings
like a church bell when you tap it on the
bottom panel. Considering that this is a
pedal that’s likely to be used in chaotic stage
situations, that’s a good thing. Apart from
flinging it from a fifth floor apartment window,
it will take a lot of effort to do damage
to this pedal. It’s also a good-looking pedal.
The footswitch is situated in the center of
a stylized windmill graphic, while the three
chicken-head control knobs are stacked
vertically along the left edge—spaced far
enough apart to switch on the fly.
Manipulating the controls is relatively intuitive once you get a handle on how the pedal works. But keep in mind that the controls enable you to manipulate some very unusual effect parameters. Mix is the most straightforward, and permits you to balance your straight and effected signal. The rate knob is where things start to get more esoteric, but essentially it determines the frequency with which the crackling, broken effect kicks in. The mill knob is actually a four-position switch, and it increases the intensity of the effect as you move it clockwise. The footswitch—rather than a click-it-and-forget-it type switch works only when you hold it down—an indication, perhaps, of how judiciously you’ll want to use this effect.
Parts Unknown
You have to approach the Farmer’s Mill
with an open mind. But what really helps is
a dose of punky, irreverent, smash-’em-up
attitude. To start, go to YouTube and check
out a young Pete Townshend assaulting
his Rickenbacker and stacks on “Anyway,
Anyhow, Anywhere”—it’ll not only fire you
up appropriately, but it’ll offer important
clues to how to best use the Farmer’s Mill.
I set the pedal up on the tail end of a chain of fuzzboxes and just before an analog delay with a feedback-ready rig of a cranked blackface Tremolux and a Rickenbacker 330—and taking a cue from Pete—launched into the barrage of hanging 1st position and power chords that makes up the Who’s “Circles.” With the mix and rate at high noon and the mill switch in its second-most intense setting, the Farmer’s Mill became great punctuation for big-lingering chords—especially when I threw in some switch toggling to add to the anarchy. It would be easy to dismiss such use of the Farmer’s Mill as mere theatre—and to be sure, throwing the effect on is an attention grabber. But there’s a real musicality to the way the Farmer’s Mill sounds in this context—and if you thrill to the sounds of Townshend’s auto-destruct assaults or the raw, unbridled aggression of punk and garage, the Farmer’s Mill has a knack for adding a clues to how to best use the Farmer’s Mill. sweet drop of adrenaline on top, and at high volume, the thrilling sensation that the whole house is about to come down.
The Mill works well with different flavors of low-to-medium gain fuzz and buzzing ’60s-style fuzz tones. And switching quickly between fuzz voices created a cool compound chaos that could be thrilling, were it not for the effort it took to keep the Farmer’s Mill bypass switch depressed while activating different fuzzes. And this is one situation where the otherwise cool intermittent switch setup became a considerable limitation.
Ratings
Pros:
Rock solid and artfully designed.
delightfully chaotic. Great studio tool.
Cons:
Very expensive.
Tones:![]()
![]()
![]()
![]()
![]()
Playability/Ease of Use:![]()
![]()
![]()
![]()
![]()
Build:![]()
![]()
![]()
![]()
![]()
Value:![]()
![]()
![]()
![]()
![]()
Street:
$359
Crushsound
crushsound.com
At more extreme settings, the Farmer’s Mill is great for more experimental expressions. And it’s a great texture to have on hand in recording situations. I mixed a few tracks of detuned chords subjected to the Mill’s more aggressively crackling fourth position into a sort of melodic, musique concrète-styled sound collage—which added a touch of dread and menace not unlike the haunting sound of Thurston Moore’s dying amp on Sonic Youth’s “Providence.” More adventurous applications aside, though, the Farmer’s Mill gets a lot less practical at these extreme settings— especially when you dial the mix way up. And if you are using this pedal in more conservative settings, it might be best to reserve use for a really big finish or the more controlled environs of the recording studio, where this pedal can be a real asset.
The Verdict
Most tone purists and traditionally minded
players won’t find much use for the Farmer’s
Mill, in fact, chances are that many will
find it downright repellent. But guitarists
who live on the experimental side of
the fence and understand and value the
expressive side of sonic chaos will relish the
potential of what the Farmer’s Mill can do.
While radical at its core, it can be dialed
back to be very effective and highly musical
when used judiciously. And if it’s pure bedlam
you’re looking for, the Farmer’s Mill is
more than willing to take the ride.
A few modifications—like a set-and-forget switch and an expression pedal option for the rate control—would make the pedal even more usable. But the Farmer’s Mill really is about surrendering control for your sound to some extent, which can be a very powerful creative gesture. It’s fun to imagine the wildly varied and new music that can emerge from that mindset, and it’s reassuring to know that madmen are building pedals like the Farmer’s Mill to make such music happen.
Chops: Intermediate
Theory: Beginner
Lesson Overview:
• Overcome the “major third”
tuning barrier.
• Create lines that use a threeover-
four pattern.
• Combine the Dorian mode
and blues scale to craft
exotic phrases.
You’ve probably heard the phrase “stumbling block” before. In my experience, a block is just one of many things that can be stumbled on. Guitar cables, bedposts, my own shoes, uneven sidewalks, and maybe worst of all …
The major third tuning between the 3rd and 2nd strings.
Just when you find yourself in a nice comfortable scale sequence, the transition between those two strings can leave your fingers in an unexpected tangle. Let’s take a look at one of these potentially tangled-up phrases and find some solutions.
A common pattern that many musicians use is the descending “four.” You play four consecutive notes in a descending scale. Then you start on the next lower step and do the same thing, and keep that pattern going until you reach some sort of bottom.

Yngwie Malmsteen and Michael Schenker are both masters of this pattern, and they tend to play it on a single string (usually the high E string). The good part about staying on a single string is that you don’t have to deal with any kind of jumping to the next string. So the intervals between the strings become a non-issue. The only drawback is that the length and range of the phrase is limited. The “bottom” doesn’t take long to reach. Yngwie and Michael usually solve this by making the transition to a different pattern that easily allows them to travel to the next string. And that is a solution that absolutely works. Check out Michael’s solo in “Mother Mary” for a perfect example of this.
But what if you really want to keep this four pattern going?
Let’s begin by playing a short version of it that uses two strings in Fig. 1.
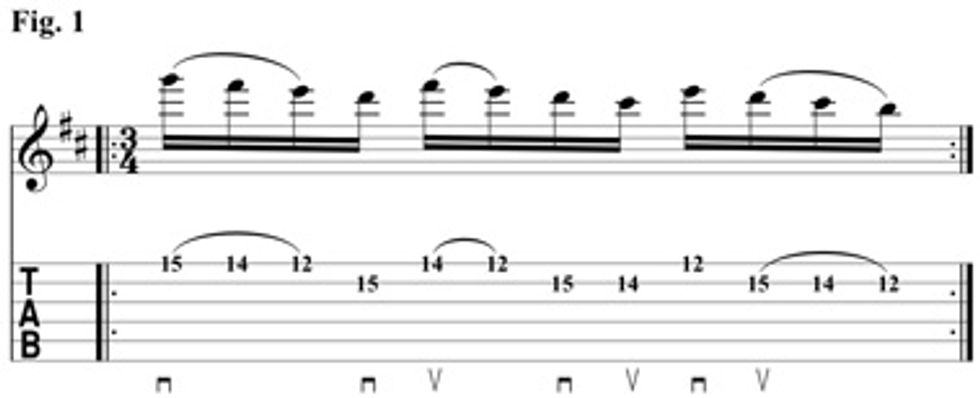
My goal is to eventually play this at blinding speeds, but without having to “muscle through” it. So please take a close look at my suggested combination of picked notes and pull-offs. The pull-offs give your right hand some quick breaks, and it makes the overall sound of the lick a bit friendlier as well. It may take some time to program your picking hand not to pick everything, but just slow the lick down and take it in small sections until you can put the whole thing together and play it comfortably.
Now that you can play this first phrase, let’s take another look at what it actually is. I like to think of it as a nice self-contained set—three groups of four on two strings. That’s it. Now we’re ready to build it into something bigger in Fig. 2.
This lick starts exactly the same way as the last one. But then it keeps going and going! The fingerings occasionally change from the original version to keep things within the Dorian-blues sound. And in the interest of keeping a consistent picking and pull-off pattern, I took some liberties with the starting notes of the pattern. But when you play through it, I think you’ll see the method to my madness. The resulting sound is a satisfying and very long set of descending fours, with the potential to be very fast. And without the usual 2nd-to-3rd-string tangle-ups.
Finally, let’s look at reversing this pattern and doing a version with ascending fours in Fig. 3.
This pattern is based on 16th-note triplets, instead of straight 16ths. Why? It just naturally started to sound like that when I played it, so I decided to keep it that way. And I like the four-played-against-three feel that happens in this case.
Again, please pay close attention to which notes you pick and which you hammer-on. Having those small breaks for your picking hand will make a huge difference in how quickly you can play the lick, and how relaxed you can be with your technique. If you want to play Queen’s “Sheer Heart Attack” with all downstrokes, you’ll need some muscle. But these facemelting fours require very little punk power. It’s just a matter of practicing to get the strokes right.