Andy’s axe!
The Police guitarist’s go-to guitar is the source of a few mysteries, so let’s crack the code.
Hello and welcome back to Mod Garage. In this column, we’ll take a closer look at the wiring of Andy Summers’ famous Telecaster, as well as some of the many mysteries of this guitar that remain unsolved today.
Best known as the guitarist from the Police, Summers was born and raised in England. He picked up the guitar at a young age, and moved to London when he was 19, aspiring to become a professional musician. Eventually, he played with some legendary bandleaders, including Eric Burdon and Jimi Hendrix. Summers studied classical guitar and composition in Los Angeles at California State University, Northridge, graduating in 1972. After moving back to London, he played with Joan Armatrading, Jon Lord, Mike Oldfield, and many more before meeting Gordon Sumner (aka Sting) and Stewart Copeland and joining the Police in 1977. The rest, as they say, is history.
The guitar Summers is most associated with—and which you can hear on a lot of the band’s hit records—is a well-worn and heavily modified sunburst Fender Telecaster. Let’s dive into what makes it so unique.
The story goes that before returning to the U.K. from Los Angeles, Summers bought this Telecaster from one of his guitar students for $200 (approximately $1,420 today). It was already highly modified, and Summers instantly fell in love with it. Modifications included a brass nut and brass bridge plate with six individual brass saddles. The bridge pickup was installed directly into the body and there is a humbucker in the neck position, plus it had a phase switch on the bridge pickup and an additional third pot and switch controlling its active boost circuitry. The only mod Summers did on the guitar after receiving it was installing replacement Schaller tuners.
Summers has stated that the guitar is from 1961, although, because of the double binding on the body, it’s quite possibly a sunburst Telecaster Custom from 1963. The serial number on the neck heel indicates 1961, suggesting Fender may have used pre-produced necks from an earlier batch for the first run of Telecaster Customs in 1963. Or maybe it was a custom order from someone who wanted double binding in 1961? Dennis Galuszka from the Fender Custom Shop was the lucky guy who had the pleasure of taking the original instrument apart to closely study it while collecting info for the Tribute series. In September 2024, he told Guitar World: “If I had to guess, it looks like the neck came off a ’50s Tele because it actually had a little white blonde paint—like they used on ’50s Teles—left on the butt. But the neck pocket had no date written or stamped on it, which was weird. And the body has been routed out so much under the pickguard that all traces of a date are long gone.” There are no records at the Fender factory that can shed any more light on this, so it will remain a mystery—but not the only one.
Putting a neck humbucker on a Telecaster was nothing too special at this time; same goes for the phase switch. But while brass hardware had become a popular mod to many guitars by the mid-to-late ’70s, it wasn’t something that was common on Telecasters (or on Fenders in general), making the brass nut and bridge plate unusual.
Another mystery is the active booster circuitry inside this guitar. When the Fender Custom Shop released the Masterbuilt Andy Summers Tribute Telecaster in the mid 2000s, it was equipped with the mid-boost circuit from the Eric Clapton Strat. This circuit first debuted in 1983 in the Fender Elite Stratocaster, 10 years after Summers received this Telecaster. So the circuit used in Summers’ Telecaster must have been a different one. Keeping the timeline in mind, it’s likely that it was one of the many treble-boost circuits from this era—maybe something like the Dallas Rangemaster, EHX LPB-1, or something similar with a single-pot boost control. Or maybe it came from a cannibalized stompbox or was a home-brewed device ... again, this will remain a mystery. My personal guess is that the original circuit in the guitar stopped working after 1983, and one of the guitar techs had to replace it. Maybe Summers was not interested in those details, and as long as there was a boost available, he didn’t care what was going on under the hood.
Belt-buckle rash? A bit.
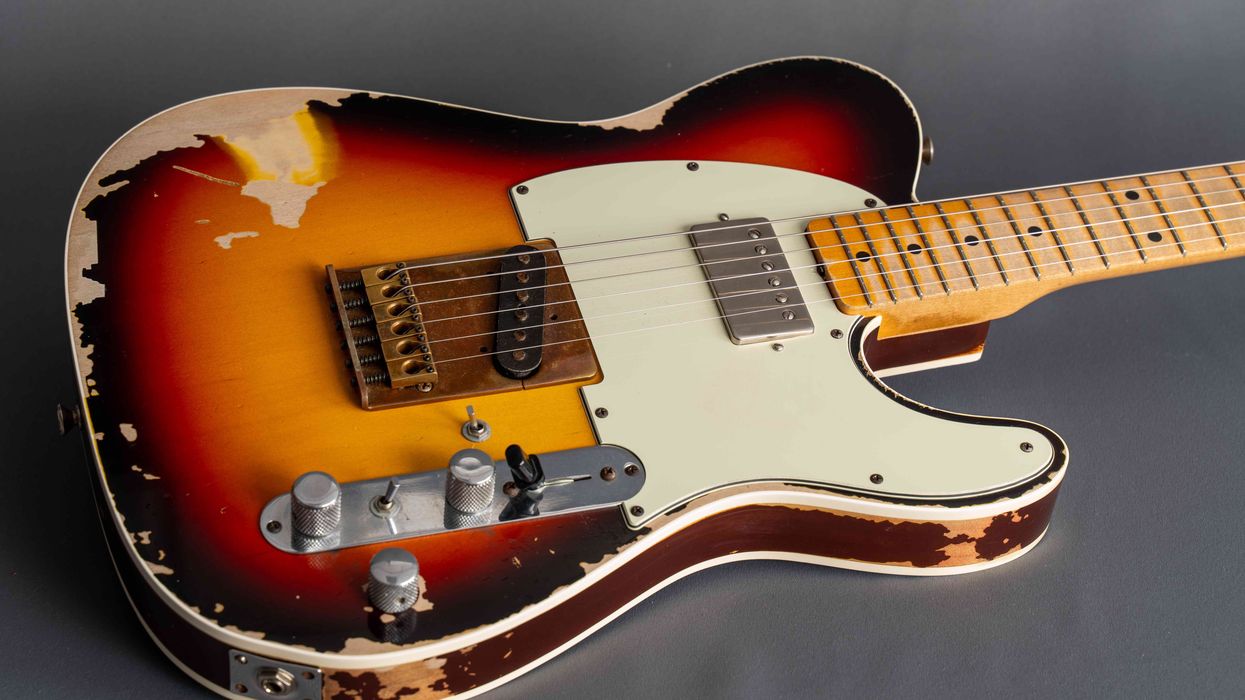
Photo courtesy of Ten-Guitars (https://ten-guitars.de)
Another mystery is the identity of the student who he purchased the guitar from. Summers has never shared their name, and we don’t know who modded it. Interestingly, in all those years, no one ever spoke up to earn the credits for this modding work. This alone fuels speculation as to who really did all these mods.
Now, let’s take a look what features this guitar has:
• 2-piece alder body, white double binding, 3-tone sunburst finish
• Quarter-sawn maple neck, C profile, 21 vintage frets, 7 1/4" fretboard radius, brass nut
• Scale length 25 1/2", width at nut 1.650"
• Brass bridge plate with six individual brass saddles
• Schaller M6 tuning machines
• Two butterfly string trees
• Rectangular jack plate held by only two of four screws
• 3-ply mint green pickguard with ’59 PAF humbucker in the neck position and ’60s Telecaster single-coil pickup directly mounted into the body
• Standard Telecaster 3-way pickup selector switch with modern wiring: bridge/bridge + neck in parallel/neck
• 250k master audio volume, 250k master audio tone controls
• Mini-toggle phase switch for the bridge pickup on the control plate
• Extensive routing on the back housing the active boost circuitry, 9V battery, and the additional third pot for controlling the amount of boost, all covered with a homemade backplate out of 3-ply black pickguard material
In the next installment of this column, we will break it down piece by piece, talk about the wiring, and how you can build your own Andy Summers tribute Telecaster, so stay tuned.
Until then ... keep on modding!
Fig. 1
In my guitar shop, players often ask about how to improve the tone in a Tele neck pickup. Here are several ways to address it, including a pickup wiring that removes the tone load in the neck pickup’s switching phase, resulting in a slight high-end boost.
Hello and welcome back to Mod Garage. This month, we’ll continue our “no tone control” journey from last month [“Mod Garage: The Scott Henderson S-Style Wiring”] with a cool mod for your Telecaster. Something I hear a lot in the shop is that people aren’t happy with the tone of the neck pickup in their Telecaster. It’s often described as muffled, colorless, lifeless, or similar. Why is this? It’s usually a mixture of three things:
1. The physical location of the neck pickup. You have the same issue on every electric guitar, no matter if it’s a Telecaster, a Stratocaster, a Les Paul, or whatever else. The neck pickup has the warmest tone of them, which is the physical nature of the beast.
2. A standard Telecaster neck pickup has a closed metal cover that’s attached to the pickup’s ground to add some shielding. Because the cover is closed, a good portion of high end will be drained to ground because of eddy currents, even with a thin German silver metal cover.
3. Interestingly, the neck pickup of a Telecaster is often adjusted way too low from the strings for whatever reason. Some players told me that they hit the metal cover with their plectrum, so they adjusted it deeper to get it physically out of the way.
So, let’s see what can be done to address the above problems regarding a Telecaster neck pickup.
Physical location: We can’t outsmart physics and we can’t change the location of the neck pickup inside a Telecaster, so there is nothing we can do here.
Metal cover: We have several possibilities to enhance the tone of the neck pickup. One option is to simply replace the metal cover, which will change the tone noticeably, similar to how moving a carpet or rug away from your amp changes the sound. On the other hand, you lose the shielding abilities of the metal cover. A good compromise is an open-frame pickup cover in the shape of a rectangle with an open top, to break eddy currents. This will enhance the tone while still providing some shielding.
Another solution would be to swap the pickup with a Stratocaster pickup or whatever pickup you like best. But this is not as easy as it sounds. Other pickups have other dimensions, and you will need to reroute the pickup cavity in the body as well as the opening in the pickguard to make them fit. There are a lot of replacement pickguards available that already have such routings for a Strat pickup, so this is not really a problem. A good compromise is a replacement pickup in a Telecaster neck pickup size that offers a different construction under the hood, like the Lollar Royal T Neck that is a Stratocaster-style neck pickup in a Telecaster shape. These are 1:1 ratio replacement pickups, so you don’t have to struggle with new pickguards and routing the Telecaster’s body.
"One option is to simply replace the metal cover, which will change the tone noticeably, similar to how moving a carpet or rug away from your amp changes the sound."
Pickup height: This is super easy to solve: Simply adjust the pickup closer to the strings. The closer the pickup is to the strings, the more high end and volume it will have. We measure the pickup height from the top of the pickup magnet to the bottom of the string while the string is pressed in the last fret with the guitar in playing position. A good starting point for a Telecaster neck pickup is 3.5 mm (9/64") on the low E string and 3.0 mm (1/8") on the high E string. Start with this and listen to what happens when you change the pickup-height adjustment until you find the tone you like best.
I recommend adjusting pickup height first and hear if this does the trick for you. If not, continue with swapping pickup covers or pickups.
As you can see, there are many ways to address the muffled tone of a Telecaster neck pickup if you don’t like it. Here’s another weapon of choice you could try that lies somewhere between the aforementioned strategies. Maybe you adjusted your standard Telecaster neck pickup correctly and now you’re close to being happy with the sound, but it’s still a tad too warm and round for your taste.
Chances are good that this can be solved inside the wiring. Usually, Telecaster players are happy to have a tone control for the bridge pickup that can sound very shrill and ice-picky without one, depending on your playing style and type of bridge pickup. But only a few players really use the tone control for the neck pickup. So how about a wiring with the tone control only affecting the bridge pickup? This way you will get rid of the load of the tone pot (usually 250k) plus the tone cap. Maybe this will give you the tad more high end you’re looking for, so give it a try.
The good news is that you don’t need to change the standard 3-way pickup selector switch like we did on the Stratocaster last month. This is mostly because a regular Tele only has a single master tone control, so we’re happy with the two switching stages of the standard switch you already have in there.
With this wiring, illustrated in Fig. 1, you will end up with these three settings:
1. Bridge pickup with volume and tone control
2. Bridge + neck pickup in parallel with volume for both pickups and no tone control
3. Neck pickup with only volume control
To further enhance this wiring, you can use a no-load pot for the tone control. This way you’ll also be able to engage the bridge pickup without tone control if this is an option you want.
That’s it for this round! Next month, we’ll continue with some Danelectro wirings, so stay tuned.
Until then ... keep on modding!Fig. 1
Here’s a workaround to get a similar configuration without having a third pickup. Plus, this serious tone weapon can be integrated into any given Telecaster wiring.
Hello and welcome back to Mod Garage. After writing the column about the Brent Mason Telecaster wiring in October 2021, I received a lot of requests from you about a more practical and non-invasive version of it. Well, you asked, and the Mod Garage delivers.
A lot of people don’t want to route an additional hole into their Telecasters to add a third pickup in the middle position, which is a massive task. I totally understand this, so let’s see what can be done instead, and let’s add some more tonal flexibility, which was another common request after that article.
The good news is a lot can be done. We touched on this multiple times in past columns: mimicking Stratocaster in-between tones with a Telecaster without having a middle pickup using half-out-of-phase wiring, for example. Some time ago we explored the Bill Lawrence way of doing this (“Mod Garage: The Bill Lawrence 5-Way Telecaster Circuit”) and the Jerry Donahue Telecaster wiring as well (“Decoding Jerry Donahue’s 5-Way Telecaster Wiring”). These two columns are great starting points to read about the basics of half-out-of-phase wiring and what it does.
In general, there’s nothing wrong with using these two wirings the way they are. But our goal is to get a little bit closer to the Brent Mason Telecaster wiring, plus add more tonal flexibility. Brent Mason’s wiring is straightforward—basically it’s a normal Telecaster wiring with an added middle pickup that has its own volume pot. Mason’s Telecaster is loaded with three humbucker pickups for trouble-free performance regarding hum and noise in both studio and live situations. But it doesn’t have any additional switching for splitting the individual humbuckers, so there are a lot more sounds under the hood to discover. If you need them or not ... well, it’s all up to you. The basic setup works well for Brent, and he can get his signature sounds in any given situation, but it’s not a crime to want more flexibility.
A lot of people don’t want to route an additional hole into their Telecasters to add a third pickup in the middle position, which is a massive task.
The basic plan for today looks like this:
1. Swap both pickups on your Telecaster for the correct Brent Mason models.
2. Add a triple-sound switch to each of the two pickups.
I will show you how to do this in a way you can integrate into any given Telecaster wiring, but to get the most out of it, I recommend combining it with the Jerry Donahue wiring. This way, you will receive an ultra-flexible Telecaster wiring that can also cover basic Stratocaster in-between tones.
Let’s start with the pickups. Brent uses Seymour Duncan pickups. If you want to get as close as possible you should use the following models:
- Bridge position: Vintage Stack Tele STK-T3b, which is a vintage-flavored, traditional-sounding humbucker with 4-conductor wiring.
- Neck position: Vintage Mini Humbucker, built-in 180 degrees flipped, so the open pole pieces are facing the bridge rather than the neck for more high-end and clarity in the tone. The pickup also sports a 4-conductor wiring.
If your Telecaster has the traditional vintage routing under the hood, the cavity for the neck pickup must be enlarged to make the mini humbucker fit, which can be a downside if you want to plug ’n’ play. If enlarging the routing is not an option for you, there are numerous humbuckers on the market that will fit into the routing, such as the Seymour Duncan Hot Rails and Vintage Stack Tele neck pickups. Almost every pickup manufacturer has such a pickup in its portfolio, so there are plenty of options.
Choosing a Stratocaster neck pickup will result in the same problem: They won’t fit into the standard vintage neck routing of a Telecaster.
Rig Rundown: Brent Mason [2021]
It’s impossible to overstate Brent Mason’s impact on country and, arguably, even rock guitar. Over the course of his more-than-35-year career, Mason has perf...If you have a full humbucker routing under the hood, which you can find on a lot of newer Telecaster models, you’re good to go the easy way, but keep in mind that you’ll have to enlarge the hole in the pickguard as well. Don’t forget to build it in 180 degrees flipped, like on Brent’s Telecaster, to get closer to his trademark sounds.
Changing the bridge pickup should be a no-brainer: It’s an easy 1:1 swap.
For adding the two triple-sound switches, you’ll need two DPDT on-on-on mini toggle switches. You can’t use push-pull or push-push pots for this because they’re only available as on-on or on-off versions, so the third switching position is absent. But on common Telecaster control plates, it’s no problem to place two of these switches between the two pots and you don’t need Reiki hands to operate them. But again, two holes must be drilled, so it’s not an easy mod if you want to make it look good on the control plate, straight in one line.
With the switches, each of the pickups will have three operation modes and tones:
- Full humbucker (both coils in series)
- Real single-coil split (one coil shut down to ground)
- Single-coil-esque tone (both coils in parallel)
This, combined with the second pickup plus all the features of the Jerry Donahue wiring, results in a lot of different tones. While the humbucker and single-coil-esque tones are free of hum and noise, the real single-coil split mode will also behave like a real single-coil, picking up all kinds of hum and noises.
This switching was made popular by the DiMarzio company under the name “dual sound,” which I think is confusing because it’s a triple-sound switch, not a dual one.
The good thing is that this switching is placed directly after the pickup, so in layman’s terms this means: The four wires from the humbucker are connected to the switch but only two wires are going out of the switch (hot + ground), so it’s super easy to add this feature to any given wiring.
You simply solder the hot output of the switch to the spot where usually the hot wire of the pickup is connected and solder the ground coming from the switch where the ground wire of the pickup is usually connected, and you’re done. So, it’s absolutely independent from the wiring that’s coming after the switch, and you can transfer it to any given guitar.
You can’t use push-pull or push-push pots for this because they’re only available as on-on or on-off versions, so the third switching position is absent.
Now, let’s focus on the bridge pickup to demonstrate the wiring on the switch, as seen in Fig. 1. Please note the jumper wire on the switch and don’t forget to solder it. The middle position of the switch is the real single-coil split. With the toggle up, it’s full humbucker, and the toggle down is the hum-free single-coil-esque tone. I used the Seymour Duncan color code for this because we’re talking about Seymour Duncan pickups. If you want to use pickups from a different company, you’ll have to transfer the color code using one of the many transfer charts online.
The wiring of the neck humbucker is exactly the same: the bare ground wire of both pickups always goes to ground. After wiring both pickups to their mini toggle switches, you only have to connect four wires before you’re done. The hot output of the neck pickup switch goes to the spot where usually the hot wire of the neck pickup is connected to and the hot output of the bridge pickup switch to where the hot wire of the bridge pickup is connected to. Likewise, the ground output of the neck pickup switch goes to the spot where usually the ground wire of the neck pickup is connected, and the ground output of the bridge pickup switch goes where the ground wire of the bridge pickup is usually connected.
Congratulations, you’re done! This is a good alternative to the original Brent Mason wiring, and it adds many more possible tones and variations. Especially in tandem with the Jerry Donahue wiring, this is a serious tone weapon with an almost unlimited number of sounds.
That’s it for now. Next month we’ll continue with another guitar mod, so stay tuned. Until then ... keep on modding!