Chops: Intermediate
Theory: Intermediate
Lesson Overview:
• Understand how to become more economical in your fretting-hand fingerings.
• Discover easier ways to play arpeggios.
• Learn how to move between major and minor arpeggios.
Click here to download a printable PDF of this lesson's notation.
The subtle art of finger rolling is one of the most difficult fretting-hand techniques to master. It involves barring across a single fret, but with a twist: The trick is to “roll” your finger from string to string as you cleanly separate the notes you’re playing. Eddie Van Halen, Steve Morse, Yngwie Malmsteen, Angus Young, and Stevie Ray Vaughan are among the greats who use this technique, and you can incorporate it into your music too, once your fretting fingers get acquainted with the motions.
The first step is to fully understand what you’re attempting to do with this technique. For example, if you want the notes you’re playing to bleed into each other, leave the barred finger pressed down and allow the individual notes to ring freely. Conversely, if you want a melodic idea or arpeggio to come through without the uncontrolled ringing sound, apply individual string muting as you roll your finger. This allows each note to resonate individually, making what you play sound tighter and more focused.
To get a feel for this, play through Ex. 1—a basic blues-rock lick in A minor that uses the rolling technique with the third finger. As you play through this example, notice the movement between the adjacent notes on the 4th and 3rd strings at the 7th fret, and try to limit the amount of ringing (or “bleeding”) between these two notes.
Click here for Ex. 1
The basic demonstration shown in Ex. 1 is similar to what Billy Gibbons, Angus Young, and Slash have played using this technique. Once you have the basic idea under your belt, move forward to get a glimpse of how to perform finger rolling along a single position of a very common scale.
Ex. 2 features the legendary “box” shape of the A minor pentatonic scale (A–C–D–E–G) starting at the 5th fret. As you’ll see, this scale shape provides plenty of opportunity to roll your fingers into notes on adjacent strings. Take your time as you play through this one, and you’ll gradually become comfortable with the process.
Click here for Ex. 2
The next example (Ex. 3) features a two-part roll on the top two strings. Notice how the first half requires a rolling motion using the index finger, while the second shape requires a pinky roll.
Click here for Ex. 3
Now that these minor-based shapes are under your fingers, let’s move this idea into a major key. Ex. 4 features a basic alteration to the previous example, seamlessly shifting these shapes into the key of A major. As you perform this example, notice this variation requires a larger stretch up to the 9th fret, uncovering the A major tonality with the C#.
Click here for Ex. 4
Ex. 5 contains another rolling challenge for your fretting hand: Here we play a three-note A power chord and roll the third finger between the 4th and 3rd strings. See how cleanly you can perform it, and be sure to keep the overlay of ringing notes at a minimum as you roll your way through this beneficial exercise.
Click here for Ex. 5
As you work through this example, try to separate each note by sounding and then muting the strings as you move along. The physical rolling motion will occur with your third finger at the 14th fret, and you should notice how your third finger shifts to efficiently separate these two notes.
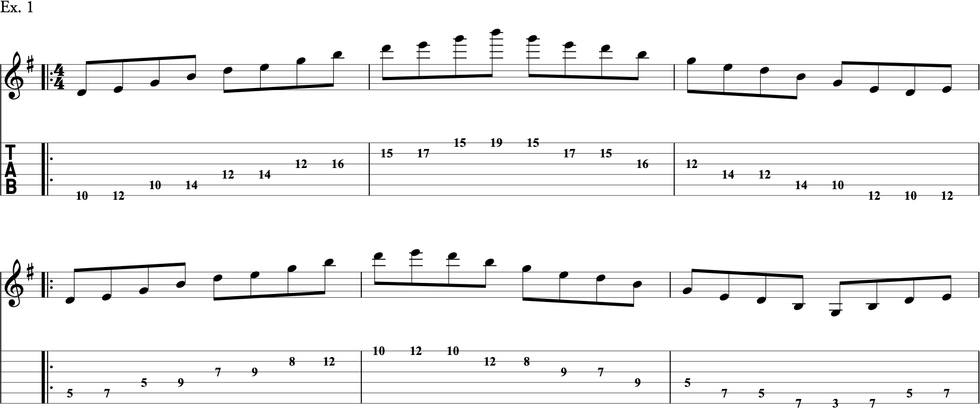
Hearing finger-rolled arpeggios is quite common, and Yngwie Malmsteen can do this at blazing speeds. He has built a career on sweeping through arpeggios (especially minor and diminished shapes), and he uses finger-rolling techniques every time he picks up a guitar and performs these super-human sweeps.
To give your fingers an arpeggio-rolling challenge, play through Ex. 6—a transformed variation of the previous example featuring an Am–G–F–Em chord progression. Pay attention to the fretting-hand fingering and picking directions as you sweep your way through this phrase.
Click here for Ex. 6
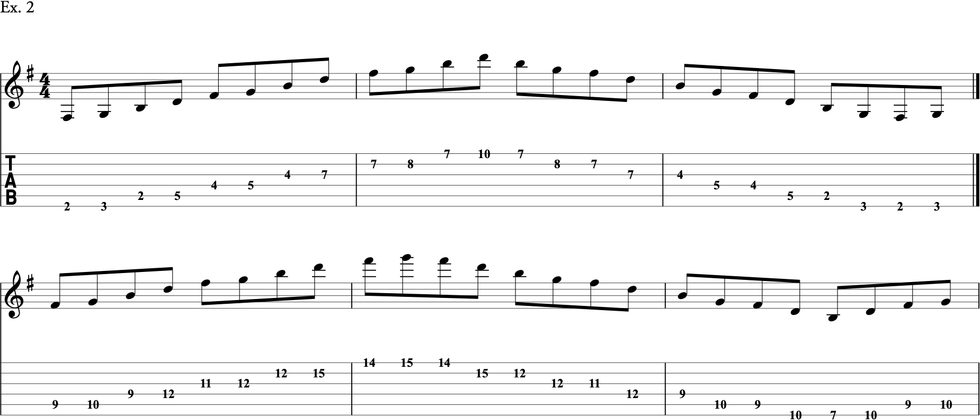
Once you’ve built some strength rolling through arpeggios, expand these ideas to other strings and positions. In Ex. 7 you’ll find both A and Am arpeggio fingerings that rely on extensive finger rolling to execute properly. Notice that the first shape involves a “triple-roll” using the pinky along the top three strings, while the second shape features a double index and double pinky rolling motion. Practice through these two shapes slowly as you become comfortable rolling your fingers between these two finger-friendly arpeggios.
Click here for Ex. 7
As you continue to study this finger-rolling technique, you’ll discover a variety of new fingerings, licks, and finger-twisting situations that will further challenge your ability to use this awkward, yet important, performance technique. Like string muting and dampening, finger rolling offers a great way to clean up your playing and improve your overall sound when moving along adjacent strings.


