 | |
|
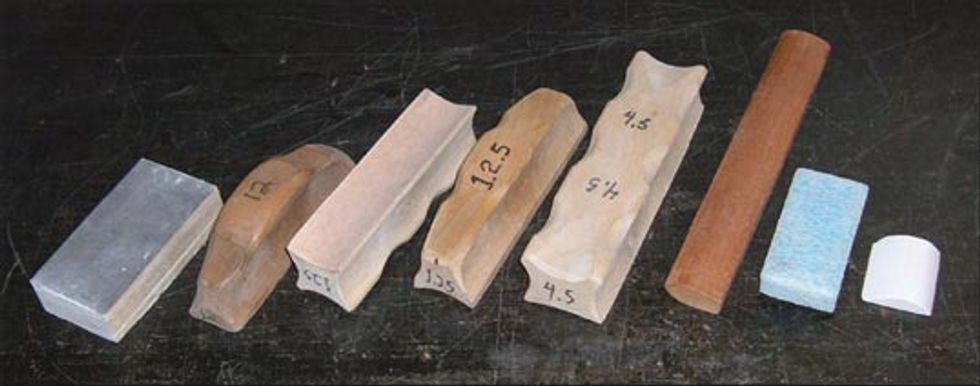
Plenty of sanding tasks in this business need to be done by hand and making your own specialized blocks can help. Most of the blocks in the JET Guitars shop are made from scrap korina or mahogany, both of which are easy to shape on a 48” belt sander.
The photo shows some of the various sanding blocks used in our shop, starting with the basic flat block (left). Moving to the right, the radiused blocks are indispensable for neck and fingerboard sanding. Most of these have fine sandpaper glued onto them to help grip your sanding sheet, although some use a leather lining for fine sanding. A stick with a French curve profile is useful for sanding chamfers. A softer foam block for final scratch removal tasks on fingerboards, rims or during clearcoat rubout frequently comes in handy. Finally, the Corian wedge (right) is used in corners during rubout. Since this is a wet process, Corian is better than wood because it won’t warp and will retain a sharp edge.
In my shop, a lot of the sanding is done with 1/4” sheets and cut-up belts that have been used on the machines. As far as brands go, I have had good experiences with Canada’s Carborundum brand and 3M. If you want a really fast-cutting and long-lasting product, I recommend 3M SandBlaster maroon 100 and 150 grit. When you get down to 220, using aluminum oxide (AO) is perfectly acceptable, although some prefer garnet for the final step. That’s the overview for wood sanding. Wet sanding of the final clearcoat prior to buffing – rubout – is a completely different animal. A 5” PSA air sander, running at around 50 psi, is my tool of choice for larger surfaces. For smaller surfaces like the headstock, I like to slow down the sander. I get good results using Klingspor silicon carbide discs (particularly PS11/12700T). Plan on using one disc of each grit per guitar and approximately three hours for this step. Runs, edge build and drop fills should be leveled using a scraper or microscope slide before you start sanding.
The basic technique is to soak the disc in water, then sand at moderate speed. Start with 320 or 400 grit, and step through 600, 800, and finally 1000. You will need to frequently wipe off the residue and water, and inspect the surface – look for pocks, scratches and swirls, and go over them until they are gone. Being thorough at this stage will pay off big because flaws that are hard to see during rubout always appear during buffing. In fact, I almost always find some swirl or scratch during buffing that needs a little more 1000 grit hand sanding.
A major risk during rubout is burning right through to the wood, which will require you to stop and repair the area. You may also see lifting of the finish if water gets into the wood near holes and cavities, although this may be reversible if it’s not too severe. Learning how to prepare and head off these problems is a completely different process that begins even before painting, and it is important to note that nitrocellulose, urethane and polyester are all chemically different coatings, each requiring its own mindset and touch during rubout and buffing. If you’re used to the heavy, hard, dry character of polyester, you’ll need to lighten up a lot and get used to more rolling and clogging of the abrasive disc as you switch to nitro, for example.
Curved areas like the neck and rims need to be rubbed out by hand – there is no way I would trust a machine on them. You could use a soft block, but I usually rely on my hands. In my shop the used SC discs are recycled for fret polishing or other metal work.
Jeffrey Earle T.
Jeffrey Earle T. handbuilds JET Guitars in North Carolina, USA.
jetguitars.com