Welcome back to our series on building a guitar. Last month we spent our first day gluing our guitar’s sections together. By the end of the day two, we want the fretboard and headstock veneer glued in place.
Step 1
We will surface sand the front and rear flat, with the rear being of most concern. We want a final thickness of 1.915”. If you don’t have access to a wide belt sander, try your local door/cabinet workshop, or even a school woodshop. If there’s enough material to sand the front and rear, great! The body face will be later planed down to 1.780”, with the neck face at 1.895” when we’re finished.
Whether building with a bandsaw, pin router, hand-held or CNC router, tooling holes located in your templates that are universally located for front and rear routing aid in the accurate alignment of all machining operations. Leo Fender used 1/8” tooling pins in their bodies and necks. Suppliers offering a variety of template kits for DIY guitar building – including 1/4” templates with every detail needed to build – can be easily located. If you draw your own CAD templates, a blueprint shop can plot prints to the exact size, which you can adhere to Masonite with adhesive spray. Bandsaw, route and sand to the final size with drawing/ dimensions as a reference. 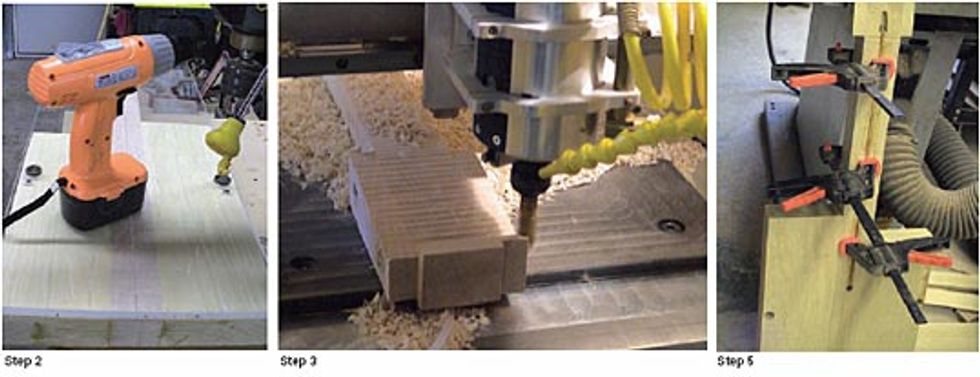
Step 2
For drilling tooling holes, I use a 1/2” thick Plexiglas template with two 3/4” drill bushings and a centerline scribed to align. The fixture has two screw holes located out of the work area – use two wood screws to keep it in place and drill through the holes with a drill press.
Step 3
We now need to create our headstock angle. This can be whatever you want – flat and offset to the fretboard surface like a Fender design or a pitched headstock of your choice angle, like a Gibson. I am using a 12-degree cut with a 5/8” ball end mill. This can be bandsawed and edge sanded just as easily.
Step 4
The truss rod slot will vary based upon the dimensions of the rod used – most will have specs included. I use a custom made rod installed in a 7/32” round bottom channel, which matches the truss rod size without binding. The channel can be routed with a plunge router or table router. A fixture with arc’ed guide rails can be made for a vintage rod; some use a flat bottom channel. Using a thin, metal yardstick on edge, bend the stick to create your arc, based on the depths needed for the rod used (start, middle and end points of depth). I use a 7/32” ball nose cutter to route the channel, anchor hole and the opening at the headstock. Keep in mind, you can reverse the rod installation and put the adjusting area at the butt end; it doesn’t have to be at the headstock. Once routed, lube the rod with beeswax to keep glue from sticking and install. Bending the rod to match the channel’s shape is a key element to not loading your neck with tension.
Step 5
Installed above the rod is a 7/32” wide, 1/2” tall, X long (length of slot) fillet. This fillet matches the channel’s arc, glued only on the sides. Make sure not to get any excess glue between the fillet and rod – don’t force it, as it may split your neck later. I use a few Quick Grip clamps, light pressure and make sure the fillet is pulled all the way in to avoid rod rattle. An hour is all you need before pulling the clamps and surfacing the fillet flush.
Unfortunately, we’re out of space, but next month we’ll get the headstock veneer and fretboard glued in place.
Gene Baker
Any questions or comments visit
www.finetunedinstruments.com
www.meangene.org
email me at b3gene@verizon.net
Fine Tuned Instruments LLC, home of his “b3” instruments.