Every now and then, someone in my blues/R&B band will bring a recorder to a gig or practice. For a while, it was a Sharp minidisc, but that whole category of recorder is outdated and a bit complex to use – plus, transfering the music in real time is a pain.
We''ve been known to go to the other end of the spectrum and have hauled a rack case with a high-end digital recorder and top-notch preamps. But that setup is complicated and there’s a lot of gear to haul in addition to our usual PA, amps, etc. In the end, we had the potential to get a CD-quality recording, but were always stymied by something – the wrong level on one of the tracks, bad acoustics in the house, an overly noisy audience – you name it.
I''ve been looking for a simpler solution to take home the goods – something to toss in the gear bag, plop down on a table and just hit ''record.'' Enter two little gems from Zoom that both wear the label “Handy Recorder.”
The Zoom H2 and the Zoom H4 are indeed handy. They''re also on opposite ends of the field recorder realm. The H2 – the newer of the two models – is a straight-forward recorder with a minimal learning curve. The H4 is like a loaded burger with everything on it. It has a bigger learning curve but it can do nearly anything you can dream up.
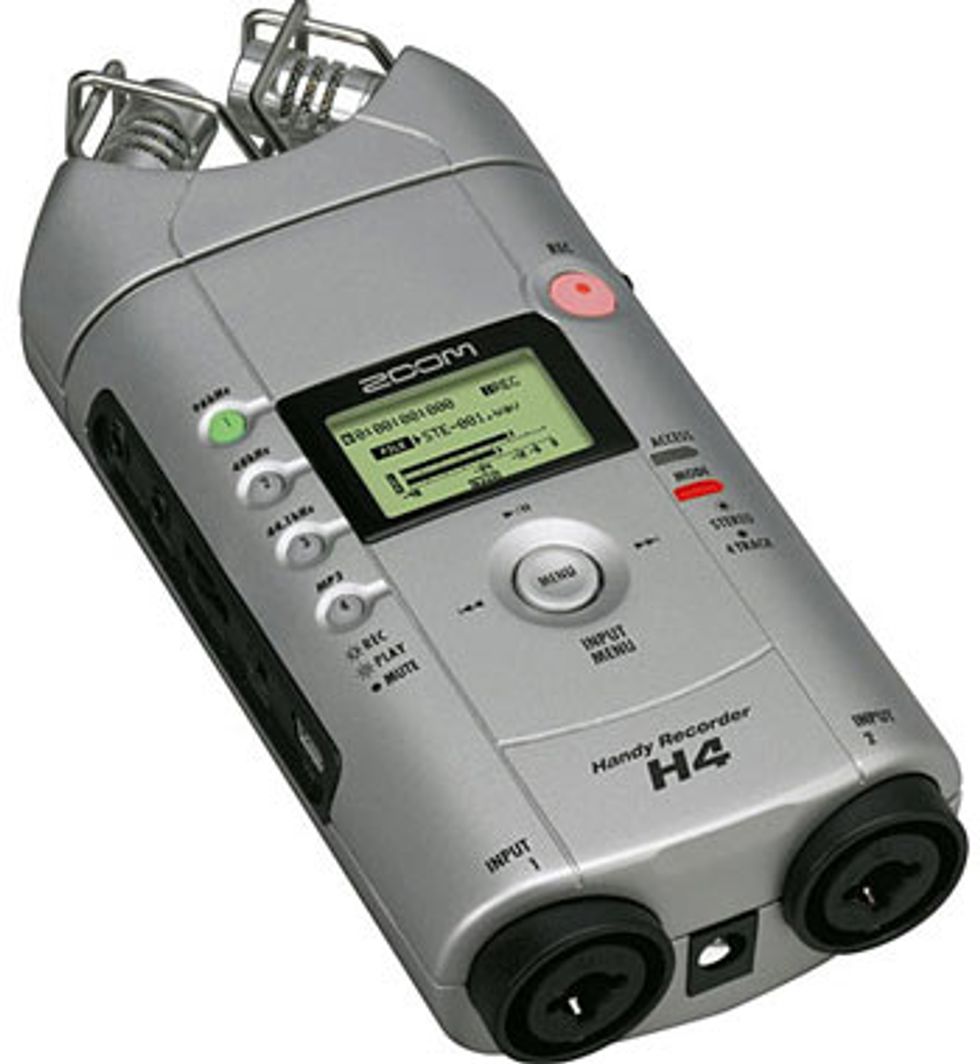
The Zoom H4
The H4 is really three devices in one: a stereo field recorder, a 4-track recorder for songwriting on the road, and a USB computer interface. As a field recorder, it has two mic capsules on the top in an X-Y pattern. The most straightforward application is to switch it on, aim it toward the band and press the record button. To set the level, there is a 3-level sensitivity switch. Pick the right sensitivity and let the H4’s auto-level scan calibrate the appropriate amount of gain. This isn’t an auto-gain function that rides gain during recording but instead a quick way to get started. When you’re ready to record, press the record button again, the red light goes from flashing to solid, and you’re underway.
In the stereo mode, you have four recording options controlled with a set of four buttons that select 96khz, 48khz, 44.1khz and MP3 (at several levels of resolution). The included 512 meg SD card gets around 40 minutes of stereo recording at 44.1 khz. Drop in a 2 gig card instead and you’ll get more than 3 hours worth of recording time (in MP3 mode, you can record for hours on end!). If you’re so inclined, it’s possible to dial in several options – phantom power for an external mic, compression/limiting, high-pass filtering to cut wind rumble, even mic modeling for four popular studio mics.
To navigate these features, the H4 uses a combination of a menu button and a tiny jog wheel. The display was fairly tiny and for my old eyes, reading glasses were needed to get through the menus. Probing the Zoom website (www.samsontech.com), I found a system upgrade that added a few features and also changed the display font to something easier to read. Nonetheless, there were times when I got caught pushing the menu button instead of turning the jog wheel – that meant starting over – but eventually I got used to the routine of starting with one button and shifting to the other.
To give the H4 a whirl, I recorded an old upright piano at home from a few feet away. Running through my studio monitors, the sound was great, with a clear frequency response and a good bottom. At a gig a few nights ago, I ran the direct out from my bass amp directly into the H4’s XLR jack to create some play-along practice tunes for our guitarist. Again, the recordings sounded fine and should be helpful – and if he can figure out the songs from just the bass part, I’ll give him extra credit.
Need a Tiny Recording Studio?
Moving to 4-track mode, the H4 becomes a recording studio in one hand. On the bottom of the H4, you’ll find two input jacks – incredible for a device this small. Each is a combo jack that can accommodate a guitar cable or an XLR mic plug. You can use the built-in stereo mics, too, plugging in a guitar, bass or keyboard, or use the mic of your choice. You can even use both inputs at once. Once you’ve toggled the menu button down to pick an input you can dial in a plethora of effects – essentially, the H4 has a couple of Zoom multi-effect pedals inside, with amp and cab modeling, plus auto-wah, phaser, chorus, reverb, delay, and even more. In addition to the factory presets, you can edit and store your own patches.
Working in 4-track mode doesn’t end with adding effects to your input. I was pleased to find a metronome and a tuner, too. There is also a tiny mixer screen that allows bouncing tracks, panning, setting track levels – even punching in to fix a few muffed notes. Looking through the manual, I noticed that you can only use the 44.1 khz recording resolution in this mode. That makes sense, though, because you’re juggling total recording time with recording quality and 44.1 khz is a viable level to shoot for.
Those same buttons that choose your recording resolution in stereo mode become track selection buttons in 4-track mode, allowing you to select which tracks you record to and which tracks will be playing back. Handy!
In case you feel cramped putting a tune together with the H4’s buttons, menus, and small display, there’s yet another option. With the recorder turned off, you can plug in the included USB cable, hook up the other end to your computer, and voila! – the H4 is powered by the computer’s USB port. In this mode, a new menu pops up with two choices – audio in/out and connect to PC. The first of these two options lets you record through the H4’s guitar and mic inputs right to your computer. Although the H4 includes a version of Cubase, I used it with GarageBand. On its own, a USB interface will cost a good chunk of the H4’s $300 street price, so if you anticipate that kind of use, it’s a definite plus.
Going with the “Connect to PC” option lets you take whatever you’ve recorded onto the SD card and dump it onto your computer. Compared to the old minidisc, this is a real timesaver, with transfer taking place as data rather than in actual recording time. Once in your computer, the standard WAV and MP3 files are available for whatever recording interface you like.
To work with the 4-track mode, I recorded a bass duet. On one track was a melody line played up high on my fretless electric bass – a jazzy version of “Oh, What a Beautiful Morning.” I played a walking bassline on the second track using my electric upright bass. I monitored the sound through studio monitors, which worked fine since no mics were involved. Once recorded, I was able to pan each instrument left and right and tweak the balance between them. Finally, I sent the two tracks to my computer, imported them to GarageBand and added some reverb, compression, and EQ. In all, these tasks were easily done once I figured out the basic working scheme. If you’re writing a song with, say, acoustic guitar, vocal, bass and a lead instrument, the H4 makes it a snap to record and mix.
The Big Picture for the H4
Despite all I’ve written about the H4 so far, this barely scratches the surface of what it can do. Dig into the 100-page manual and you’ll learn a lot more about what it''s capable of. On the plus side, you’ll find the Zoom H4 to be a very versatile, do-nearly-everything unit. Although the first few minutes seemed daunting, it soon became manageable, even logical. I was also initially concerned about some of the switches that are quite tiny – I wondered how sturdy they would be. I’m a careful guy, though, and after some time with the unit, I think it should last quite awhile.
The H4''s tiny display is one of the key downsides, as is the multi-layered menu system and the need to work between the menu button and the jog wheel to make selections. I wish there was a way to mount the H4 on a stand besides the option they provide – a cradle attached with hook-and-loop straps with a tripod-threaded nut on the back side. The SD card is a little difficult to grasp and remove because the plastic door gets in the way. And frankly, I don’t think I’d use mic modeling, preferring to apply EQ after the fact to accomplish approximately the same thing. Ditto with the effects, because it’s easier to edit and adjust an unaffected track. But for quickly adding in a convincing modeled electric guitar in 4-track mode, this is your baby. Finally, the H4 is a bit bigger than I’d prefer, but given all that it can do, I can live with that.
Buy if...
you''re looking for a moderately-priced recorder with a lot of versatility.
Skip if...
a big learning curve will keep you from using great features.
Rating...
MSRP $499 - Samson Tech - samsontech.com |
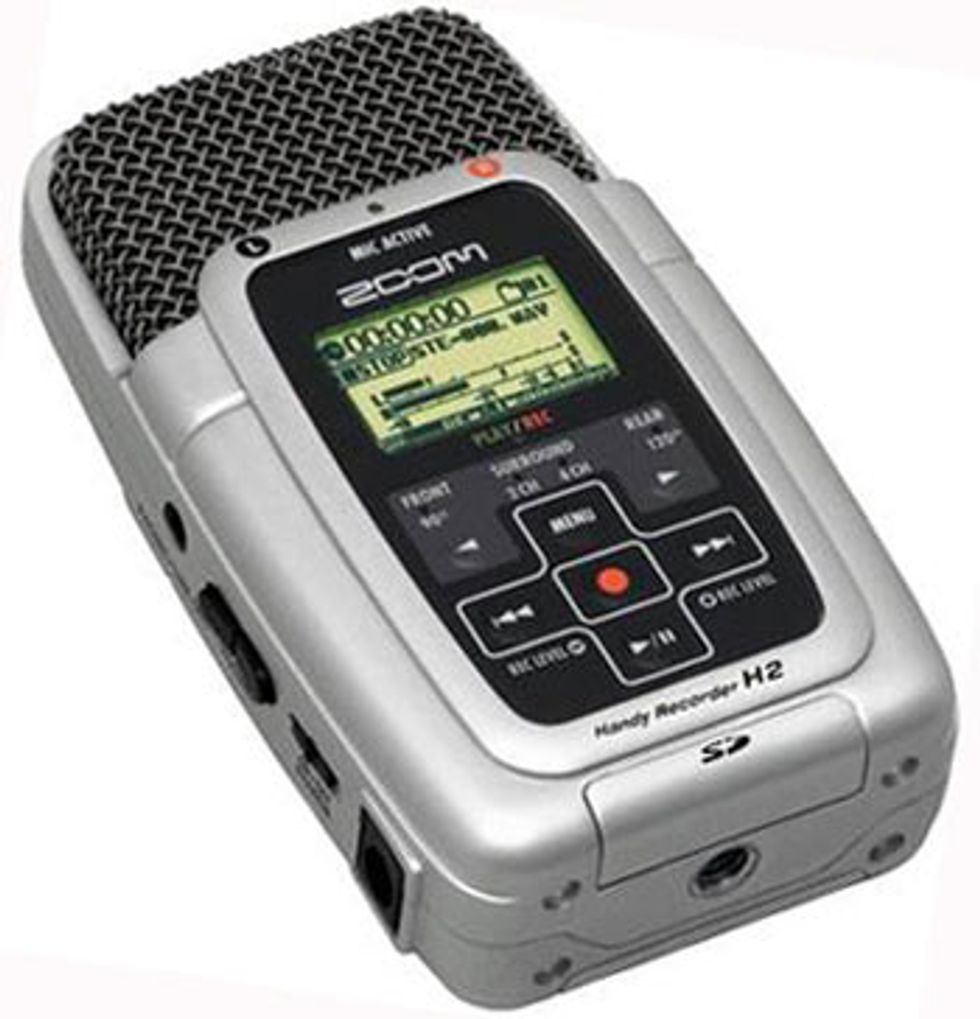
Keeping it Simple with the H2
The H2 Handy Recorder takes the opposite route of the H4. It’s a simple recorder that can be brought to a gig, set up quickly, and forgotten until the end of a set. The H2 is a couple inches shorter than the H4, but about the same width and thickness. When I first brought the H2 to a gig, our guitar player mimed shaving his chin with it – the H2 has an uncanny resemblance to an electric shaver. You might also mistake the H2 for an old-school mic from the ‘50s, at least when looking at it from the rear.
Lurking under that shaver-like screen is something surprising – two pairs of mic capsules that can be used in either a 90 degree angle (on the front) or a 120 angle (on the back). You can also combine them together for recording 360 degrees in either stereo or 4-track sound that can be edited into surround sound.
Compared to the H4, the H2 is more intuitive to operate. After sliding the on-off switch, the H2 boots up in whatever mode you used last (same as the H4). Although it also uses menus, more of the controls are right on the face as dedicated buttons. Two arrow keys let you choose the mic configuration, which is noted by a tiny red LED dot. Another red dot lights on the top of the recorder, showing which side has the active mics.
Rather than using the menu-button-plus-jogwheel method of selecting options, the H2 uses a single menu button and the forward/back membrane buttons for playing back recordings. It’s a bit unintuitive at first to move up and down by arrows that point sideways, but that’s still a problem most of our logic systems can handle. Working this way with the menus, the red record button in the middle becomes the selection key for menu choices. It’s a cleaner approach than with the H4, but it still requires patience to work your way up and down the menu options.
Stripped Down but Nicely Functional
Although the H2 lacks the effects available in the H4 – no reverb or amp modeling, for example – it offers some useful options in their place. There are two levels of auto-gain, plus three levels of compression and three levels of limiting. I found the limiter to be a useful feature for managing peaks while recording at a gig, making the H2 a set-and-forget gig recorder.
Imagine any accessory that you could possibly want – the H2 likely comes with it. In addition to the wall-wart power supply, USB cable, windscreen and carrying pouch of the H4, the H2 has some great conveniences. Rather than a strap-on cradle, the H2 has a tripod socket on the bottom. Besides using a tripod, though, the H2 has a little three-legged screw-on base and a mic clip adapter. There is also a pair of earbuds for listening to what you’ve recorded and a stereo Y cable with 1/8” miniplug to a pair of RCA plugs – great for running the H2 into a mixer, or conversely, going into the H2’s line-in jack from your CD player.
Inputs and options are simpler for the H2. The H4’s combo ¼”/XLR jacks are gone, with only a 1/8” miniplug mic input and 1/8” line-in/out jacks instead. The output jack doubles for connecting the earbuds, with a rocker volume switch alongside. If you see the H2 as a basic gig recorder, these differences should be no problem. I can imagine using the earbuds or running through my studio monitors, but probably wouldn’t use the line-in or mic-in jacks.
Like the H4, when you connect the USB cable to the H2, you’re ready to transfer files to a computer or have the H2 serve as a computer interface. Again, I wouldn’t use the H2 as an interface through its built-in mics, but the file transfer capability is extremely handy.
Giving the H2 a Gig Test
As with the H4, you can record in WAV or MP3 formats. The MP3 format proved useful at a gig where the H2 was first tested. In part, this was because of the long recording time on a 512 meg memory card, but also because the MP3 format is the standard for online sharing. We were in a noisy bar with poor acoustics, but once the crowd thinned out, I decided to record our last set from a table out in front of the band where a some loyal fans were willing to babysit the H2. Playing the recordings back at home, I thought the quality was excellent and the performances were better than usual.
Using a shareware product called MP3Trimmer (deepniner.net/mp3trimmer), I quickly listened to the tunes and picked out four. MP3Trimmer easily extracted the tunes to separate files and another program, MP3Gain (mp3gain.sourceforge.net) helped me bring up the sound level – I didn’t have a chance to fine-tune the recording level while playing, but the low sensitivity setting on the H2 kept levels in bounds.
You can hear the gig recordings at my band’s MySpace site, all done with the Zoom H2 (www.myspace.com/tornadoesblues).
The H2 went to a second gig where we performed in a small restaurant with a stripped down trio of guitar, bass, harmonica and vocals. I set the H2 on a shelf above a wine rack at the back of the room and let it run. Again, the recordings were crystal clear, so much so that we could understand conversations between the wait staff and the diners – I’ll pick a better recording location next time! The recording at that gig was well-balanced, with clean highs and smooth, focused lows.
Another handy use – one I didn’t take advantage of – is to record a practice where we typically play in a circle. Set the H2 to 2-channel surround and everybody gets into the mix with little fuss. This would be great to record an acoustic livingroom jam, too. And if you’re a podcaster, imagine using the H2 in either 2- or 4-channel mode to record an interview with just one device and no extra mics.
Which Recorder to Pick?
In all, both the H2 and H4 are excellent recorders, chock full of features and priced at a very nice level. With care, both should last quite awhile. The H2 typically sells for about $200 and the H3 for $300. If you want to record your gigs and practices, the H2 is a no-brainer choice. If you envision more recording needs – song writing on the road, for example – the H4 will easily do that, plus record your gigs as you go.
The H2 shows that Zoom learned some things from its first venture with the H4. For many of us, we don’t really need effects, mic and amp modeling, 4-channel recording and all the rest. In their place, we’d like easier, more intuitive controls that get the recording job done with fewer operator errors. By concentrating on the essentials needed in a field recorder, the H2 provides quality recording at a new low price point. The SD card on the H2 is easier to reach through a bottom hatch, and the accessories are nicely functional. For my gig recording needs, the H2 is the Handy Recorder of choice.
Buy if...
you want a value-priced recorder with easy-to-learn basic functions.
Skip if...
you need multi-tracking or convential input jacks for guitars or mics.
Rating...
MSRP $335 - Samson Tech - samsontech.com |
Our expert has stated his case, now we want to hear yours. Share your comments and ratings below.


![Rig Rundown: AFI [2025]](https://www.premierguitar.com/media-library/youtube.jpg?id=62064741&width=1245&height=700&quality=70&coordinates=0%2C0%2C0%2C0)