One of the biggest guitar heroes to come out of Britain in the last decade is Matthew Bellamy—the falsetto-voiced leader of internationally acclaimed apocalyptic-prog band Muse. Hailing from southwest England, the futuristic power trio (Bellamy, bass virtuoso Chris Wolstenholme, and drummer Dominic Howard) has been filling stadiums all over the world with an epic style that combines a Radiohead-like indie streak with the drama of Queen and the dystopian outlook of a fantastically bleak sci-fi movie.
Be sure to watch the detailed video where Crimson Guitars luthier Ben Crowe walks you through this project step by step. Plus, hear the MIDI pad in demoed in various music applications and styles.
Bellamy’s playing on six studio albums and multiple worldwide tours proves he’s got no end of chops in the traditional sense, but he and his bandmates are equally admired for always pushing the envelope and embracing new technologies (their live shows are some of the most spectacular in rock). Bellamy isn’t the first to have guitars with the nearly limitless power of a MIDI XY-pad controller built right into them, but he’s more identified with the mod than any player on the planet. He’s even got a signature Manson Guitarworks MB-1S guitar with a MIDI controller screen option.
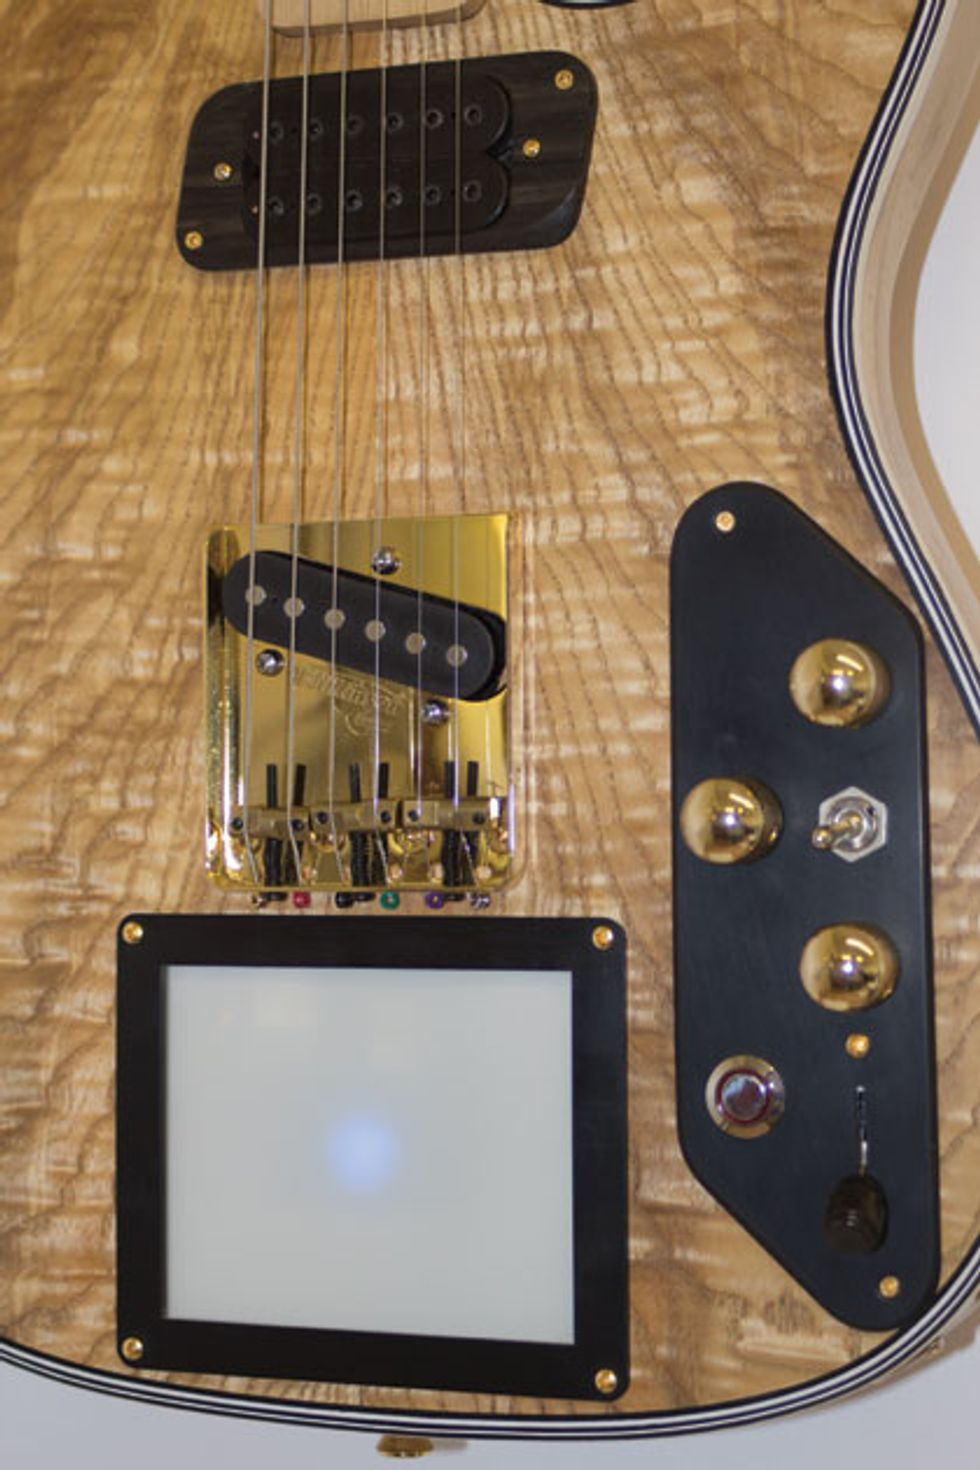
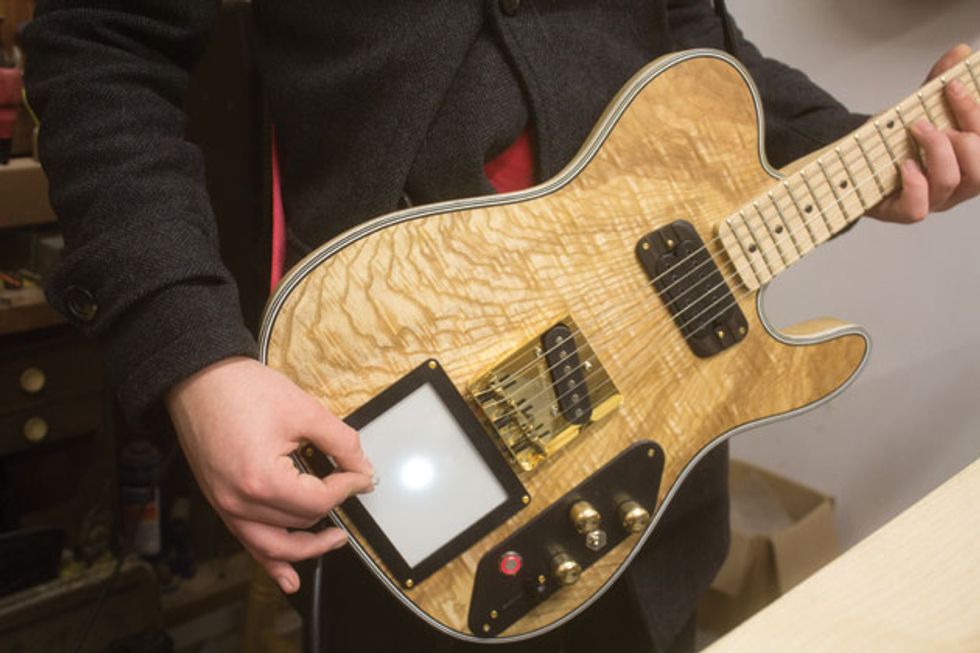
As you can see, this modification puts what looks like an iPad mini (or an Etch A Sketch, if you’re of a certain age) into the top of your solidbody. Wondering what the “XY” part of the controller-pad description refers to? Reach back into those long-repressed memories of geometry-class problems that required plotting points on an X/Y axis using two coordinates. Similarly, a MIDI controller pad’s interface tracks the touch of your fingertip using the same coordinate logic. And it’s capable of controlling any number of devices: a Korg Kaoss Pad, a DigiTech Whammy, software plug-ins, synth modules, and anything controllable via standard MIDI. Sounds fun, doesn’t it? Believe you me, it is!
At Crimson Guitars (crimsonguitars.com) here in the U.K., we first became interested in the XY MIDI controller’s capabilities through our work building signature guitars for Robert Fripp. We tried several of the kits available online from different companies, but they left us cold with their insanely complex wiring and excessive soldering requirements.
Stuff You’ll Need
- A solidbody guitar that you’re prepared to put a big hole in
- An XY MIDIpad or XY MIDIpad Mini kit (which includes the screen, surround/mounting frame, “brain,” rotary encoder, hold button, on/off switch, MIDI output socket, and all necessary wiring) from AmpTone Lab (amptonelab.com)
- A battery box
- Routing templates (which we’ll show you how to make)
- A knob for the rotary encoder
- Scratchplate or backplate material (may not be necessary for some guitars)
- Shielding tape and/or paint
- MIDI-compatible outboard gear
But when we found AmpTone Lab (amptonelab.com), a high-tech music-products manufacturer based in Poland, we fell in love with the whole idea again. In fact, after we installed our first AmpTone Lab XY MIDIpad, we became wholehearted supporters of their work and started stocking all their products.
Before You Order—Check Your Axe’s Dimensions!
So all this talk of making your guitar sound like a spaceship or a hurricane or a flock of quacking ducks has got you excited, eh? We can’t blame you—but don’t order your MIDIpad just yet! First, you need to figure out which model is right for your guitar. The standard MIDIpad needs a 128 mm x 107 mm surface area, while the Mini—which was designed for Strat-style guitars with less space behind the bridge—requires 98 mm x 76 mm. To figure out which is appropriate for your instrument, cut out a paper template using these dimensions and hold it in place on your guitar. Behind the bridge seems to be the default choice, but you can put your screen anywhere you want. We’ve installed them at various angles to optimize interactivity according to guitar model and player needs.
You must also account for your guitar’s depth: The controller and LED unit require at least 18 mm, though if you have a larger guitar it can't hurt to go a little deeper. This allows the light from the LED to spread further on the screen.
Lastly, if you’re wondering about this new cavity’s effect on your guitar’s natural timbre, let me assure you that, in my experience, it’s pretty minimal. Some instruments (like, say, a Les Paul-style axe) might even benefit tonally—and ergonomically, through added weight relief.
Speaking of Les Pauls, part of their allure is obviously those shapely contoured tops. Equally obvious: Glass doesn’t bend so well. This doesn’t mean you can’t fit these delicate screens to a guitar with a carved top, but it requires a bit more care and skill. The trick is to route an extra cavity for the surround that keeps the four corners of the screen flush with the top so that the surround still holds the screen in place. You can bend the surround along the top’s contour, but the flat screen will sit lower in the guitar, leaving some gaps between the top surface of the screen and the underside of the surround. This is remedied by packing the gaps with form-fitting material—ideally carved pieces of wood—that hold everything securely in place. Another option is to make another template (see the “Creating Screen Templates” section) and route a third cavity that allows the surround to be recessed into a flat cavity. If you choose this option, you’ll probably want to paint or finish the walls of that cavity where they are visible.
Plan Your Control Layout
Before you fire up any power tools, put some serious thought into how you’ll use the MIDI screen while you’re playing. The on/off switch should probably be put out of the way, but you’ll want the push button—which is integral to operation—close by your picking hand. Ideally, you should be able to push it and drag your finger across the screen without having to move your hand or arm too much out of regular playing position. Same goes for the rotary encoder—missing your cue because it took too much effort to switch between sounds is not going to be impressive onstage.
The xy MIDIpads run off a single 9-volt battery. You can opt for a battery box, which requires its own routing and template making, or you can secure the battery with a clip somewhere inside the main control cavity. Having the battery too near the guitars standard wiring, though, can promote excess signal noise.
Of course, figuring out where to position these new controls depends entirely on your guitar. If you’re putting the XY MIDIpad in a Strat-style guitar, you may decide to mount the controls in the existing pickguard. If you’ve got a Les Paul or another guitar without a scratchplate, you’ll probably mount them right on the face of the guitar. Either way, you’ll likely need to route out a larger or entirely new control cavity and either modify your existing pickguard or make the associated new scratchplate or back plate. Given the invasiveness of this project in comparison to, say, swapping pickups, you’ll definitely want to spend some time considering the aesthetics of the final result before you crack on with the hole-making fun.
No Router? Relax—You Can Still Be a MIDI Maniac
Now, we know not everyone has a router lying around their flat. Theoretically, it is possible to create the necessary cavities for this project using a combination of drill bits and chisels. But if you think about the combined price of the MIDIpad and your guitar, it probably makes sense to purchase a cheap router and bearing cutter to assure that you do justice to the job and don’t risk damaging your instrument with more primitive methods and tools. You’ll end up with perfectly clean lines and uniformly deep cavities for both your recessed screen and the main pile of electronics. And if you think you might get even more into modding and building guitars, a router will quickly become invaluable.
Still want to go old-school on the project? Here’s how: Follow the prescribed instructions, but in place of the router, use the Forstner bits to pre-drill the deeper cavity. Then, cut the outlines into the top with a scalpel blade or X-Acto precision knife and very carefully use a flat chisel to remove wood down to the required depth. Take extreme care to make sure the chisel and knife cuts meet up so that your parts fit without cramping or cramming. The depth of the lip where the screen will sit is of prime importance and has to be perfectly flat to avoid having the screen crack as you install it. Got it? Okay, now on to the preferred method.

Tools You’ll Need
- Router with 1/2" bearing cutter (a model with ultra-fine depth adjustment, such as those from Triton Tools, is preferable)
- Power drill or drill press
- Forstner drill bits (12 mm for MIDI output, 15 mm for hold button, 30 mm for pre-drilling the cavities)
- Long drill bit for creating wire channel. The length may vary depending on the guitar, but it should be a 12mm spade bit in 12” extension.
- Chisel, bradawl, drafting compass, and a sharp knife or scalpel blade
- Medium-sized screwdriver
- Calipers (any standard set)
Creating Screen Templates
Now that you’ve determined optimum MIDIpad orientation and you’re certain you’re ready to put a large hole in your guitar, it’s time for templates. I’ve installed a MIDI screen without them before, but it was unpredictable—and scary. The screen’s surround can hide a bit of roughness from your router passes, but without a template to guide your hand you’re bound to go completely off piste and wish you’d taken the time to make or buy a set of templates.
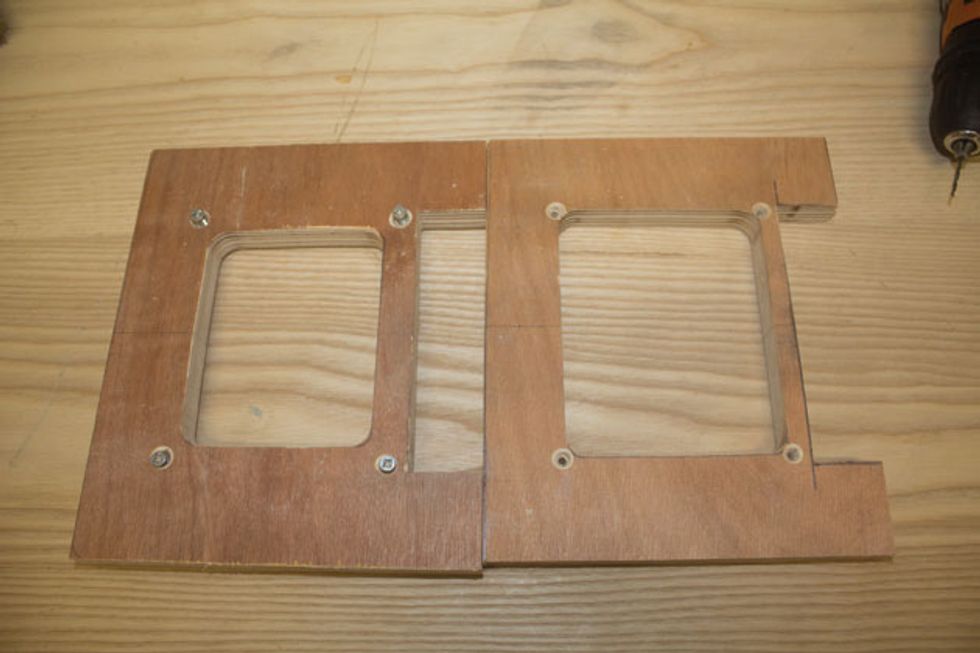
You’re going to need two templates: The first should match the inner rectangle of the surround. This is for the deeper rout that the controls will sit in. The second, larger, template needs to match the outline of the glass screen itself. You can then do a shallow rout around the edge of the deeper cavity, forming a ledge for the screen to sit on. (Note: If you want your surround to sit flush with your guitar’s top, you can make a third template to create another ledge matching the external dimensions of your chosen surround. However, with this approach, even a small mistake will be visible on the guitar. You’ll also need to devise a separate way of securing the third template to the guitar top, perhaps using clamps or double-sided tape.)
To create your templates:
1. Take a piece of 20 mm-thick plywood or medium-density fiberboard (MDF) that’s big enough to accommodate the dimensions of your chosen MIDI screen. (Make sure the surface that will be against your guitar is smooth and won’t scratch, dent, or otherwise damage the finish.) This is thick enough to allow your router to hover over your bridge should you choose to leave it on through the installation.
2. Place the plastic surround from the XY MIDIpad (or Mini) on the template material and use a sharp tool or pencil to mark the positions of the four holes. Then, trace the inner edge of the surround onto the first template’s blank.
3. Drill the four holes in your template material using a 4 mm drill bit. (Note: After drilling the four corresponding holes in your guitar, you will use them to secure the template to the surface of the instrument. Just remember to use screws of the same width for securing the template and the surround.)
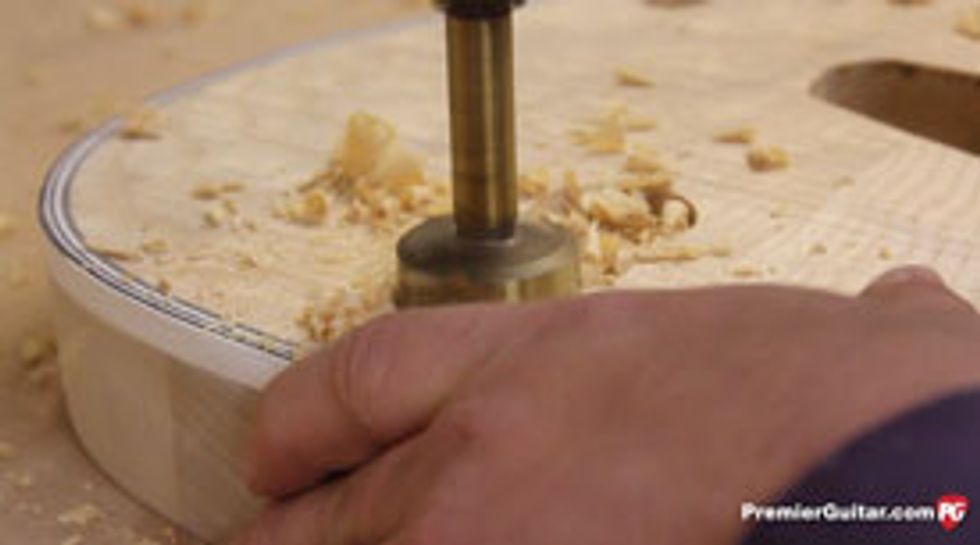
4. Cut out your template using your router and 1/2" bearing cutter. Remove excess wood from the center either with the Forstner bits, or with a jigsaw and then a file, rasp, or chisel cut down to your lines. Use this hand-made template to rout, with the bearing cutter, your actual master template.
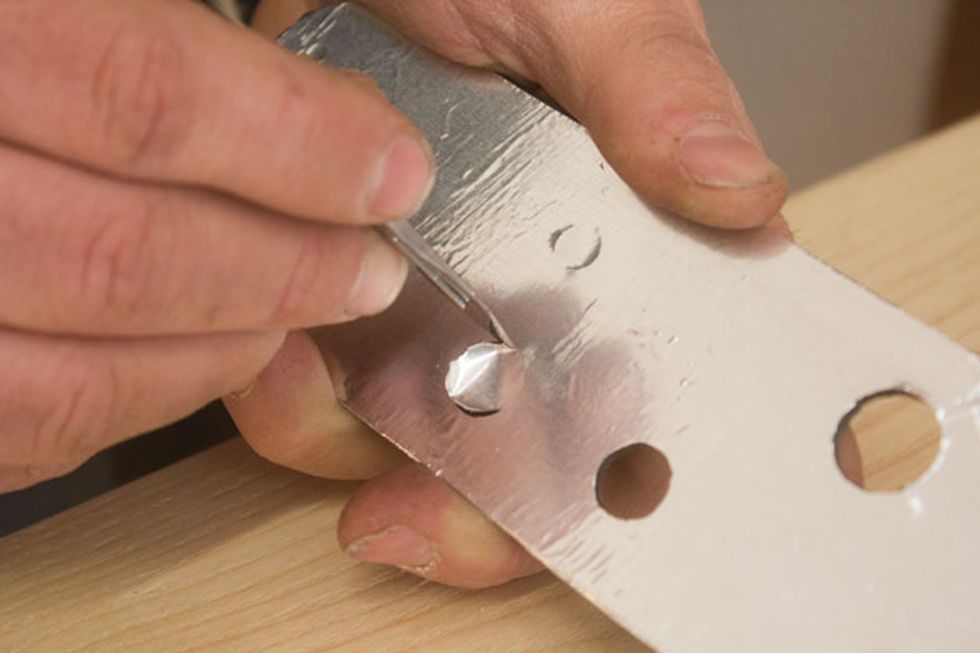
5 If you’re not removing your guitar’s strings and hardware—or if you’ve got bridge-mounting studs to work around—cut out a notch big enough to accommodate your particular bridge from one side of the template (see photo above) to make room for them. The trick is to leave enough template for your router base to remain stable while you use it.
6 Repeat steps 1–5 for your second, larger template, but this time use the dimensions of the glass screen itself on the second piece of template material. You will have to cut out the corners of the final rout with a sharp chisel to seat the glass properly.
Stripping Down
If time is of the essence, you don’t actually need to disassemble your guitar for this project. Leave the strings on, save yourself a few hours of setup work, and maybe even play your guitar instead! Even if the MIDIpad’s cavity is right up against the tremolo or bridge, the templates we’ve made should hold the router above your bridge and let you get on unhindered. However, this is a very dusty process, so clean freaks will probably want to take their instrument wholly or partially apart. Either way, we advise at least taping over your pickups. I often enclose all but the installation areas in a handy plastic bag—just don’t leave your guitar in there to sweat for too long!
Despite what we’ve just said, you’ll notice that the T-style guitar shown here (bought during prototyping for kits soon to be handmade by Crimson Guitars) is dismantled. This is because we’ve been using the guitar for other projects in our shop, including adding the nice, book-matched figured ash top.
Marking Your MIDIpad’s Territory
Now that your bench is clean, your templates are made, and your plans are painstakingly laid, it’s time to make the first, irreversible mark on your axe. Follow these steps to properly mark your guitar for routing. (Note: These steps are for the typical approach of positioning the MIDIpad’s screen along the horizontal centerline of the guitar’s body.)
1. Use a ruler to measure the screen surround’s centerline, and then either scratch it into the underside of the surround or mark the line with masking tape.
2. Align the surround’s centerline with your guitar’s centerline. For both cosmetic and structural reasons, it’s probably safest to make sure that the amount of space between the surround and the bridge equals the amount between the surround and the rear of the guitar.
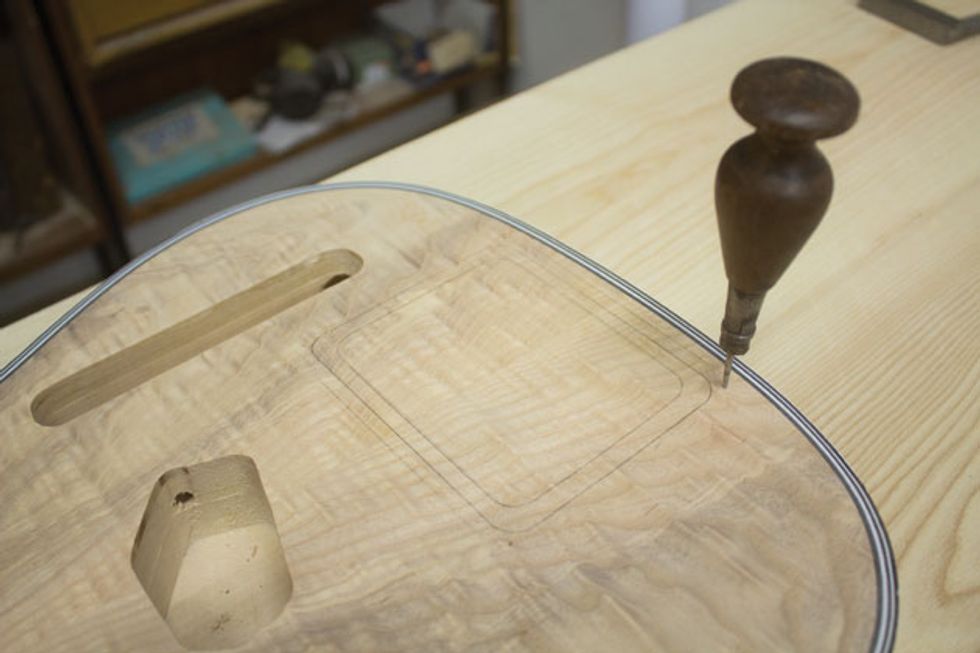
3. Using a sharp bradawl or a drafting compass’ spike—and making sure you hold the template perfectly still for accuracy—mark the center of each of the four holes on the guitar’s surface.
Warnings and Disclaimers
Whenever you’re using power tools and sharp implements, there are multiple hazards to be aware of. If you are not experienced with any of the tools here, or if you are unsure of your ability to successfully and safely complete this project, we recommend taking this step-by-step guide to a qualified guitar tech.Remember: When drilling and routing, always wear eye and hearing protection—proper safety goggles and either earplugs or protective headphones
The AmpTone Lab kits include breakable glass—watch out for razor-sharp edges!
A clean workbench with a non-slip mat is critical to safe routing and drilling
4. Pre-drill each hole with a 2.5 mm drill bit so that the holes are a little smaller than the screws that secure the surround. (Remember, you’ll need to find 30mm long screws of the same width as the ones supplied with the kit in order to secure the templates before routing the new screen cavity.)
5. Screw the surround onto the surface of the guitar.
6. Mark the internal rectangle of the surround onto your guitar using a bradawl or sharp knife (pen or pencil lines will wipe off too easily).
7. With the surround still in place, you can more easily envision the ideal position for the rotary encoder pot, button, and power switch. Use your bradawl or compass spike to mark the center of the holes for each.
8. Remove the surround and screw the template with the larger hole to the guitar. If the screw holes line up properly, your template should be perfectly centered around the rectangle traced from the inner edge of the screen’s plastic surround in step 6. If this is the case, trace the inside of the larger template onto the guitar’s top.
9. Remove the larger template and screw on the smaller template. Scribe its internal lines into the middle of the other two rectangles. When the template is taken off again, you should end up with three concentric rectangular marks perfectly nested inside one another.
10. If you have decided to expand an existing guitar-control cavity (or add a new one), mark out the areas that need routing.
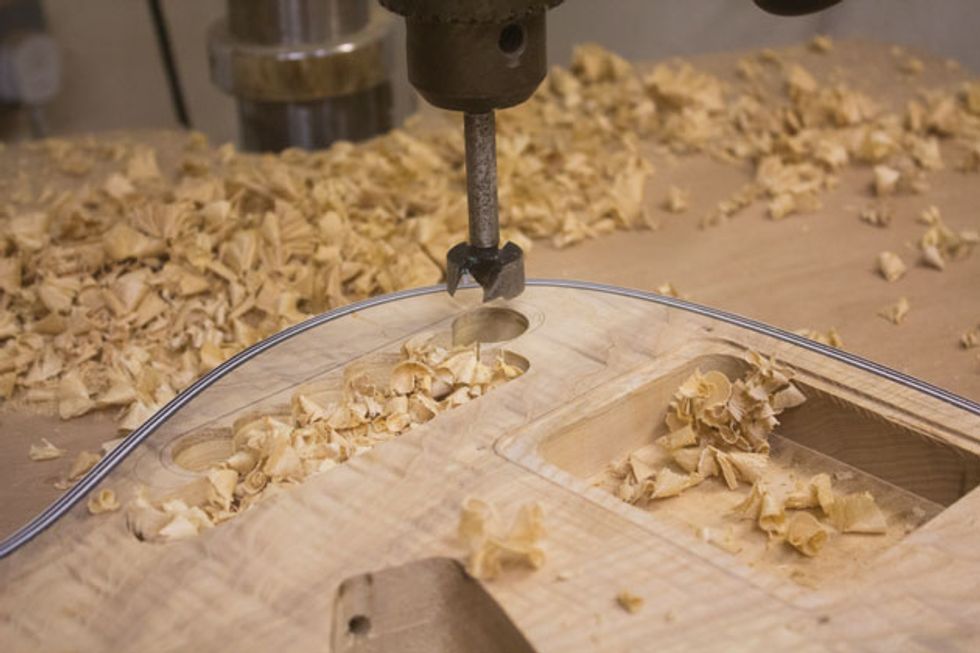
Let the Dust Fly: Pre-Drilling and Initial Routing
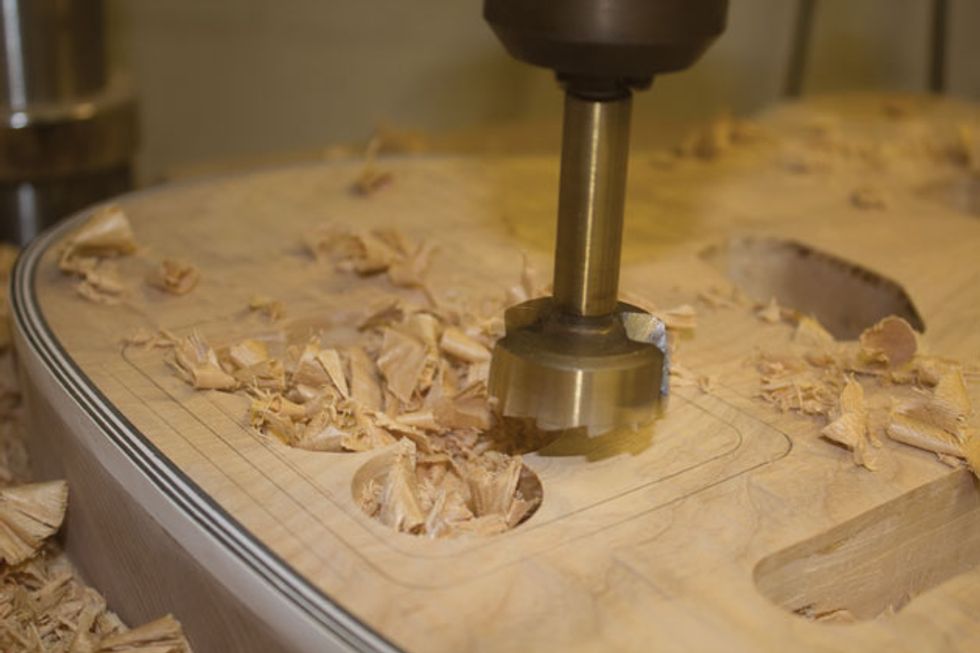
Now that we’ve marked up the top of the guitar, it’s time to take some serious chunks out of it. You’ll want to drill starter holes before routing. This pre-drilling serves several purposes: First, it makes the job of routing much easier—both on you and the router cutter. Second, it saves time. Routing a cavity that’s 20 mm deep in hardwood without pre-drilling will take quite a long time and blunt the tool much faster.
Pre-drilling can be done by hand with a standard power drill and a Forstner bit (the bigger the better), but a drill press is the safer, simpler method. You can use standard large drill bits, but they’ll take much longer—and there’s also a greater likelihood that you could accidentally drill too deep and go right through the guitar. Whichever approach you choose, be certain to set the drill press’ depth stop (or put tape around the standard drill bit) so you don’t go too deep. You want to drill to within 2 mm of your intended depth. After that, we’ll move on to routing.
Drill out as much wood as you can from the middle rectangle. Mark my words, the middle one! Your goal is to leave about a 10 mm ledge for the glass screen to sit on. (If you’ve decided to enlarge or add a control cavity, pre-drill those spots now as well.)

1. Screw the smaller template down securely onto the guitar’s top, and then use your router to carve out the deeper central cavity. We do this one first so that the bearing on the bit is in contact with the walls of the cavity all the way down. Route it to a depth of at least 18 mm.
2. Use a set of calipers to measure the thickness of your glass screen (they tend to differ slightly from kit to kit). Ours measured about 1.7 mm. You want the top of the screen to end up perfectly flush with the top of the guitar so that the plastic surround holds it down tightly but without too much pressure on the glass. If you don’t have access to calipers, you can proceed to step 4 and route in very small increments, pausing periodically to test the depth with the screen itself. Just be careful—it’s very delicate. (We do sell individual replacement screens if the worst happens!)
3. Remove the smaller template and securely fasten the larger template (the one that matches the glass screen’s dimensions) to the guitar. Then route the shallow screen recess area. (Note: It’s preferable to have a router with ultra-fine depth adjustment, such as those from Triton Tools.)
4. Pre-drill and route away any other cavities needed for a battery box or the extra controls. The instructions above on how to make a template should work here: Whatever you are routing, make a template to guide you and keep your guitar safe from mishaps. Again, pre-drill the cavities with Forstner bits or large standard drill bits (10 mm or more), taking into account the required cavity depth.
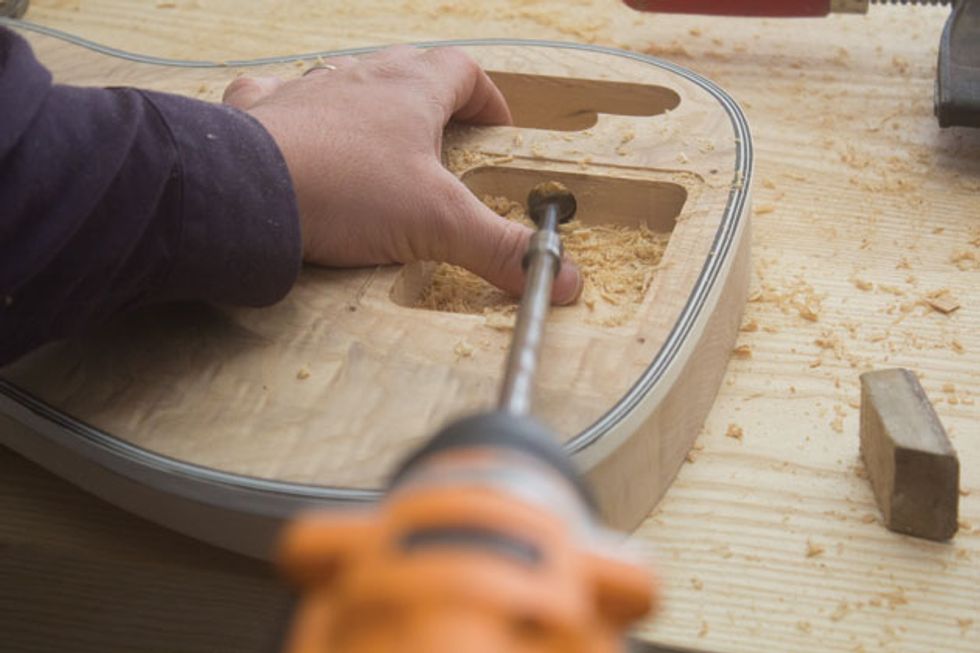
Connecting the Cavities
Your new screen cavity needs to be joined up with the existing (or new) control cavity. To do so, you’ll need a drill bit large enough to accommodate the XY MIDIpad’s largest connector. The MIDIpad project video on premierguitar.com covers a few options, but chances are you have a spade or flat bit that will do the job fine. I prefer to use extensions to the drill bit so that the body of the drill is as far away from the top of the guitar as possible—spinning chucks near glossy guitar tops are scary things. Just to be safe, I recommend putting a slice of veneer or another sturdy protective material under the drill bit to protect the finish against slips.
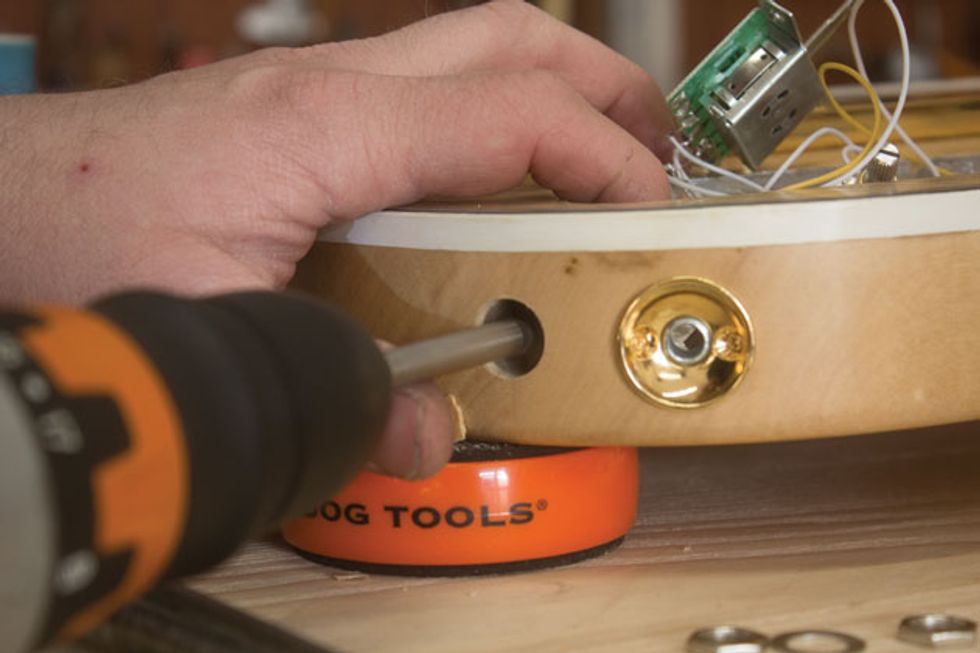
To install the MIDI output jack, use a 12 mm drill bit to drill through the side of the guitar. Obviously, the jack must connect to the main XY MIDIpad cavity, so be aware of how much wire you have to play with—we want to keep soldering to an absolute minimum. You can then drill the rest of your control layout holes through the guitar’s top or your scratchplate. Once you’ve done so, clean up the dust and shavings before working on the electronics.
Installing the XY MIDIpad
We’re so close to being able to test out this MIDIpad that we can practically feel the coordinates coursing through our neurons toward our fingertips. Let’s get this thing in the guitar so we can start spacing out!
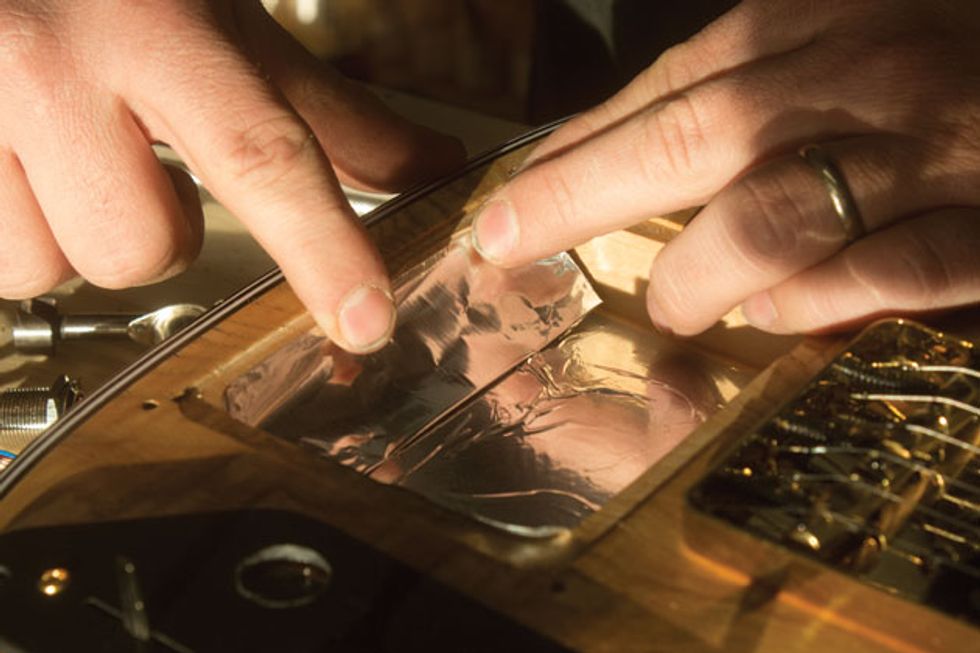
1. Shield the screen cavity from undesired electrical fields. Just as you wouldn’t throw a set of pickups in a new project guitar and wire up some pots in a bare control cavity, you shouldn’t just fit the MIDIpad in the guitar as is. Sometimes there can be crosstalk between the LED behind the screen and your guitar’s existing electronics. You can shield the cavity by coating it with shielding paint or an adhesive-backed foil. (Note: If you use foil, make sure the edges of adjacent pieces overlap for a better electrical connection. Also, use a scalpel to remove excess shielding from holes in any new scratchplate material.)
2. Use a ruler to measure the cavity for the correct location of the AmpTone microcontroller—the black box with the LED in the top. This is where all the XY MIDIpad’s magic happens, and you want the LED to be in the very center of the screen once it’s in place. Measure from corner to corner, and then go back to that trusty bradawl and mark screw positions at either end of the controller. You need to get the measurement along the long axis of the cavity as exact as possible, but the short axis is more forgiving because the controller has a long section where the whole unit can move along the screws.
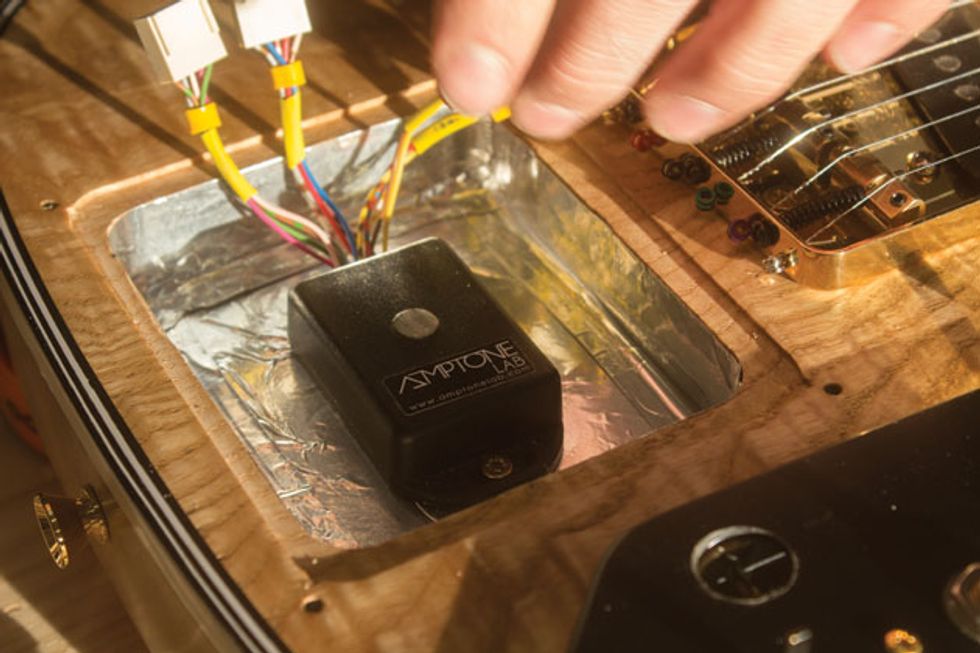
3. Screw the microcontroller down with the wires pointing away from the main control cavity
of your guitar.
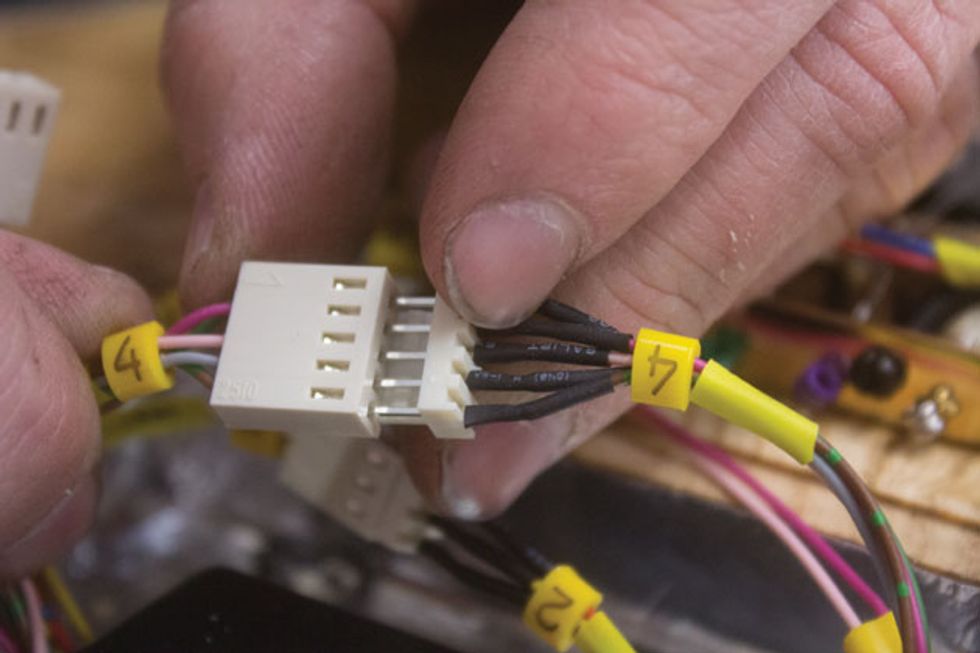
4. Install the rotary encoder, hold button, and on/off switch, threading the wires through the new holes. You’ll find that AmpTone has done an incredible of designing and building a kit that’s fast and easy to install, and one of its highlights is the fact that you really don’t have to solder anything. Each part has a numbered connector that effortlessly clicks into its mate. Make sure each component—including the MIDI out socket—is securely in place before clicking it into its partner. Also, be mindful of how you route the wires. You don’t want them to inadvertently obscure the glow of the LED—or rattle inside the cavity. Be sure to use the supplied p-clips to secure the wires to the wall or floor of the cavity.
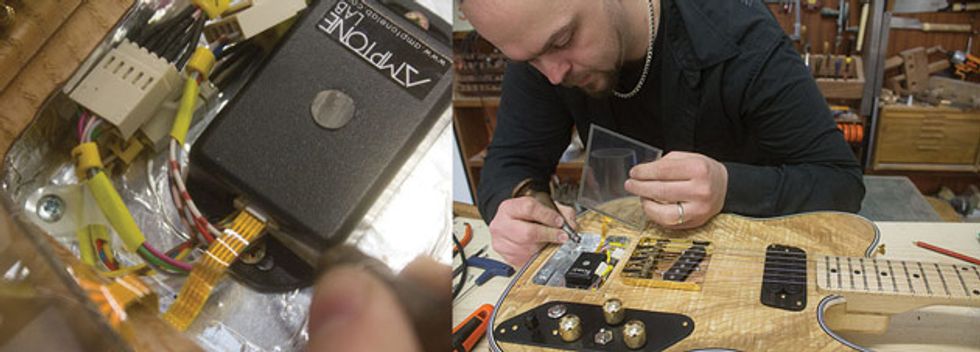
5. Wire up the screen. This is a little more complex than some of the other steps, so be sure to check out the video. A tiny, gray drawer pulls out from the center of the nest of wires emerging from the microcontroller. Carefully pull this drawer open using a bradawl or similar tool. The glass screen has a ribbon wire attached to one side. The other end of the ribbon has a white rectangle on one side. You’re going to slide this end of the ribbon into the little drawer, and the white rectangle must face the guitar as it goes in. This is one of the few points in the wiring process where you could conceivably go wrong (though the only result would be no signal to the brain from the screen, an easily reversible mistake). Once the ribbon wire is inserted, push the drawer shut again using a small, pointy implement, locking the ribbon securely in place.
6. Put the white light diffuser underneath the screen, place the screen in its cavity, and secure it by screwing the surround in place over the glass.
7. It is often not required, but to prevent extraneous noise from the screen as it sends its data, solder a wire from either of the two lugs on the on/off switch the back of a grounded pot. This is the only time in this whole build that you will need a soldering iron—bask in the genius!
8. Replace and secure all scratchplates and covers.
It’s Alive—Mwahaha!
The AmpTone Lab XY MIDIpad runs on a 9-volt battery, which can be situated either in a battery box or inside the control cavity. (Batteries last a long time in this application, so it’s up to you.) Plug in your battery, press the MIDIpad’s power button, and—if all has gone as expected—you’ll have a working MIDI controller in pretty much the most convenient spot possible. Plug it into any MIDI-compatible sound generator and wail, bleep, blurg, or explode—the sky’s the limit!
Ben Crowe is head luthier at Crimson Guitars in the U.K. Visit crimsonguitars.com to see his entire line of bespoke guitars, extended-range instruments, and tools and jigs for luthiers—as well as an impressive series of tutorial videos.
Watch the step-by-step video (with several demos at the end):


![Rig Rundown: Russian Circles’ Mike Sullivan [2025]](https://www.premierguitar.com/media-library/youtube.jpg?id=62303631&width=1245&height=700&quality=70&coordinates=0%2C0%2C0%2C0)