Every guitar player is on a quest to find his or her perfect tone. Many of us long to get the guitar sounds we hear on albums and projects
Every guitar player is on a quest to find his
or her perfect tone. Many of us long to get
the guitar sounds we hear on albums and
projects we idolize. Often what happens is
you buy the same amp your favorite artist
used, only to find it’s not quite what you
heard on the recording. You then seek out
mic’ing techniques, mics and preamps, all
kinds of advice from every website imaginable,
and it all leads to a dead end.
The problem could be that one amp may
not be able to give you everything you
want. In fact, many artists use several different
amps simultaneously when recording
and performing. Here’s how it works
– each amp has certain strengths and by
combining different amps, you can blend
those strengths together. It’s like a good
sports team; you utilize the strengths of
each player. Stevie Ray Vaughan is a great
example. He often combined different
amps to produce his trademark tone, both
on stage and in the studio.
When combining amps, you can use less
gain, and still get the sustain you’re looking
for. Imagine cleaning up and articulating
every detail of your playing, getting all the
sustain you need, and adding more punch
so you can be heard through the mix. This
is what it’s all about.
The truth is, you can never have too
many amps. Ask my wife – our house
used to have a room filled with close
to 35 guitar amps. But if you don’t have
two or three guitar amps sitting around
waiting to be plugged in simultaneously,
you’re not alone. Many people have multiple
guitars, but far fewer have multiple
amps. If you only have one amp, you
may need to call your friends together
for an amp summit meeting!
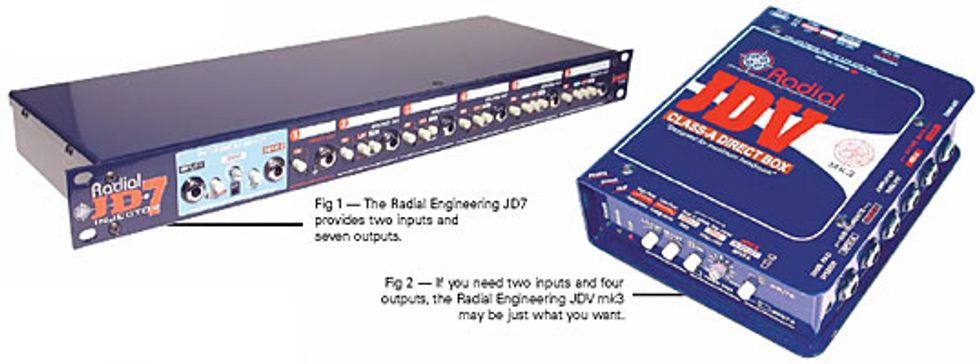
Once you’ve gathered a few different
amps, you need to hook them up so you
can play through them simultaneously. A
“Y” cable will do the job, but there are better
solutions. (There are many to choose
from, but I’ve tested the following, and
they work for me.) For large rigs, check
out the Radial Engineering JD7 (see fig 1).
This rackmount box has two guitar inputs
and seven outputs; one direct out and six
Jensen transformer-equipped isolated outs.
This means no ground loops between
amps and no humming/buzzing – just killer
tone. The smaller Radial Engineering JDV
mk3 (see fig 2) supports two guitar ins
and four outs, including a tuner out, for
smaller setups. You could start with the
Radial Engineering Big Shot ABY for a twoamp
setup.
A great starting place is a Marshall, a
Fender, and a third amp from another manufacturer.
Set up the Marshall amp in the
middle with no reverb, add the Fender with
some reverb to the left (you might set it
with slightly more ‘verb than normal as it’s
offsetting the dry Marshall), and the third
amp on the right with a medium amount
of reverb. Match the volumes among the
amps, and begin experimenting. As you
play, change the volume levels and
tone settings on each amp to find a “composite”
sound you like. You may find one
amp is great for shimmery highs, while
another provides low-end thump. Or they
may all combine into a huge punchy tone.
You’ll probably find yourself getting lost in
non-stop playing – there are nearly infinite
options for dialing in the amps’ volume and
tone settings!
Good luck in your quest for tone, and
remember, when your spouse says, “You
can’t play more than one guitar at a time,”
you can reply with, “Yes dear, but I can use
more than one amp at a time!”
Brian Cravens
Brian Cravens has owned, or is in the process of arranging
a second mortgage to own, virtually one of every Fender
amp made in the 1960s. Many ‘60s and ‘70s Marshalls
have also found a home under his roof. He helps people in
the quest for perfect tone at his Sales Engineer position at
Sweetwater. You can reach him at 1-800-222-4700 ext. 1278
or at brian_cravens@sweetwater.com.
How an Italia Speedster, a sturdy Jazz bass, and a little “sad chorus” can kickstart an international dance party.
The last two years have given us plenty of reasons to seek a jaunty, joyous listening experience in our music. And one of the best finds around is Los Bitchos—the all-female, internationally assembled outfit consisting of Australia-born Serra Petale (guitar), Sweden’s Josefine Jonsson (bass), Uruguay’s Agustina Ruiz (keytar), and South Londoner Nic Crawshaw (drums).
Los Bitchos’ bubbly instrumental psychedelia cocktail mixes their collective musical ingredients (Argentinian cumbia, Peruvian chicha, Turkish Anatolian rhythms, and classic American surf rock), creating a devilishly delicious concoction that’s refreshing as a mojito, hits like a negroni, and is as tropical as a mai tai. The good-time gals socked the world with their 2022 debut, Let the Festivities Begin!, showcasing their superpower of rump-shaking revelry.
Before Los Bitchos’ Nashville opening slot in support of Belle and Sebastian, PG was invited to the historic Ryman Auditorium for a quick and loose gear chat. We covered their streamlined setups that include a favored, fast Italian ride (not a Ducati) that made the trip from the U.K., learned why Petale is “Miss Chorus” and loves the effect’s “sad sounds,” and was schooled on why Jonsson just needs a J bass and an Ampeg amp to make the room twist and shout.
“For me, the big difference between a workhorse guitar you take on tour compared to the instruments you keep at home is the humbucker pickups,” stated Los Bitchos guitarist Serra Petale during a recent Big 5 video for PG. Petale expounds in the Rundown, saying that she prefers performing with the above Italia Guitars Maranello Speedster II because its humbuckers offer beefier tones and a louder presence compared to the single-coil guitars she prefers for recording. “The Los Bitchos live show is a lot different than the album experience,” she adds. Her only touring guitar for this U.S. run takes Rotosound BS10 British Steels (.010–.046).
Veloce
A shot of the Maranello’s cool matching headstock. Note the stylish Italia badge and how the dual racing stripes continue.
Backline Bedrock
This Fender Twin Reverb offers Petale enough punch for her guitar to be heard and a clean platform for her fuzz and chorus pedals to reconfigure her signal.
“I am Miss Chorus”
That’s what Serra Petale declared when asked why she identified a chorus pedal as her secret weapon in the earlier Big 5 video with PG. Her current main modulation manipulator is the Electro-Harmonix Small Clone. (In the Big 5 video, she named the EHX Neo Clone as her go-to, but she’s since acquired the stomp favored by Kurt Cobain.) Another Mike Matthews design makes an appearance in the shape of a big-box EHX Big Muff. The two other noisemakers are a Boss SD-1 Super Overdrive and a Mooer Pure Octave. A Korg Pitchblack keeps her Italia in line.
Just a J for Josefine
The newest addition to Josefine Jonsson’s bass family is her current crush—a Fender Player Plus Jazz Bass that’s been “just lovely to play.” The stock J has Player Plus Noiseless Jazz Bass pickups, a 3-band active EQ with an active/passive toggle, a 4-saddle HiMass bridge, and a modern C-neck shape. She keeps both volume controls wide open and dials in dynamics with her attack. She notes in the Rundown that she’s always bonded more with the Jazz than the Precision, because of the J’s smaller size and thinner neck.
Ain’t Nothing to It But to Rocket
For this run of U.S. shows supporting Belle & Sebastian, Josefine plugs her Player Plus J straight into this Ampeg Rocket Bass RB-112 because, as she put it in the Rundown, “anything Ampeg and I feel like I’m in safe hands.”
Luthier Dave Helmer shows you how to cure buzzy strings, bad intonation, gnarly frets, high action, and other common troubles with off-the-shelf axes.
Guitars are the best. We love them. It’s fun to fall in love with a guitar at a store, buy it, and proudly bring it home. But we’ve all been there … where after a month that new guitar is just not playing as good as it was before. As guitar players, we know what feels good and what feels bad when it comes to playability. Maybe you have setup preferences that you like on all your guitars, or maybe you want to experiment with changes to your setup?
With a few tools, you can perform a handful of tasks that will make your new axe play better and stay in tune. This article is for folks who already know how to tighten loose parts, raise and lower string saddles or bridges, and adjust their truss rods—though I’ll share a tip on how to check it with even more accuracy.
Is that big bulky stock nut uncomfortable on your hand? Let’s trim it down and reshape it. If the action feels high and the neck looks straight, I’ll show you how to lower the action. And haven’t we all swapped out pickups and wondered, “Do they really sound better, or do I think that just because they’re new?” Before you swap your pickups, I’ll share some pickup-height measurements that might make you change your mind.
But wait! There’s more. With everything feeling and playing great, does moving into the upper register start to sound out of tune? Intonation is very easy to check and adjust. When you go to vibrato or hold a note, do the frets feel “sandy”? Are the fret ends rubbing against your hand while you play? Let’s flush and polish those up.
To be clear, we’re not swapping out anything on your new guitar: We’re simply refining the setup. Be sure to go online to see eight videos I made showing various processes covered in this story.
Begin the Beguine
There is an order of operations for best results. Neck relief is the first item to dial in, followed by getting the nut slots cut to the proper depth. After that, setting your string and pickup heights is in order. The final step is setting intonation.
Fret polishing is its own event and can happen anytime between string changes. Getting the frets feeling comfortable and well-polished will take some time and attention. You’ll also need some specialized tools as well as some that can be found in most households. Check the box for my list.
Tools You’ll Need
All of the specialized tools in this list are available through online suppliers, including StewMac and Amazon.
6" Ruler with measures in 64ths
String action gauge [Photo 1]
Miscellaneous screwdrivers
Allen wrenches
Radius blocks
Understring radius gauges (with the radius on the bottom and the top)
Fret-end dressing file
Micro-Mesh sticks [Photo 2]
Tape (low tack)
Cotton swabs
Paper towels (blue shop towels preferred)
Clean cotton rags
Nut files [Photo 3]
Stikit sandpaper
Tri-Flow lubricant
Capo
Feeler gauges
Simichrome polish
Polishing the Frets
Let’s start with the most Zen of these tasks: fret polishing.
Tape off the fretboard using low-tack tape, exposing only the frets. De-tack each piece of tape on your clothing or maybe a rag—I use my jeans or my sweatshirt. Making it less sticky helps prevent pulling finish off a maple fretboard or the neck. Taping the fretboard also prevents putting any cross-grain scratches into it while you file and polish. You can choose to tape off the entire fretboard or work your way down one fret at a time. Dealer’s choice.
One thing to note about tape, any tape: Even when you de-tack it, you do not want to leave it on overnight. If that happens, rub the tape with your finger, which will break the surface tension. Then carefully pull the tape off from a corner, making sure you’re pulling it off at an angle and not at a straight line with the fretboard edge.
Photo 4
Every fret end has a small burr on the corner from the initial fret job. The fret-end dressing file has a non-marring smooth side for rounding the fret end, and a safe square edge for getting into the corner of the fret end. So, take the fret-end dressing file, use the squared off-side, and file both corners of the fret end [Photo 4].
How to Polish Frets
Here’s how easy it is to polish and smooth frets.
Photo 5
One or two strokes is all you’ll need. Then, using the non-marring side of the file, slightly round off the fret ends. [Photo 5].
Photo 6
With the file positioned vertically, file downward to make the fret end flush with the edge of the fretboard [Photo 6].
Photo 7
For a nice, rounded-off look, polish the frets using the same rounding motion from the previous step, working through all three grits of the Micro-Mesh stick [Photo 7].
Photos 8 (top) & 9 (bottom)
Then, polish both the sides and the top of the frets [Photos 8 and 9]. Using a soft cloth and Simichrome, buff every fret. This will give you a great shine and help prevent oxidation. Now it’s time to remove the tape and condition the fingerboard if it needs it.
Note: Every fret has two fret ends to clean up and polish along with the fret itself. This is a fair amount of handwork. If you’ve never done it, you will get tired and need a break. Take that break. Take multiple breaks. Let the process take however long it requires without rushing. If you’re new, do all the fret polishing over a weekend or a few days. It should be fun, not painful. If it is difficult, call your local luthier and hire them to do it for you.
Adjusting Neck Relief
Neck relief refers to the slight amount of concave bowing intentionally created in the neck of a guitar or bass by adjusting the truss rod. For the safety of the guitar, be sure to slack the strings before doing any adjustments to the truss rod. Neither you nor your guitar needs to be tense during this process.
Photo 10
Before whipping out an Allen wrench for the truss rod, start by sight-checking the neck’s straightness. You can sight the neck with the guitar on its back, but I like to put it on edge and look at it that way. It’s easier to see how much curve there is when the guitar is on its side. I feel like gravity plays tricks on my eyes when I sight the neck with the guitar on its back. When I play the guitar, it’s on its side anyway, so looking at it from this vantage point is best [Photo 10].
Photo 11
Tune the guitar to pitch, put a capo on the first fret, and press fret 15 with your left hand. With your right hand, take a feeler gauge and check the gap at frets 7 through 9 (left-handed players, flip your hands around) [Photo 11].
From the top of the fret to the bottom of the string, the gap is usually anywhere from .003" to .012", depending on the feel you are going for. The feeler gauge should fit just between the top of the fret and the bottom of the string. The string shouldn’t move. This will tell you how much “relief” is in the neck. If you find this challenging, keep going—this will take some practice.
When dialing in the relief, I go back and forth between adjusting the truss rod and the string action. Getting the strings low and playing clean on a budget axe can be a challenge. Usually the fretwork isn’t that great, and in the upper register the frets can be unlevel, causing buzzes and clanks. If you need to raise the string action to get the notes to play clean, some fret leveling may be in order. (For more on fret leveling, go online to our article “About Fret Leveling,” from the December 2007 issue.) For good energy transfer, the neck should be as straight as possible. If the neck is straight and the frets are not level, the strings will buzz with low action.
In general, the flatter the radius on the fretboard, the straighter you can get the neck with the truss rod adjustment. On a fretboard with a 12" radius, you should be able to get .005" relief, and on a vintage 7.25" radius board you may need as much as .014" relief. The only way to get better at checking and setting relief is practice.
Refining the Nut
String buzzes, pinging noises when you tune, strings sticking in the slots, and too much string motion in the nut slots are all indicators of trouble. Before getting out the sandpaper and Micro-Mesh sticks, be sure you know if your guitar’s nut is TUSQ or bone. TUSQ is softer, so you should leave TUSQ nut slots a little higher. This leaves room for the TUSQ to wear without causing buzzing on the first fret. With bone, you can cut the slots lower, because it holds up to string wear.
How to Shape Your Guitar's Nut
Watch as Dave Helmer sands down the back half of a nut and creates a smooth finish.
The back side of the nut is usually very bulky and could often stand to lose some material to be more comfortable on your hand. So, let’s start there. Tape off the neck and headstock around the nut using a few layers of tape to protect the headstock face and fretboard. Then, slack the strings and pull them to either side of the nut.
Photo 12
Sand a bevel into the backside—the side closest to the headstock—of the nut using P320 and P400 grit Stikit sandpaper on a flat sanding stick. The bevel should start at the back of the nut and come forward about one-third to one-half the thickness of the nut [Photo 12]. Use P320 for most of the sanding and switch to P400 for the last 5 to 10 strokes.
Photo 13
Next, take a fresh Micro-Mesh stick and work through the various grits to buff/round over the bevel you’ve sanded into back of the nut [Photo 13], so it looks and feels good.
Photos 14 (left) & 15 (right)
TUSQ nuts are often tall, and the strings sit deep in the slots. Wound strings require 50 percent of the diameter of the string to sit in the nut slot, with the other 50 percent above the top of the nut surface. The plain strings should be flush with the top of the nut. Take a look at the wrong appearance [Photo 14] and the correct look [Photo 15] for properly seated strings.
How to Sand Your Guitar's Nut
Our luthier shows you how to use a radius block and sand down a nut.
Photo 16
Use a radius block that matches the radius of your fretboard. With P320 and P400 grit Stikit sandpapers, use mild pressure to sand down the top of the nut. Sand a bit and check your progress by setting the strings in the slots and putting a little tension on them. Tuning to pitch isn’t necessary. Use the P320 for most of the sanding, and switch to P400 when you are close to the 50/50 height for the wound strings. The radius block sanding will leave a flat, sharp edge on each side of the TUSQ nut [Photo 16]. To round over the sharp edge, use the sanding block and Micro-Mesh stick.
Use the coarse grit of a Micro-Mesh stick to round over and blend the bevel from the back into the top of the nut. Work through the grit gauges until it’s smooth. There is a fine balance between the bevel at the back of the nut and the top radius of the nut. Go back and forth between the two steps to get a nice, finished look and a nut that functions at optimal levels.
… And Refining the Nut Slots
Nut height is the distance from the top of the first fret to the bottom of the string. A good height on the wound strings is about .020", and for the plain strings about .015". Measuring this gap with a feeler gauge can be tricky because of the fretboard radius. Many repair folks do this by eye and feel, based on experience. It takes some practice. A good check: At pitch, fret the third fret and check for a small gap between the string and the top of the first fret.
How to Widen Your Guitar's Nut Slots
A diamond file can make quick work of deepening and widening nut slots.
Photo 17
The bottom of the string should be sitting on the bottom of the front half of the nut slot [Photo 17]. File down each nut slot to its proper depth using the corresponding nut file. There are diamond nut files on the market in multiple sizes to accommodate many string gauges. Make sure to keep your strokes straight. The standard-toothed files have less sizes and usually require rolling them from side to side to get a well-fit string.
Next, using a proper-sized file, round over the bottom back half of the nut slots down, toward the face of the headstock and away from the strings. This will allow the strings to move freely during tuning or bending, while still having support from the front half of the slot.
How to File D and G String Slots on Guitar
The D and G nut slots require special attention on 3x3-style headstock configurations.
Photo 18
On guitars with 3x3 headstock configurations, the D and G strings need the back half of the slots feathered out away from the center, so the string has a direct path to the tuner post. Using a file that is one size bigger than the string and rolling it side to side on the back of the nut slot will give the string a straight path to the tuner post. Photo 18 is my illustration showing which slots need feathering.
Additionally, use pencil lead to lubricate the slots. Just get in there with the point of a pencil and mark the slot with its graphite. You might also put a drop of Tri-Flow on the front of the string tree. Tri-Flow will run down the string, so take a cotton swab or cloth to clean up any excess. Tri-Flow has Teflon in it, so you don’t need much.
Adjusting String Action
First, find your string height by measuring the string action at the 17th fret on a Fender-style guitar and at the 15th fret on a Gibson-style instrument.On electric guitars, action can range from 3/64" to 3/32", depending on the player’s comfort. My preferences are 1/16" on the treble side and 5/64"on the bass side on both Fender- and Gibson-style guitars measured at the appropriate fret.
How to Adjust Guitar Action
Here’s a look at how our author adjusts the action.
Photo 19
Always loosen the string tension before making action adjustments. This will save wear and tear on the small bridge components. Take either a 6" ruler or a string action gauge and set it on the frets. Measure from the top of the fret to the bottom of the string [Photo 19].
If the action is high, you will lower that string’s saddle or that side of the bridge. If it is low, you will raise it. Make sure the individual saddles are sitting square and upright to the face of the bridge. You do not want them sitting at an angle or leaning over. This will cause buzzing.
Photo 20
The bottom of the strings should match the radius of the fretboard when measured with an understring radius gauge [Photo 20]. Start your adjustment with the outside strings, working toward the center. On Fender-style guitars, set the two outside strings to the height you want and have the middle four strings a bit higher than that. Bring the gauge up from underneath and just touch the two outside strings. Then, bring the strings down a little at a time until the radius matches.
On a Gibson-style Tune-o-matic, the saddles are not individually adjustable. So, if the radius doesn’t match, the saddles will need to be filed. To do this, I recommend using toothed nut files and a rolling side-to-side motion. Do a little work and check your progress. Remember to slack your strings when adjusting the saddle or bridge up or down.
Changing Pickup Height
Photo 21
Finally, let’s take a look at pickup-height adjustment. First, to check pickup height, use the two outside strings again. Press the top wound string on the last fret and measure the distance from the top of the pole piece to the bottom of the string [Photo 21]. This distance can range from 3/64" to 1/8". My preferences are 1/16" on the treble side and 5/64" on the bass side.
Adjusting Guitar Pickup Height
Dave Helmer walks you through the process of adjusting the height of your guitar’s pickups.
On most styles of pickups, there are height adjustment screws on either side of the pickup to raise or lower it. The closer the pickup gets to the strings, the more present string frequencies become. If you get too close, the magnetic pull can affect the string’s vibration and you may hear some strange sounds as you go into the upper register.
On Strats, the neck pickup is regularly set too close, and at the 12th fret and above, the low E and A can sound choked, honky, and not clear. Lowering the neck pickup with a screwdriver usually solves this issue.
Setting Intonation
Photo 22
If you can’t get your guitar accurately in tune, you might need to check its intonation. Adjust all saddles as far back as possible so every string will play flat at the 12th fret. You will adjust the saddles forward, gradually making the octave play sharper until it’s in tune with the open string [Photo 22].
Adjust Your Guitar's Intonation
With a tuner and a screwdriver, Dave Helmer shows you how to adjust your guitar’s intonation.
Depending on your vibrato style, experiment with intonating the plain strings slightly flat. Use your ear and do what sounds good. Sometimes, the plain strings can have perfect intonation, but playing with vibrato can make them sound sharp.
To fine-tune intonation, the individual bridge saddles must be adjustable. Once the intonation is set, recheck the string radius using the understring radius gauge and adjust as needed. The radius can change as the saddles come forward during intonation.
Tri-Flow is great for lubricating saddle parts. Put a small drop on the saddle-height adjustment screws and capillary action will suck it in. Adjust the saddle up and down a few times to coat the threads. Clean up any excess with a cotton swab or cloth. Put a drop or two onto a cotton swab and apply the Tri-Flow to the top of each saddle where the string rests. This will help strings move freely during tuning and after any bends or vibrato.
And that’s it! For a relatively small investment in tools and time, you’re now ready to supercharge your new guitar—and maybe your long-treasured axes, too.