Play whatever you want, whenever you want. Sounds good, right? The road to get to that level can be filled with practicing new scales and chords along the way. New patterns and shapes can be tricky and trying to get your fingers to do your bidding can be a challenge. It seems like there are millions of finger exercises to work on, but to what end?
You learn a crazy shape, play it for your friends and family, they're (not) impressed, and then it's on to the next. Not much of a long-term plan for development.
I have worked on the following examples over the years, and they have taught me a lot about how to physically play the guitar and gain more control over my fingers. Other patterns and shapes are just as good, so long as you practice them correctly and know what you're trying to achieve. So, what are you trying to achieve?
Relaxation
Don't crush the guitar while playing. The harder you press down, the longer it takes to release all that physical energy. Lighten up and you can move your fingers faster.
Great Tone
Place your fingertip right behind the fret, keep your fingers at a right angle to the neck, keep the pad of your thumb on the back of the neck. Your hand is not a coat hanger that hangs on the guitar.
Smooth as Silk
Legato means "connected." All notes get their full value, with no dead air in between.
Shape vs. Sound
Yes, these exercises and patterns will sound weird. Focus on the finger pattern, not the sound it produces.
Every Possible Finger Combination
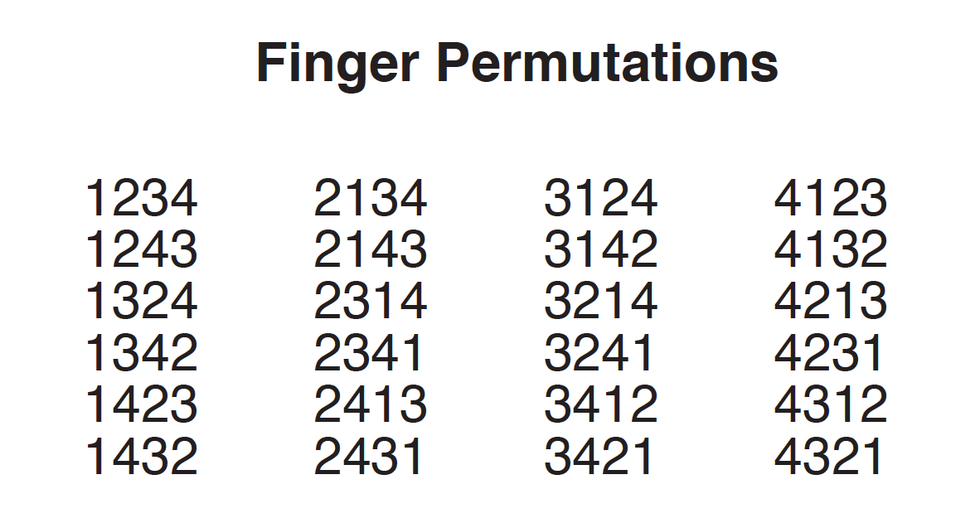
Ex. 1 is a list of all permutations (or combinations) of the first, second, third, and fourth fingers of your fretting hand. Pick a position, play each permutation with various rhythms on each string. I typically start on the 6th string and move through to the 1st string, and then back down.
Play the first pass in whole-notes and the second pass in dotted half-notes. Keep making the counts smaller until you're doing sixteenth-notes (four notes per click) Use a metronome, set at a tempo that makes the sixteenth-notes playable. Yes, the whole-notes will take a long time, but this is not a speed drill. Focus on relaxed, legato-style playing and great-sounding notes. Don't get bored with it!
Finger Freedom Ex. 1
In the following examples I took a single permutation and worked it from whole-notes up to sixteenth-notes. For these, I chose 1423 and started in 7th position. As you work through each example, think about tone, time, and above all, be relaxed.
Finger Freedom Ex. 2
Finger Freedom Ex. 3
Finger Freedom Ex. 4
Finger Freedom Ex. 5
Finger Freedom Ex. 6
Finger Freedom Ex. 7
Finger Freedom Ex. 8
Keep It Separated
The next exercise is designed to enhance your disassociation skills. Switching to permutation 3421, Ex. 9 moves the permutation up and down the 1st string. Begin with the open E, play the permutation in 1st position, play the open E, play the permutation in 2nd position, etc. Once you get the idea, do this on all six strings, use all the rhythms from the previous examples and move up the neck until you run out of frets.
Finger Freedom Ex. 9
Ex. 10 and Ex. 11 use the 2431 permutation to build chords across the neck. These also tackle the sound vs. shape issue and require additional focus on relaxation and hand position. In Ex. 10, build each chord using the permutation and let the notes ring out. Relax all four fingers, move up a set of strings, and build the next chord. Ex. 11 is the same 2431 permutation but builds the chords from the 1st-string side of the neck.
Finger Freedom Ex. 10
Finger Freedom Ex. 11
If you're into frustration and possibly throwing your guitar out a window, then this next group of exercises is right up your alley. For these there is one additional rule: Once a finger is placed on the fretboard, it stays on the fretboard until you have to move it again.
In Ex. 12, place your index finger on the 7th fret of the 4th string and hold it down, but do not play this note. Use your second, third and fourth fingers to play the notes on frets 8, 9 and 10 on the rest of the strings.
Finger Freedom Ex. 12
Ex. 13 is the same concept but this time you're holding down your second finger, using your first, third, and fourth fingers to play the notes on frets 7, 9, and 10 on the rest of the strings.
Finger Freedom Ex. 13
Ex. 14 and Ex. 15 continue this process, holding down your third and fourth finger, respectively. In all four examples skip over the 4th string with your remaining fingers.
Finger Freedom Ex. 14
Finger Freedom Ex. 15
Ex. 16 and Ex. 17 are less irritating, but only slightly so. These exercises continue to focus on hand position, relaxation, and legato playing while moving only one finger at a time. In Ex. 16, use your first and third fingers on the 6th string, then second and fourth fingers on the 5th, back to first and third on the 4th string, etc. Continue this process all the way up to the 1st string and then back down to the 6th string. Ex. 17 starts with the second and fourth fingers on the 6th string and continues in a similar fashion.
Finger Freedom Ex. 16
Finger Freedom Ex. 17
Even though these examples are not written out in all subdivisions, they should eventually be practiced that way. Remember to start at a slow tempo, playing longer rhythms. Focus on note quality, relaxed left-hand playing and legato style. Move to eighths, triplets and sixteenths only after these examples become more familiar. Good luck!


