As a typical guitarist, I have to multitask during live performances. Singing, playing lead and rhythm guitar parts and working the crowd all at once can be quite demanding during a show. To simplify the performance and not compromise my guitar tone and effects, I use MIDI switching. If you’re tired of dancing on your pedals give this a try.
Tools
The main benefit of MIDI switching is it enables you to organize and change all of your effects and amp channels with the touch of a button. Here are the tools you’ll need to get started: MIDI foot controller, MIDIcapable effects, MIDI-capable amp, MIDI cables and Guitar cables.
There are several MIDI foot controller pedals available. Examples include: Voodoo Labs Ground Control Pro and GCX Switcher, Fender Cyber Foot Controller, Tech 21 MIDI Moose and MIDI Mouse, Roland GFC-50 and FC- 300, and T.C. Electronic G-Force and G-System (which is an effects unit as well as MIDI controller).
As for MIDI-capable effects, almost all rackmount effects have MIDI In, Out, and Thru ports, including: Lexicon MX, MPX and PCM series; T.C. Electronic D-Two, G-System and G-Force; Alesis MicroVerb and MidiVerb, and a long list of others. Also, there is no need to stop using your stomp boxes – they can be incorporated into this setup if you have the right MIDI foot controller.
Amps such as the Marshall JVM410 and Randall RM4, RT2, and MTS Series RM100S also feature MIDI switching capability.
Setup
Once you have your tools, you’ll need to get them set up. This includes making the MIDI cable connections, running the guitar signal connections, and programming the system.
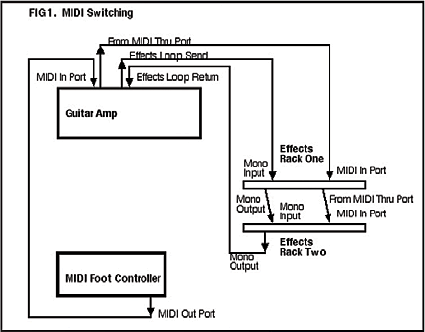
The MIDI foot controller is the master. The effects and amp are slaves. For this example, we’ll use two rackmount effect units (see Fig 1). The signal flow starts at the foot controller MIDI Out port. Select the desired length MIDI cable – say 20’ – and connect the foot controller’s MIDI Out into the amp’s MIDI In port. The next MIDI cable is plugged into the amp’s MIDI Thru port and connected to the first effect’s MIDI In port. We’ll chain the next effect together in the same manner from effect one’s MIDI Thru port into effect two’s MIDI In port.
This connects the controller, the amp and two effect units together via MIDI. The reason we use the MIDI Thru ports instead of MIDI Out ports is because a MIDI Thru port duplicates the exact message the In port receives. This allows you to daisy-chain multiple pieces of MIDI gear together so the MIDI messages from the foot controller get all the way through to the last effect in the chain.
With rackmount effects, you’ll often get the best results using your amp’s effects loop (look on the back of the amp) to do this. Use a guitar cable from the amp’s effects loop Send and connect it to effect one’s mono Input (often the left channel), then out of effect one’s mono Output (again, often the left channel) to effect two’s mono Input. We’ll complete the process by connecting effect two’s mono Output to the amp’s effects loop Return.
Program
To program this setup you’ll need to decide what amp channel (clean, crunch or lead) and effects you want.
The amp will probably have a MIDI “Learn” button on it. Once you’ve selected the channel you want, press the MIDI Learn button and select the channel you want on the foot controller. The amp will store this information and each time you select that channel on the foot controller it will switch the corresponding channel on the amp.
The effects are a little different. They’re already set up to respond to a MIDI command. You pick the desired effect and save it to a user preset (the same preset number you want associated with the amp channel). For example, let’s say that for channel 1 you want a clean guitar tone, and a small hall reverb and a chorus from your effects. You would MIDI Learn the amp to the clean channel, effect one to a small reverb on preset 1, and effect two to a chorus on the foot controller’s preset 1. When you select preset 1 on the foot controller, the amp and both effects will switch to the designated settings listed, providing instant tone without a lot of dancing.
Of course, this is just a basic overview of the process. Consult the manual for your MIDI foot controller to get the specifics for your rig. It’s all pretty easy once you do it a time or two, and it’s well worth it to simplify your rig and streamline your performances.
Tim Harrington
Tim Harrington performs in the Tim Harrington Band (tim-harrington-band.com), is a recording and live sound engineer and has been a Sweetwater Sales Engineer for four years. You can reach him at tim_harrington@sweetwater or 800-222-4700 x1395.


