Using automation, you can precisely adjust a track’s volume levels and pan positions, as well as
toggle solo and mute buttons on and off, change EQ and effects parameters in real time, and more.
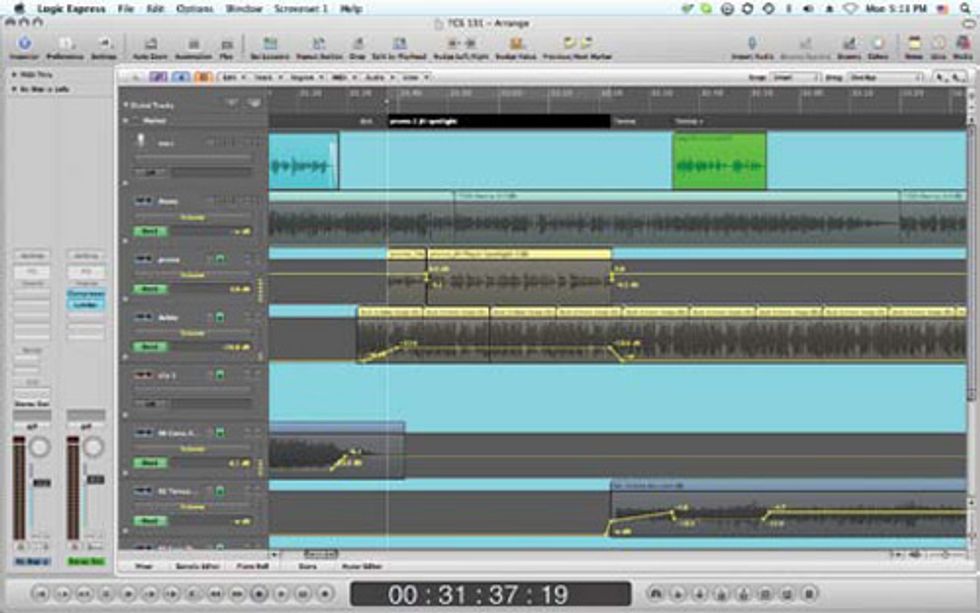
In this mix, the horizontal yellow lines indicate automated volume levels.
Details, details, details. Many PG readers own home studios where we can record, edit, and mix. Most of us are probably using a computer-based digital audio workstation (DAW) running software like Apple Logic, GarageBand, Avid Pro Tools, Propellerhead Record, MOTU Digital Performer, Cakewalk Sonar, or whatever. With all of these, you can automate virtually every mix element at your own pace. While some say this can be bad because you can go on and on without making final decisions, I think it’s a good thing. With a mix, it’s truly all in the details.
Mixing can be the most frustrating part of any project. While it seems like writing and recording all the elements would be the hardest thing (which it can be), mixing is the last stage—and thus your final opportunity to make it all work together. The pressure is on you or whomever is mixing the music to get the kick to be heard with the bass, every vocal level balanced with just the right amount of EQ, every guitar lick punched through, and every reverb just right.
And then, of course, you have to output a stereo mix in the proper format for either a mastering engineer or a direct purchase. With some projects having more than 100 channels (yes, the big ones are that brutal), the task ahead can be daunting. Like anything else, mixing is an art form that takes time to get right.
But therein lies the value of a DAW. Many of us, myself included, choose to mix “in the box,” which means the entire production stays within the computer, with no (or very little) outboard gear involved. The only external piece of hardware I run through is a Manley Massive Passive tube EQ—and, even then, it’s almost always set up precisely the same. Working this way, every single element is stored with automation: Every time you call up a mix, it’s exactly as you last left it. This means you can listen to, reflect upon, and analyze the music— focusing on all the small, but important details—and make changes accordingly.
While some projects (such as TV work) must be mixed under tight deadlines, many do not have to be rushed. That means you can and should take your time and do it right. My mindset? People will listen to this for many years to come, so don’t rush this last step.
I like to make working mixes that I can easily place into my iPod and share with band members or artists. While the mixes I make are always 16-bit/44.1 kHz (just like a CD), I’ve found that MP3 or AAC mixes are perfectly acceptable for referencing. Just try to encode them at the highest possible bit rates you can while still keeping the file sizes manageable for today’s internet connections.
I don’t organize songs by labeling them as versions (such as “My Song Version 1”)—I simply date them. This way, the version with the latest date is simply the latest updated version. I place them into a folder called “bounces” (such as “My Song Bounces”). I color-code the latest file red, so I’ll instantly know that’s the current mix. If I do several mixes of a song in one day, I’ll include information in the file name, such as ‘“My Song - vocal up 1dB 4.28.11.”
I make MP3s and AACs for sharing with clients or band members, but I also put full-resolution mixes into my iPod or iPhone. In iTunes, I create a playlist for each current project titled “XXX Production Mixes,” drag the latest files in, and then listen at my leisure. To keep track of any changes I want to make on a given version, I’ll type instructions into the Notes App on my iPhone and email them to myself.
I’ve found it’s best to do multiple kinds of listening. Sometimes I’ll listen to the song as a whole, while other times I’ll focus intently on just a single element—such as how the kick and bass work together or how the delay and ’verb blend on the guitars. I’ll also listen without thinking—try to experience the song almost unconsciously. Does something stick out? If it does, I’ll make a note of it.
The next day, I’ll call up the mix, check my notes, and make the fixes. With DAW automation, you can compare every change to the previous version. Depending on the project, I’ll go through this cycle more than 10 times per song. It can be arduous, but it gets the details right. For example, yesterday I was doing an unfocused listen during a hike, and I noticed one song’s vocal reverb was too dry. Switching my brain to a focused listen, sure enough, it was. But I hadn’t noticed it on previous listening sessions because I was too focused on other details. I made the fix later that day, and then output a new mix and stored it in my iPod.
By using your DAW’s automation, keeping your files organized, and constantly listening, comparing, and paying attention to every element, you can deliver better mixes. Next month, we’ll examine some useful guitar-specific mix techniques. Meanwhile, remember that it’s all in the details.
 Rich Tozzoli is a
Grammy-nominated
engineer and mixer who
has worked with artists
ranging from Al Di
Meola to David Bowie.
A life-long guitarist, he’s
also the author of Pro Tools Surround
Sound Mixing and composes for the
likes of Fox NFL, Discovery Channel,
Nickelodeon, and HBO.
Rich Tozzoli is a
Grammy-nominated
engineer and mixer who
has worked with artists
ranging from Al Di
Meola to David Bowie.
A life-long guitarist, he’s
also the author of Pro Tools Surround
Sound Mixing and composes for the
likes of Fox NFL, Discovery Channel,
Nickelodeon, and HBO.