Welcome back to our neck thru guitar project.
Last month, we discussed using CAD
to design, and now we’re ready to start
measuring. Our specs are roughly as follows:
a Wilkinson VS300 tremolo, Sperzel
locking tuners, 5-way switch, Volume, Tone,
Tone with push/pull coil-split, top-loaded
controls and pups, arranged HSH using
DiMarzio Virtual Vintage Series pickups.
The neck is a 25.5”
scale, has 22 frets, 12”
radius, 1.680” nut and a
2.250” heel width and
features a 12 degree
angled headstock,
drilled 3x3 with straight
string pull.
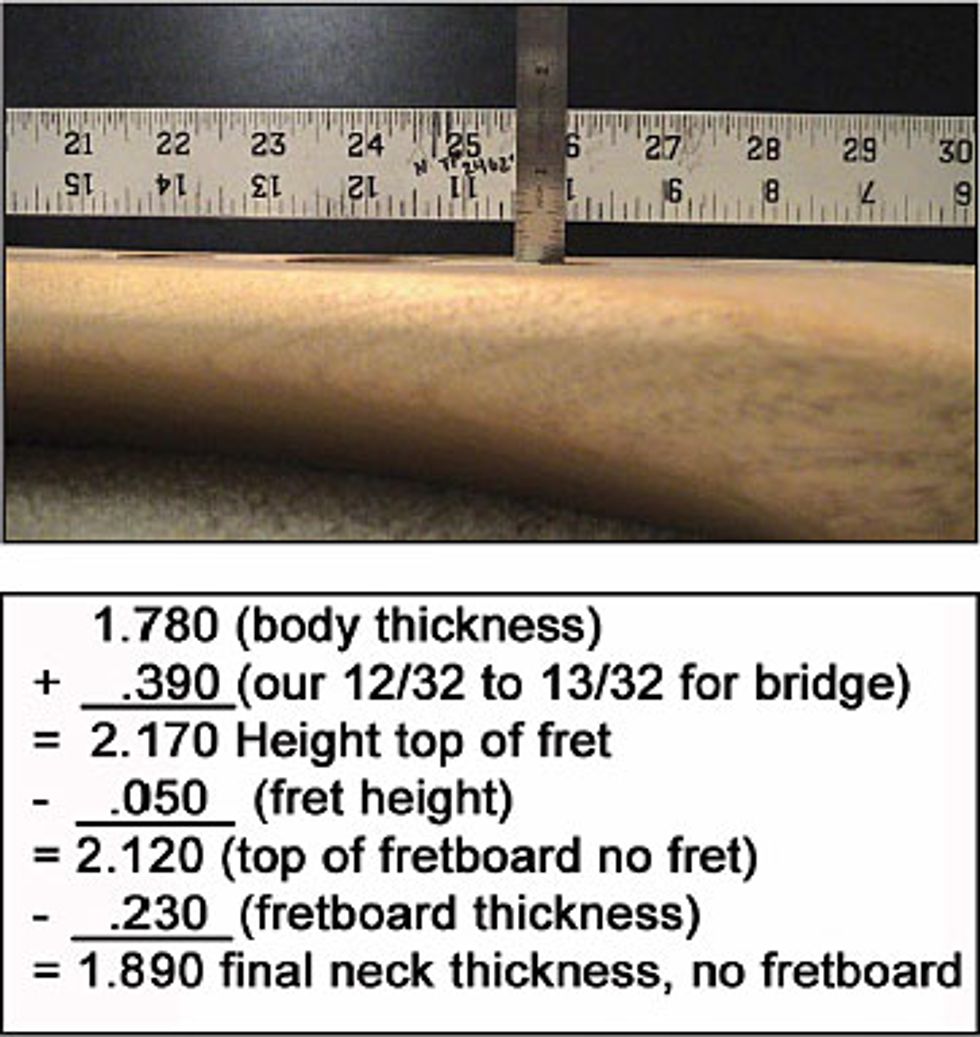
The Tremolo
The block on a VS300
requires a body thickness
of 1.750” to 1.780”,
but you may find ways
to manipulate that
depending on if you
use a tremolo or hardtail
bridge. This bridge
requires a target string
height of 12/32” to
13/32” from the body
surface plane to the
string height plane. You
can learn a lot from
guitars already built
and playing fine. If you
have a guitar that is a good sample for
the bridge you wish to use, just reverse
engineer the process. Set up the guitar to
proper playing specs (bridge height and
truss rod), lay the guitar on its back and
remove the strings. Place a straight edge
or good yard stick along the center of the
fretboard. Also view the current truss rod
setting – it should be flat for this reference.
Using a 6” machinist rule, measure
the distance between the top of the
body (our body plane) and the bottom of
the ruler (our string plane) viewed at the
intonation point – in our case, 25.5 inches
from the nut.
Fretboard Thickness
This is an important note pertaining to the fretboard and/or neck to body plane offset. For this project I want to keep with a fretboard edge thickness of .170” to .180”, so when I draw my fretboard I’ll take this into consideration as I generate my width and fretboard radius, ending up with a final board thickness between .230” and .250” at the thickest points. On some necks the fretboard thickness at the edge grows thick to thin, based on how you cut the radius in relation to the neck plane. I like it consistent, plus the side dots are easier to center that way. You can play with the final fretboard thickness – some like ‘em fat, some thin – but the truss rod can also demand certain neck shape thicknesses, based on truss rod depths at critical points.
Truss Rod
For this project I am using what I refer to as a “compression” truss rod, which requires an arc cut channel; it’s the same basic truss rod used by most major manufacturers. In the bottom shape of the channel, the key is to get the rod to react its best against string tension. It can be a consistent arc, which is where most people start, or you can tailor your own ideas. Other two-way rods often get a flat bottom channel, making routing them with a plunge router very easy. An arc channel requires you to create a jig that has raised arc-shaped rails for the router base to ride on, to give you the final depths needed for your truss rod. Our truss rod is a 7/32” diameter rod, so I’ll use a 7/32” ball nose router bit to cut a matching round bottom, no plastic sleeve required. I highly recommend lubing up that truss rod with some raw beeswax to keep it operating smoothly for life and help avoid any glue that may come in contact with it.
Next month we will make a check list of all the operations, cutters and drill bits to be used and story book the entire process for reference and editing as we build any model. If you can see your project from start to end, you’ll have a far greater understanding of all that is required and work your way around obstacles. Stop back next month as we start wood chucking and gluing.
Gene Baker
Any questions or comments visit
www.finetunedinstruments.com
www.meangene.org
email me at b3gene@verizon.net
Fine Tuned Instruments LLC, home of his “b3” instruments.