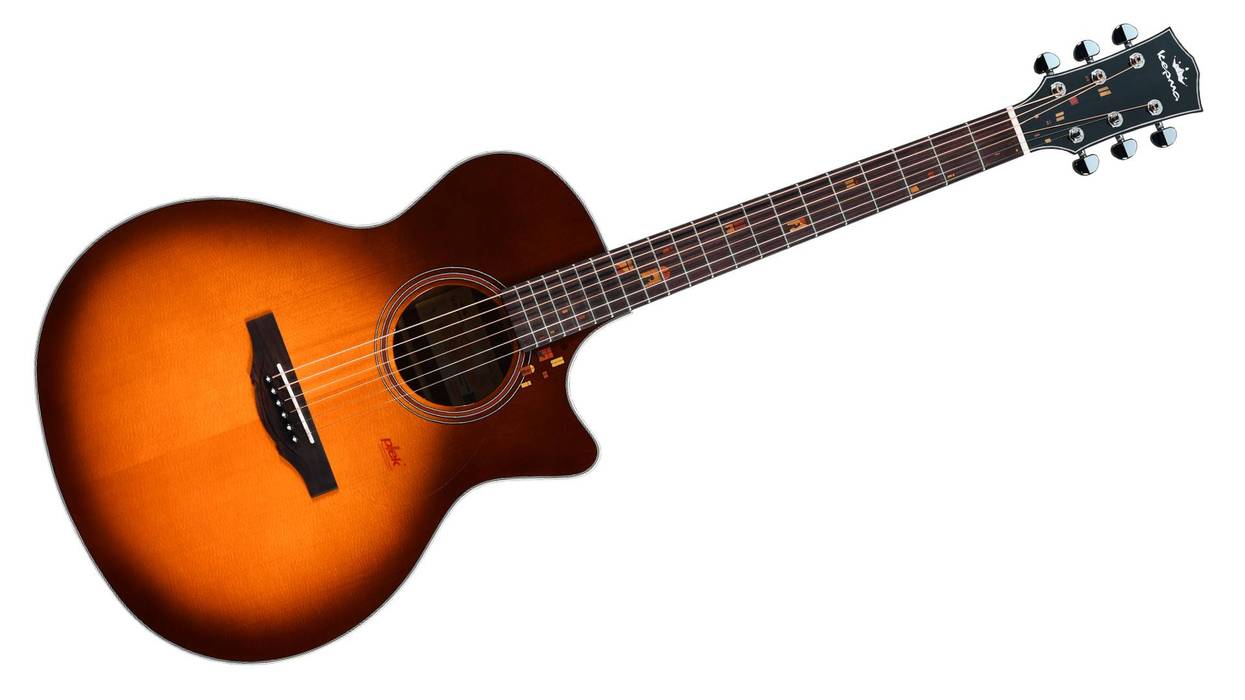
Our series on how to age a guitar, piece by piece, continues. This month we tackle the bridge and strap buttons.
Image 1 — Courtesy of singlecoil.com
Hello and welcome back to “Mod Garage." This month we'll continue with our relic'ing project, taking care of the rest of the hardware: the bridge including its studs and the strap buttons. This is also the first time we'll discuss some possible upgrades regarding the hardware.
Image 2 — Courtesy of singlecoil.com
When comparing the strap buttons of our Harley Benton DC-Junior guitar (Image 1) with vintage Gibson Les Paul Junior Double Cut ones (Image 2), it's easy to see they have a slightly different shape and are mounted in a different way. While vintage Juniors have the upper strap button mounted on the back of the guitar, our Harley Benton has it on the upper horn, like a Stratocaster. Regarding balancing the guitar when playing it on a strap, I think this is a good upgrade. But if you want to stay more original, you can relocate the strap button to the back of the guitar, closing the hole on the upper horn if you wish.
The original strap buttons have a slightly different shape, and the early models were made out of aluminum, while the ones on the Harley Benton are metal. You can buy aluminum strap buttons with the original shape from several companies if you wish: the Gibson part number is PREP-020. Personally, I'm fine with the ones on the Harley Benton guitar, but I removed the black felt washers underneath them. Vintage guitars don't have these, and because we'll relic the body of the guitar as well, there's no need to protect the finish in these areas.
Image 3 — Courtesy of singlecoil.com
As for the bridge, we have a big difference here. The vintage Gibson has the classic, super-simple, and non-adjustable wraparound-bridge design (Image 3), while the Harley Benton has a wraparound version with six individual adjustable saddles, like a Stratocaster (Image 4).
Image 4 — Courtesy of singlecoil.com
Regarding tuning, this is a real upgrade, but I think it destroys the appearance of this guitar and its design of simplicity. Besides this, the quality of this bridge is only average. It will work, but there are bridges like this on the market with better design and quality. So, if you like the idea of individual adjustable strings, you can keep this bridge or buy one like it with better quality. The studs have a metric M8 x 1.25 mm thread, and the bridge has a post spacing of 82 mm and a string spread of 52.5 mm.
Image 5 — Courtesy of singlecoil.com
I decided to change the bridge for a compensated, non-adjustable wraparound bridge made out of solid aluminum from the KMS company called the “Whiptail" (Image 5). This looks pretty much like the original but is compensated for a better intonation and is a real upgrade regarding tone.
Image 6 — Courtesy of singlecoil.com
I also changed the diecast studs for the KMS version made out of steel (Image 6) and incorporated another upgrade: an additional thumbwheel to lock the studs against the bushings. I do this on almost all Gibson-style bridges to enhance tone and stability. The problem is, there are no existing thumbwheels with a M8 thread, so I had to use a standard thumbwheel and modify it to fit. The system behind this is very easy: Simply put the thumbwheel on the studs as high as possible and screw the studs into the bushings before installing the bridge. After adjusting the perfect height of the studs, get the thumbwheel as low as possible and tighten it so it will lock the studs against the top of the bushings (Image 7). Voila! The whole bridge system is as solid as can be now, and you'll instantly recognize how tone and sustain is enhanced on most guitars, so give it a try. I left the original bushings in place to avoid any possible damage on the lacquer when pulling them out to replace them. The factory-equipped ones are okay and will work fine.
Image 7 — Courtesy of singlecoil.com
You can use the same relic'ing process we used for the metal parts of the tuners and screws in my previous column, “DIY: Relic'ing Tuners, Part 1," but I'll also show you an alternative way to do this. If you want to keep the stock bridge or change it for a similar type with individual adjustable saddles, it's important to completely disassemble the bridge before you start. At first, have a look at the pics of the original bridge and strap buttons, to get an impression of how they look after 50 years and more. Especially on the vintage bridge (Image 3), you can see there is noticeable wear-off where the strings have contact and that everything looks a bit dull. So, as always, break the shine with fine sandpaper or steel wool. If you want to mimic heavy wear-off on the bridge, use a small file or some sandpaper wound around a toothpick or similar, and rub away the nickel plating at the contact points of the strings. Next, put everything inside our box with the mixture of nails, metal parts, broken glass, gravel, sand, little stones, basalt, etc. and shake the devil out of it to create some nice random scratches, dings, dongs, and bumps. When you're happy with the result, take the parts out of the box and use a soft brush to clean them from dust. If you want, you can use iron (III) oxide (ferric oxide) liquid to create even more patina on some random spots of the hardware and the screws. Don't forget to wear gloves and goggles and to use old newspapers to protect the surface you're working on.
You may have heard of the aging method using hydrochloric acid (aka muriatic acid) for hardware. This is a good alternative for the parts we have in the works now. So, why didn't I mention this earlier? For a very good reason: We started with the metal parts of the tuners, and even if you close the hole in the case carefully, more than enough acid fumes will creep into the guts of the tuner, causing corrosion inside. This often results in non-turning tuners that you'll have to replace. The only procedure that's safe for this is to take the tuners apart and only age the cases. We're talking about a very strong acid, so before we start, here are the basic rules to follow to be safe:
- Always wear acid-resistant gloves, goggles, an apron, and respiratory protection.
- Never do this inside your flat. Do it outside or in very well-ventilated areas.
- Keep away all pets and children from this procedure.
- Always have a bowl of clear water near you to stop the process.
- Never put the parts directly into the acid. Only the fumes of the acid should make contact with the hardware.
- Never put the acid into your sink or outside in a sea, river, etc. This is hazardous waste! For disposal, contact your local acceptance point for hazardous waste.
If you feel unsure about this procedure, stay away from it! The “stone aging" process works well and is not dangerous in any way. Safety first is the prime directive here.
You don't need much for this. First and foremost, you need hydrochloric acid. The highest possible concentration of this acid is 37 percent, but I suggest using a 25 percent concentration or less. As a rule of thumb, think of it this way: less concentration equals longer time to expose the hardware to the fumes, but safer handling. You can dilute hydrochloric acid with cold water if you want to get a softer concentration. Always put the acid into the water, never the other way around! This works pretty well on nickel-plated hardware. A higher concentration will work best for chrome-, gold-, and black-plated hardware.
Image 8 — Courtesy of singlecoil.com
We also need to use two plastic boxes that fit into each other, and the biggest one, containing the smaller one, needs a lid (Image 8). Never use any metal or aluminum boxes for this. I recommend using clear plastic boxes so you can see what's going on inside from the outside.
The process works best if you slightly break the shine of the parts with some fine sandpaper or steel wool, and then afterwards clean and degrease them with naphtha. Now put the hardware into the smaller box and the acid into the bigger box. Put the smaller box into the bigger box so it will swim on the acid. Now, close the lid of the bigger box and wait. The fumes of the acid will start the process on the hardware and, depending on the hardware, its plating, and your personal taste, the process can last from a few minutes up to several hours. Check closely for the result, especially when having different kinds of hardware in the box. When you're happy with the result, take the inner box with the hardware out and put the hardware into clear, cold water to stop the process. Afterwards dry it with an old cotton rag or towel, and then you're done!
Again, this is only one way of doing it. You're invited to discuss other options with each other in the comments section online.
Image 9 — Courtesy of singlecoil.com
Here's the result of the process after breaking the shine, putting it in the aging tumbler for an hour, and then a 45-minute treatment in the hydrochloric acid box (Image 9). I think it looks great, and I'm very happy how it turned out.
In the next part of this series, we'll start relic'ing the pickup, including the pickup cover and the screws, and talk about pickups for such a guitar in general. But first, we'll have a deeper look into another guitar mod next month: the combined “preset/deck" solution for series switching on a Stratocaster.
Until then ... keep on modding!
Fig. 1 -Strap buttons come in an amazing array of shapes and sizes.
Everything you need to know to easily secure your acoustic or electric.
For most performers, it's essential that a guitar has strap buttons (Fig. 1). Though many guitars come with strap buttons already installed, some don't. If you have a guitar without strap buttons and want to install them, the good news is it's a straightforward job—if you know the correct procedures.
There are two critical considerations: The first is to find the right location. If strap buttons are installed incorrectly, your guitar won't balance well when you play standing up. The second consideration is to be very careful when installing a button on the neck heel—you can crack it. So, using both an acoustic and an electric guitar to illustrate the process, let's find out how to do this right and avoid those potential problems.
Our instruments.
Recently, a client brought in two guitars: a Larrivée OM-03 Vintage Sunburst and a 2002 Gibson SG Supreme. The Larrivée already had an endpin, but it lacked a strap button. The owner wanted me to install one so he could stand when playing onstage. For the SG Supreme, he wanted me to replace the stock buttons with a set of locking devices, so he could safely rock out with his band. For the Larrivée, we decided on a standard nickel-plated strap button and felt washer from Allparts; for the SG Supreme, we chose Schaller Security Locks.
One caveat.
My client wondered if adding a strap button would devalue his acoustic. On most modern flattops, a correctly installed strap button won't devalue the instrument (two exceptions are high-end vintage guitars or classical guitars). A strap button is useful for working musicians, and most guitar manufacturers will offer to install one before the guitar leaves the factory. Another reason to add a strap button to an acoustic is that tying a strap around the headstock (the old-school approach) can damage the finish, and in some cases, add unnecessary pressure to the neck joint. There's a lot of debate about this. Most collectors would never want anything installed on a guitar that was not considered original, so if you have a vintage axe keep this in mind.
Selecting the location.
Fig. 2 (left) To install a strap button on the treble side of a flattop's neck heel, you need to take two measurements. One is the distance down from the fretboard. Fig. 3 (right) The second measurement is the distance away from the body.
Let's begin with the acoustic. The first step is to decide where to install the strap button. For the Larrivée, I determined that the best location was on the treble side of the neck heel about 1 1/4" below the top of the fretboard (Fig. 2) and about 1 1/2" out from the body (Fig. 3). I selected this spot for balance and structural integrity: This placement will keep the guitar from leaning away from you when you play, and this part of the neck heel is very stout, so you won't have to worry about cracking the heel—assuming the button is installed correctly, as we'll discuss in a moment.
Fig. 4 - Mark the strap button's location by pressing the screw tip into the wood.
Once you've made these two measurements and located their intersection, mark it. You can mark the location using a pencil or gently press the strap button screw into the heel (Fig. 4).
Tip: If you use a screw to mark the drilling location, be careful not to slip—you could scratch the heel.
Selecting the drill bit.
The goal is to drill a hole that's slightly smaller than the outside diameter of the screw. If you use a drill bit that's too big, the screw will strip the wood and the button will not hold properly. Most strap button screws are relatively close in size, but they do vary depending on the manufacturer. Make sure you measure both the threads and the screw shaft so you know what size drill bit to use.
For example: The outside diameter (including threads) of my strap-button screw was 9/64", and the shaft (without threads) was about 7/64" in diameter. By choosing a 7/64" bit, I left enough wood for the screw to tap (or thread) itself into the heel without damaging it.
Gauging drill bit depth.
Fig. 5: Measure drill bit depth, then mark it with a red Sharpie.
With the screw inserted into the button, measure the depth needed for the screw and mark your selected drill bit with a red Sharpie (Fig. 5). This way, you'll know how deep to drill the hole. If you drill too far, you could hit the neck pocket. But if the hole is too shallow, you could crack the heel when you install the screw. Measure carefully and get it right.
Drilling the hole.
This is where all your measurements pay off. Remember, you don't have to push hard—let the drill and bit do the work. You simply control the process by keeping the bit aligned and watching the depth (Fig. 6).
Fig. 7: Countersinking the hole with a Phillips screwdriver.
Before you insert the screw, use a medium-tip Phillips screwdriver to countersink the hole you just drilled (Fig. 7). This prevents the finish from chipping around the hole when you insert and tighten the strap-button screw. After countersinking the hole, install the strap button with a small felt washer between the wood and metal. The washer prevents the strap button from marring or denting the finish and wood, and it looks nice.
Fig. 8: Place a felt washer between the neck and button, then slowly tighten the screw until
the button is flush to the neck heel.
Voilà—a correctly installed strap button can add utility to a steel-string guitar (Fig. 8).
Strap-locking devices.
Fig. 9: Each Schaller Security Lock consists of an integrated screw and button, a locking mechanism that attaches to the guitar strap, and a washer and nut used to secure the locking device to the strap.
There are many different types and brands of locking devices on the market, but as I mentioned, my client wanted Schaller Security Locks (Fig. 9) for his SG. Once you've selected your locking hardware, it's crucial you measure the length of the included screws that go into the body and subsequently attach to the locking mechanism. In a moment, we'll see why.
The work begins.
Fig. 10: Comparing the length of the stock SG screw and button (left) with the Schaller screw.
Installing the Schaller button on the SG's lower bout was easy because it was already pre-drilled for the original strap button I'd removed. Because the Schaller screws with their integrated buttons were longer than the original Gibson hardware (Fig. 10), I redrilled the hole to the proper depth using a 7/64" drill bit. So far, so good.
Fig. 11: The Schaller screw is too long for the SG's neck joint—it might hit the truss rod.
Ah, but the other strap button was a different story. On SGs, Gibson typically installs a strap button on the back of the guitar, right behind the neck joint. After I removed the stock button and measured the depth of the Schaller screw against the SG's neck joint (Fig. 11), I realized the screw would penetrate too far and possibly hit the truss rod. Yikes!
This left me with two choices: see if I could use the original hardware, or shorten the supplied Schaller screw and integrated button. Fortunately the Gibson button fit inside the Schaller locking mechanism, so I decided to reuse the original screw and button, rather than shorten and rethread the Schaller screw. Once again, I included a felt washer between the body and button.
Loading the strap.
Fig. 12: Attaching the Schaller Security Lock to the strap.
One of the features that makes the Schaller system so secure is that the locking mechanisms attach to your strap. It's simple: Slip the strap-lock base into the strap's slit. Place the included washer over the device's shaft. Using a 9/16" deep-well nutdriver, tighten the nut over the washer (Fig. 12). This makes it nearly impossible for the locking mechanism to slip out of the strap. Rinse and repeat.
To mount the strap to the guitar, simply pull up on each lock's post, slip the lock onto its respective button, and release the post to lock it to the button.
[Updated 10/8/21]