Our series on how to age a guitar, piece by piece, continues. This month we tackle the bridge and strap buttons.
Image 1 — Courtesy of singlecoil.com
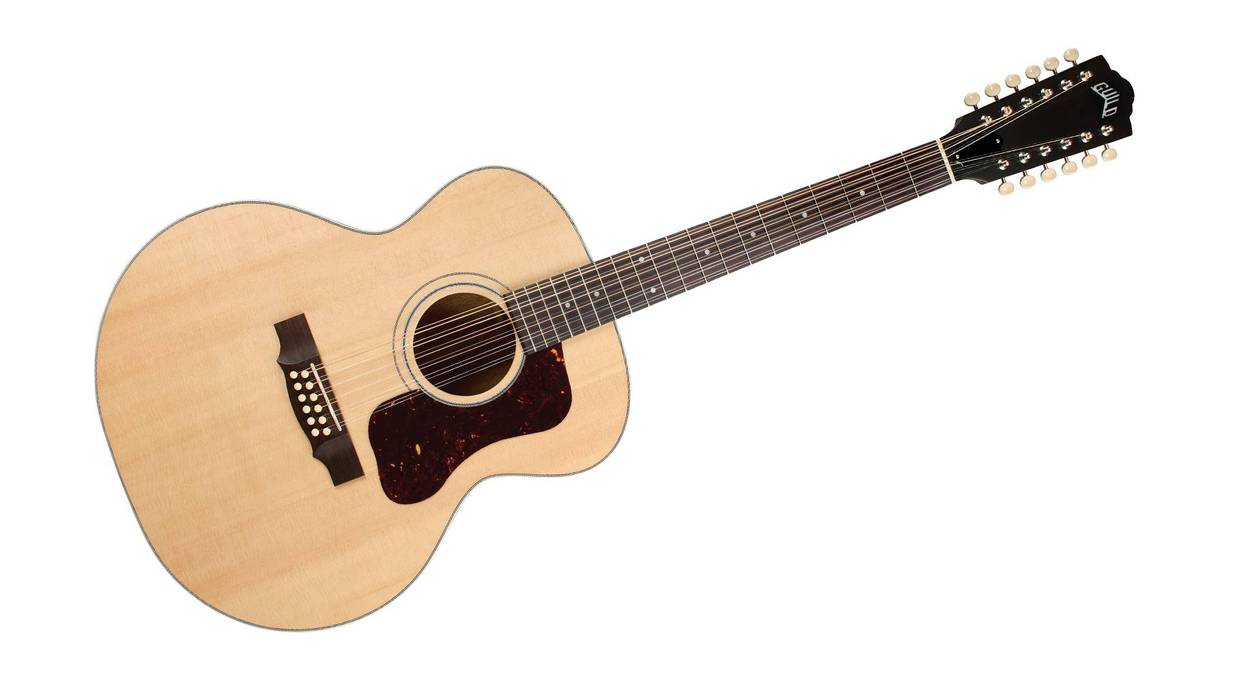
Hello and welcome back to “Mod Garage." This month we'll continue with our relic'ing project, taking care of the rest of the hardware: the bridge including its studs and the strap buttons. This is also the first time we'll discuss some possible upgrades regarding the hardware.
Image 2 — Courtesy of singlecoil.com
When comparing the strap buttons of our Harley Benton DC-Junior guitar (Image 1) with vintage Gibson Les Paul Junior Double Cut ones (Image 2), it's easy to see they have a slightly different shape and are mounted in a different way. While vintage Juniors have the upper strap button mounted on the back of the guitar, our Harley Benton has it on the upper horn, like a Stratocaster. Regarding balancing the guitar when playing it on a strap, I think this is a good upgrade. But if you want to stay more original, you can relocate the strap button to the back of the guitar, closing the hole on the upper horn if you wish.
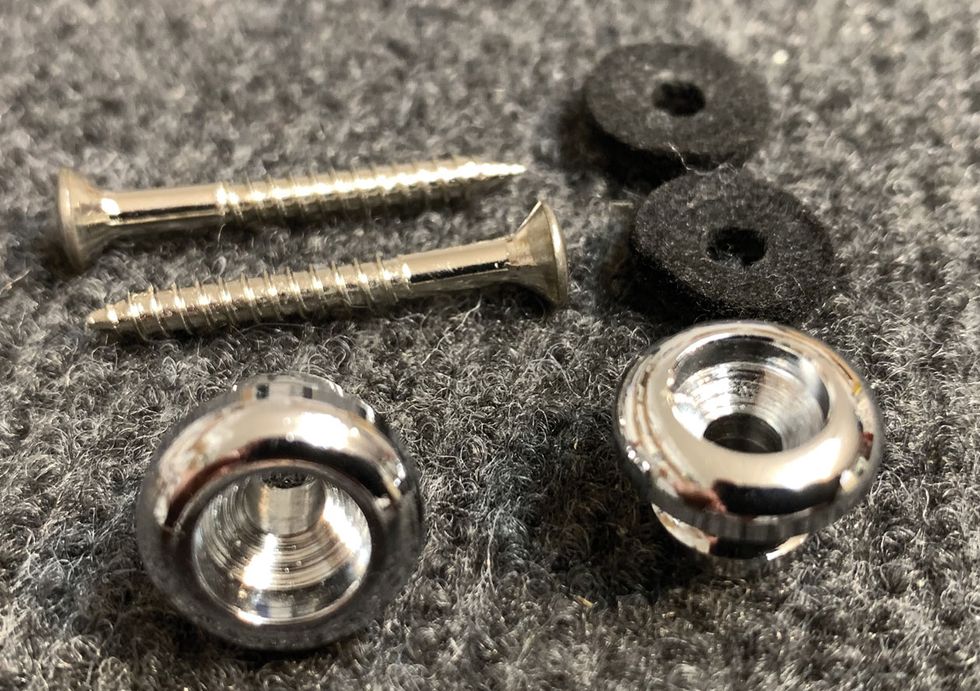
The original strap buttons have a slightly different shape, and the early models were made out of aluminum, while the ones on the Harley Benton are metal. You can buy aluminum strap buttons with the original shape from several companies if you wish: the Gibson part number is PREP-020. Personally, I'm fine with the ones on the Harley Benton guitar, but I removed the black felt washers underneath them. Vintage guitars don't have these, and because we'll relic the body of the guitar as well, there's no need to protect the finish in these areas.
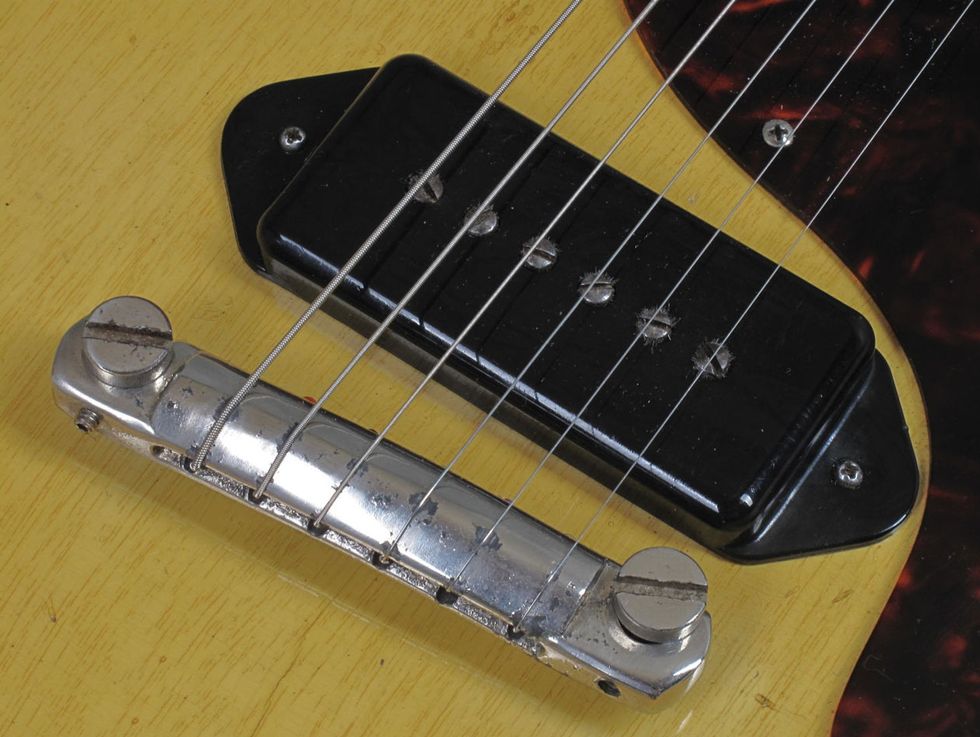
Image 3 — Courtesy of singlecoil.com
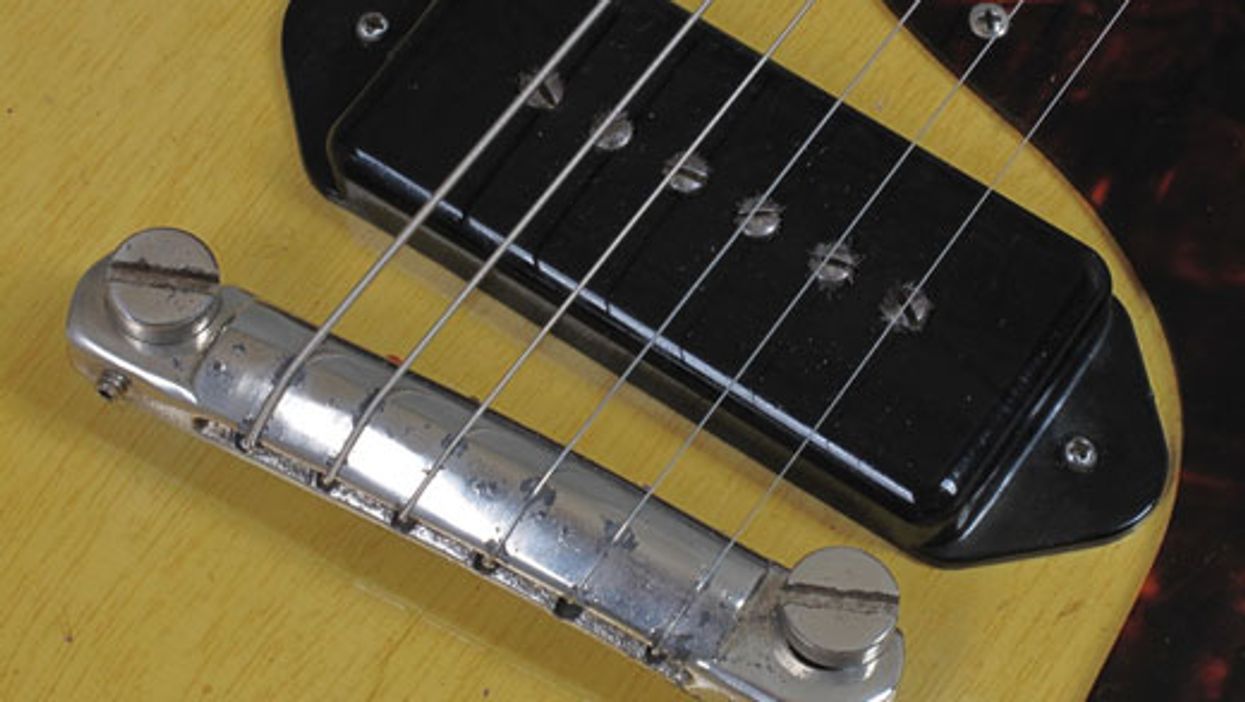
As for the bridge, we have a big difference here. The vintage Gibson has the classic, super-simple, and non-adjustable wraparound-bridge design (Image 3), while the Harley Benton has a wraparound version with six individual adjustable saddles, like a Stratocaster (Image 4).
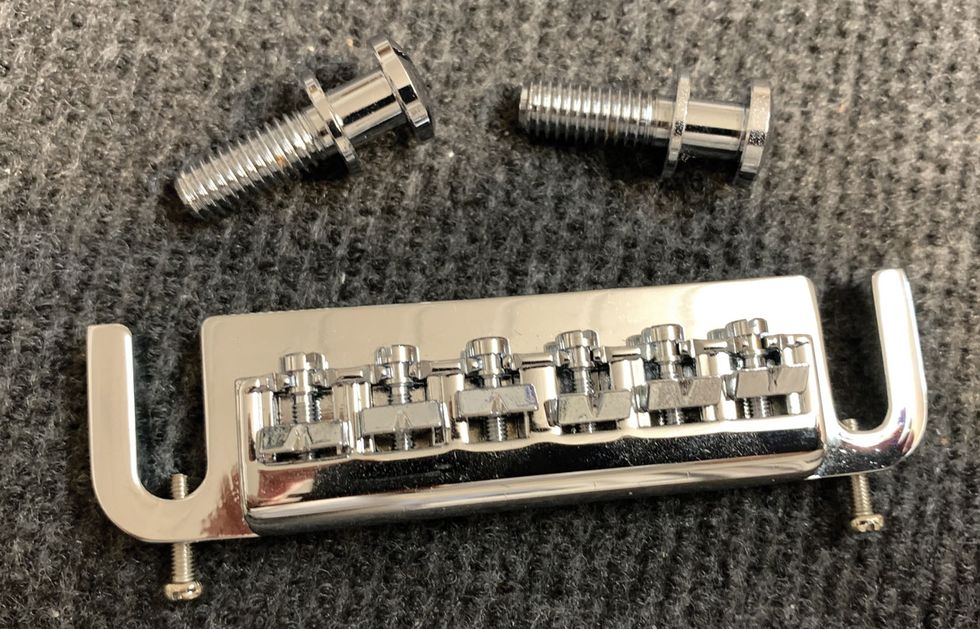
Image 4 — Courtesy of singlecoil.com
Regarding tuning, this is a real upgrade, but I think it destroys the appearance of this guitar and its design of simplicity. Besides this, the quality of this bridge is only average. It will work, but there are bridges like this on the market with better design and quality. So, if you like the idea of individual adjustable strings, you can keep this bridge or buy one like it with better quality. The studs have a metric M8 x 1.25 mm thread, and the bridge has a post spacing of 82 mm and a string spread of 52.5 mm.
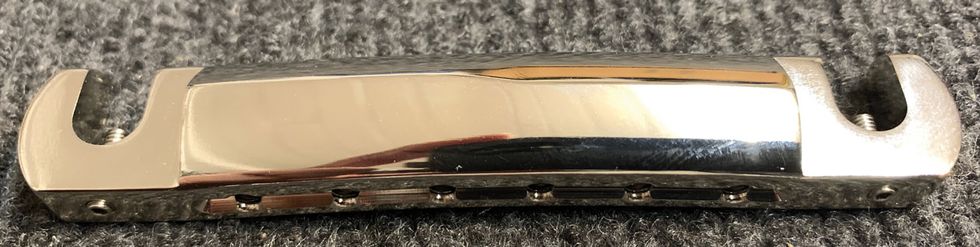
Image 5 — Courtesy of singlecoil.com
I decided to change the bridge for a compensated, non-adjustable wraparound bridge made out of solid aluminum from the KMS company called the “Whiptail" (Image 5). This looks pretty much like the original but is compensated for a better intonation and is a real upgrade regarding tone.
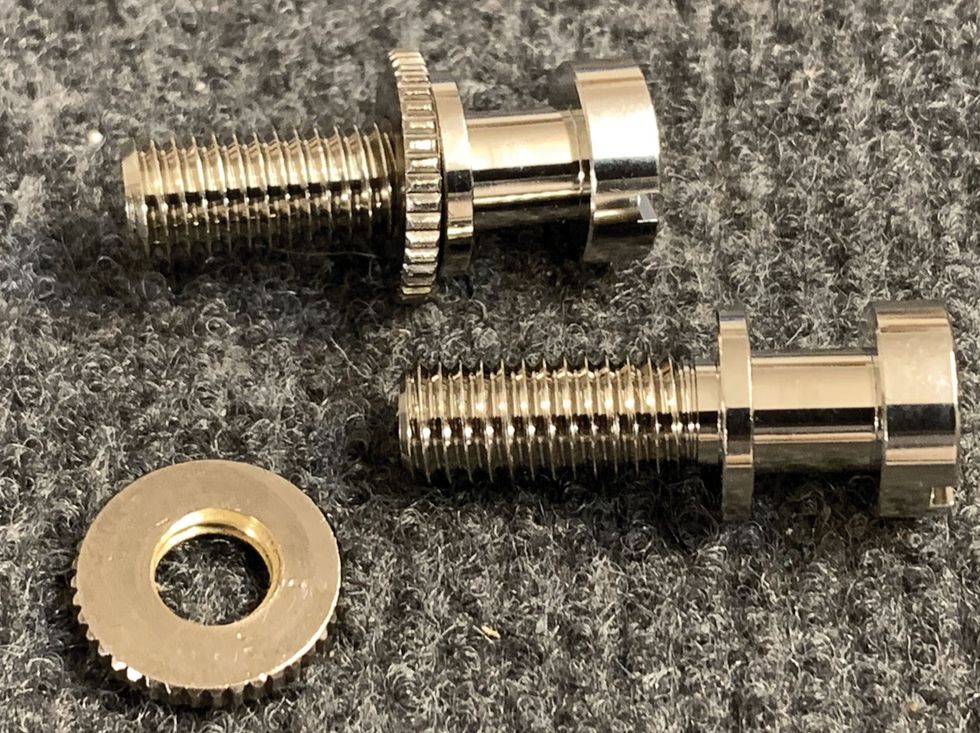
Image 6 — Courtesy of singlecoil.com
I also changed the diecast studs for the KMS version made out of steel (Image 6) and incorporated another upgrade: an additional thumbwheel to lock the studs against the bushings. I do this on almost all Gibson-style bridges to enhance tone and stability. The problem is, there are no existing thumbwheels with a M8 thread, so I had to use a standard thumbwheel and modify it to fit. The system behind this is very easy: Simply put the thumbwheel on the studs as high as possible and screw the studs into the bushings before installing the bridge. After adjusting the perfect height of the studs, get the thumbwheel as low as possible and tighten it so it will lock the studs against the top of the bushings (Image 7). Voila! The whole bridge system is as solid as can be now, and you'll instantly recognize how tone and sustain is enhanced on most guitars, so give it a try. I left the original bushings in place to avoid any possible damage on the lacquer when pulling them out to replace them. The factory-equipped ones are okay and will work fine.
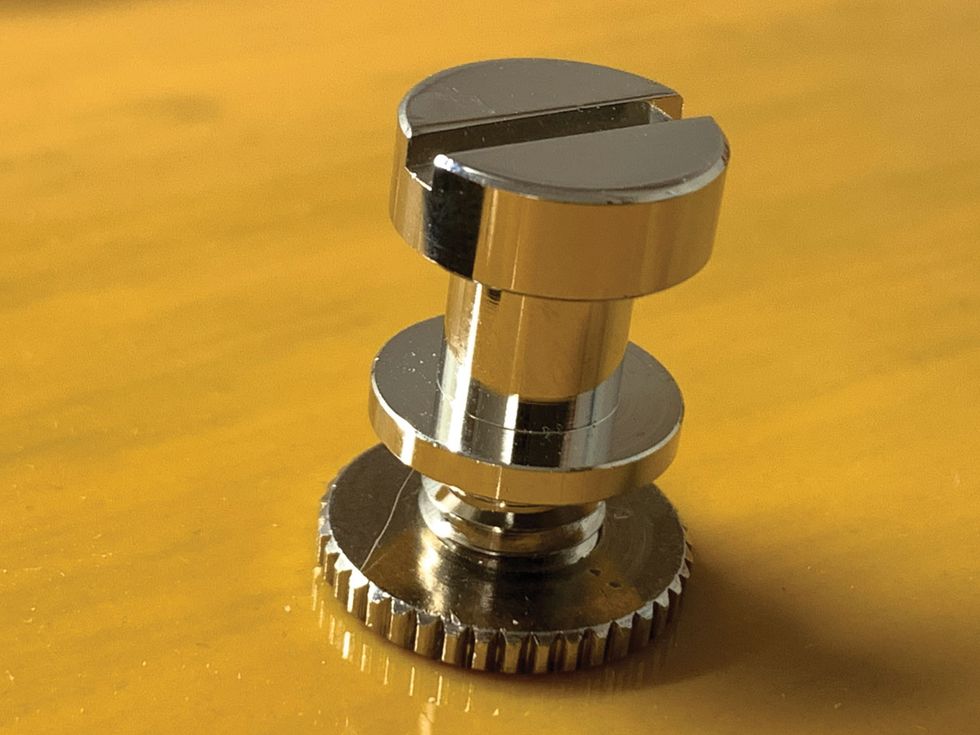
Image 7 — Courtesy of singlecoil.com
You can use the same relic'ing process we used for the metal parts of the tuners and screws in my previous column, “DIY: Relic'ing Tuners, Part 1," but I'll also show you an alternative way to do this. If you want to keep the stock bridge or change it for a similar type with individual adjustable saddles, it's important to completely disassemble the bridge before you start. At first, have a look at the pics of the original bridge and strap buttons, to get an impression of how they look after 50 years and more. Especially on the vintage bridge (Image 3), you can see there is noticeable wear-off where the strings have contact and that everything looks a bit dull. So, as always, break the shine with fine sandpaper or steel wool. If you want to mimic heavy wear-off on the bridge, use a small file or some sandpaper wound around a toothpick or similar, and rub away the nickel plating at the contact points of the strings. Next, put everything inside our box with the mixture of nails, metal parts, broken glass, gravel, sand, little stones, basalt, etc. and shake the devil out of it to create some nice random scratches, dings, dongs, and bumps. When you're happy with the result, take the parts out of the box and use a soft brush to clean them from dust. If you want, you can use iron (III) oxide (ferric oxide) liquid to create even more patina on some random spots of the hardware and the screws. Don't forget to wear gloves and goggles and to use old newspapers to protect the surface you're working on.
You may have heard of the aging method using hydrochloric acid (aka muriatic acid) for hardware. This is a good alternative for the parts we have in the works now. So, why didn't I mention this earlier? For a very good reason: We started with the metal parts of the tuners, and even if you close the hole in the case carefully, more than enough acid fumes will creep into the guts of the tuner, causing corrosion inside. This often results in non-turning tuners that you'll have to replace. The only procedure that's safe for this is to take the tuners apart and only age the cases. We're talking about a very strong acid, so before we start, here are the basic rules to follow to be safe:
- Always wear acid-resistant gloves, goggles, an apron, and respiratory protection.
- Never do this inside your flat. Do it outside or in very well-ventilated areas.
- Keep away all pets and children from this procedure.
- Always have a bowl of clear water near you to stop the process.
- Never put the parts directly into the acid. Only the fumes of the acid should make contact with the hardware.
- Never put the acid into your sink or outside in a sea, river, etc. This is hazardous waste! For disposal, contact your local acceptance point for hazardous waste.
If you feel unsure about this procedure, stay away from it! The “stone aging" process works well and is not dangerous in any way. Safety first is the prime directive here.
You don't need much for this. First and foremost, you need hydrochloric acid. The highest possible concentration of this acid is 37 percent, but I suggest using a 25 percent concentration or less. As a rule of thumb, think of it this way: less concentration equals longer time to expose the hardware to the fumes, but safer handling. You can dilute hydrochloric acid with cold water if you want to get a softer concentration. Always put the acid into the water, never the other way around! This works pretty well on nickel-plated hardware. A higher concentration will work best for chrome-, gold-, and black-plated hardware.
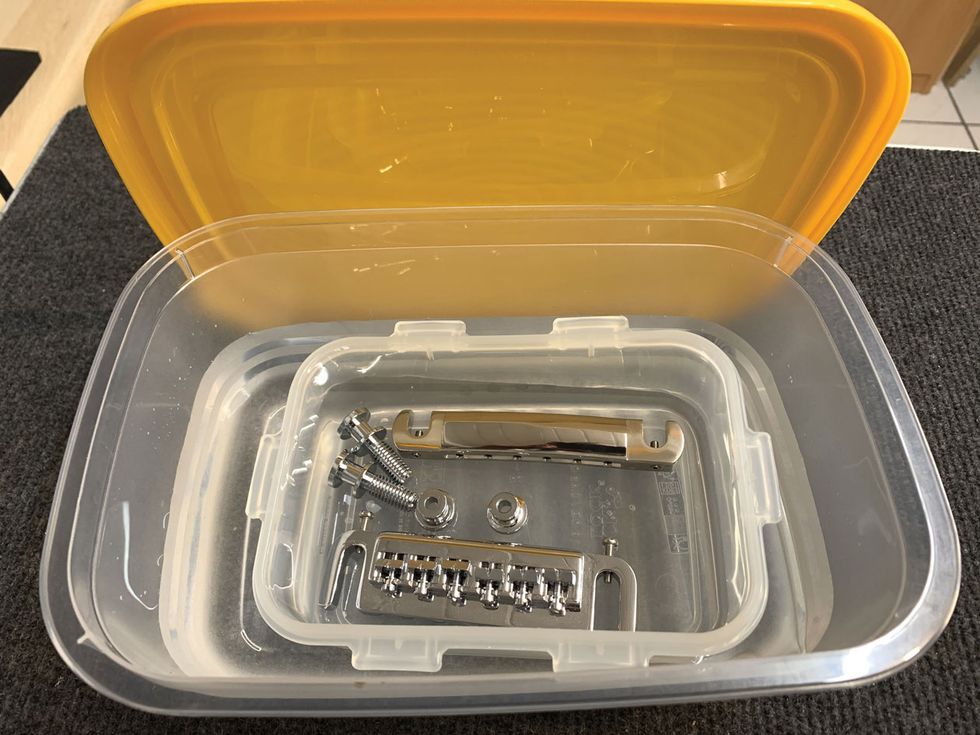
Image 8 — Courtesy of singlecoil.com
We also need to use two plastic boxes that fit into each other, and the biggest one, containing the smaller one, needs a lid (Image 8). Never use any metal or aluminum boxes for this. I recommend using clear plastic boxes so you can see what's going on inside from the outside.
The process works best if you slightly break the shine of the parts with some fine sandpaper or steel wool, and then afterwards clean and degrease them with naphtha. Now put the hardware into the smaller box and the acid into the bigger box. Put the smaller box into the bigger box so it will swim on the acid. Now, close the lid of the bigger box and wait. The fumes of the acid will start the process on the hardware and, depending on the hardware, its plating, and your personal taste, the process can last from a few minutes up to several hours. Check closely for the result, especially when having different kinds of hardware in the box. When you're happy with the result, take the inner box with the hardware out and put the hardware into clear, cold water to stop the process. Afterwards dry it with an old cotton rag or towel, and then you're done!
Again, this is only one way of doing it. You're invited to discuss other options with each other in the comments section online.
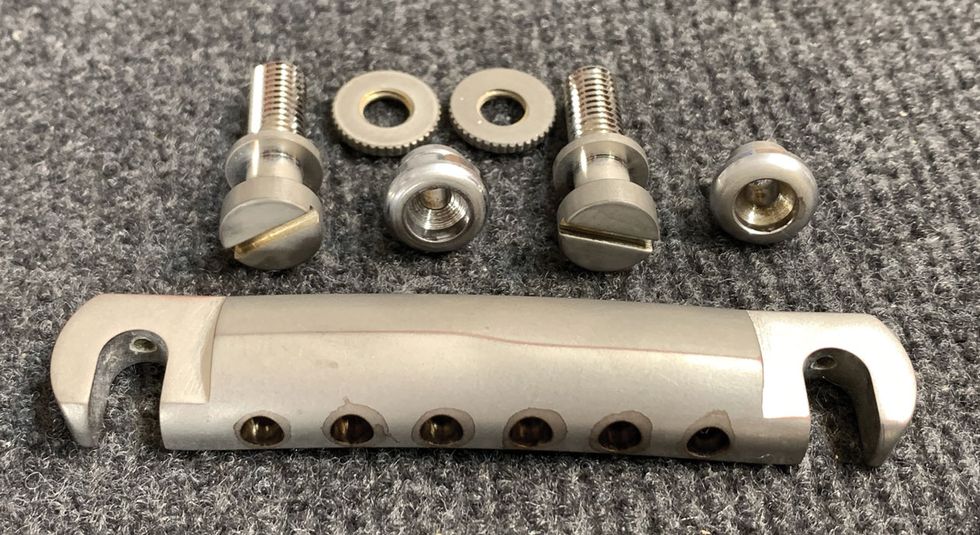
Image 9 — Courtesy of singlecoil.com
Here's the result of the process after breaking the shine, putting it in the aging tumbler for an hour, and then a 45-minute treatment in the hydrochloric acid box (Image 9). I think it looks great, and I'm very happy how it turned out.
In the next part of this series, we'll start relic'ing the pickup, including the pickup cover and the screws, and talk about pickups for such a guitar in general. But first, we'll have a deeper look into another guitar mod next month: the combined “preset/deck" solution for series switching on a Stratocaster.
Until then ... keep on modding!
A well-organized sample library is crucial for musicians, producers, and sound designers. It enables smoother workflows, saves time, and nurtures creativity by providing easy access to the perfect sounds.
Greetings, and welcome! Last month, I began the first of a multi-part Dojo series centered around field recording and making your own sound libraries by focusing on the recording process. This time, I’m going to show you ways to organize and create a library from the recordings you’ve made. We discover things by noticing patterns in nature, and we create things by imposing our own patterns back into nature as well. This is exactly what you’re doing by taking the uncontrolled, purely observant recordings you’ve made in the natural world and prepping them as raw material for new patterned, controlled forms of musical expression. Tighten up your belts, the Dojo is now open.
Easy Access Needs
Before you start diving in and heavily editing your recordings, identify what you have and determine how to categorize it for easy retrieval. A well-organized sample library is crucial for musicians, producers, and sound designers. It enables smoother workflows, saves time, and nurtures creativity by providing easy access to the perfect sounds. Whether you are starting from scratch or adding to an existing collection, a systematic approach can make a world of difference.
Take stock of your files, identify patterns, themes, and timbres, and then decide on potential categories for folders that make sense for your workflow. Typically, I will make dozens and dozens of raw recordings (empty stairwells, gently tapping two drinking glasses together, placing a contact mic on industrial equipment, etc.) and I will prearrange them into sub categories before I even start to edit. My top-level folders are: percussive and melodic. I may divide further depending on the source material.
For instance, recordings that could become drum hits can be separated into folders for kicks, snares, hi-hats, and percussion. Melodic information that might be used for one-shots or loops can be sorted by potential instrument type or key. This will save you hours of time later. For those who work with a specific genre, it can also be useful to group recordings by their possible stylistic context, like industrial, cinematic, or soundscapes.
Working with Raw Material
What are the best ways to start working with the raw recordings? First, make sure you have some way to edit them. Open your DAW and create a new session. Be sure to include the date and “raw recordings” in your session title and save the session. Next, import the file(s) into your DAW as a new audio track, or hardware sampler (for old schoolers). Then start listening for anything that ignites your imagination. Keep it short and pay attention to what you’re hearing. Ask yourself, “What would this be cool for?” Here’s a personal tip: Don’t delete everything that is not of immediate interest, just mute the sections that you’re not identifying with right now—they might become amazing once you start to process them with delays, reverb, and pitch shifting. Once you’ve got loads of appealing individual snippets and you’ve trimmed the start and ending for each one, you’re going to bounce or export each individual element to a specified folder on your hard drive. Now it’s time to think about file naming conventions.
“A well-organized sample library is crucial for musicians, producers, and sound designers.”
Clear and consistent file names are crucial. They ensure you can search for samples directly through your operating system or DAW without relying solely on folder hierarchies. Include lots of details like sample type, tempo, key, or sound source in the file name because it makes it easier to locate quickly in the future. For example, instead of naming a file “loop001.wav,” a more descriptive name like “Broken_Guitar_Arp_Raw.wav” provides instant context. I like using “Raw” at the end of my file name so I know it is in its original state. If you want to add processing like distortion, amp sims, modulation, and time-based effects, go ahead! Export each iteration with a new file name, e.g., “Broken_Guitar_Arp_TapeDelay.wav.”
Building a sample library isn’t just about organization—it’s also about curation. Remember that the quality of your library is waymore important than its size. Focus on making high-quality samples. Take the time to audition each of your recordings to weed out those of inferior sound quality. This decluttering process helps streamline your workflow and ensures that every file in your collection adds value.
Next month, I’ll guide you through ways to import and use your samples in your recording sessions. Namaste.
This versatile ramping phaser is distinguished by a fat voice, vibrato section, and practical preamp.
Uncommonly thick phaser voice. Useful range of ramping effects. The practical preamp section can be used independently. Nice vibrato mode.
Visually cluttered design. Some ramping effects can be difficult to dial in with precision.
$249
Beetronics FX
beetronicsfx.com
The notion behind a ramping phaser predates the phaser pedal by many moons—namely in the form of thetwo-speed Leslie rotating speaker. A Leslie isn’t a phaser in the strictest sense, though the physics behind what the listener perceives are not dissimilar, and as any phaser devotee can tell you, there are many audible similarities between the two. At many phase rates and intensities, a phaser stands in convincingly for a Leslie, and the original king of phasers, theUniVibe was conceived as a portable alternative to rotary speakers.
Fundamentally, the analog 6-stageBeetronics Larva Morphing Phaser (which, henceforth, we shall call the LMP) effectively mimics the acceleration and deceleration of a two-speed Leslie speaker. That isn’t a new concept in the pedal universe. But Beetronics’ take offers many cool variations on that ramping effect. It also features a wet-signal-only vibrato setting and a nice sounding preamp. And at its core is a rich, deep phase voice that is a distinct alternative to many standard-bearing phasers.
Thick As Honey
There is an inherent richness in the low-to-mid range in the LMP’s phase voice—even at the lowest resonance settings. Beetronics lofty sonic goal and inspiration were the famously warm and dusky Moogerfooger MF-103 12 -stage Phaser, and it certainly It sounds thicker than any of my vintage or vintage-clone phasers, including both 4- and 6-stage models. The heft of this phaser voice will be enough to sell the LMP to some prospective customers. Surely the preamp, which lends its own fatness, contributes something to the low-mid weight. On the other hand, I used the LMP’s preamp alone in front of each of the vintage phasers I tested and each still sounded comparatively thin in that part of the EQ spectrum, so there is something in the modulation section of the LMP circuit that adds its own thump and heft. When you use the phaser in clean and low-gain overdrive situations, that low-mid bump can sound pretty nice, especially if a bright amp or guitar are in the chain or you use reverb or another effect that tends to emphasize treble peaks. Things can get a little more complicated when you stack effects, use big, mid-scooped fuzzes, or situate your phaser at the front of an effects chain. A potential buyer would be wise to investigate how that tone profile fits with the most permanent parts of their rig, and some may dig a more traditional sound that makes room for more detail, but in general I loved the sound, particularly in minimalist effect arrays.
Fluid States
The ramping or “morphing” effect that is the marquee feature in the LMP is engaging, practical, and opens up many possibilities, particularly in terms of segues and phrase punctuation. Obviously, the independent sets of rate and depth controls for each phase circuit enable morphs between very different phase textures. But it’s the ramp-shape switch that makes the LMP much more than just two phasers in one. In the leftmost position, phaser 1 will ramp up or down to the phaser 2 position at the rate determined by the ramp speed control and stay fixed there until you hit the left footswitch again (clip 1). If you also set the ramp speed to zero, this makes the switches between the two phasers instantaneous.
In the middle position, the left footswitch assumes non-latching functionality. It will ramp to the phaser 2 speed when you hold the switch and return to phaser 1 speed when you release. And when you set the ramp rate to zero, you can create momentary and instantaneous switches between speeds as you hold or release the switch (clip 2). In the rightmost position, phaser 1 ramps to phaser 2 as you hold the switch and then moves back to the phaser 1 rate immediately after it is released. I enjoyed using radically different phaser rates for these functions most, but more subdued and mellow shifts are no less useful for lending musical interest in the right context.
Hits From the Hive
Beetronics famously has fun with their pedal designs. Enclosure graphics are typically bold and eye-engaging, and while that makes the company’s wares feel like treasures among meat-and-potatoes stomps, it can make the pedals needlessly busy to some. A number of players will no doubt feel the same about the LMP, and the cluttered enclosure graphics and blinking lights can have the effect of making the pedal seem less approachable than it is. In fact, the LMP is pretty intuitive once you learn which control is which. The phaser knobs are mirror images of each other. The preamp controls (preamp level and master output) are comparatively petite but grouped conveniently in the center. The chrome-ringed (and very range-y) ramping speed and resonance controls are visually distinct from the rest of the knobs, while the two 3-way toggles for ramping shape and the preamp-only, preamp + phaser, and vibrato + phaser modes are easy to sort out. It’s no model of minimalist, easy-to-read graphics, and I wouldn’t want to sort out this pedal for the first time on a dark stage. In general, though, functionality does not suffer much for the bold appearance.
The Verdict
The U.S.-made LMP is a solid, high-quality piece of work that makes its $249 price tag much more digestible. And the degree to which you perceive the cost as excessive will certainly depend on the degree to which you consider phaser, rotary, and vibrato sounds foundational within your musical creations. Accordingly, you should consider the value score here on a sliding scale. But with a fine-sounding and functional preamp section and ramping capability broad enough to span simple Leslie emulation, and radical shifts that can themselves serve as dramatic musical hooks and punctuation, the Larva Morphing Phaser could, for the right player, … um …“bee” more than the sum its parts
The voice of the guitar can make the unfamiliar familiar, expand the mind, and fill the heart with inspiration. Don’t be afraid to reach for sounds that elevate. A host of great players, and listening experiences, are available to inspire you.
In late fall, I had the good fortune of hearing David Gilmour and Adrian Belew live, within the same week. Although it’s been nearly two months now, I’m still buzzing. Why? Because I’m hooked on tone, and Gilmour and Belew craft some of the finest, most exciting guitar tones I’ve ever heard.
They’re wildly different players. Gilmour, essentially, takes blues-based guitar “outside”; Belew takes “outside” playing inside pop- and rock-song structures. Both are brilliant at mating the familiar and unfamiliar, which also makes the unfamiliar more acceptable to mainstream ears—thereby expanding what might be considered the “acceptable” vocabulary of guitar.
Belew was performing as part of the BEAT Tour, conjuring up the music of the highly influential King Crimson albums of the ’80s, and was playing with another powerful tone creator, Steve Vai, who had the unenviable role of tackling the parts of Crimson founder Robert Fripp, who is a truly inimitable guitarist. But Vai did a wonderful job, and his tones were, of course, superb.
To me, great tone is alive, breathing, and so huge and powerful it becomes an inspiring language. Its scope can barely be contained by a venue or an analog or digital medium. At Madison Square Garden, as Gilmour sustained some of his most majestic tones—those where his guitar sound is clean, growling, foreign, and comforting all at once—it felt as if what was emanating from his instrument and amps was permeating every centimeter of the building, like an incredibly powerful and gargantuan, but gentle, beast.
“The guitar becomes a kind of tuning fork that resonates with the sound of being alive.”
It certainly filled me in a way that was akin to a spiritual experience. I felt elevated, joyful, relieved of burdens—then, and now, as I recall the effect of those sounds. That is the magic of great tone: It transports us, soothes us, and maybe even enlightens us to new possibilities. And that effect doesn’t just happen live. Listen to Sonny Sharrock’s recording of “Promises Kept,” or Anthony Pirog soloing on the Messthetics’ Anthropocosmic Nest, or Jimi Hendrix’s “Freedom.” (Or, for that matter, any of the Hendrix studio recordings remixed and remastered under the sensibilities of John McDermott.) Then, there’s Jeff Beck’s Blow by Blow, and so many other recordings where the guitar becomes a kind of tuning fork that resonates with the sound of being alive. The psychoacoustic effects of great tones are undeniable and strong, and if we really love music, and remain open to all of its possibilities, we can feel them as tangibly as we feel the earth or the rays of the sun.
Sure, that might all sound very new age, but great tones are built from wood and wires and science and all the stuff that goes into a guitar. And into a signal chain. As you’ve noticed, this is our annual “Pro Pedalboards” issue, and I urge you to consider—or better yet, listen to—all the sounds the 21 guitarists in our keystone story create as you examine the pedals they use to help make them. Pathways to your own new sounds may present themselves, or at least a better understanding of how a carefully curated pedalboard can help create great tones, make the unfamiliar familiar, and maybe even be mind-expanding.
After all these years, some players still complain that pedals have no role other than to ruin a guitar’s natural tone. They are wrong. The tones of guitarists like Gilmour, Belew, Vai, Hendrix, Pirog, and many more prove that. The real truth about great tones, and pedals and other gear used with forethought and virtuosity, is that they are not really about guitar at all. They are about accessing and freeing imagination, about crafting sounds not previously or rarely heard in service of making the world a bigger, better, more joyful place. As Timothy Leary never said, when it comes to pedalboards and other tools of musical creativity, it’s time to turn on, tune up, and stretch out!
With 350W RMS, AMP TONE control, and custom Celestion speaker, the TONEX is designed to deliver "unmatched realism."
"The next step in its relentless pursuit of tonal perfection for studio and stage. Born from the same innovative drive that introduced the world's most advanced AI-based amp modeling, TONEX Cab ensures that every nuance of modern rigs shines onstage. It sets the new standard for FRFR powered cabinets for authentic amp tones, delivering unmatched realism to TONEX Tone Models or any other professional amp modeler or capture system."
Setting a New Standard
- Professional full-range flat-response (FRFR) powered cab for guitar
- True 350 W RMS / 700 W Peak with audiophile-grade power amps and advanced DSP control
- The most compact 12" power cab on the market, only 28 lbs. (12.7 kg)
- Exclusive AMP TONE control for amp-in-the-room feel and response
- Custom Celestion 12'' guitar speaker and 1'' high-performance compression driver
- 132 dB Max SPL for exceptional punch and clarity on any stage
- Programmable 3-band EQ, custom IR loader with 8 onboard presets and software editor
- Inputs: XLR/1/4" combo jack Main and AUX inputs, MIDI I/O and USB
- Output: XLR output (Pre/Post processing) for FOH or cab linking, GND lift
- Durable wood construction with elegant design and finish
- Swappable grill cloths (sold separately) and integrated tilt-back legs
Finally, Amp-in-the-room Tone and Feel
Thanks to its unique DSP algorithms, TONEX Cab's exclusive AMP TONE control stands apart from any other FRFR in the market today, allowing players to dial in the perfect amount of real amp feel and response to any room or venue.
It achieves this through advanced algorithmic control over the custom high-wattage Celestion 12'' guitar speaker and 1'' high-performance compression driver. Together, they deliver the optimal resonance and sound dispersion players expect from a real cab. Combined with a wood cabinet, this creates a playing experience that feels alive and responsive, where every note blooms and sustains just like a traditional amp.
Ultra-portable and Powerful
TONEX Cab is the most compact 12'' powered cab in its class, leaving extra room in the car to pack two for stereo or to travel lighter. Despite its minimal size, the TONEX Cab delivers true 350 W RMS / 700 W Peak Class-D power. Its unique DSP control provides true-amp sound at any volume, reaching an astonishing 132 dB Max SPL for low-end punch and clarity at any volume. With larger venues, the XLR output can link multiple cabs for even more volume and sound dispersion.
Amplify Any Rig Anywhere
TONEX Cab is the perfect companion for amplifying the tonal richness, dynamics and feel of TONEX Tone Models and other digital amp sims. It adds muscle, articulation, and a rich multi-dimensional sound to make playing live an electrifying and immersive experience.
Its onboard IR loader lets players connect analog preamps directly to the cab or save DSP power by removing the modeler's IR block. Precision drivers also work perfectly with acoustic guitars and other audio instruments, ensuring that time-based effects shine with studio-quality clarity and detail.
Pro-level Features
TONEX Cab offers plug-and-play simplicity with additional pro features for more complex rigs. Features include a 3-band EQ for quickly dialing in your tone to a specific room without editing each preset. You can program the eight memory slots to store both EQ and AMP TONE settings, plus your cabinet IR selection using the onboard controls or the included TONEX Cab Control software. Seamlessly select between memory slots with the onboard PRESET selector or via the built-in MIDI I/O.
On Stage to FOH
TONEX Cab's balanced audio output makes it easy to customize the stage or house sound. It features pre- or post-EQ/IR for cab linking or sending sound to the front-of-house (FOH). The AUX IN allows users to monitor a band mix or play backing tracks. These flexible routing options are ideal for fine-tuning the setup at each gig, big or small.
Stereo and Stacking
With two or more TONEX Cabs, any rig becomes even more versatile. A dual TONEX pedal rig creates a lush, immersive tone with spacious, time-based effects. Players can also build a wet/dry or wet/dry/wet rig to precisely control the direct/FX mix, keeping the core tone intact while letting the wet effects add depth and space. Stack multiple cabs for a massive wall of sound and increased headroom to ensure the tone stays punchy and powerful, no matter the venue size.
Designed to Inspire
The TONEX Cab's Italian design and finish give it a timeless yet modern look under any spotlight. The integrated tilt-back legs let users angle the cab and direct the sound, which is optimal for hearing better in small or dense sound stages. Swappable optional grills (Gold/Silver) make it easy to customize each rig's appearance or keep track of different TONEX Cabs between bandmates or when running stereo rigs.
Bundled Software
TONEX Cab includes a dedicated TONEX Cab Control software application for managing and loading presets and IRs. As part of the TONEX ecosystem, it also includes TONEX SE, the most popular capture software program, with 200 Premium Tone Models, unlimited user downloads via ToneNET and AmpliTube SE for a complete tone-shaping experience.
Pricing and Availability
TONEX Cab is now available for pre-order from the IK online store and IK dealers worldwide at a special pre-order price of $/€699.99 (reg. MSRP $/€799.99*) with a black grill as the default. The optional gold and silver grill cloths are available at a special pre-order price of $/€39.99 (reg. MSRP $/€49.99*). Introductory pricing will end on March 18, with TONEX Cab shipping in April.
*Pricing excluding tax.
For more information, please visit ikmultimedia.com