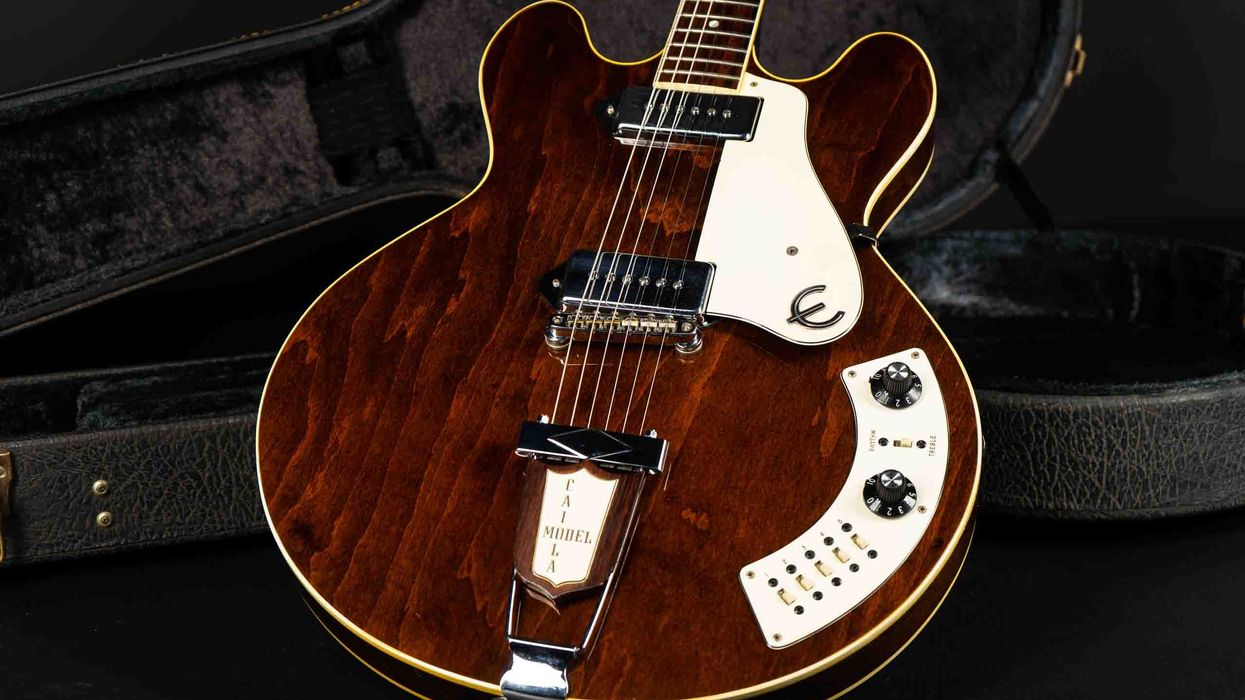
Courtesy of SINGLECOIL (www.singlecoil.com)
Let’s go under the hood of these legendary rockabilly machines and explore different ways to enhance a passive guitar system.
Welcome back to Mod Garage. Before we start, some good news! After finishing the relic’ing series, I was able to raise $650 from our Harley Benton guinea-pig guitar in an auction. The money went to our local animal shelter for cats and dogs, to help pay some vet bills.
This month, we’ll take a closer look at the typical wiring you can find in almost every Gretsch guitar. Since 2002, the Gretsch guitar company has been a division of Fender Musical Instruments Corp. But the company has a long history. It all started in 1883 in Brooklyn, New York, when a German immigrant from the town of Mannheim named Friedrich Gretsch started his own shop to make banjos and drums. Sadly, Gretsch died in 1895 at the untimely age of 39 during a visit in Hamburg, Germany. His 15-year-old son Fred (the Americanized version of “Friedrich”) had to run the company. In the 1930s, Gretsch started making guitars and the company had their first heyday. Like many companies during WWII, Gretsch had to stop production of instruments to help in the armament industry. After the war, the two sons of Fred Gretsch (Fred Jr. and William) took their father’s place and started making instruments again. In 1948, the Gretsch Broadkaster drum set was their best-selling item, and the start of another story with a certain Leo Fender offering an electric guitar with the same name, only spelled slightly different.
With the emergence of rockabilly and rock ’n’ roll in the ’50s, Gretsch guitars became popular in the hands of players like Chet Atkins, Eddie Cochran, Cliff Gallup, Duane Eddy, and even Elvis Presley. Later in the game, George Harrison, Brian Setzer, Malcolm Young, and many more became popular Gretsch players.
Sidenote: In 1999, Gretsch took over the Bigsby company, which was their exclusive hardware supplier since 1951. Instruments featuring a Bigsby tailpiece, like the White Falcon, Country Gentleman, Nashville, Duo Jet, etc. are real guitar icons today.
The wiring concept of Gretsch guitars is unique and noticeably different from that of most other companies, offering a volume control for each pickup along with a master volume control. This wiring is combined with a pickup-selector switch and a tone control in basically three versions:
“The interesting part is the arrangement of the volume controls—it’s been said that this was a suggestion from Chet Atkins.”
1. Master tone control (with or without no-load pot)
This is what we know from a lot of other guitars sporting a master tone control for all pickups: Sometimes a no-load pot is used to get rid of the pot’s load when it’s fully opened. Gretsch typically uses 500k audio pots and .022 µF tone caps.
2. Two-way tone switch
There is no tone pot, but there’s a switch that activates two different tone caps as a kind of pre-set tone. Gretsch typically uses 500k audio pots, as well as a .012 μF and .0039 μF (3900 pF) tone cap on the tone switch.
3. No tone control at all
It is what it says: There is no tone control at all with 500k audio pots for the volume controls.
Use whatever tone cap you like best. The 500k choice for the tone pot is a good working solution in a passive guitar circuit. On my own Gretsch 6120, I decided to use 3300 pF and 6800 pF caps on the tone switch, and it works fine for me.
The interesting part is the arrangement of the volume controls—it’s been said that this was a suggestion from Chet Atkins. Having a volume control for each pickup is common on other guitars, like on a typical Les Paul. But the combination with a master volume control is rare … and the source of some unwanted effects. Let’s have a look at the typical Gretsch volume wiring scheme (Fig. 1). I decided to use the one without tone control because this is the basic wiring and can be found on the 6122 Country Gentleman. The wirings with a tone control are identical regarding the volume controls.
This arrangement in a passive guitar system will result in a loss of tone because of two reasons:
1. The three volume pots will drain a good portion of high-end to ground when rolling back the volume, which is the nature of the passive beast.
2. Long shielded wire runs are used inside the hollowbody Gretsch guitars, adding capacitance to the system, resulting in even more high-end loss.
Even with the pickup height adjusted correctly, the loss in high-end is clearly noticeable, so let’s see what can be done. For some players, this is no problem at all and part of the tone. If you’re happy with the way your guitar sounds, there’s no reason to change the system. If you want a clearer tone with more high-end definition, you have the following options.
If you don’t want to convert your Gretsch guitar into an active system to get rid of the high-end loss, you’ll need to compromise by adding a treble-bleed network to the volume pots. We talked about this sometime ago in detail [“Mod Garage: Deep Diving into Treble-Bleed Networks”].
Selecting the right treble-bleed network is a matter of choice. What works for me might not work for you. Maybe you like some more high-end when rolling back the volume than others or vice versa. With the typical Gretsch Filter’Tron pickups, I like a 470 pF cap with a 150k resistor in parallel. Try this as a starting point and see if you like it. In theory, you’ll need a treble-bleed network on all three volume controls, which gives you a wide control regarding sound. In my own 6120, I use different treble-bleed networks because I want more high end from the neck pickup compared to the bridge pickup. I’ve also seen configurations with a treble-bleed network on the two volume controls for the pickups and without one on the master volume control. Personally, I don’t like this configuration. Using one on the master volume and not on the two controls for the pickups will have a better result.
You see, it’s a wide field of experimentation, but it’s worth the effort. While you’re in there, I recommend changing the 500k audio volume pots for 250k audio pots to benefit from the much better taper in a passive system. The difference in high end is minimal (if audible at all), and you can compensate easily with the treble-bleed network by choosing slightly higher values. I did this in my 6120 and the difference was huge.
“Don’t underestimate the time you’ll need to get the electronics of a hollowbody guitar out and back in. Even on a good and clear day, you can’t do this within 30 minutes, so don’t hurry.”
Don’t underestimate the time you’ll need to get the electronics of a hollowbody guitar out and back in. Even on a good and clear day, you can’t do this within 30 minutes, so don’t hurry. If you’ve ever changed the electronics inside such a guitar, you know what I mean.
Gretsch uses shielded wires inside, but sadly, the quality is only average. The wire has a high capacitance, and, especially inside big hollowbodies, you can find up to 2.5 meters (about 8.2 feet) of it, which is a real sound killer on its own. The shorter the wire, the less capacitance it will add to the circuit, so you should optimize the length of the wire wherever possible. If you want to stick with shielded wire, you should use a high-quality one with a low capacitance. I like to use the .155-diameter George L’s high-end wire for this. It’s very thin, with a capacitance of only 19 pF per foot, which is unbeatable ... but still affordable.
In comparison, I measured 46 pF per foot with the original wire from the factory. The before/after effect will be like lifting a blanket from the amp. But you can also use non-shielded wire if you’re not concerned about shielding. I replaced all wires in my 6120 with the George L’s .155-diameter cable and was able to reduce the original length of the wires to 50 percent, which means reducing additional capacitance to the circuit noticeably.
As you can see, tone is not set in stone, and there are ways to enhance your Gretsch wiring. Next month, we’ll dissect the Scott Henderson Stratocaster wiring, so stay tuned.
Until then ... keep on modding!
Image 1 — How to Get the Most out of Hum-Sing-Hum Wiring
This circuit lets you get HSH and SSS-like tones from a single guitar.
Hello and welcome back to Mod Garage. Today we'll talk about HSH wiring in general and how to get the best out of it. In general, an HSH configuration means that you have three pickups on your guitar: a bridge humbucker, a middle single-coil, and a neck humbucker. This configuration was very popular in the so-called “super-strat" era, but is still used today, even if you don't see it as often. Almost every manufacturer has at least one or more HSH models in its portfolio, from Ibanez to Suhr, Charvel, Fender, and PRS to Framus, just to name a few. So, I think it's worth taking a closer look at this special configuration, its possibilities, and its downsides.
The original HSH concept is clear and easy: combining humbucker and single-coil pickups on a guitar to enhance your tonal palette by implementing two different basic sounds. You have the power of the two humbucker pickups plus the clearness and chime of a single-coil pickup, so the possibilities to combine these three pickups is virtually unlimited. For example, you can put a really hot modern humbucker at the bridge position for fat, loud, and overdriven lead playing. A PAF-style neck humbucker will take you instantly to blues land, while an S-style middle single-coil will give you an additional archetypal sound we all love.
It came into fashion to split humbucker pickups to receive a single-coil type sound from them, usually by shutting one coil down to ground, which makes things even more complex in an HSH configuration. Playing the three pickups on their own is trouble free and the purest shape of the basic HSH concept. The problems start when you want to combine the pickups to get even more sounds out of your guitar. Usually the humbucker is way louder than your single-coil pickup, upstaging its tone when playing together. With the humbuckers in split-mode, balanced volume together with the single-coil pickup is usually not a major problem but phasing often is. You will have to take care not to end up in an out-of-phase dilemma, if it's not intended. With two splittable humbuckers, the number of possible combinations is almost slaying: You can combine all individual coils (five in total) in parallel or in series, you can have all of these combinations in phase or out of phase, you can operate the two humbuckers in normal humbucker mode (both coils in series), or in a hum-free single-coil sounding mode (both coils in parallel), or in real single-coil mode (one coil shut down to ground). You see, it's easy to get lost with all these possibilities.
Not everything that's technically doable sounds great or is useable in a musical context, so it's time to think about the combinations you really need and want from such a configuration. Almost every company came up with their own solution and combinations. What I want to show you is a wiring with two stages to get the most desirable sounds out of an HSH guitar. It's basically the combination of the standard HSH switching with auto-split wiring when combining the humbuckers with the middle single-coil on the first stage, and a normal S-style single-coil wiring by splitting the humbuckers into single-coils on the second stage. This is like having an HSH and SSS guitar in one package.
Not everything that's technically doable sounds great or is useable in a musical context, so it's time to think about the combinations you really need and want from such a configuration.
We've talked about auto-split several times before, but this means that a humbucker is automatically split into a single-coil when it's combined with a single-coil pickup, usually in an HSS or HSH configuration. With this wiring you will receive the following combinations:
Stage 1 (HSH auto-split mode):
- Bridge humbucker alone
- Bridge humbucker inside coil in parallel with the middle single-coil
- Middle single-coil alone
- Neck humbucker inside coil in parallel with the middle single-coil
- Neck humbucker alone
Stage 2 (SSS operating mode):
- Bridge humbucker inside coil
- Bridge humbucker inside coil in parallel with the middle single-coil
- Middle single-coil alone
- Neck humbucker inside coil in parallel with the middle single-coil
- Neck humbucker inside coil
If you want to squeeze more sounds out of this, you can add phase switches, series/parallel switches, humbucker multi-sound switches, etc. Keep in mind that most humbucker pickups in split mode don't sound like a real single-coil pickup—only sort of ... but, in most cases and especially in a band context, this is all you need. For me, this is the most practical HSH wiring when you don't need series and out-of-phase switching. But as mentioned, all this can be added to the circuit.
So here we go. The good news for this wiring, as seen in Image 1, is that you can leave your stock 5-way pickup selector switch (with the standard two switching stages). All you additionally need is a DPDT switch to change between the two operating modes. This can be an additional mini toggle switch or a push-pull or push-push pot. Both humbuckers need to have a 4-conductor wiring, so you have access to both coils. This wiring will not work with humbuckers sporting the traditional 2-conductor wiring. I show the version with a standard push-pull pot and, as usual, with the Seymour Duncan color code. If you use pickups from a different company, you need to transfer this color code, but you already know where and how to do this. For clarity, I left out all ground connections (there are many of them in this wiring), using the standard ground symbol instead. Simply solder these wires to the back of one of the pots and do the same with the string-grounding wire in your guitar.
That's it! Next month we return to our DIY relic series, taking care of the plastic tuner buttons, so stay tuned.
Until then, keep on modding!
[Updated 7/26/21]
Stratocaster
Want a vast sonic palette at your fingertips? Here’s a way to get 10 unique sounds from one guitar.
Exactly 10 years ago, I wrote my first column for the publication that evolved into Premier Guitar, and as you can imagine, this is a landmark for me. To celebrate this decennial anniversary, I've cooked up something special. Fair warning: This is a complex mod, so it may not be for everyone. But even though the wiring resembles a circuit from the Apollo 12 mission, it's worth the work if you dream of having a vast sonic palette at your fingertips. The goal of this wiring is to create two independent switching stages: a standard Stratocaster setup mated with a typical PRS scheme. This “Strat-PRS crossover" will give you the best of both worlds in one guitar.
Overview and considerations.
For this project, you need a guitar with three pickups—neck and bridge humbuckers, plus a middle single-coil—wired to a special 5-way switch and master volume and master tone controls.
To get the required HSH configuration, you can take an existing dual-humbucker guitar and add a middle single-coil or replace a Strat's neck and bridge single-coils with humbuckers. For most guitars, this will necessitate body routing (a job for a pro) as well as a new pickguard.
A few other things to bear in mind: While it's possible to use single-coil-sized humbuckers, you'll get the best results using standard humbuckers with a middle single-coil. In particular, it's the PRS tones that benefit from this pickup mix.
Although the middle pickup can be any standard single-coil of your choice, both humbuckers must have 4-conductor wiring. If you have traditional 2-conductor humbuckers, you can either convert them to 4-conductor wiring or simply replace them with modern 4-conductor types. I suggest considering the latter, because converting a 2-wire humbucker to a 4-wire design entails removing the cover, and this exposes the extremely delicate coil wires. In this state, it's easy to damage the pickup. Unless you're comfortable with such an operation, take the pickups to your local tech or send them to a pickup manufacturer and ask them to do the conversion for you. Again, the safest option is to use stock 4-wire humbuckers, which are readily available from dozens of companies.
Also, when wiring two pickups together and splitting a humbucker, it's easy to get lost in all kinds of out-of-phase issues when you mix pickups from different makers. To avoid inadvertent phase problems, I highly recommend using all three pickups from the same manufacturer. This will ensure that both the polarity of the magnets and polarity of the individual coils—and this is especially critical for the humbuckers—are correct in relation to each other. (In future columns I'll go into this topic in greater detail and show you how to avoid any phase troubles right from the get-go.) If you intend to combine pickups from different companies, contact the manufacturers' service departments and explain what you want to do so they can guide you through the pickup selection process.
The nitty-gritty. For this mod, you'll need a 5-way switch with four, instead of the standard two, independent switching stages. The open-framed version of this switch is available from Fender as a 5-way Super Switch, but there are also PCB-based versions of this switch. To find out more about these switches, read "Introducing Fender's 5-Way Super Switch" and "Exploring Fender's 5-Way Super Switch."
Even though the wiring resembles a circuit from the Apollo 12 mission, it's worth the work if you dream of having a vast sonic palette at your fingertips.
This project also requires an additional switch to toggle between standard Strat and PRS modes. You can either add a 4PDT mini-toggle switch or replace one of the pots with a Fender S-1 push/push switching pot. I opted for the S-1 to keep the control layout as clean as possible, but if you want to install an additional switch instead, you can convert the S-1's switching matrix to your 4PDT switch.
Another item you'll need for this project is a 500k-ohm resistor. Any type and wattage will do; I use a 1/4-watt metal film resistor because it's small and easy to work with.
Both the master volume and tone pots are 500k, a value that makes sense for the PRS mode. For the Strat mode, we have a neat little trick I'll show you in a moment. As for the tone cap, a standard 0.022 µF value will work fine. If you want a little less capacitance, try a 0.015 µF or 0.01 µF value. Either will work great for the Strat mode. If you want, you can also incorporate the typical PRS treble bleed network between the volume's input and output to keep the high-end alive when rolling back the volume. This will work for the Strat mode as well, but not perfectly—give it a try and see what you think. The official PRS method is a 180 pF "cap only" wiring.
The following chart details the 10 pickup selections in our crossover wiring scheme.
The Strat mode yields five classic single-coil tones—bridge, middle, and neck pickups solo, plus a pair of dual-pickup settings. For the latter, the humbuckers are split and the active coil is wired in parallel to the middle single-coil to achieve the Strat's signature cluck in positions 2 and 4. Depending on the humbuckers, this can work quite well.
Pushing the S-1 down gives you the switching matrix of a modern PRS equipped with two humbuckers. Position 4 sounds similar to a Telecaster's middle position, with bridge and neck single-coils in parallel, and when you add that to the available Strat and full humbucker settings, you have a lot of tonal possibilities.
Hookup tips.
Because there are so many wires to connect, I recommend approaching this in two stages. Start by soldering all the jumper wires on the 5-way Super Switch (Fig. 1) and the S-1 pot (Fig. 2). It's much easier to solder these wires before mounting the components in the guitar.
Notice the additional 500k resistor on the S-1 switch, soldered between the switch and the lug that will ultimately connect to ground. This is a cool little gimmick to get a more classic Strat tone. Here's the lowdown: A standard Strat has three 250k pots, yet here we have two 500k pots—a configuration that gives the middle single-coil more highs than we're used to hearing on a Strat. By adding this 500k resistor in parallel, the middle single-coil will sound like it's in a 250k environment when the S-1 is in Strat mode.
Fig. 3 is the full schematic. I used Seymour Duncan's color code—a standard for such drawings. If you're using pickups from a different manufacturer, simply convert the color code of the wires, following the manufacturer's instructions. To keep the schematic as clean as possible, whenever multiple wires lead to the same spot, I combine them in the drawing. In such a complex wiring, it's very easy to mix something up, so be patient and work methodically. Go one step at a time and double-check each connection.
Next time, we'll begin investigating pickup parameters to learn how to interpret them and what they can tell us about a given unit's sound. Until then ... keep on modding!
[Updated 9/27/21]