
First, let’s discuss polarity. In short, we can define the polarity of a pickup as the direction—north or south—of the magnetic field.
It’s important to consider polarity when attempting to combine pickups and achieve a hum-canceling effect. You’ve probably seen RWRP—reverse wind, reverse polarity—in a pickup description, especially when looking for Strat middle pickups. Hum canceling is only achieved when both pickups have opposite phase and opposite polarity—so, one pickup needs to have north and the other south polarity.
Humbucker pickups also work on this principle. Both coils have opposite phase and polarity, so when you combine them in series or in parallel, it will be free of hum. (The fun really starts when you start considering coil-splitting options, but that’s for another time.)
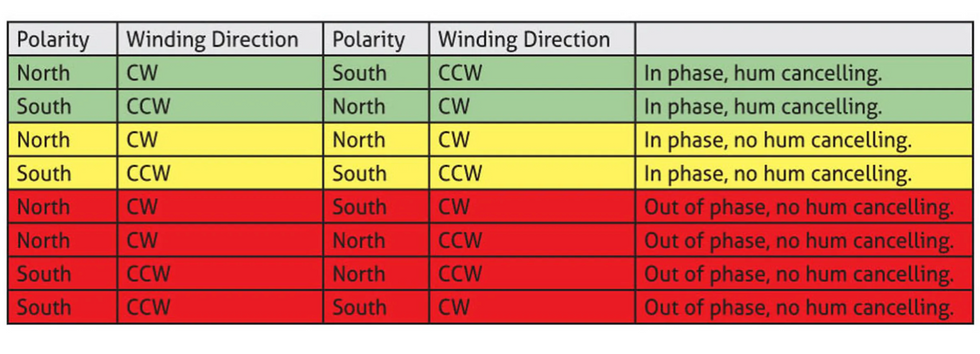
What happens if you combine mismatched pickups? You’ll receive hum or out-of-phase tones, and, in the worst possible scenario, both at once. As a guideline: If you want two pickups to be in phase, both the polarity and the wind direction have to be either identical or opposite. In other words, two pickups with the same wind and polarity will be in phase, and so will two pickups that have opposite polarity and wind. If the two pickups have the same wind but different polarity, or the same polarity but different wind, they will be out of phase with each other.
“What happens if you combine mismatched pickups? You’ll receive hum or out-of-phase tones, and, in the worst possible scenario, both at once.”
Since many pickup manufacturers do not mention the polarity in their pickup descriptions, here are some simple ways to figure it out on your own. (This can be a real problem because you need the pickups on your table to test them. If you need to know about polarity before ordering a new pickup, there is no way around contacting the manufacturer and asking for it.)
Use a pickup polarity tester. There are several polarity testing devices on the market that are specifically made for pickups. They are usually not very expensive and are a must-have tool for every guitar tinkerer. The most common one is made by Schatten Design Canada, which is very easy to use. It’s a see-through tube with a magnet inside, you simply move it on the magnet you want to test and receive a clear reading if it is north or south.
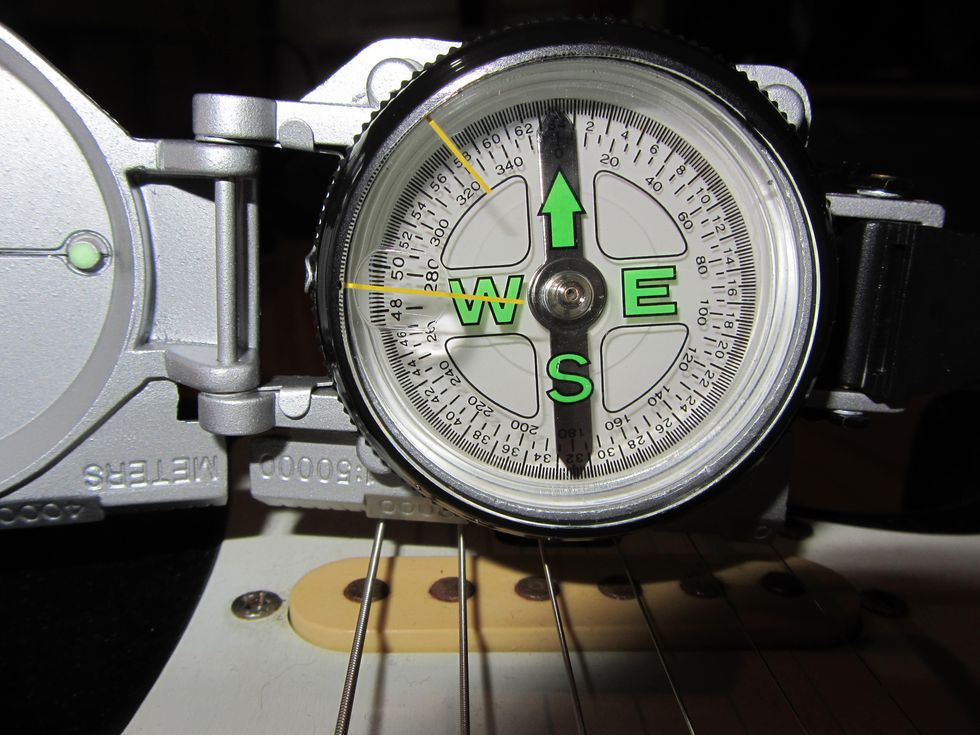
Photo courtesy of singlecoil.com
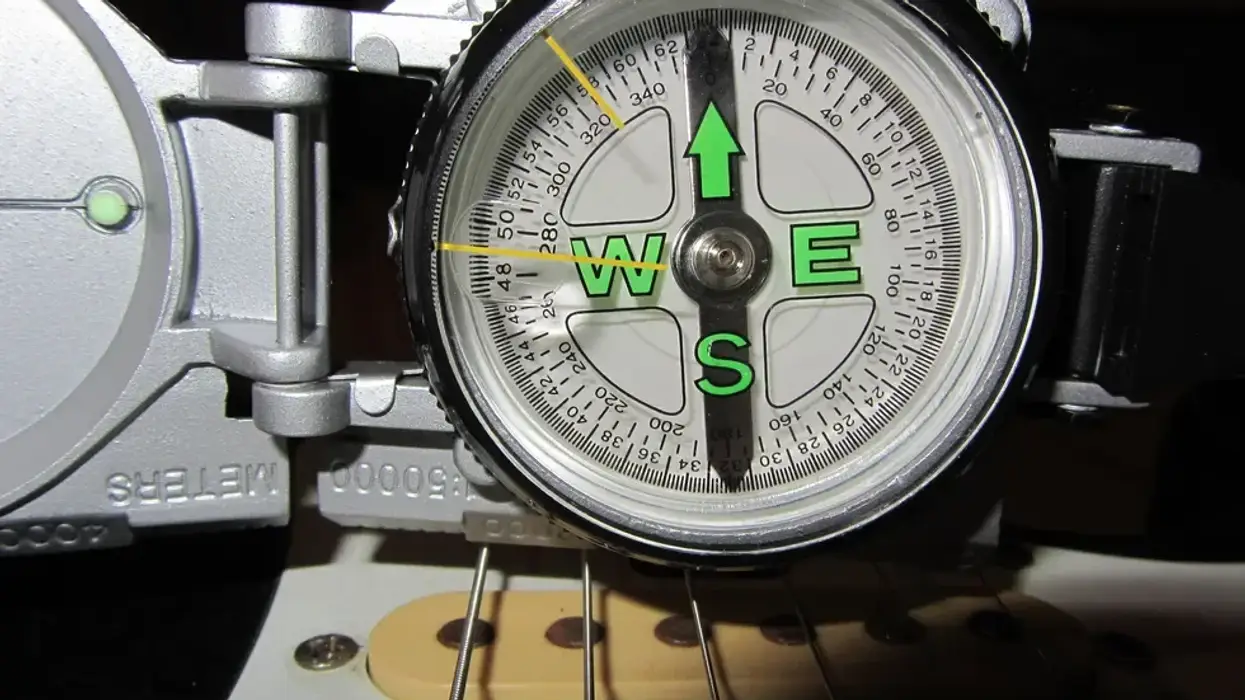
Using a compass. If you have an analog compass, you can use it as a polarity tester for pickups. When using a compass, the needle will always point toward the north magnetic pole. So, if your pickup has a polarity of north, it will point toward the pickup, and if it’s south, it will point away.
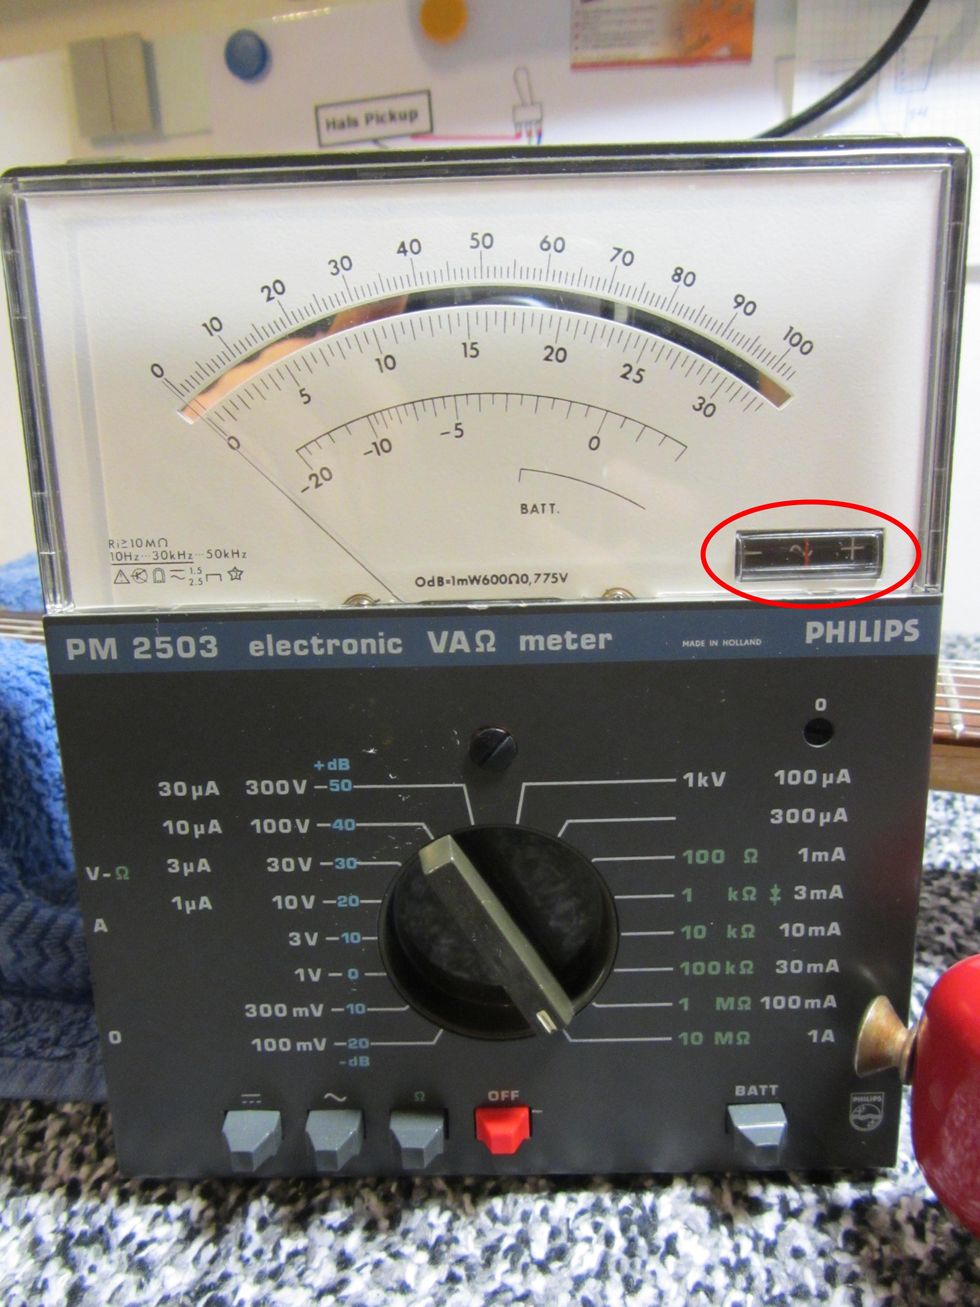
Photo courtesy of singlecoil.com
Using an analog meter. In the ’60s, it was common that analog meters had a built-in polarity test. Most of these vintage meters are sought-after items today and fetch high prices. We have a Philips meter from the late ’60s in the shop. If you have one, here is how to use it to determine polarity: Connect the pickup wires to the meter: connect the white one as the + and the black one as the –. Use a heavy screwdriver or a piece of steel and move a piece of steel quickly towards the magnets of the pickup without touching them. (A regular string doesn’t have enough mass for this.) When the polarity meter (the small rectangular display on the right bottom of the main display marked in red) shows +, this is defined as north, while – means south.
Now, let’s take a look at phase. We can define the electrical phase of a pickup as the direction of its winding, which can be clockwise or counter-clockwise. But it’s not all that easy.
You can determine the direction of a pickup’s winding by how it is wound when looking at it from above, with the pickup facing up toward you. I think this definition comes from the early Fender years, and the factory never changed this terminology, winding all pickups for several decades in a clockwise way. For a long time, reverse-wound middle pickups had a clockwise winding, and to change the phase they simply interchanged the two pickup leads. From an electrical point of view, this is all okay. But there are two good reasons to make reverse-wound pickups in a counter-clockwise direction:
Many players believe that a counter-clockwise wound pickup sounds different or better than a clockwise-wound one with reversed leads. And if a string contacts the pickup’s magnet, a clockwise-wound pickup with reversed leads will short out when the hot gets connected to ground and will go silent. If you touch the magnets of such a pickup with your finger, you will be rewarded with a loud humming noise.
Besides the clockwise/counter-clockwise terms, some pickup makers will use the following descriptions, which explain how the pickup is attached to the winding machine and the direction it moves in the machine:
• top right, top going (counter-clockwise)
• top right, top coming (clockwise)
• top left, top going (clockwise)
• top left, top coming (counter-clockwise)
So, if you have to determine the phase of a pickup, here’s how you can do that.
Build yourself a phase-testing unit. This was covered back in our July and August 2017 issues (and can be found here and here), and is probably the easiest way to measure phase.
Use an analog meter with a polarity test option as mentioned above. Connect the pickup wires to the meter, the white (hot) one as the + and the black (ground) one as the –. If the wires of your pickup have different colors, you will have to use the ones that are defined as hot and ground according to the manufacturer. Now, use a heavy screwdriver or a piece of steel or iron and move it quickly toward the pole pieces of the pickup without touching them. When the polarity meter shows +, it means that the wire that is connected to the + input jack is really the hot connection of the pickup. If it shows –, it means that the pickup wire connected to the + input jack is ground. You will be surprised how many times the white wire is not really the hot connection!
Using a standard analog meter without a polarity test is not recommended, and you’ll risk breaking your meter. There are ways to tweak a standard analog meter for this measurement, e.g. using the zero and scale setting or a resistor in series with the pickup to get the needle somewhere off zero, near the middle of the scale. It’s also possible to use a standard digital multimeter by connecting the pickup to it, using the DC/ohms setting, but you have to look quick to note what happens. These MacGyver procedures are only recommended for experienced techies.
This phase/polarity table shows what you can expect from every possible combination:
I hope this will help you avoid possible trouble when you want to combine pickups from different companies. We’ve only scratched the surface of phase and polarity, so ask a pickup pro sometime and they can tell you all about it.
That’s it! Next month, we will take a deep dive into the G&L Passive Treble and Bass control (PTB), so stay tuned!
Until then ... keep on modding!