Does it bug you to lose treble when you roll back the guitar volume? Here are three solutions to that problem.
Passive single-coil pickup systems have an inherent sonic idiosyncrasy: When you turn down the volume—even just a bit—the high-end loss is not proportionate to the volume reduction. In other words, a small cut in volume creates a far greater drop in your guitar's treble response. This is true of the Stratocaster and Telecaster, as well as many other popular models, so I'm sure you're familiar with it.
This quirk of passive electronics isn't really a big deal for all players. Many aren't bothered by it because they've simply gotten used to the sound over the years. Others really like this "problem," since it lets you coax a second tonal color from the same pickup—simply roll back the volume a tad to fatten up the tone. But a lot of guitarists (myself included) prefer to maintain an identical amount of treble at any volume setting.
Using active electronics is the only real solution to combating the "volume-versus-tone" issue—all other strategies are just a compromise. That said, compromise can lead to significant improvements. Personally, I use a compromising solution in all of my own guitars. And my favorite solution is one of the easiest mods ever: add a "treble-bleed network" between the input and output of the volume pot(s) of the guitar. This works with passive single-coils and humbuckers, but if your guitar has more than one volume control, like on a Les Paul, each volume pot needs its own treble-bleed network.
Some Background.
So, what is a treble-bleed network and how does it work? In layman's terms, it's usually a combination of a small capacitor and a resistor in parallel. Techies call this a RC network, but such systems are also called a "treble bypass filter" or TBA, for treble-bypass arrangement. You can also find variations that use only a cap, or a resistor in series with the cap.
The theory behind this little rascal appears straightforward, but it's much more complicated than it seems. So as not to slam you with theory, I'll stick to the basics, which means having to over-simplify the following explanation.
Fig. 1
Schematics courtesy singlecoil.com
First, the good news: It's possible to calculate the values for a treble-bleed network that will work superbly in a given guitar. The bad news? The formula behind it is complex and beyond the scope of this column. There are many parameters involved in this formula, such as the number, ratio, and resistance of the pots in your guitar, the pickups, the length and capacitance of your guitar cable, the input impedance of your amp, and more. All of these must be calculated in the context of a Fletcher-Munson curve, which defines equal-loudness contours for the human ear. Doable, but really complicated!
Typically, you have to make several simulations and analyze the corresponding curve to see if it matches your goal. Such calculated networks will work wonderfully in the guitar you calculated them for, but when you change one of the parameters—like the length or type of your guitar cable, or you plug into a different amp—the treble-bleed network will stop working perfectly. That's an unavoidable fact. Because of all the parameters involved, it's easy to see why standard "one-size-fits-all" networks are an illusion.
So you can experiment to determine what you like best, based on your own gear and sonic goals, I'll describe the different types and possible value ranges of the components. Because the range of these components is very limited, at minimum you'll achieve good results. But if you want great results, it's important to realize you'll have to experiment with each individual guitar, and this includes a lot of component swapping.
When you roll down the volume, the treble-bleed network starts to filter out some bass frequencies, making the highs more prominent.
The Details.
When you roll down the volume, the treble-bleed network starts to filter out some bass frequencies, making the highs more prominent. It won't boost anything (treble, in this case) because a passive device can only filter out certain frequencies. The networks are always connected between the input and output of the volume control, as shown in Fig. 1.
There are basically three different types of treble-bleed networks (Fig. 2), and we'll examine each of them. On the left is "cap only," which isn't a true network because it's a capacitor without a resistor. Fender made this version popular in the '60s when they started installing a 1000 pF cap on Telecaster volume controls. Together with the 1M pots they used at this time, the sonic result was kind of creepy ... thin and bright.
This value is still popular today in many one-size-fits-all solutions. This circuit has one problem: As the volume is turned lower, more of the higher frequencies will predominate—even to the point where the guitar starts to sound very "tinny" as the volume approaches zero. Depending on what you're after sonically, this can be a good thing or not. If you want to experiment with this cap-only configuration, good working values are from 220 pF up to 1500 pF.
Our second type of treble-bleed network is shown in the center of Fig. 2. This consists of a cap with a resistor in parallel. This is the version you'll find in most treble-bleed networks. A very popular combination is a 1000 pF cap with a 150k-ohm resistor in parallel. This works for almost any guitar, when it comes to a one-size-fits-all solution.
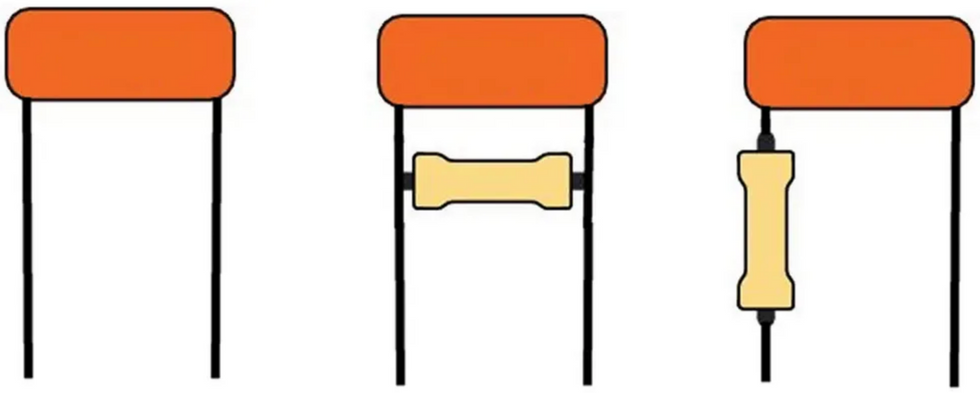
Fig. 2
The cap-with-resistor-in-parallel version can be superior to the cap-only method because, as you turn the volume lower, the higher frequencies don't dominate. The problem with this circuit is that it affects the taper of the volume pot in a negative way when the two values are not carefully matched to each other. Good working values to try are from 220 pF up to 1500 pF for the cap, and 100k-ohm up to 330k-ohm for the resistor.
Our third treble-bleed network, shown on the right, consists of a cap with a resistor in series. This configuration became popular in the '90s when Australian luthier Chris Kinman started to use a 1200 pF cap and a 130k-ohm resistor in series for his guitars. This scheme is regarded by many to be the best of the three versions, because it seems to solve the problem of the volume pot taper and the tinny sound. Even Fender uses it now. Their system employs a 1000 pF cap and a 130k-ohm resistor, and is dubbed the Fender Tone Saver. Values you should try are 470 pF up to 1500 pF for the cap, and 100k-ohm up to 330k-ohm for the resistor.
Regarding the two components, here's a rule of thumb: Brightness is determined by the resistor's value (less ohms yields more highs), but the frequencies that are present are determined by the cap's value—the lower the value, the higher the frequencies, and conversely, the higher the value, the lower the frequencies.
Into the sound lab. To conduct your own treble-bleed network experiments, solder two wires to the input and output of the volume pot and connect alligator clips on the other ends. If you let the two wires hang out from under the pickguard for fast access, you can easily try every combination of cap and resistor. (Be sure to take notes.)
After you find your favorite combination, remove the two wires and permanently install it to the volume pot. Remember, what you choose may be very different from another player. Some like more high end (this is often due to a dark-sounding amp), while others prefer more midrange to get a punchy sound. It's worth taking the time to try several combinations. This simple circuit can turn a muddy-sounding guitar into an articulate one—even with tons of distortion—because the tone will clean up when you roll back the volume.
I can't advise you what to use—you need to explore this yourself or let an experienced tech calculate your personal treble-bleed network, based on your specific rig. Many guitarists like the cap-only version for Strats and Teles, while others prefer a cap and a resistor in parallel. The resistor-in-parallel and resistor-in-series schemes perform more-or-less equally, but the parallel version offers more highs when you turn down the volume. Again, this can be positive or negative, depending on your pickups and amp.
Okay, that's it for now. Until next time ... keep on modding!
[Updated 9/10/21]
- Mod Garage: The Fender Greasebucket Tone Circuit - Premier Guitar ›
- The Fascinating Peavey T-60 Tone Circuit - Premier Guitar ›
- Mod Garage: Three Ways to Wire a Tone Pot - Premier Guitar ›
- Mod Garage: The Fender Greasebucket Tone Circuit - Premier Guitar ›
- The Fascinating Peavey T-60 Tone Circuit - Premier Guitar ›
- Assessing a Pickup’s Polarity and Phase ›
Day 9 of Stompboxtober is live! Win today's featured pedal from EBS Sweden. Enter now and return tomorrow for more!
EBS BassIQ Blue Label Triple Envelope Filter Pedal
The EBS BassIQ produces sounds ranging from classic auto-wah effects to spaced-out "Funkadelic" and synth-bass sounds. It is for everyone looking for a fun, fat-sounding, and responsive envelope filter that reacts to how you play in a musical way.
With pioneering advancements in pickups and electronics, the AEG-1 is designed to offer exceptional acoustic sound and amplification.
The LR Baggs AEG-1 represents a highly versatile, forward-thinking approach to acoustic guitar luthierie. It sports a streamlined body shape with built-in electronics and pickup/microphone settings, providing a wide range of tones suitable for different playing environments and musical styles.
"The reason for AEG-1’s groundbreaking performance is its patent pending integrated neck support system that frees the guitar’s top and back from the need to support the neck. This allows Baggs unprecedented freedom to voice the top and back of each guitar to maximize the acoustic response, achieving a full-bodied sound from a slim and comfortable design. With greater structural integrity, more string energy is driven into the top, resulting in a wider dynamic range, greater tonal depth, enhanced low-frequency response, and improved tuning stability."
The AEG-1’s electronics feature an all-discrete studio grade preamp with a multi-pole crossover system that seamlessly blends the HiFi Pickups and Silo Mic for an inspiring feel and sound in any position – ranging between direct and natural to open and airy,and everywhere in between. As with all LR Baggs electronics, you can expect wonderful warmth, purity, low noise, and long battery life. The system’s three-knob side-mounted controls offer quick access to master volume, pickup/mic blend, tone shaping, phase inversion, and a battery life indicator.
Features
- Three different gloss-finished options for top wood: Torrefied Sitka Spruce, Natural Engelmann Spruce, or Sunburst Sitka Spruce
- Indian Rosewood back, with composite poplar frame body
- African Mahogany neck wood carved in a slim “C” shape
- Indian Rosewood fretboard with 16” radius, 25-5/8” (651mm) scale length and 20 frets
- Indian Rosewood bridge with composite saddle
- Nut width is 1.7” (43mm)made of composite material, with closed back tuners
- Onboard electronics/pickup system: Custom HiFi Duet with HiFi Pickups and Silo Microphone
- Full-sized body similar to a dreadnought-style guitar with scalloped X bracing, slim profile 2-1/2” body depth, and carved beveled armrest for extra comfort
- Utilizes single 9-volt with approximately 120-hour life
The Baggs AEG-1 Acoustic Electric Guitar is the culmination of a lifetime dedicated to high-performance acoustic amplification, all rooted in the craftsmanship of a luthier. Our founder and master luthier, Lloyd Baggs, began his journey as a guitar maker, creating instruments for artists like Ry Cooder, Jackson Browne, Graham Nash, and Janis Ian. His deep respect for the guitar evolved into a quest to faithfully amplify his own instruments for live performance.
After years of studying the physics of acoustic instruments and pioneering advancements in pickups and electronics, the Baggs AEG-1 is the realization of everything we’ve learned about acoustic sound and amplification. Lloyd’s dual expertise as a luthier and a pickup designer allowed us to craft a guitar and its electronics in harmony, finely tuning the system for this instrument.
Lloyd Baggs, founder of LR Baggs and Baggs Guitars, describes the journey that has led to his newest creation: “My desire to faithfully amplify the acoustic guitars I was building as a luthier led to the creation of our pickup company. It became my life’s work to eliminate every obstacle to playing live acoustic guitar easy, inspiring, and fun. The AEG-1 is the realization of this philosophy and I’m incredibly proud of this instrument. I hope it brings you inspiration and joy for years to come!”
Designed in California and manufactured in South Korea, the Baggs AEG-1 carries a street price of $1599.
For more information, please visit lrbaggs.com.
Trey Hensley | Baggs AEG-1 First Listen - YouTube
Enjoy the videos and music you love, upload original content, and share it all with friends, family, and the world on YouTube.LR Baggs AEG-1 Acoustic-electric Guitar - Torrefied Spruce Top
AEG-1 Acou Elect Guitar, TorrefiedA familiar-feeling looper occupies a sweet spot between intuitive and capable.
Intuitive operation. Forgiving footswitch feel. Extra features on top of basic looping feel like creative assets instead of overkill.
Embedded rhythm tracks can sneak up on you if you’re not careful about the rhythm level.
$249
DigiTech JamMan Solo HD
digitech.com
Maybe every guitarist’s first pedal should be a looper. There are few more engaging ways to learn than playing along to your own ideas—or programmed rhythms, for that matter, which are a component of the new DigiTech JamMan Solo HD’s makeup. Beyond practicing, though, the Solo HD facilitates creation and fuels the rush that comes from instant composition and arrangement or jamming with a very like-minded partner in a two-man band.
Loopers can be complex enough to make beginners cry. They are fun if you have time to venture for whole weeks down a rabbit hole. But a looper that bridges the functionality and ease-of-use gap between the simplest and most maniacal ones can be a sweet spot for newbies and seasoned performers both. The JamMan Solo HD lives squarely in that zone. It also offers super-high sound quality and storage options, and capacity that would fit the needs of most pros—all in a stomp just millimeters larger than a Boss pedal.
Fast Out of the Blocks
Assuming you’ve used some kind of rudimentary looper before, there’s pretty decent odds you’ll sort out the basic functionality of this one with a couple of exploratory clicks of the footswitch. That’s unless you’ve failed to turn down the rhythm-level knob, in which case you’ll be scrambling for the quick start guide to figure out why there is a drum machine blaring from your amp. The Solo HD comes loaded with rhythm tracks that are actually really fun to use and invaluable for practice. In the course of casually exploring these, I found them engaging and vibey enough to be lured into crafting expansive dub reggae jams, thrashing punk riffs, and lo-fi cumbias. Removing these tracks from a given loop is just a matter of turning the rhythm volume to zero. You can also create your own guide rhythms with various percussion sounds.
Backing tracks aside, creating loops on the Solo HD involves a common single-click-to-record, double-click-to-stop footswitch sequence. Recording an overdub takes another single click, and you hold the footswitch down to erase a loop. Storing a loop requires a simple press-and-hold of the store switch. The sizable latching footswitch, which looks and feels quite like those on Boss pedals, is forgiving and accurate. This has always been a strength of JamMan loopers, and though I’m not completely certain why, it means I screw up the timing of my loops a lot less.
Many players will be satisfied with how easy this functionality is and explore little more of the Solo HD’s capabilities. And why not? The storage capacity—up to 35 minutes of loops and 10 minutes for individual loops—is enough that you can craft a minor prog-rock suite from these humble beginnings. Depending on how economical your loops are, you can use all or most of the 200 available memory locations built into the Solo HD. But you can also add another 200 with an SD/SDHC card.Deeper into Dubs
Loopers have always been more than performance and practice tools for me. I have old multitrack demos that still live in the memory banks of my oldest loopers. And just as with any demos, the sounds you create with the Solo HD may be tough to top or duplicate, which can mean a loop becomes the foundation of a whole recorded song. The Solo HD’s tempo and reverse features, which can completely mutate a loop, make this situation even more likely. The tempo function raises or lowers the BPM without changing the pitch of the loop. As a practice tool, this is invaluable for learning a solo at a slower clip. But drastically altered tempos can also help create entirely new moods for a musical passage without altering a favorite key to sing or play in. Some of these alterations reveal riffs and hooks within riffs and hooks, from which I would happily build a whole finished work. The reverse function is similarly inspiring and a source of unusual textures that can be the foundation for a more complex piece.
HD, of course, stands for high definition. And the Solo HD’s capacity for accurate, dense, and detail-rich stacks of loops means you can build complex musical weaves highlighting the interaction between overtones or timbre differences among other effects in your chain. I can’t remember the last time I felt like a looper’s audio resolution was really lacking. But the improved quality here lends itself to using the Solo HD as a song-arranging tool—and, again, as a recording asset, if you want a looped idea to form the backbone of a recording.
The Verdict
With a looper, smooth workflow is everything. And though it takes practice and some concentration in the early going to extract the most from the Solo HD’s substantial feature set, it is, ultimately, a very intuitive instrument that will not just smooth the use of loops in performance, but extend and enhance its ability as a right-brain-oriented driver of composition and creation.
Three thrilling variations on the ’60s-fuzz theme.
Three very distinct and practical voices. Searing but clear maximum-gain tones. Beautiful but practically sized.
Less sensitive to volume attenuation than some germanium fuzz circuits.
$199
Warm Audio Warm Bender
warmaudio.com
In his excellent videoFuzz Detective, my former Premier Guitar colleague and pedal designer Joe Gore put forth the proposition that theSola Sound Tone Bender MkII marked the birth of metal. TakeWarm Audio’s Warm Bender for a spin and it’s easy to hear what he means. It’s nasty and it’s heavy—electrically awake with the high-mid buzz you associate with mid-’60s psych-punk, but supported with bottom-end ballast that can knock you flat (which may be where the metal bit comes in).
The Warm Bender dishes these sounds with ease and savage aplomb. Outwardly, it honors the original MkII—a good way to go given that the original Sola Sound unit is one the most stylish effects ever built. But the 3-transistor NOS 75 MkII is only one of the Warm Bender’s personalities. You can also switch to a 2-transistor NOS 76 circuit, aka the Tone Bender MkI. There’s also a silicon 3-transistor Tone Bender circuit, a twist explored by several modern boutique builders. Each of these three voices can be altered further by the crown-mounted sag switch, which starves the circuit of voltage, reducing power from 9 to 6 volts. From these three circuits, the Warm Bender conjures voices that are smooth, responsive, ragged, mean, mangled, clear, and positively fried.
The Compact Wedge Edge
Warm Audio, quite wisely, did not put the Warm Bender in an authentically, full-size Tone Bender enclosure, which would gobble a lot of floor space. But this smaller, approximately 2/3-scale version, complete with a Hammerite finish, looks nearly as hip. It’s sturdy, too. The footswitch and jacks are affixed directly to the substantial enclosure entirely apart from the independently mounted through-hole circuit board, which, for containing three circuits rather than one, is larger and more densely populated than the matchbox-sized circuit boards in a ’60s Tone Bender. Despite the more cramped quarters, there’s still room for a 9V battery if you choose to run it that way. Topside, there’s not much to the Warm Bender. There’s a chicken-head knob for output volume, another for gain, and a third that switches between the NOS 76, NOS 75, and silicon modes. Even the most boneheaded punk could figure this thing out.
A Fuzz Epic in Three Parts
Most Warm Bender customers will find their way to the pedal via MkII lust. If you arrive here by that route you won’t be disappointed. The Warm Bender’s NOS 75 setting delivers all the glam-y, proto-metal, heavy filth you could ask for. It sounded every bit as satisfying as my own favorite MkII clone save for a hint of extra compression that falls well within the bounds of normal vintage fuzz variation. My guess is that when you’re ripping through “Dazed and Confused” you won’t give a hoot.
“There’s more color and air in the NOS 76 mode.”
If the NOS 75 circuit suffers by comparison to anything, it’s the 2-transistor friend next door, the NOS 76. The lower-gain NOS 76 mode is, to my ears, the most appealing of the three. It’s the most dynamic in terms of touch response and guitar volume attenuation and delivers the clearest clean tones when you use either technique. There’s more color and air in the NOS 76 mode, too. Paired with a neck-position single-coil, it’s an excellent alternative for Hendrix and Eddie Hazel low-gain mellow fuzz that’s more like dirty overdrive. The silicon mode, meanwhile, lives on the modern borderlands of the ’60s-fuzz spectrum. It’s super-aggressive and focused, which can be really useful depending on the setting, but lo-fi, spitty, and weird when starved of voltage via the sag switch. It’s deviant-sounding stuff, but extends the Warm Bender’s performance envelope in useful ways, particularly if you hunt for unique fuzz tones in the studio.
There’s a widely accepted bit of wisdom that says most germanium fuzzes sound lousy unless you turn up everything all the way and use your guitar controls to tailor the tone. This is partly true, especially with a Fuzz Face. But in general, I respectfully disagree and present the Warm Bender as exhibit A in this defense. The gain and volume controls both have considerable range and fascinating shades of fuzz within that can still rise above the din of a raging band.
The Verdict
Some potential customers might balk at the notion of a $199 vintage-style fuzz made in China—no matter how cool it looks. But the Warm Bender looks and feels well made. The sound and tactile sensations in the three circuits are truly different enough to be three individual effects, and $199 for three fuzz pedals is a sweet deal—particularly when consolidated in a stompbox that looks this cool. There is a lot of variation in old Tone Benders, and how these takes on the circuits compare to your idea of true vintage Tone Bender sound will be subjective. But I heard the essence of both the MkI and MkII here very clearly and would have no qualms about using the Warm Bender in a session that called for an extra-authentic mid-’60s fuzz texture.