
After meeting my PG colleague Joe Gore at last year's Musikmesse and exchanging email, I realized we share a passion for guitar wiring mods. After reading his excellent article “Three Must-Try Guitar Wiring Mods" [PG, July '14], I suggested doing something together for PG, and here it is. I took the basic idea from Joe's “Varitone variation" mod and extended it here.
A common problem. Using a Varitone or Varitone variation means switching capacitance. Depending on the switch's design and its location in the circuit, this can result in a loud popping noise in a passive guitar wiring scheme if you switch capacitors. You can prevent this by turning down your guitar's volume pot or putting your amp on standby, but what if you want to use the rotary switch mid-song?
There's an easy solution: Get some 10M resistors. (I like 1/4-watt metal-film resistors because of their small size, but you can use any resistor type or voltage you want, so long as it has the correct resistance.) Solder one between the rotary switch's center input lug (labeled “Center lug connects to volume pot lug 3" in Joe's diagram) and the lug the capacitor is connected to. You need to use a separate resistor for each capacitor, which means a total of three resistors if you follow Joe's diagram. With more than three caps, it can be tricky fitting all those resistors on a rotary switch, so small-sized resistors are welcome. This simple yet effective solution prevents popping noises in most cases, and is something Gibson used in their original Varitone design.
A different way to use the switch. In most cases players choose a switch to dial in different capacitor values, as Joe explains in his article. It's a great way to have many tonal shades available in only one guitar. With a 12-pole switch, you can connect 12 caps, and that's a lot. It can be difficult to add so many caps, depending on the guitar's available space. It's not much fun in a Telecaster, for example, but is relatively stress-free in a standard Strat. So using very small caps, or a unit with SMD (surface-mount device) caps, such as Stellartone's ToneStyler, can be a great solution if space is tight.
Here's a design I recently created for a customer: a 12-pole rotary switch with 11 caps—and 11 10M resistors! (The first position is bypass, with no tone cap engaged.) The caps are divided into two groups: The first is a kind of warmth control, with caps ranging from 1000 pF up to 6800 pF. The second group includes more typical tone cap sizes, ranging from 0.01 µF up to 0.1 µF. This way, you have a wide range of available tones. Of course, you can use fewer than 11 caps if you don't need so many options.
Another alternative is to switch between caps of the same value, but different type. One of our jazz-playing customers decided to use 0.033 µF tone caps in all his guitars—a nice in-between value if the standard 0.022 µF is too bright, but 0.047 µF is too dark.
He loves a rich, woody tone with nice overtones, so a certain cap from Roederstein is his standard. But he also wanted a warm, woolly tone as well as a slightly mid-scooped one, so we installed a rotary switch with his beloved Roederstein cap for the standard sound, a NOS paper-in-oil cap for the warm tone, and a standard “orange drop" cap for a slightly scooped sound. All three caps were 0.033 µF.
The original Varitone design. The original Gibson Varitone design used an inductor to create a series of notch filters together with the capacitors. Personally, I think adding the inductor is not the best choice. The design may have worked in the '50s, but today most of us are looking for different tones. (Joe described the tone of the original design in his article.) However, the original Varitone still has its fans, so let's look at it.
The original Varitone is a rotary switch with five different caps: 1000 pF, 3000 pF, 0.01 µF, 0.03 µF, and 0.22 µF. The first switching position is bypass, and each cap is paired with a 10M resistor. There's also a 1.5H choke as an inductor. If you want to add an inductor, you can use Xicon's 42TM019-RC or 42TL021-RC, both available inexpensively from Mouser, Radio Shack, and other electronics vendors. (These inductors have center-tapped primaries and secondaries. Use the entire primary or the entire secondary, and ignore center taps for Varitone wiring.)
Adding an inductor to Joe's wiring is quite easy. All caps are connected to ground after the rotary switch, so simply loosen this connection and wire the inductor between the caps and ground, and that's it! You can find good step-by-step instructions on installing the inductor at https://www.diyguitarmods.com/varitone-wiring-instructions.php.
If you want your circuit as close to the original as possible, connect a 100k resistor between the center input lug of the rotary switch (labeled “Center lug connects to volume pot lug 3" in Joe's diagram) and the wire coming from the volume pot. Several companies offer premade Varitone switches with the inductor added if you don't want to build one yourself.
Making it even more flexible. With the standard Varitone switch, the selected cap is engaged all the way. Joe's article describes the difference between cutting varying amounts of signal at a fixed frequency (as on a standard tone control) and cutting fixed amounts of signal at varying frequencies (as on a Varitone). But if you add a master tone control, you combine both approaches for an extremely flexible mod. Here's how to do it.
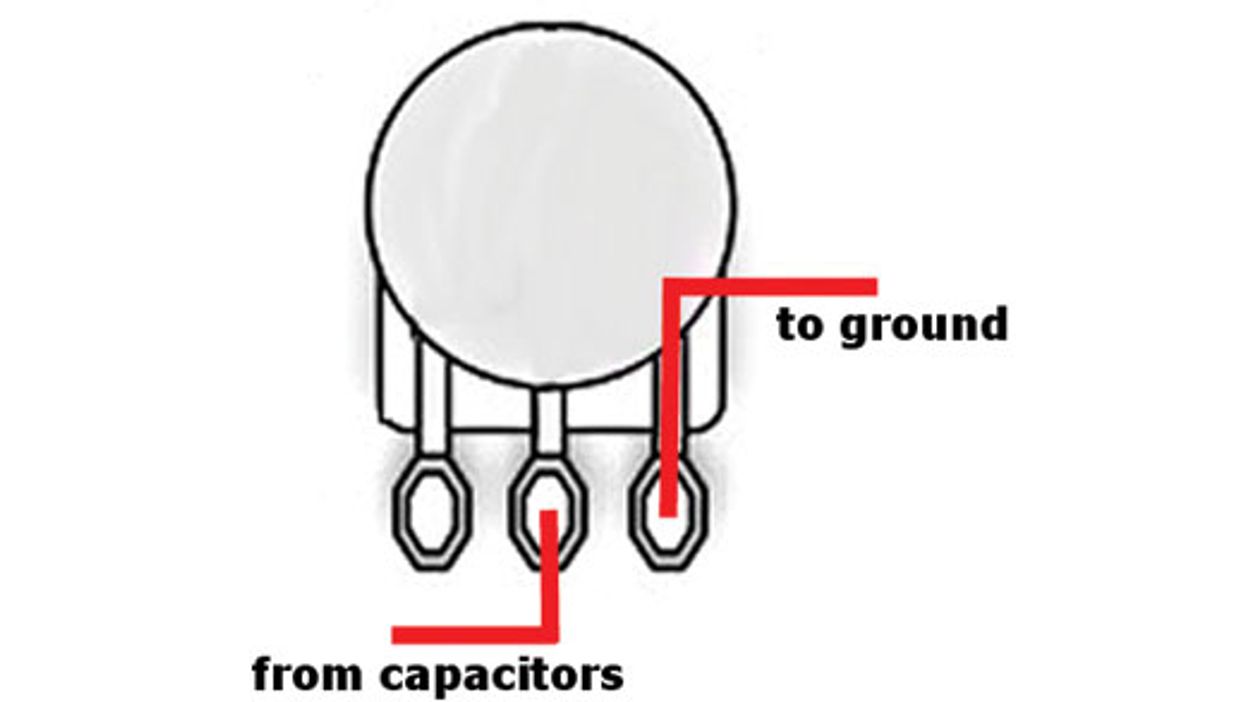
Add a 250k or 500k pot to your guitar near the Varitone switch. Loosen the connection where all the caps go to ground. Twist and solder the open ends of the caps together with a length of insulated wire. Solder the other end of the wire to the middle lug of the tone pot (Image 1). Lug #3 isn't connected to anything, and lug #1 goes to ground. Okay, you're done!
Now the rotary switch selects the tone cap, while the pot fine-tunes the settings. Give it a try—I'm sure you'll be amazed. And next month we'll explore another mod where the rotary switch is the headliner. Until then, keep on modding!