Get out your DMM, and let's explore the simple ways to ground Strats, Teles, and Les Pauls. The good news is, there is no such thing as overgrounding.
We'll break this down into two sections. Today, we'll talk about grounding in general and different ways to do it. In part two, we'll focus on grounding legs on the casing of a pot, like on the Stratocaster's master volume pot. And we'll come back to all this in a future column about how to shield pickguards and compartments the right way, which is also an important part of the grounding system.
Before we start, let's remind ourselves: We're talking about grounding in passive guitars, so we're talking about your standard Stratocaster, Telecaster, Les Paul, and the like. We're not talking about your amps, stompboxes, grandma's old steam radio, and other active devices.
In other words, it doesn't make a "better" grounding, but for showcase reasons, this is a cool option, anyway ... you hear with your eyes, too.
The good basic news is that it's not really hard to understand and you only need a simple digital multimeter, or DMM, set to continuity to analyze the grounding system in your guitar. I usually set it to audio or "beep mode," so you don't have to watch the display of your DMM. It's really simple: When it beeps, there is contact. If not, there is no connection.
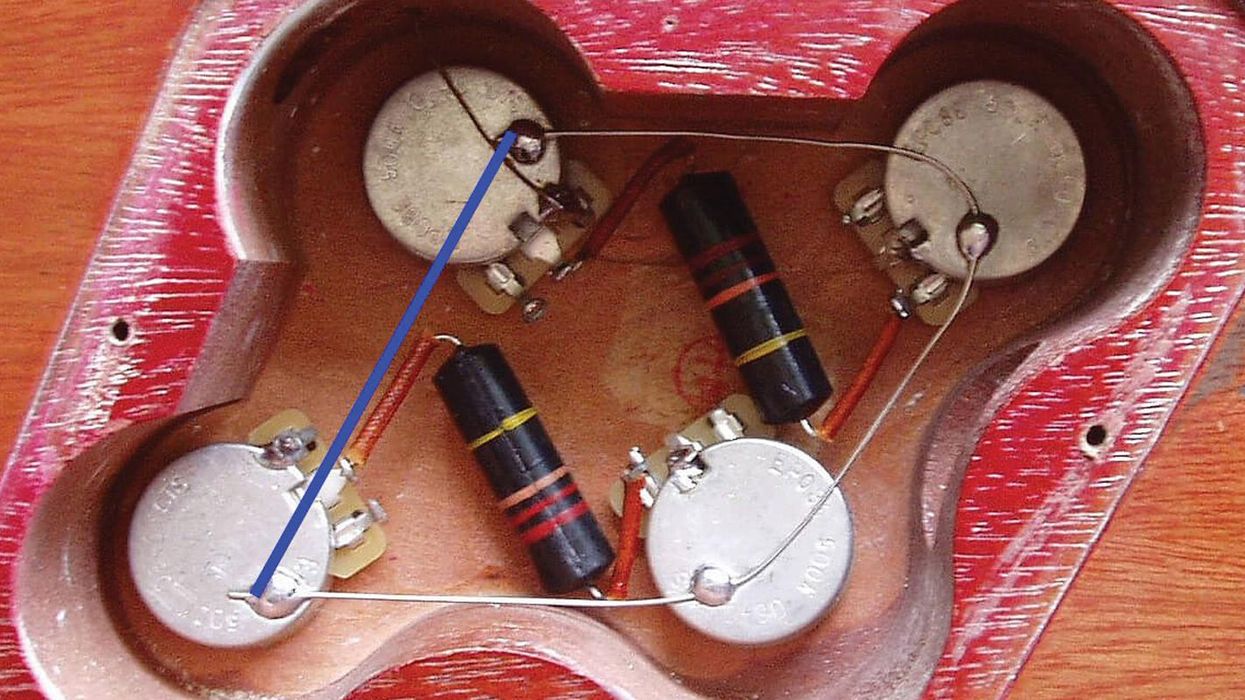
More good news: There's no "over-grounding." But there are things you can do wrong and then you're in trouble. My favorite on the "Grounding Pet Peeves" list is closing the ground ring on Les Pauls, ES-335s, and similar guitars. As you can see in Image 1, the ground ring is not closed, but many people like to add another ground wire, which I've marked blue, to "enhance" and complete the wiring because they feel that there's something missing. What happens if you do this? You created a perfect antenna to pick up radio and CB signals, so you can play along with your favorite radio station.
So, please don't do this. Sometimes less is more. Rant over … for now.
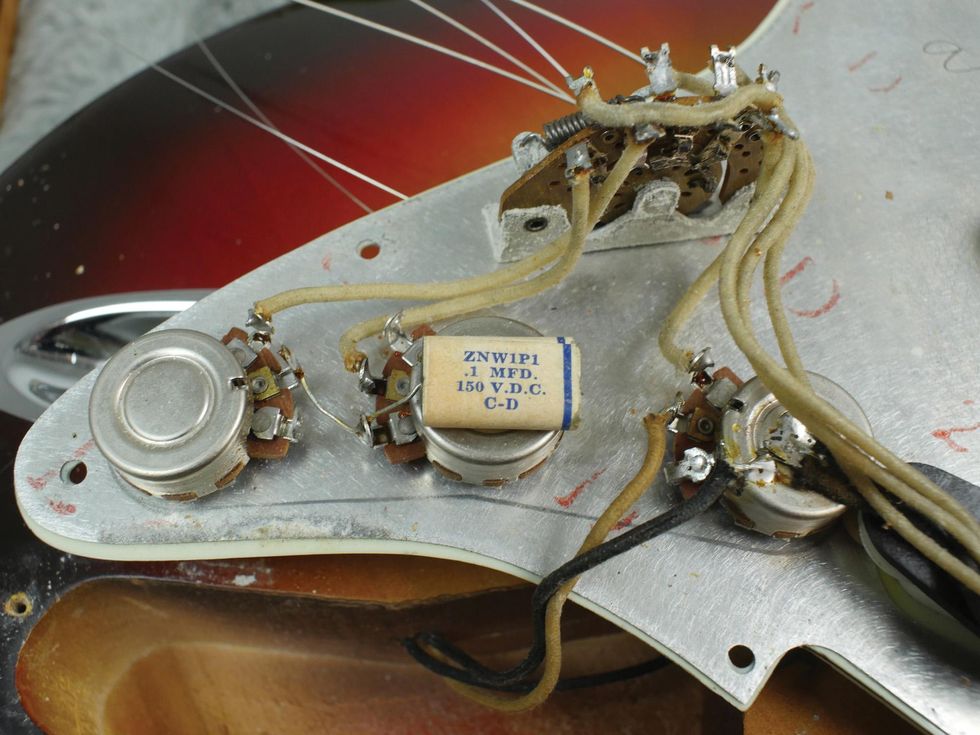
Image 2
Image courtesy of singlecoil.com
For today's guinea pig, I chose the Stratocaster, but will also elaborate on other guitars. Let's have a look at how to connect all casings together to ground them. The two basic rules of thumb are:
1. When your pickguard, control plate, or compartment is conductive, you don't need to add any ground wires to the individual components. They're already connected together because their metal parts are touching the conductive surface. This is the shield underneath a Stratocaster pickguard, the metal control plate on a Telecaster, or the metal "cage" you can find in some Les Paul models where the pots are installed through. But always try before you trust! Use your DMM set to continuity and do a test to see if the surface is really conductive. If it is, your DMM will show (or beep) continuity. This is especially important when you see black shielding paint anywhere in your guitar. It should be conductive, but in most cases, it's simply black paint to mimic shielding. On some models, like an ES-335 and similar, there is neither a shield nor any conductive paint underneath the top, so there is no way around using wires to ground all metal parts. If you're unsure, always run a wire from part to part to ground it. Even if the surface is conductive, it will do no harm to have double-grounding.
2. All this will only have an effect when you connect the system to the string grounding wire, by simply soldering it to the back of a pot, to the ground lug of your output jack, or to the copper foil underneath your pickguard, etc. Whatever you prefer. This wire usually comes from the tremolo claw in a Stratocaster, from underneath the bridge plate in a Telecaster, or from one of the studs on a Les Paul, ES-335, etc. If you are unsure which of the wires is the right one, the test is really simple: Use your DMM with one probe on the stripped wire you want to test and the other touching one of the metal strings. Continuity? Congratulations, this is the string grounding wire.
Image 2 shows the most minimalistic grounding version: Underneath your Stratocaster pickguard is a conductive shield (same for the Telecaster metal control plate). Install the pots and the switch and that's it. No additional wire connections are necessary, as the conductive shield will connect all parts. Use your DMM with one probe on the back of the pot and the other touching the shield, and then repeat this procedure with all three pots and the switch.
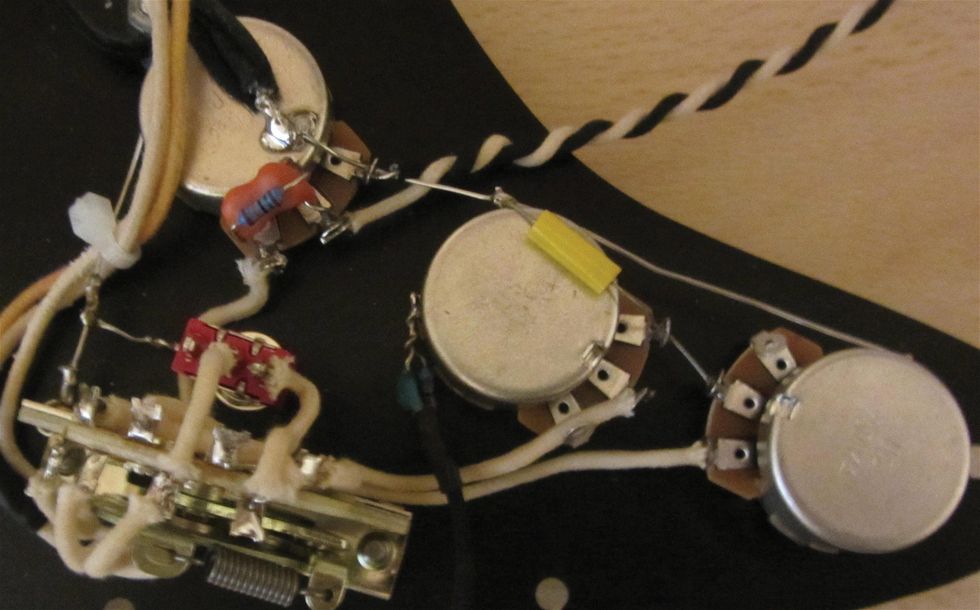
Image 3
Image courtesy of singlecoil.com
This is a Fender Stratocaster from 1959, and you can see there are no additional ground wires from pot to pot. The shield underneath the pickguard makes the connection and this is the way all early Fender guitars were grounded. Leo Fender was an educated accountant, well known for not wasting anything, and his defined goal was to build guitars in large quantities but in a short and cost-effective time. So why waste a piece of wire when you don't need to, and why waste time for such an operation when it's not necessary?
The second grounding version involves simply running a wire from one metal part to the next. This can be an insulated wire or a bare solid wire—sometimes tubing is used with bare solid wire to insulate it. The diameter of the wire is not important: A heavy-gauged wire won't make a better ground, in this case.
Image 3 shows the grounding version with simply a bare solid wire running from part to part. Image 4 shows the grounding version with tubing over the wire running from part to part. Please note that both pickguards in Image 3 and Image 4 don't have a conductive shield. Also note that there is a wire running from the volume pot to the 5-way pickup selector switch to ground it as well.
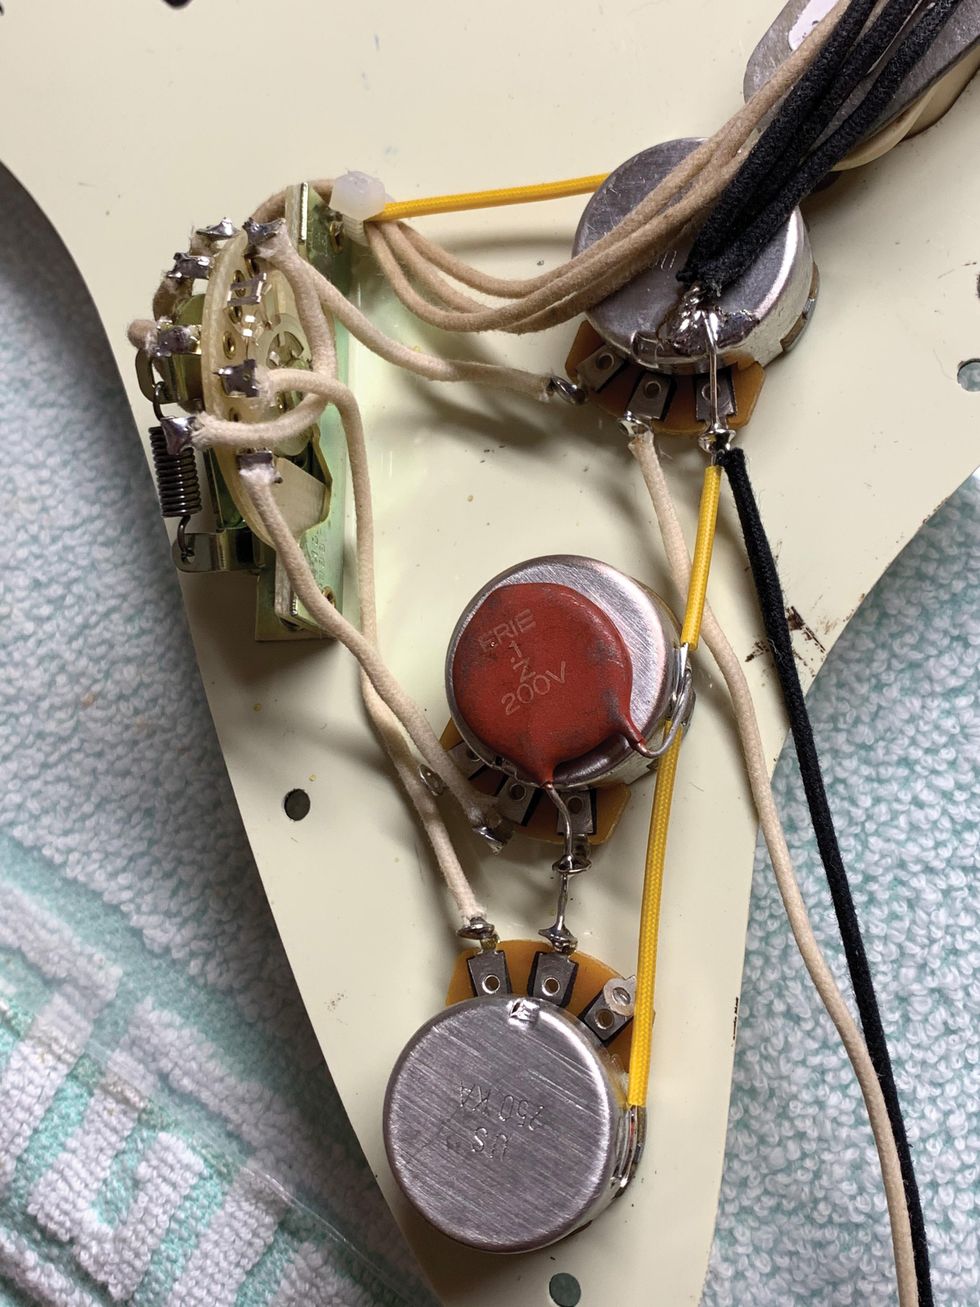
Image 4
Image courtesy of singlecoil.com
On some guitars, you can see that a ground strap is used to connect the parts, but this is the same principle and only a variation regarding materials. John "Dawk" Stillwell (may he rest in peace), the former guitar tech for Ritchie Blackmore, was well known for using this technique, and you can see what this looks like in Image 5.
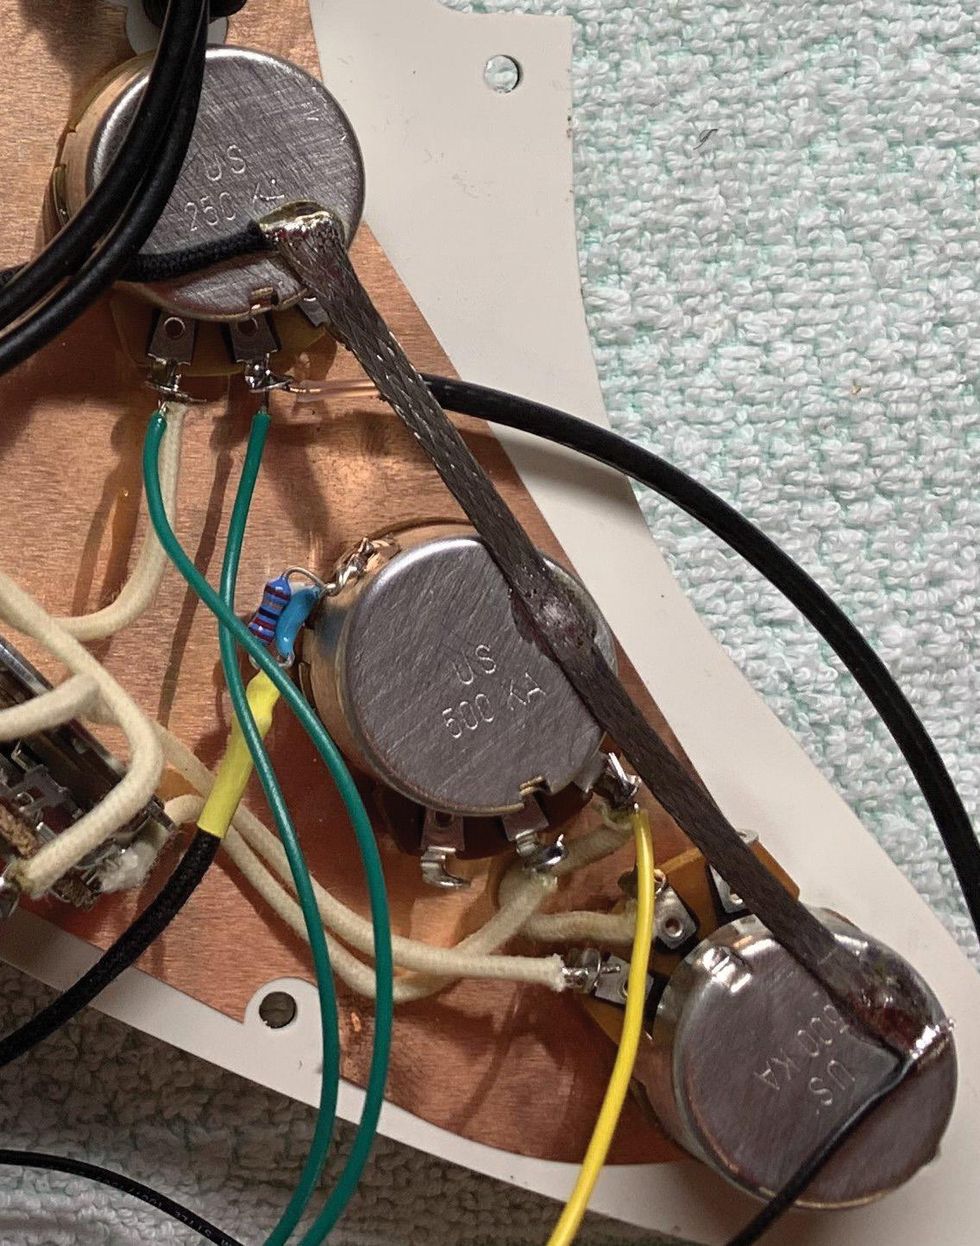
Image 5
Image courtesy of singlecoil.com
It looks pretty cool but has no advantage over using an insulated wire or bare wire. In other words, it doesn't make a "better" grounding, but for showcase reasons, this is a cool option, anyway ... you hear with your eyes, too. As you can see, this pickguard has a highly conductive copper shield, so any connection between the parts is obsolete anyway.
So, what version is the best, you might ask? For me, it's using a bare solid AWG 19 wire (also sometimes called "ground bus wire") that I only put sleeve on in certain guitars, such as a Les Paul. On all Fender guitars, and especially in any Stratocaster, I use it bare for some good reasons. With this technique, you can minimize the number of soldering spots and it offers some great advantages that you'll see in the second part of this series when we talk about grounding legs on pots.
Why is it important to minimize the number of soldering spots on the cases of the pots? It not only looks neat and tidy and saves time and material (Leo Fender would have chosen this technique for sure), but it also minimizes the risk of damage from overheating, which is the most important reason for me. The easiest way to damage a pot is to overheat it, especially when attaching a ground wire to the back casing. It usually takes 60 watts of power for this, and with a wrong soldering technique this can be a real disaster. I've discussed this topic before, but if you aren't familiar, read my column "How to Install and Maintain Your Guitar's Pots," from the May 2020 issue.
I'll share two advantages, shown on a Stratocaster, of why I prefer this technique. (I'll give more advantages in the sequel installment of this column).
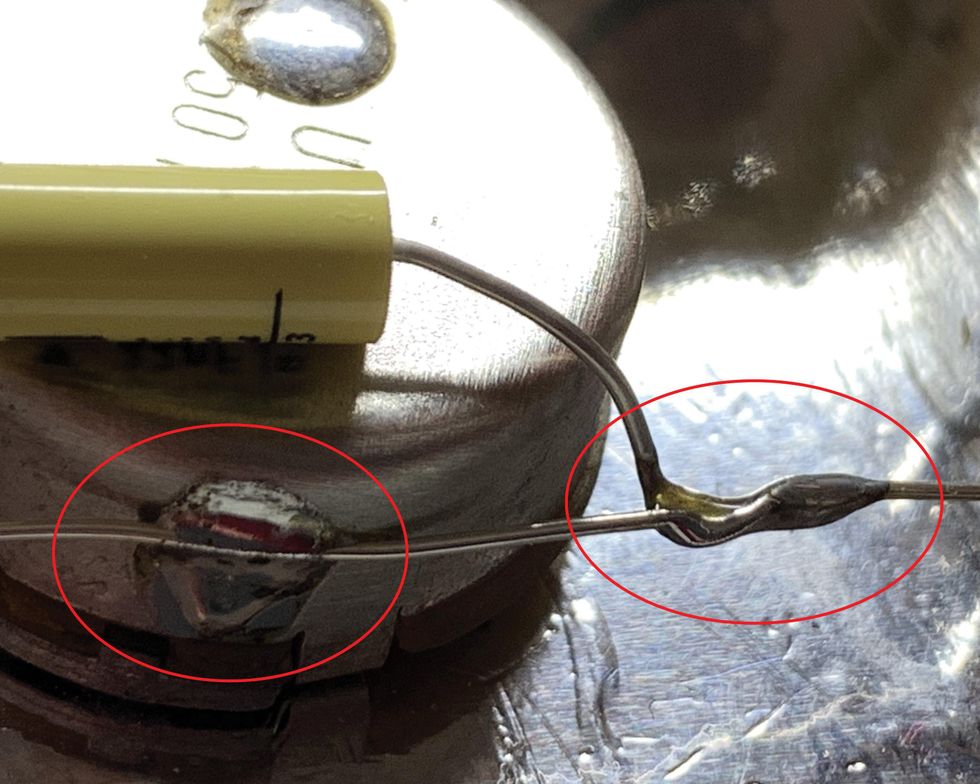
Image 6
Image courtesy of singlecoil.com
In Image 6, you can clearly see on the casing of the pot that there is only one soldering spot to connect the wire. With an insulated wire running from pot to pot, you would have two soldering spots or you have to heat it up for a second time. Next, look at the leg of the tone capacitor that needs to be connected to ground. Instead of making an extra soldering spot for it on the case or heating up an existing soldering spot for a second time, I simply solder it to the ground wire and that's it. The still unpopulated soldering spot on the back of the case is for the string grounding wire.
That's it, for now. Next month we'll continue our relic'ing project, focusing on the pickup and its cover, so stay tuned.
Until then ... keep on modding!Fender’s Jack White Collection dropped this week, and it includes what might be the most exciting tube amp design in decades. Fender’s Stan Cotey shares some firsthand insight into this unique amp’s design.
This week, Fender and Jack White dropped a new line that spun heads across the guitar-gear universe, proving that the Third Man’s brain knows no bounds. White has been blowing minds with Third Man Hardware’s line of collaboratively conceived gear. Working with makers of all sizes, each yellow-and-black piece is as unique as White himself.
Hooking up with Fender for the Jack White Signature Collection—which includes the Signature model hot-rod Jack White TripleCaster Telecaster and the stunning Jack White TripleSonic Acoustasonic—is as big as it gets, and this week’s announcement is proportionately epic.
The all-new Jack White Pano Verb amp looks to be one of the most forward-thinking advances in tube amps we’ve seen in … well, a very long time! Although it’s roughly inspired by three vintage Fender models—a 1964 Vibroverb, a 1960 Vibrasonic, and a 1993 Vibro-King—the Pano Verb is a rare all-new design that is poised to thrill. The single-channel stereo amp delivers 70 watts of combined power and features stereo harmonic tremolo and stereo reverb circuits, with unique routing options through the hip pair of 15" and 10" speakers. If you haven’t checked out Fender’s video announcing the amp, prepare to have your mind blown by the possibilities.
“It wasn’t based on what we could or couldn’t do, or what even was or wasn’t possible. It was just what Jack was looking to accomplish.”
Fender Vice President of Research and Development Stan Cotey, who worked closely with White to develop the prototypes for the Pano Verb, says, “There were no restrictions as far as how wild something could be. It wasn’t based on what we could or couldn’t do or what even was or wasn’t possible. It was just what Jack was looking to accomplish.” Putting those goals into action was a kick for Cotey. “I love the fact that we’re still pushing the idea of vacuum tubes and that there are things remaining to be done,” he says. “And [the Pano Verb] is a really crazy thing. It’s fun when one of the larger companies tackles a big crazy thing and releases it in a bold manner.”
We rang up Cotey to get the scoop on designing the amp as we wait to get our hands on one.
Cotey calls the Pano Verb “a really crazy thing,” and says, “It’s fun when one of the larger companies tackles a big crazy thing and releases it in a bold manner.”
The Pano Verb has a refreshingly unique and adventurous set of features.
Stan Cotey: There’s two separate power amps, there’s two separate preamps, there’s a reverb circuit. There are two separate harmonic vibrato circuits. There’s two full, separate amps in it—there’s one power supply, but everything else, there’s at least two of.
There are several different kinds of stereo interaction that could happen. The harmonic vibrato could be stereo. The reverb, even though it’s a mono tank, could be steered to the speakers differently, which kind of gives a stereo-imaging thing. So, that opens up myriad possibilities for how things could work.
How involved was Jack in the design?
Cotey: He was completely hardcore. He cared in great detail, exactly down to fine decimal points, how it worked. He was very particular about the voicing. He was very particular about the features he knew. He’s pretty studio savvy, so he had a sense of routing, how he wanted the stereo interaction of the sections to work together. He very much had an idea of stereo-ness for the amp at the outset of it. He talked early on about miking both speakers and panning them—he wanted to be able to do sort of startling things with each speaker’s content.
I think my role was to take the stuff that he wanted to do and figure out how we could do it. So, the stereo-ness of the amp, the 10" speaker versus the 15" speaker, the routing stuff you could do where the reverb goes to one speaker or both, all that stuff came from Jack.
Jack’s Vibrasonic was a touchstone for the Pano Verb.
Cotey: That amp lived with me for quite a while. He knew that he liked the harmonic tremolo.
The stereo harmonic tremolo, that’s a fairly part-intensive circuit, even in a normal brown amp. In this amp, there’s two full circuits in it, so it is literally double the parts of one of the more complicated earlier ’60s amps, just for that part of the amp. I worked out how that works. That’s two harmonic tremolos that are in sync, but opposite polarity. So, when one’s going up, the other is going down, and vice versa.
Stan Cotey is Fender’s Vice President of Guitar Research and Development and worked with White to design the prototypes for the Pano Verb.
The reverb mix on the Pano Verb is rooted in some vintage designs, but it’s handled a little differently here.
Cotey: In the video, he talked about the reverb tank in front of the amp, which forms the Vibro-King, and that he liked the idea. I think he liked the idea of having a more comprehensive, dedicated reverb circuit in an amp, not where it’s just kind of spread on the top, like margarine or something.
In a traditional Fender amp, there’s a feed that comes off the preamp circuit that goes to a driver, which is a tube and a little transformer, and that drives the reverb tank. Then, the output of the reverb tank goes into a recovery amp, a little gain stage with a tube, and that gets mixed with the output of the channel and shoved into the power amp. So, the reverb kind of occurs between the preamp and the power amp. It largely takes the tonality of the preamp on because the tone controls are upstream of it.
Jack has an old Fender amp from the early ’60s that had reverb added. I don’t know who modified it, but they actually used the second channel of the amp as the reverb return, which I think is really super clever. Then you get tone controls for the reverb. So that’s where that idea came from. He didn’t necessarily want the reverb circuit in front. He liked it between the preamp and the power amp, but he wanted to have it be more comprehensive than what would be on a typical mid-’60s Fender amplifier.
What was the most exciting feature for you to create?
The stereo harmonic tremolo was really fun, and the journey that we went on to get there was really cool. I have a tweed amp from the late ’50s from Guild that has tremolo in it, and it’s a stereo amp. It has two separate everythings. The tremolo only works on one side, and that gives the apparent sound that it’s kind of going back and forth between the speakers. We tried having just the harmonic tremolo on one side of this, and it really wanted to have two complete full circuits. So that was one of the changes that got made.
Getting the power amps to work well together was fun too. That was more about transformer and tube selection and working the power supply parts out, getting the amps where they would distort in the right way at the right times or right level. But the harmonic tremolo was definitely the elephant dancing on the bucket with the streamers going off.
Beetronics FX Tuna Fuzz pedal offers vintage-style fuzz in a quirky tuna can enclosure.
With a single "Stinker" knob for volume control and adjustable fuzz gain from your guitar's volume knob, this pedal is both unique and versatile.
"The unique tuna can format embodies the creative spirit that has always been the heart of Beetronics, but don’t let the unusual package fool you: the Tuna Fuzz is a serious pedal with great tone. It offers a preset level of vintage-style fuzz in a super simple single-knob format. Its “Stinker” knob controls the amount of volume boost. You can control the amount of fuzz with your guitar’s volume knob, and the Tuna Fuzz cleans up amazingly well when you roll back the volume on your guitar. To top it off, Beetronics has added a cool Tunabee design on the PCB, visible through the plastic back cover."
The Tuna Fuzz draws inspiration from Beetronics founder Filipe's early days of tinkering, when limitedfunds led him to repurpose tuna cans as pedal enclosures. Filipe even shared his ingenuity by teachingclasses in Brazil, showing kids how to build pedals using these unconventional housings. Although Filipe eventually stopped making pedals with tuna cans, the early units were a hit on social media whenever photos were posted.
Tuna Fuzz features include:
- Single knob control – “Stinker” – for controlling output volume
- Preset fuzz gain, adjustable from your guitar’s volume knob
- 9-volt DC operation using standard external power supply – no battery compartment
- True bypass switching
One of the goals of this project was to offer an affordable price so that everyone could own a Beetronicspedal. For that reason, the pedal will be sold exclusively on beetronicsfx.com for a sweet $99.99.
For more information, please visit beetronicsfx.com.
EBS introduces the Solder-Free Flat Patch Cable Kit, featuring dual anchor screws for secure fastening and reliable audio signal.
EBS is proud to announce its adjustable flat patch cable kit. It's solder-free and leverages a unique design that solves common problems with connection reliability thanks to its dual anchor screws and its flat cable design. These two anchor screws are specially designed to create a secure fastening in the exterior coating of the rectangular flat cable. This helps prevent slipping and provides a reliable audio signal and a neat pedal board and also provide unparalleled grounding.
The EBS Solder-Free Flat Patch Cable is designed to be easy to assemble. Use the included Allen Key to tighten the screws and the cutter to cut the cable in desired lengths to ensure consistent quality and easy assembling.
The EBS Solder-Free Flat Patch Cable Kit comes in two sizes. Either 10 connector housings with 2,5 m (8.2 ft) cable or 6 connectors housings with 1,5 m (4.92 ft) cable. Tools included.
Use the EBS Solder-free Flat Patch Cable Kit to make cables to wire your entire pedalboard or to create custom-length cables to use in combination with any of the EBS soldered Flat Patch Cables.
Estimated Price:
MAP Solder-free Flat Patch Cable Kit 6 pcs: $ 59,99
MAP Solder-free Flat Patch Cable Kit 10 pcs: $ 79,99
MSRP Solder-free Flat Patch Cable Kit 6 pcs: 44,95 €
MSRP Solder-free Flat Patch Cable Kit 10 pcs: 64,95 €
For more information, please visit ebssweden.com.
Upgrade your Gretsch guitar with Music City Bridge's SPACE BAR for improved intonation and string spacing. Compatible with Bigsby vibrato systems and featuring a compensated lightning bolt design, this top-quality replacement part is a must-have for any Gretsch player.
Music City Bridge has introduced the newest item in the company’s line of top-quality replacement parts for guitars. The SPACE BAR is a direct replacement for the original Gretsch Space-Control Bridge and corrects the problems of this iconic design.
As a fixture on many Gretsch models over the decades, the Space-Control bridge provides each string with a transversing (side to side) adjustment, making it possible to set string spacing manually. However, the original vintage design makes it difficult to achieve proper intonation.
Music City Bridge’s SPACE BAR adds a lightning bolt intonation line to the original Space-Control design while retaining the imperative horizontal single-string adjustment capability.
Space Bar features include:
- Compensated lightning bolt design for improved intonation
- Individually adjustable string spacing
- Compatible with Bigsby vibrato systems
- Traditional vintage styling
- Made for 12-inch radius fretboards
The SPACE BAR will fit on any Gretsch with a Space Control bridge, including USA-made and imported guitars.
Music City Bridge’s SPACE BAR is priced at $78 and can be purchased at musiccitybridge.com.
For more information, please visit musiccitybridge.com.