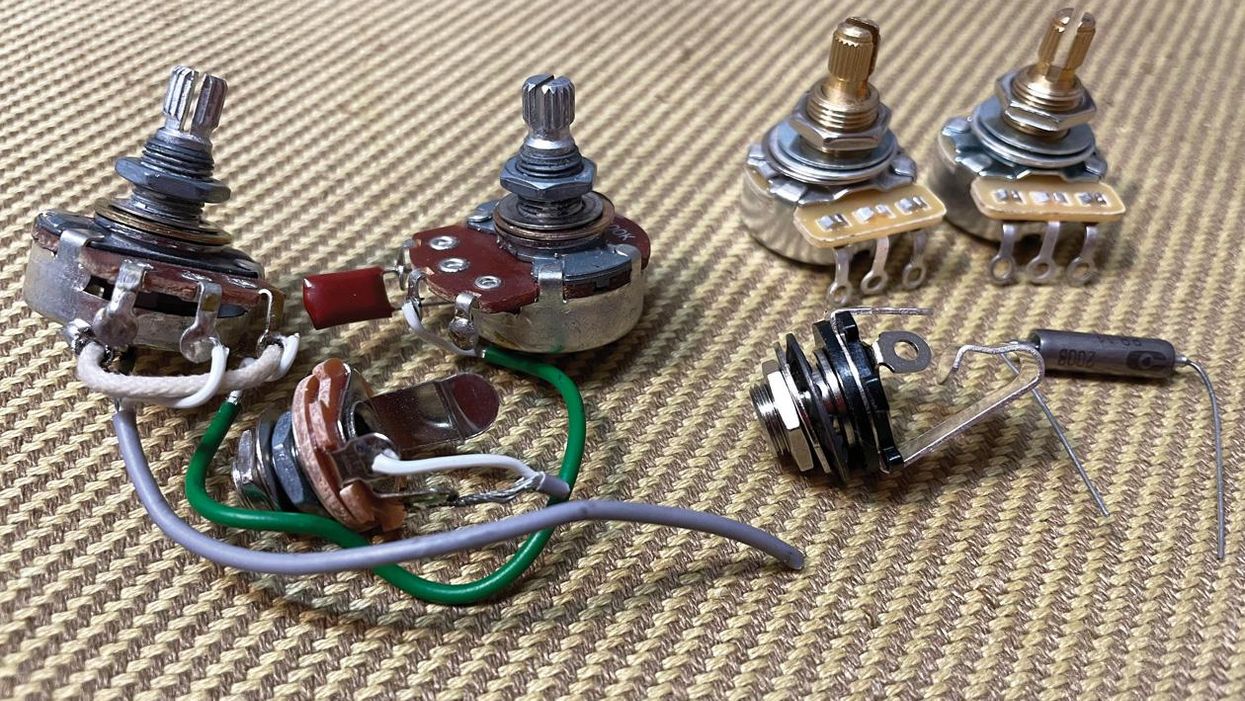
Whether you’re looking to conjure crisp clarity or crunchy character from your steel-string, these 10 soundhole pickups cover a range of sounds and prices.
LR BAGGS M1 Active
This active pickup promises 1,000 hours of playing time on a single battery. Its built-in volume control, gold-plated 1/8" jack, and adjustable pole pieces offer flexibility and high-quality feedback-resistant sound.
$229 street
lrbaggs.com
EMG ACS
With a custom-designed internal preamp and adjustable pole pieces, this pickup is built to deliver clarity with a low noise floor and a broad frequency response.
$159 street
emgpickups.com
DEARMOND Tone Boss
This passive humbucker includes an onboard volume control and adjustable pole pieces, and comes in black, cream, and tortoiseshell trim options.
$89 street
dearmondpickups.com
RECORDING KING Gold Foil Soundhole Pickup
For lo-fi, old-school sounds, it doesn’t get any simpler—or more affordable—than this.
$49 street
recordingking.com
CURTIS NOVAK DA-1200 Soundhole
This customized copy of the iconic DeArmond soundhole pickups comes in three coil options—vintage, hot, and GT. It’s available with either 250k or 500k volume pots, and can be configured with various cable options.
$359 street
curtisnovak.com
FISHMAN RareEarth
Available in both humbucking and single-coil models, this low-current active neodymium pickup runs for up to 240 hours on a set of batteries.
$219 street
fishman.com
SEYMOUR DUNCAN Woody HC
With a custom maple, walnut, or black-stain housing, these double-potted humbuckers deliver an elegant look.
$79 street
seymourduncan.com
MOJOTONE Quiet Coil NC-1
This active option is voiced to mimic the sound of a condenser mic and promises over 500 hours on a pair of lithium batteries.
$199 street
mojotone.com
BARTOLINI 3AV Acoustic Guitar Soundhole Pickup
Designed to be installed on a soundhole’s bridge side, this stacked-coil hum-canceling pickup features ceramic magnets and B-string mass compensation.
$136 street
bartolini.net
KNA HP-1A
This active neodymium humbucker features a mahogany-capped birch housing and comes with a 1/8" to 1/4" cable.
$119 street
knapickups.com
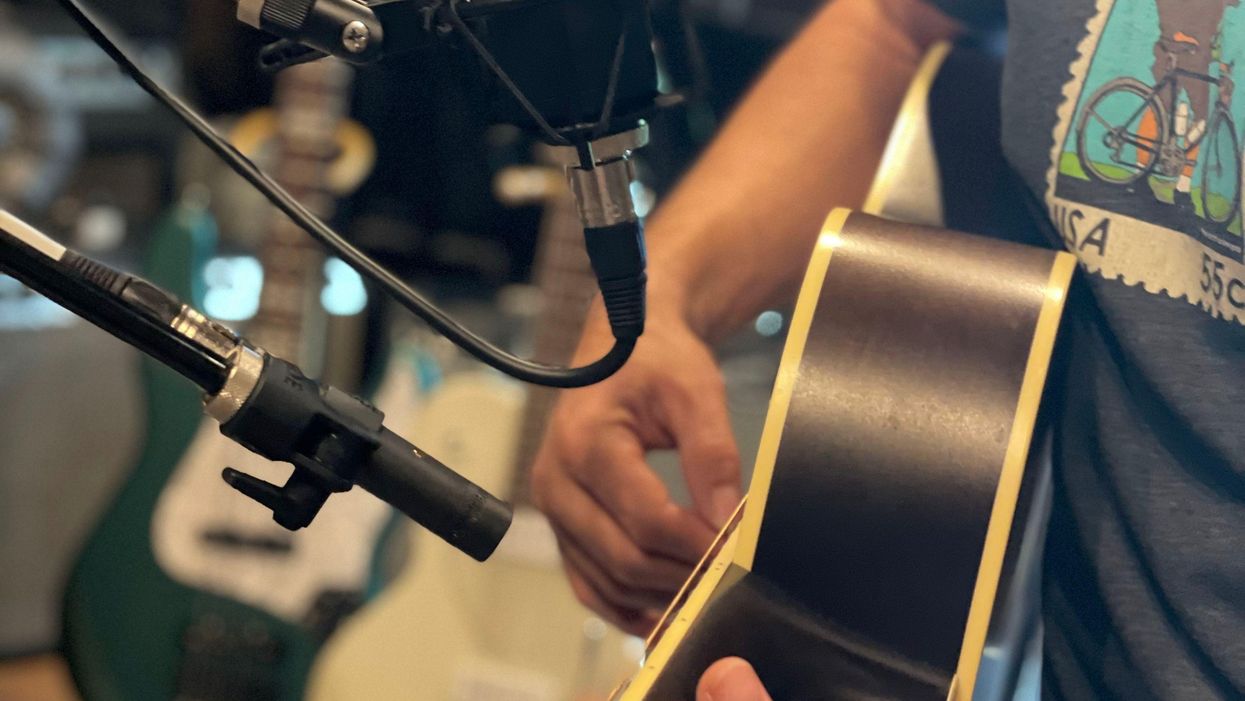
Recording vocals and a flattop at the same time can be tricky for a number of reasons. Here are some techniques to try when attempting to mitigate the sometimes-conflicting concerns of this common studio scenario.
On a recent record I produced at Blackbird in Nashville, I had to track an artist who played acoustic guitar and sang at the same time. While not an infrequent occurrence by any means, it dawned on me that this would make a great Dojo topic. So, this month I'm going to share a technique that may help you achieve great results when this situation or similar ones arise.
Most often, when recording acoustic guitar and a vocal together, the challenge for an engineer is to get as much separation of each sound source as possible. That way, if it's a stellar vocal performance but the guitar had some wrong notes or missed chords, the whole take doesn't need to be immediately scrapped. Yes, it is true that some audio artifacts may be present. We are dealing with the laws of physics, sound waves, and using two mics. But you may be able to reduce the offending track's flubs with such aplomb that the world may never know. That all depends on … angles.
You may recall that back in January I devoted an entire Dojo to microphone polar patterns, and that knowledge will come in very handy this month. In particular, your knowledge of cardioid, hypercardioid, and figure-eight polar patterns.
Let's begin with cardioid mics. The vast majority of microphones on the market are cardioid, and they come in every variety within the three main mic categories: dynamic, condenser, and ribbon. Generally, small diaphragm condenser mics offer enhanced clarity and articulation of transients on acoustic sources. Regardless of what you may have, the placement of the mics becomes the most important thing.
"You may be able to reduce the offending track's flubs with such aplomb that the world may never know."
One of my favorite workhorse mics for recording vocals in this situation is the fixed-cardioid Shure SM7B ($399 street). I like to pair this with a small-diaphragm cardioid condenser mic, like a vintage Neumann KM84, KM54, or more recent affordable mics like the superb Rode TF-5 ($1,499, matched pair), or even the budget friendly Rode NT5 ($429 matched pair). Regardless of your budget, what you want are two microphones that are either fixed cardioid or have variable polar patterns that can give you cardioid and hypercardioid pattern choices. One of my favorite mics to use on acoustic guitar is the Beyerdynamic M 160 ($699 street). It's a ribbon mic (my favorite type of mic) and it's hypercardioid, which means it offers excellent off-axis rejection.
How to place the instrument mic.
Have a look at photo 1. Notice that I've placed this cardioid mic, a Rode TF-5, close to the guitar. The capsule of the mic is aimed at the guitar's 14th fret, and it is also angled to almost 45 degrees relative to the floor. This placement will give you increased rejection of the vocals as long as this mic is around stomach-to-chest height and below the singer's mouth. Experiment with height placement and see what gives you the best results. I also like to place this mic directly under the vocal mic so I can use the upper mic as a makeshift baffle. This works best if the upper mic (the vocal mic) has a larger body than the lower instrument mic.
Photo 2
How to place the vocal mic.
Photo 2 shows how I've angled the vocal mic (a Mojave Audio MA-200, $1,199 street) upward towards the mouth from about chest/throat level. You can tinker with this height depending upon how the singer sits and plays. Most singers who are also playing will be looking down toward the neck of the guitar as they play, but if there is quite a bit of slouching, move the mic lower and increase the upward angle of the capsule. If the mic you are using can vary its polar pattern to hypercardioid, use that and listen to the differences. Ideally, at least one your mics would be variable enough to be hypercardioid, if not both. Also, place the mic that has the tightest polar pattern (hypercardioid in this case) on the guitar, since it will move the least relative to the voice.
Keep experimenting, and until next month, namaste.
DIY: How to Mic Your Acoustic Like a Pro
Let's look at the wiring and innards of our project guitar and make some swaps before we age them.
Hello and welcome back to Mod Garage. This month we'll continue with our aging series that began in May 2020 ["DIY Relic'ing: Break the Shine"]. Let's take a closer look at the electronics of our Harley Benton DC-Junior guitar, which is a copy of a Gibson Les Paul Junior double-cut, and consider some part swaps before we keep relic'ing. If you need a refresher, we covered aging of the pickup in the last part of this series ["Mod Garage: DIY Relic'ing—Aging a P-90 Pickup"].
When doing aging work to the body and the neck of this guitar (which we'll cover in a later part of this series), it's important to remove everything from the guitar that's removable, so I took out all of the electronics. Taking a closer look at the removed guts, I found two metric standard (24 mm) sized pots from the Alpha company: a 500k linear pot for the volume and a 500k audio pot for tone with a 0.022 uF polyester film cap attached to it, all connected with plastic-coated shielded wire. I also found a small-sized budget output jack, connected with plastic-coated shielded wire.
The circuit of the guitar was wired in the typical "modern" style, and you can take a look at it on the website for Roswell, which is the company that makes the P-90 pickup on this guitar.
While the overall quality of the electronics isn't bad, there's still some headroom that could be added to enhance everything and put it a little closer to the vintage Les Paul Junior tone we're going for. To spruce up usability, here is my list of electronics and optional mods for tweaking this guitar. You can see a photo of the "guts" in Image 1.
I've known players who've gotten serious cuts on their hands from these. To avoid this, I prefer blunt-tip pointers with rounded tips and minimized risk.
1. Pots
Using two 500k pots follows the original formula of the Les Paul Junior, but using a linear volume pot in a passive guitar circuit doesn't make any sense. It should have two audio pots for much better usability, preferably with a 60:40 or at least 70:30 taper. In the last part of this series on aging the pickup, we discussed the stock pickup's treble response.
If you decide to keep the stock pickup like me, it's a good idea to use a mixed configuration with a 250k audio volume and 500k audio tone pot to get the best of both worlds. The 250k pot will smooth the high-end a little bit, and, as a positive side effect, the sweep control is much better compared to a 500k pot with the same taper—the nature of the passive beast. I decided to use two U.S. inch-measurement military-grade audio pots with a 60:40 taper: 250k for volume and 500k for tone.
To make these pots fit, you'll have to slightly enlarge the metric holes in the guitar. You can easily do this with a reamer or a simple half-round file. Because it's only a smidge, you should stay away from any other method! To minimize the risk of damaging the wood, don't use a drill press with a super sharp milling drill bit, etc.
2. Tone Caps
While 0.022 uF is the quasi-standard for single-coil pickups and the correct value if you want to stay as close as possible to a Les Paul Junior (0.02 uF), I decided to change the tone cap and convert the tone control into a warmth control—something we've covered in Mod Garage before. I decided to use a NOS military-grade 3300 pF paper-in-oil cap on this guitar, which will add some oomph to the tone. With the extremely low capacitance of the cap, it'll be possible to fine-tune the high-end and treble response of the pickup very precisely. If you want super dark jazzy tones, you should stay with the 0.022 uF value. This is a wide field to experiment with if you're inclined. Gibson also used paper-in-oil tone caps in their early Juniors—the famous Sprague "Black Beauty" caps.
Fig. 1
Images courtesy of singlecoil.com
3. Wire
While plastic-coated wire works, I decided to use the vintage stuff from the '50s, just like in the original guitars: cloth-covered wire.
The original vintage wire was AWG22 7-strand, tinned copper, consisting of seven individually tinned and twisted copper strands, with a woven Celanese overwrap, followed by a waxed cotton overbraid. Such wires are available as reissues from several companies. I also decided to skip the plastic-coated wire from the volume pot to the output jack, like in the original wiring, using shielded braided wire. The length of this wire is very short, so there's not much chance for hum and noise to creep in. If you want to stay as close as possible to the original, use cloth wire and shielded braided wire for connecting the output jack.
4. Output Jack and Wiring
The quality of the stock mini output jack is very decent, but upgrading it to a full-sized version is a good idea in terms of reliability and longevity.
The early Juniors were set up with '50s wiring, which is part of their special tone, and different from the modern-wiring style our Harley Benton came with. Because I will have to rewire everything already when I put this guitar back together, I decided to convert it to the traditional '50s wiring as shown in Fig. 1. This is also why I decided not to use an additional treble-bleed network on the volume pot. Usually, the treble response is perfect the way it is with traditional '50s wiring when rolling back the volume.
5. Knobs
Image 2
Using U.S. inch pots, the stock metric knobs will not fit anymore, so you'll need new knobs for the guitar. Taking a closer look at the stock knobs shows that Harley Benton uses the right and historically correct knobs (black "top hats" with bright numbers), but the size of the numbers is not correct (too big), and the printed numbers are pure white. The numbers on vintage guitar knobs usually turn a yellowish color over the years—something that's difficult (but not impossible) to mimic when you have knobs with pure white printing. So, I decided to get a new pair of knobs that fits U.S. inch pots and has the yellowish discolored embossed numbers in the correct size. You can clearly see the difference between the two knobs in Image 2. The stock knobs are made with modern plastics while the new knobs use vintage material from the '50s: fully tinted cellulose acetate butyrate (CAB for short). Besides the different look, the feel is also different to the touch.
6. Pointers
The guitar comes stock without any pointers, but, for a more vintage look, I decided to add them. Take care to get pointers with the right hole for your pots (metric or U.S. inch). Enlarging holes that are too small is not a fun project. Vintage correct are nickel pointers with 90-degree pointed arrowhead tips. Personally, I don't like the very sharp tips of these pointers because the risk of injury is high. I've known players who've gotten serious cuts on their hands from these. To avoid this, I prefer blunt-tip pointers with rounded tips and minimized risk to hurt you.
7. Jack Plate
Gibson used nitrate 3-ply (black/cream/black) jack plates on their early Juniors, while our Harley Benton guitar comes with a single-ply, solid-black jack plate. Initially, I wanted to swap the jack plate for a vintage-correct one, but while doing so I realized the Gibson jack plate won't fit the Harley Benton, which uses a smaller jack plate. Sure, it would be possible to make a custom jack plate out of the correct 3-ply material using the stock plate as a pattern, but I decided to simply leave the stock jack plate on the guitar, sacrificing some of the vintage look. Because I decided to upgrade the output jack to a full-sized version, I had to slightly enlarge the hole in the plate with a reamer. The four stock screws are chrome, so I decided to swap them for nickel versions, which will provide a more authentic look when aging them later.
8. Back Plate
Gibson used a black nitrate single-ply back plate in the '50s. Harley Benton did the same, but with modern plastic material. This is okay for me and will look very close to the original after aging it a bit. The two stock screws are chrome, so I decided to swap them for nickel versions for a more authentic look when aging them.
That's it for now. In the next part of this series, we'll cover the aging process for the hardware parts listed above and take a closer look at the pickguard.
Until then ... keep on modding!