


Are you the sort of player who views effects as an extension of your guitar? Then chances are you’ve at least thought about installing effects inside your guitar, where you can control them as easily as your tone and volume knobs or pickup selector. It’s a fairly easy job, though it pays to work out the details in advance.
This project requires basic soldering and wiring skills. If you haven’t acquired them yet, check out our Sept. 2014 “Build Your Own Stompbox” article, which introduces both topics. In fact, I’ve used the distortion circuit from that project as a demo circuit for this one, though the techniques covered here apply to any small, simple effect circuit.
starts to lose its charge.
The usual ass-covering applies: Don’t do anything stupid or dangerous. Get help if you lack needed skills. And proceed at your own risk.
Part 1: It’s All About the Battery
Any circuit you’re likely to install will probably require a 9-volt battery, so your first task is figuring out where it will go. (Chances are the battery will hog more space than your circuit board, as in Photo 1.) And as we’ll see, the battery may also determine which effect you install.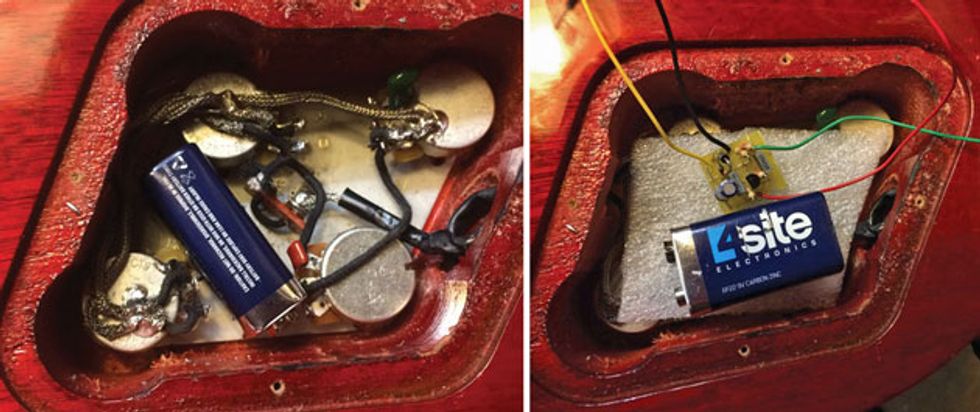
Photos 2 (left) and 3 (right)
Your first task: Open your guitar’s control cavity, grab a 9-volt, and see where it fits. On a Les Paul-style guitar, there’s usually room between and around the pots (Photo 2). Better yet, if the control cavity is deep enough, you can just lay a thin piece of foam on top of the pots (Photo 3).
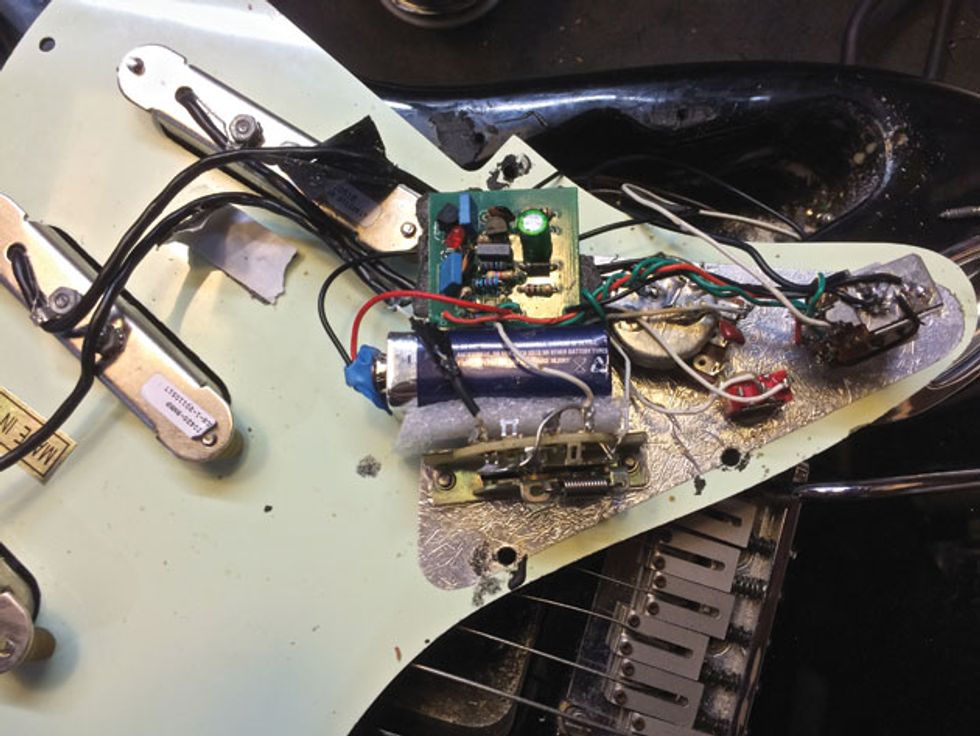
Photo 4
Strat-type guitars are a tighter squeeze, though the battery should fit between the knobs and pickup selector. In Photo 4, I’ve secured the circuit board to the back of the volume pot with double-sided foam tape. I used a thin piece of foam to insulate the battery from the surrounding hardware.
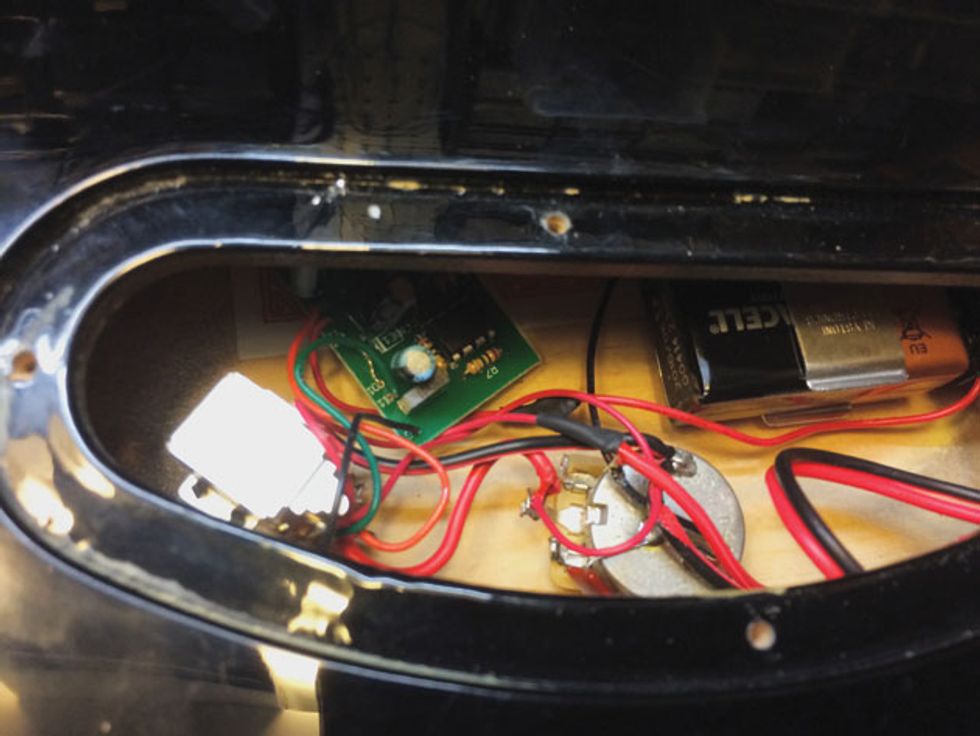
Photo 5
Sometimes it’s an easier fit, as in the spacious control cavity of the Gretsch baritone guitar in Photo 5. If only it were always that simple!
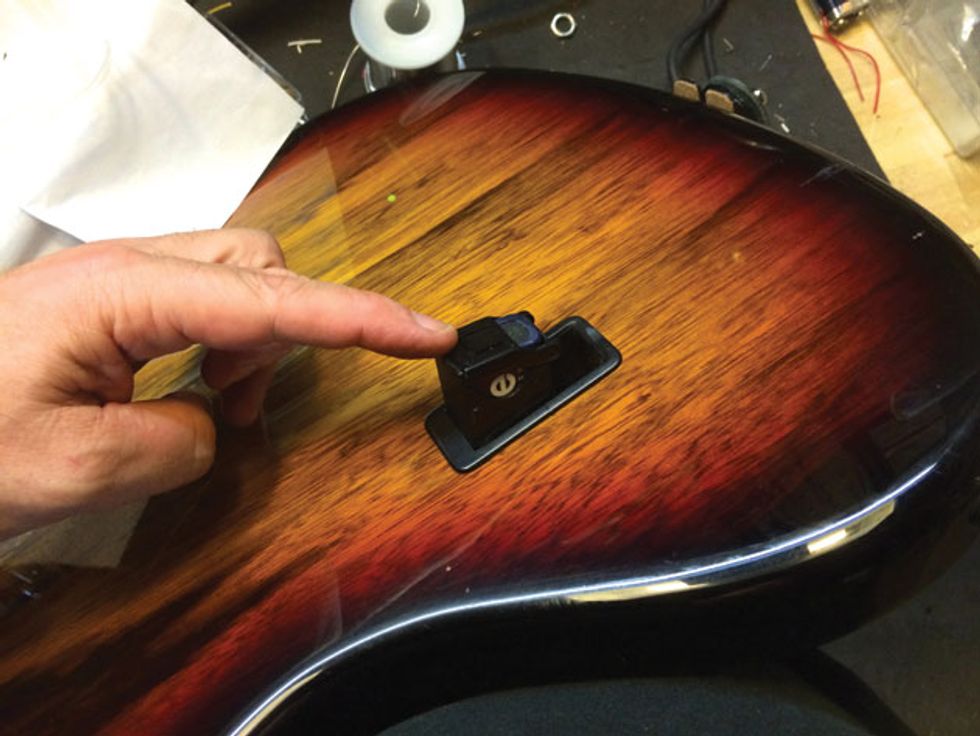
Photo 6
When you’re testing the fit, be sure to put the control cover or pickguard back on to verify that it closes properly. There’s a chance you’ll find that the project just won’t work with some guitars. If none of yours are up to the task, keep in mind that you can order bodies with pre-routed battery compartments, as on the Warmoth Jazzmaster-style body in Photo 6. A separate battery compartment makes everything easier.
That said, the project might be doable even in cramped-quarters guitars if you reclaim some space by downsizing your tone and volume pots from standard 24 mm to the 16 mm format found in most stompboxes. There is no difference in sound or performance. You might also be able to modify your guitar wiring for fewer knobs, freeing up a hole for an effect control (more on this in a bit).
A final option is to rout out extra space in your control cavity. I’m too much of a klutz to attempt such things myself, though my guitar tech friends assure me it’s not terribly dangerous or expensive to have the operation performed professionally. Just don’t do it on one of your ’59 Les Pauls.
Part 2: Choosing an Effect
It’s not just a matter of taste—there are logistical concerns. Consider the following questions.1. How quickly does the circuit eat batteries? It may sound fun to have an onboard delay effect, but delays and most modulation effects can drain a battery in a few hours. Weigh the prospect of having to change the battery after every show, especially if the change involves disassembling your guitar. Not to mention the ecological toll of burning through all those batteries. (Either way, don’t forget to dispose of them at a certified local disposal and recycling facility.)
On the other hand, most gain effects—boosters, distortions, fuzzes, and compressors—have relatively low current draw, and unlike ambient and modulation effects, they can still sound great when the battery starts to lose its charge.
I haven’t changed the battery for the germanium booster in my Les Paul in more than a year, and it still sounds awesome. (In case you’re wondering, we’ll be replacing your mono output jack with a stereo one wired to remove the battery from the circuit when there’s no cable connected to the guitar.)
My take: The only onboard effects I use are those with low current draw, though I might install a delay or trem in a guitar with an easily accessible battery compartment (and I’d use rechargeable batteries).
2. What’s the payoff? Does mounting the effect in your guitar accomplish enough to justify the hassle? Perhaps not, if you’ll merely be switching the effect on and off. That’s another argument in favor of booster and distortion circuits: If they’re sufficiently dynamic, you can conjure many tones from them just by adjusting your guitar’s volume and tone knobs. Speaking of which …
3. Does the effect require knobs—and if so, where will you put them? Another advantage of choosing a gain effect is the fact that you can get great results with no added controls other than an on/off switch (which we’ll incorporate by replacing one standard pot with a push/pull pot). Meanwhile, that delay effect probably demands mix, rate, and feedback controls plus an on/off. Thanks, but no thanks—I’ll just bend over and twist the stompbox knobs.
To install an effect with dedicated controls, you either have to drill new holes, or rewire your guitar to operate with fewer pots. You might, for example, configure your three- or four-knob guitar for a single volume and tone control, freeing up a hole for a new control. If you don’t mind drilling into your guitar or pickguard, you can just add extra pots (assuming there’s room with a battery onboard). You might also replace an effect pot with a switch, which takes up less space and is less destructive to install.
Perhaps you can get by with fewer guitar controls—say, a master volume and tone, or even volume and no tone, if you don’t use your tone controls much. (Check out the library of wiring diagrams at seymourduncan.com/support/wiring-diagrams/, which includes many such minimal schemes.)

Fig. 1
For this tutorial, I’ve installed a simple distortion—the Electra-based circuit from “Build Your Own Stompbox”—with no external controls other than on/off. I’ve replaced the project’s gain control with a fixed 470R resistor, so the effect operates close to maximum gain. Fig. 1 shows a revised schematic.
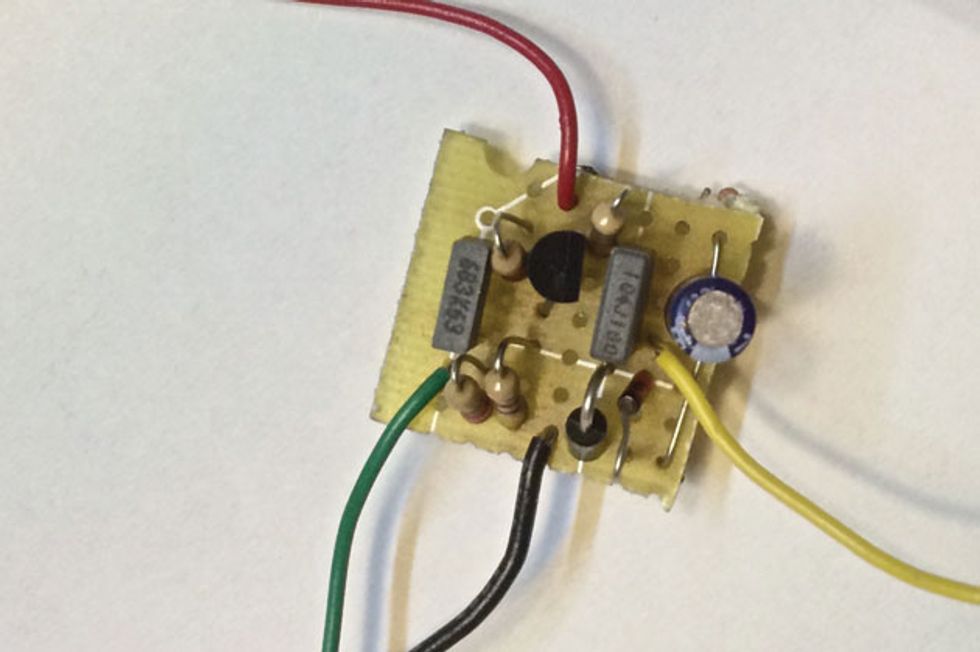
Photo 7
In Photo 7, I’ve transposed the Fig. 1 schematic to a piece of perf board the size of a postage stamp. I’ve used a .068 µf capacitor for C1 rather than the original .1 µF (104) because I like a slightly tighter sound. Go with the 104 value if you want a bit more low-end oomph. The red wire is the +9v connection. Black is ground. Green is audio input, and yellow is output. (By the way, there’s a good view of the board’s flipside in Photo 18 on the next pages.)
Since this is a highly dynamic circuit, I get all the gain control I need just by adjusting the guitar’s volume knobs. I’m installing the effect after those knobs, so they work as drive controls when the distortion is engaged. On the other hand, if your effect doesn’t do anything particularly cool when you back off your guitar volume, it may make more sense to place it before your guitar’s volume pot(s).
I’ve recorded an audio clip from the completed project that gives you an idea how dynamic the effect can sound without ever touching the amp controls. All the demonstrated tone variations result from adjusting my guitar’s volume and tone knobs and pickup selector. Your results may vary, but this provides an idea of how much variation you can get from an effect circuit with “no controls.”
Other circuits that work well with no knobs include Orange Squeezer-style compressors, Fuzz Faces, clean JFET- and MOSFET-based boosts, treble boosters, and one-transistor fuzzes such as the Bazz Fuss. (For schematics, use the Google.) Or you can just swipe a populated circuit board from any number of DIY pedal kits.
If you’re assembling a circuit board from scratch, breadboard it first, tuning it to taste. If it includes a gain pot, try replacing it with a fixed resistor of your choice. (It’s often a good idea to set this for high gain, and use your guitar’s volume pot as a “pre-drive.”) Twist your guitar’s volume and tone controls while experimenting, evaluating how the effect responds.
Again, if you find any of this confusing, check out “Build Your Own Stompbox,” which covers all these techniques.
Part 3: Project Overview
What You Need- An effect assembled (as compactly as possible) on a small circuit board. Keep the connecting wires nice and long for now
- A soldering gun or station (preferably 30 watts or more)
- Lead-free solder
- 24-gauge hookup wire (multiple colors optional)
- A 1/4" stereo jack
- A 9-volt battery snap
- A push-pull pot (details below)
- Double-sided adhesive tape
- Heat-shrink tubing
- Assorted foam scraps
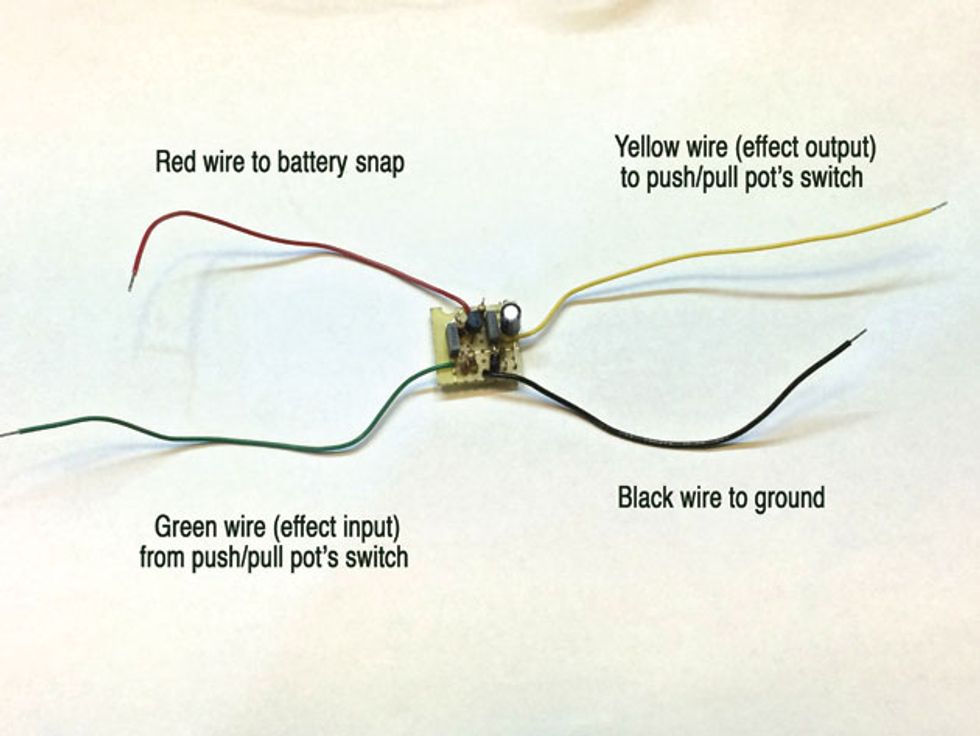
Photo 8
Whatever effect you install, you’ll be working with at least four connections: power in from the battery, a wire to ground, audio input to the effect, and audio out, as seen in Photo 8. (Color-coded wire is optional, though it’s a nice visual aid.)
We’ll replace the mono output jack with a stereo one, wiring it so there’s no current draw when your cable is disconnected, as on most stompboxes.
We’ll replace one of your extant pots with a push/pull pot. (These are available from Stewart-MacDonald and other suppliers. Choose the value right for your guitar. Usually that’s 500K for humbucker guitars, 250K for single-coil guitars, and 25K for guitars with active pickups. Make sure to get one with an extended shaft if you’ve got an old-school Les Paul, like the Gibson Les Paul Traditional I’ve used here.) The new pot will function exactly as the old one, while its built-in switch will turn the effect on and off.
Part 4: DIY Walkthrough
Meet the push/pull pot. Let’s start with a look at the push/pull pot you’ll be installing. The pot portion works as normal, and you’ll simply duplicate the wiring of whichever standard pot you choose to replace.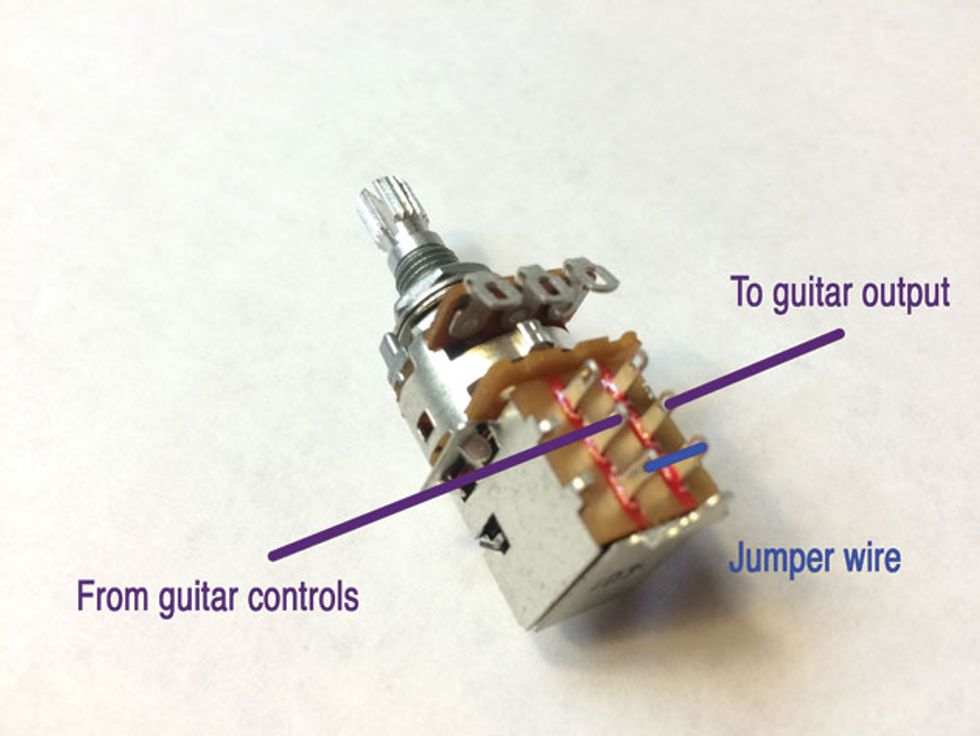
Photo 9
In most cases, the switch will be the last component before the guitar’s output jack. The signal from your pot or pickup selector enters via the middle left lug. When the switch is off, the signal gets routed through the jumper wire we’ll add, and exits via the middle right lug to the output jack (Photo 9).
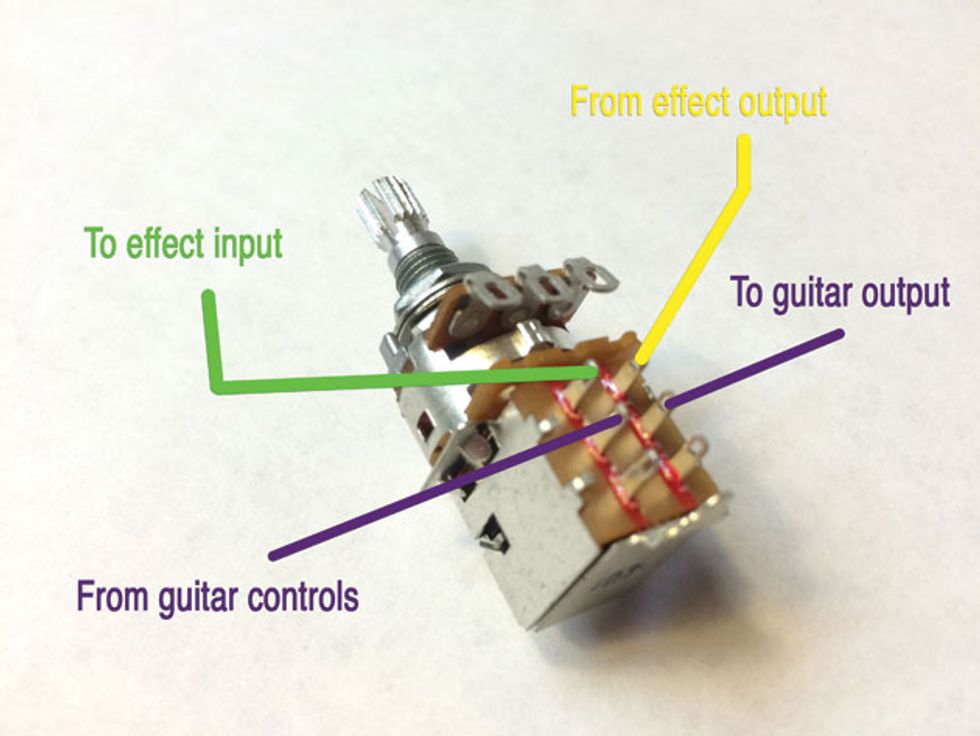
Photo 10
When the switch is activated, the input is routed to your effect input via the upper-left lug. The effected signal returns via the upper-right lug, and then flows from the middle-right lug to your output jack (Photo 10).

Photo 11
Connecting the effect to the switch. In Photo 11, I’ve soldered a jumper wire between the switch’s lower lugs. Next, I connected the green effect-input wire to the upper-left lug, and the yellow effect output wire to the upper right. The lugs are small, though 24-gauge fits just fine. Handle with care—those little parts are fragile.
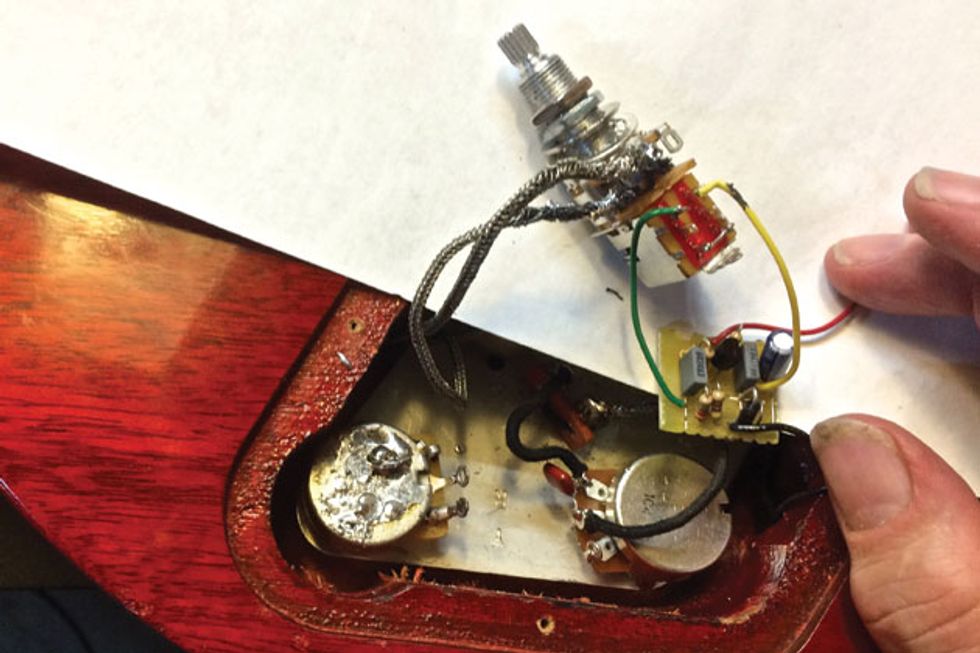
Photo 12
Transplant the wires from your old pot to the new one. I opted to install the push/pull pot in place of my old bridge-pickup volume pot. In Photo 12, I’ve de-soldered the connections from the old pot, and then reconnected them to the corresponding lugs on the new pot. (It doesn’t matter which pot you replace—in this case, the pot and switch work independently.)
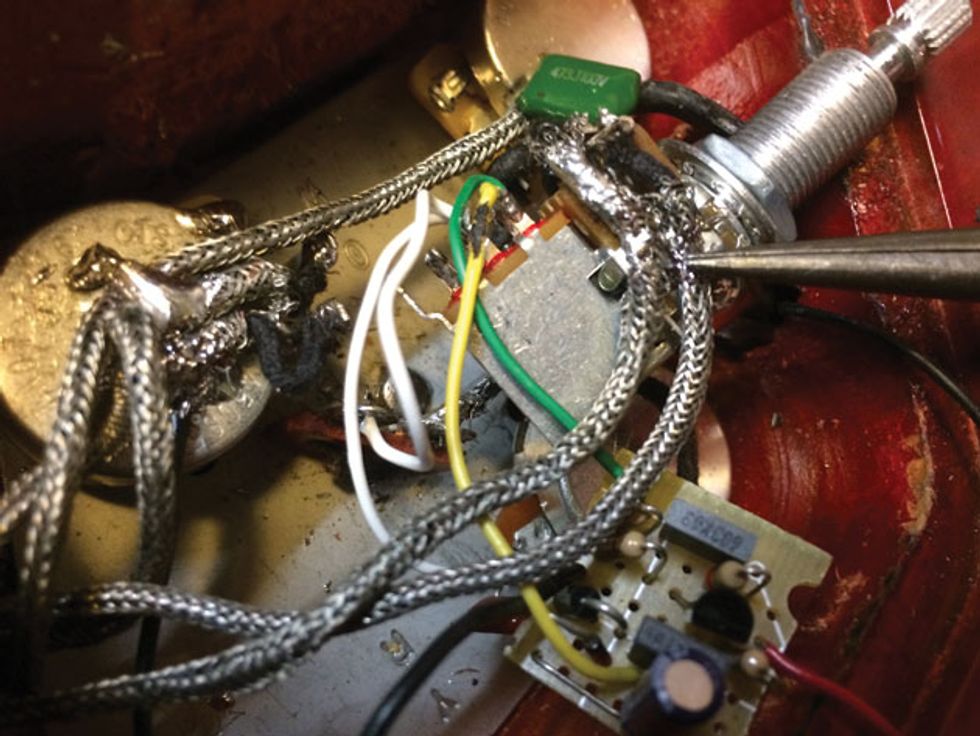
Photo 13
Ground the push/pull pot. The shielding of both wires was originally soldered to the back of the pot I’m replacing. In Photo 13, I’ve soldered the shielding to the side of the new pot. (The wires look so shabby because I’ve used this guitar for many evil experiments.)
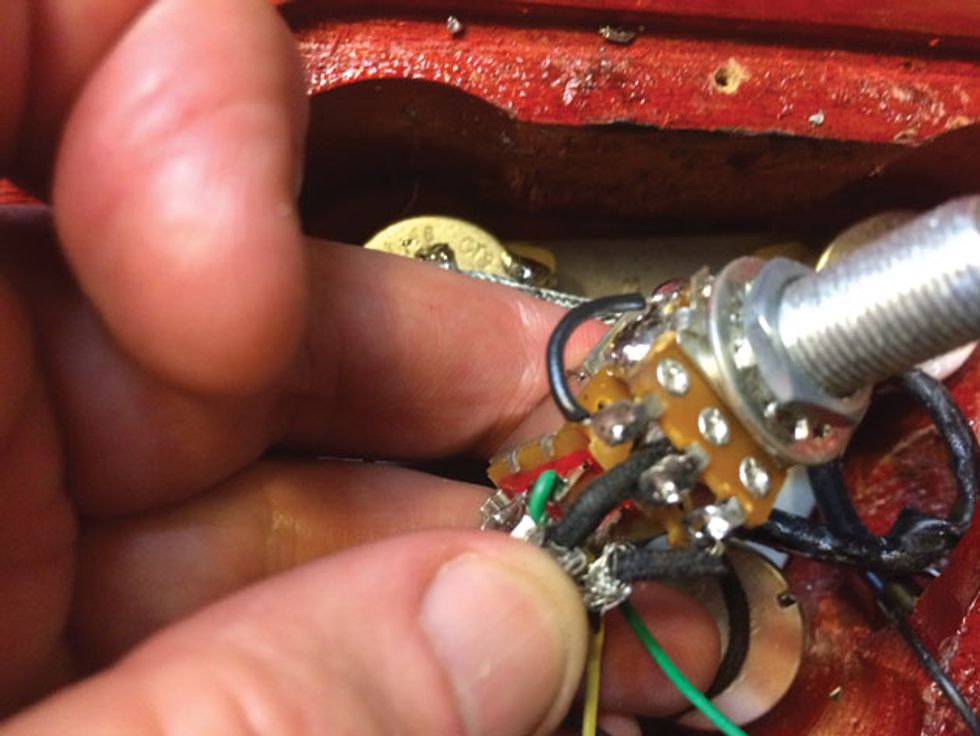
Photo 14
I also need to ground the new pot’s lug 1 (the leftmost one, when viewed from the top like this). On standard pots, you can simply bend the lug against the housing and solder it in place, but on a push/pull pot you’ll probably need to solder a short length of wire between the lug and the housing (Photo 14).
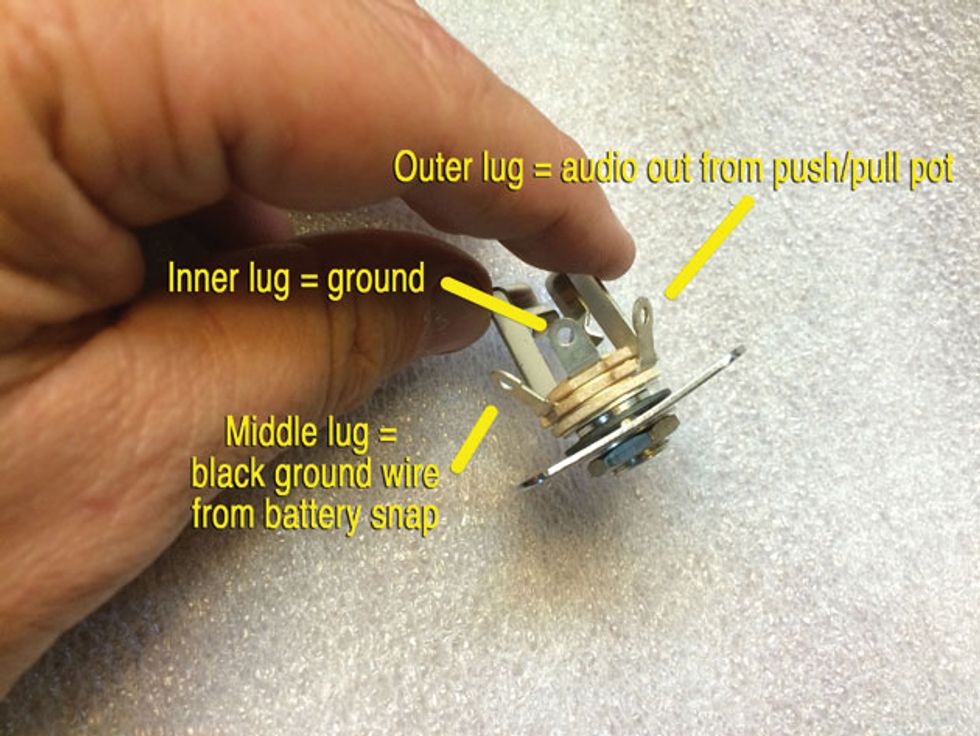
Photo 15
The stereo output jack. If you’ve built stompboxes, the connections in Photo 15 will look familiar. The inner and outer lugs connect as normal, with the former soldered to ground, and the latter carrying the audio signal. Meanwhile, the middle lug connects to the negative ground wire from the battery snap. When a cable is connected, the battery is grounded and current flows. When you unplug, the connection is broken and there’s no current draw.
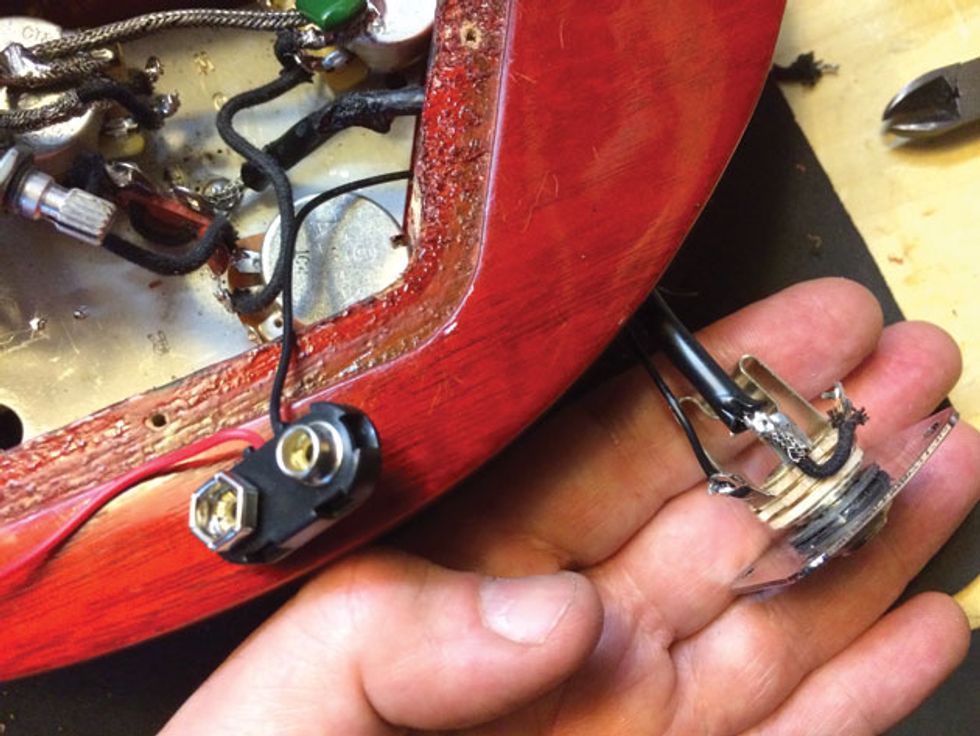
Photo 16
Replace the jack. Unscrew your old output jack and de-solder the connections. Reconnect them to the inner and outer lugs of the new jack. Weave the black battery snap wire from the control cavity through to the output jack, and solder it to the middle jack’s middle lug, as seen in Photo 16. Replace the jack (and jack plate, if your guitar has one.)
Connect the effect to the battery. Connect the effect’s power wireto the red wire from the battery snap (or wire the snap directly to your circuit board).
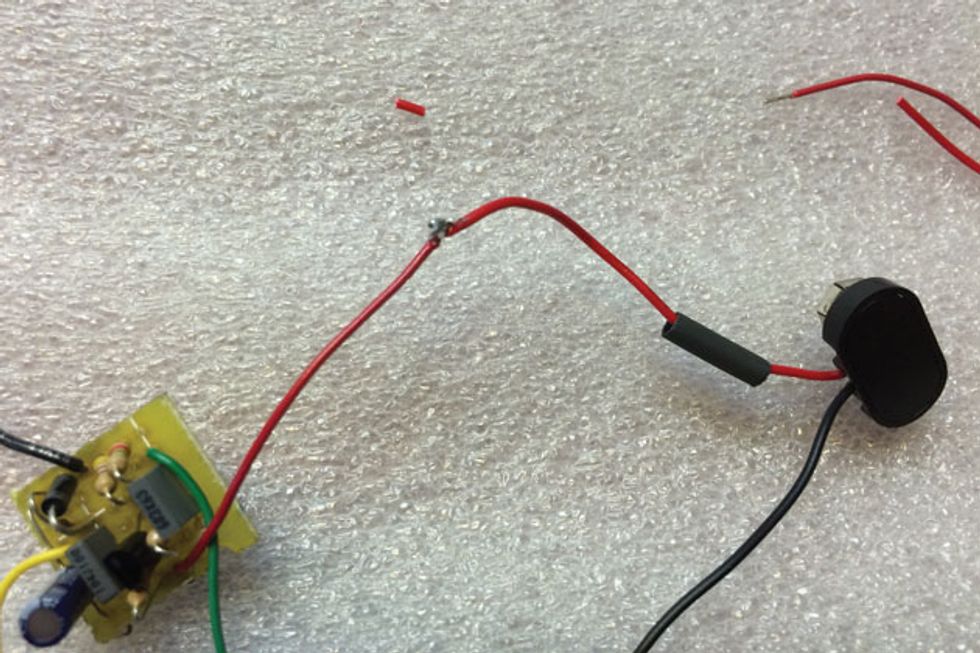
Photo 17
If you need to extend the wire from the snap (or any others wires), just make a splice, as seen in Photo 17. Slip a short length of heat-shrink tubing over the shielding, solder the wire, work the tubing over the joint, and carefully apply a lighter, match, or heat gun.
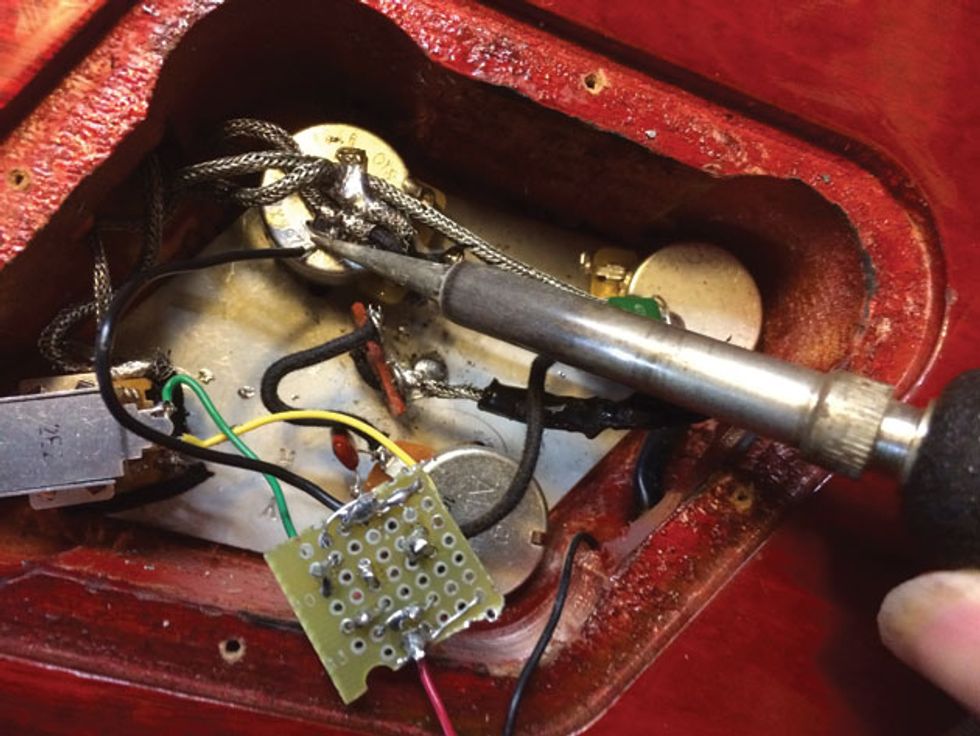
Photo 18
Ground the circuit board. Connect the ground wire from your circuit board (mine is black) to any ground point. In Photo 18, I’ve soldered it to the rear of the rhythm volume pot.
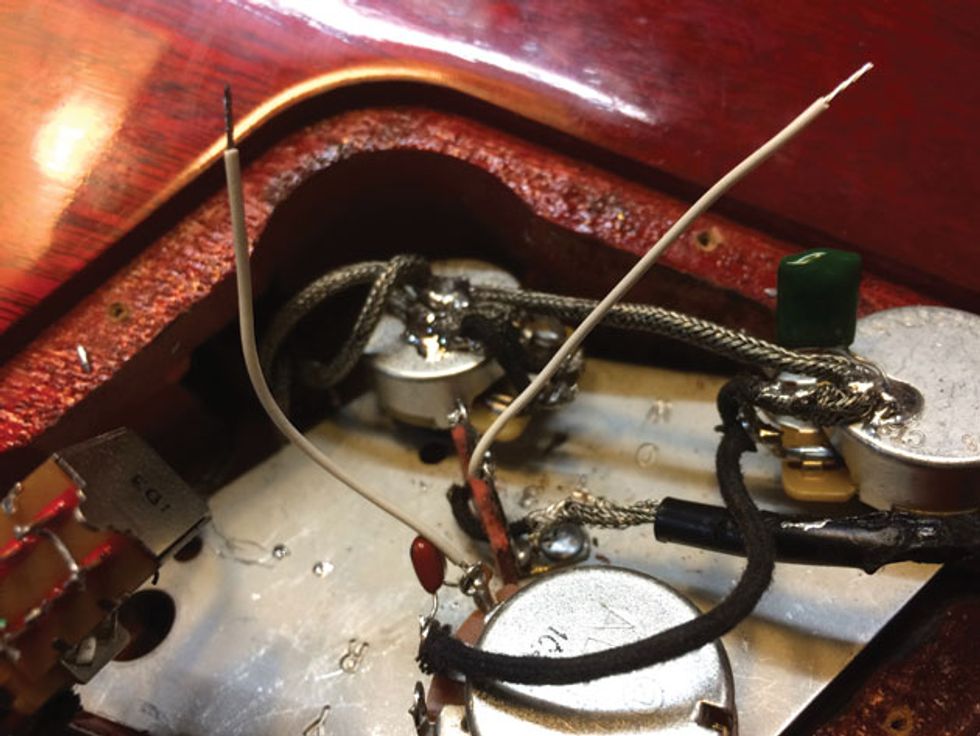
Photo 19
Make the audio connections. De-solder the audio wire at the point in the circuit where you want to install the effect. Often the effect resides between lug 2 of the guitar’s master volume and the output jack, though on four-knob Les Pauls (where the volume knobs are upstream from the pickup selector) it might go between the pickup-selector output and the output jack. If you don’t want the effect to be subject to volume-pot changes, situate the circuit board before the volume pot, with the effect’s output feeding pot lug 3.
My demo guitar has unconventional wiring: the “PTB” two-band tone control featured in our July 2014 “Three Must-Try Guitar Wiring Mods” article. In this circuit, the output from the bass tone control (the lower-right pot, as seen in the view in Photo 19) is the final point before the output jack, so I’m installing the circuit board here. Also on this guitar, there’s a piece of terminal strip linking this final stage to the output jack. I de-soldered the wire from the pot’s third lug (the topmost one in Photo 19’s view) to the terminal strip and replaced it with two short wires.
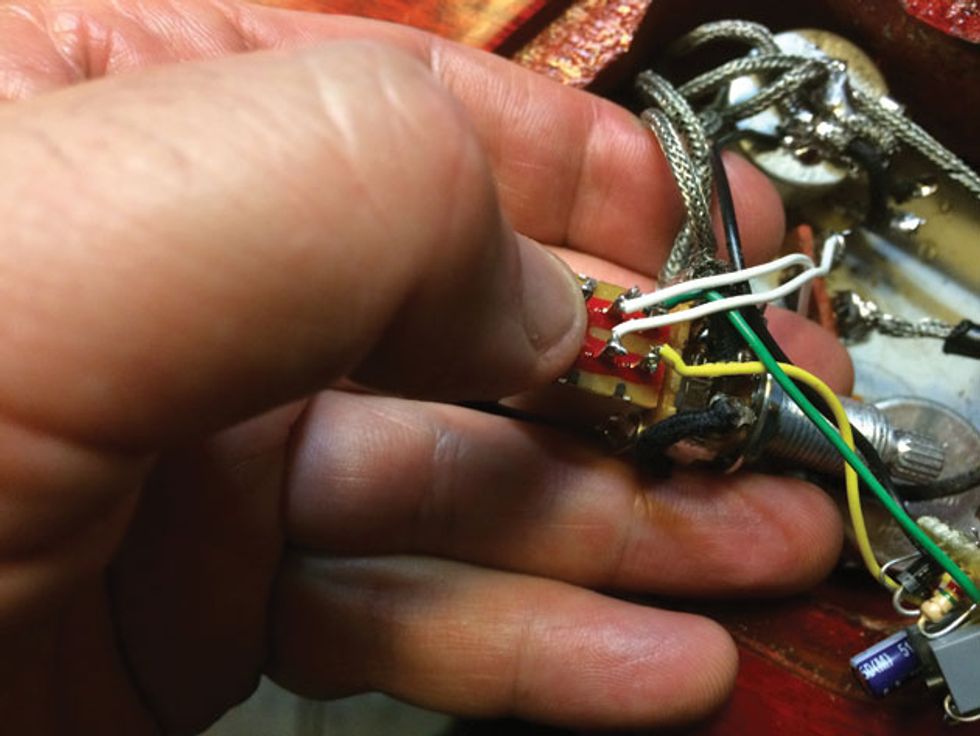
Photo 20
Solder the wire leading from your guitar circuit to the left-middle lug (the top-middle lug as viewed in Photo 20), and solder the wire leading to the output jack to the opposite middle lug.
Test the circuit. Plug in while you still have access to the control cavity. You guitar should get louder and crunchier when you pull the new switch. Verify that your volume and tone controls and pickup selector work as expected.
If the effect doesn’t work, verify that bypass mode does. If not, focus your troubleshooting on the wires connecting to the new switch’s middle lugs. If you still get no sound, or encounter loud hum, check all ground connections in the circuit using a multimeter’s continuity function (the beeper). In the unlikely event the switch works with the effect engaged, but not when bypassed, double-check that jumper wire.
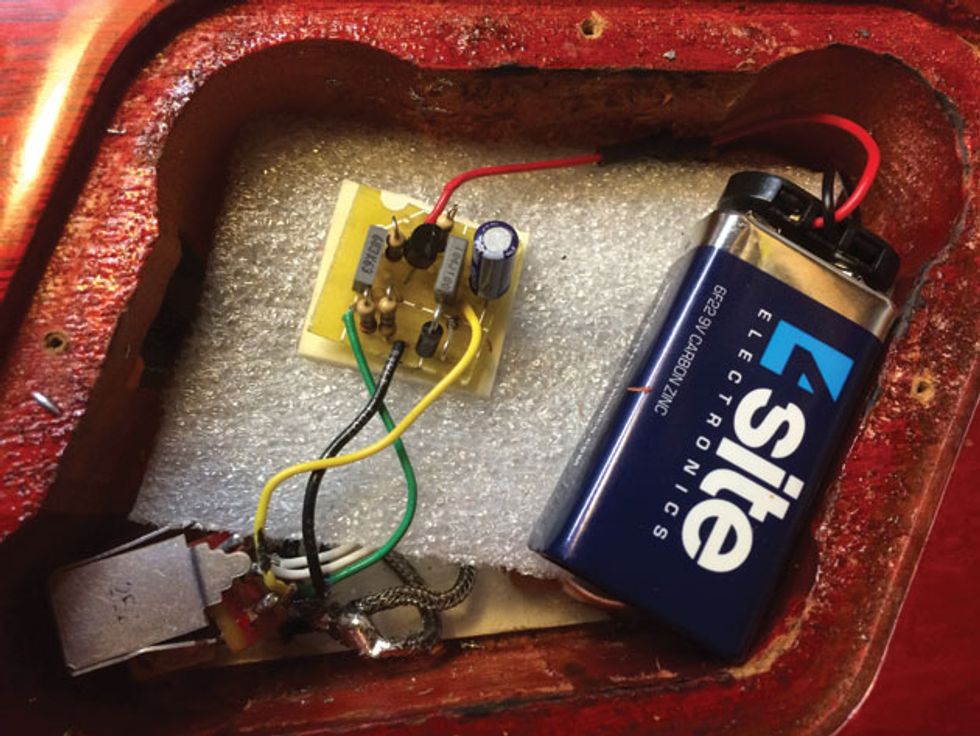
Photo 21
Stitch the patient back together. Reinstall all pots and close the control cavity. (In most cases, it’ll be easier than on this Les Paul, where the pots are secured to a metal base plate and you must unscrew all four pots from the face of the guitar for access.) Use bits of foam to protect against shorts—try not to let the circuit board or battery touch any metal components. In my case, with a layer of foam between the pots and the cavity cover, I’ve used double-sided tape to secure the circuit board (Photo 21). A double-layer of foam may adhere better. The battery is at a perfect height: I can close the compartment without squishing anything, yet it’s a tight enough fit that the battery doesn’t rattle around. You may prefer to secure it with foam, or use a small metal battery clip taped or screwed to the side of the control cavity.
Amaze your friends—and maybe yourself. Being able to summon effects from your guitar controls can inspire new musical ideas. It’s certainly fun showing up at a jam session with no pedals, and then breaking into a fat, distorted solo. And if your bandmates give you stink eye for suddenly getting louder, just say, “What? I’m not using any pedals—and I’m nowhere near my amp!”


![Rig Rundown: Russian Circles’ Mike Sullivan [2025]](https://www.premierguitar.com/media-library/youtube.jpg?id=62303631&width=1245&height=700&quality=70&coordinates=0%2C0%2C0%2C0)