Chops: Intermediate
Theory: Intermediate
Lesson Overview:
• Learn how to visualize all 12 keys in one area of the fretboard.
• Use basic arpeggios to develop lines that flow between chords and keys.
• Create righteous V–I phrases for blues progressions.
Click here to download MP3s and a printable PDF of this lesson's notation.
One of the main purposes of my Premier Guitar lessons is to help improve your chord skills, fretboard knowledge, and phrasing. The goal is to get you playing better blues by understanding what you’re playing over, so in this installment I’m going to take you through some exercises that will allow you to become more fluent in all 12 keys.
That concept can sound a little jazzy, but actually what we’re going to look at is a simple method to maximize your practice routine and improve your ability to move between dominant chords wherever you are on the neck. We’ll also get to look at a bit of music theory just to make sure we have all our bases covered.
Back in my rock heyday I could blaze all over the neck without any real thought—assuming I was in the key of A minor or E minor. It was likely a byproduct of being self-taught and the fact that certain styles of music favor certain keys.
When I went to music school I met some serious players, and a few of the bassists went on about how they practiced all of their scales and arpeggios round the “cycle.” While I had learned all of my theory prior to that point, this one piece of theory did seem a little “theory class” or “Beatles appreciation.” But very quickly I realized that with this method integrated into my practice routine I would gain a mastery of soloing without bias to any key or place on the neck—and that’s something most of us could benefit from.
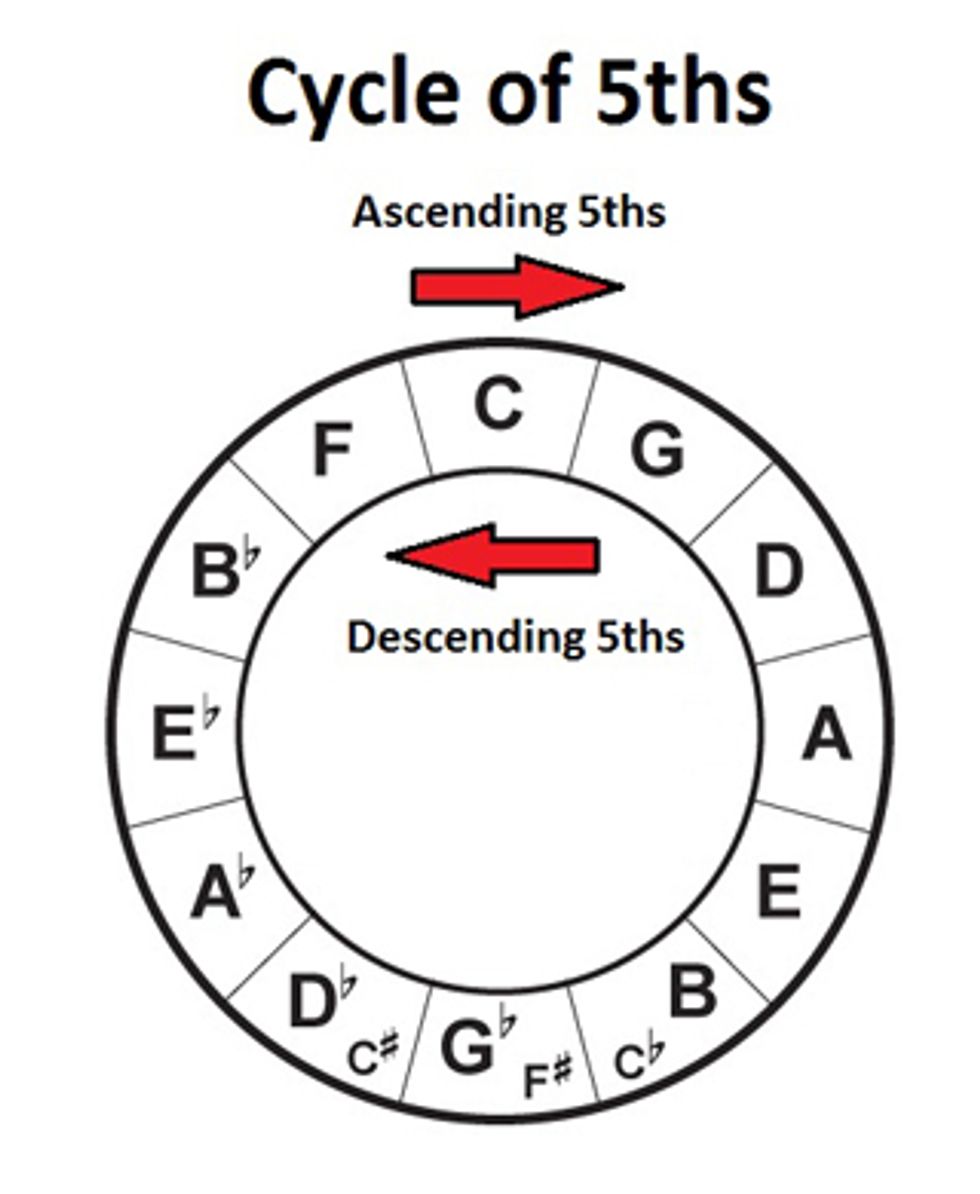
If we take a note—C, for example—and then another note a fifth higher (G), then another a fifth higher (D), and so on, after 12 steps you’ll end up back where you started having touched on every key center. If you want to go and do a little more reading you’ll also see that this cycle dictates the number of accidentals when writing keys and is a good starting point for setting modulations to the dominant or subdominant key.
Take a look at the diagram provided below and follow the cycle around. Move clockwise and you’ll be playing ascending fifths, whereas counterclockwise you’ll be descending in fifths. This is the direction we’ll take for the duration of the lesson.
Now if we play around the clock starting on C7—making all the chords dominant 7s—we’ll get something like the first three measures of Fig. 1. But to really use this system in a way that will benefit your fretboard visualization skills, you’re going to want to stay in one area of the neck (more or less) using all five chord shapes from the CAGED system. I show you an example of this in the second three measures.
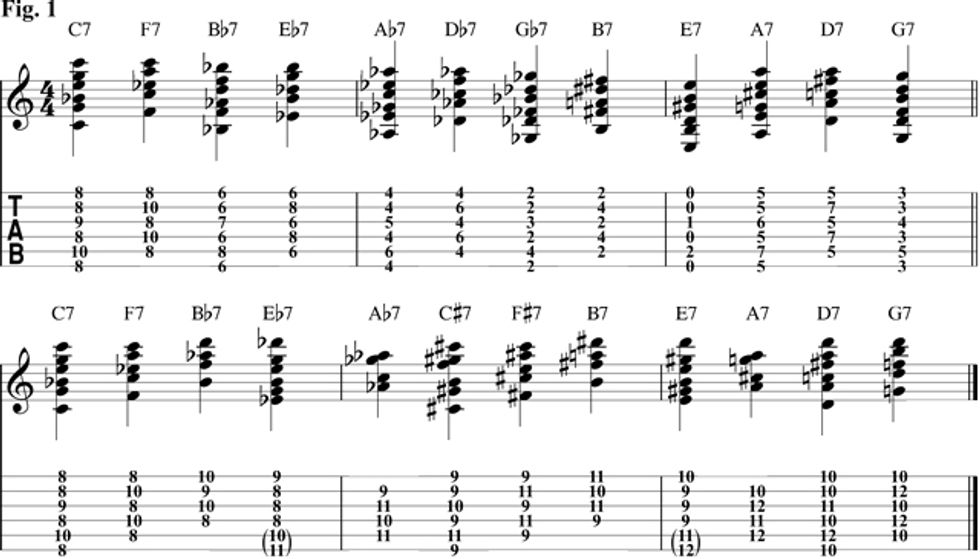
For your reference, the notes in parentheses could be played. To make your life easy we’ll omit them, though it’s important to know they’re there for when we move onto the later stages of this exercise.
Now I should point out, the first way is definitely how I’d play a chordal part, but the second way is the “roadmap” I’d follow for creating smooth melodies. When you think about it, that’s perfect, right? Your rhythm section stays solid, moving around the neck playing strong voicings while you weave a melody throughout the chords focusing on smooth voice-leading.
Before we play the next exercise, let me just give you the five dominant 7 arpeggio shapes (Fig. 2). For those of you that missed my previous lesson on the CAGED system [“Understanding CAGED and the V Chord”], you may want to go give that a spin just to brush up on terminology because from this point on I’ll refer to each shape using numbers.
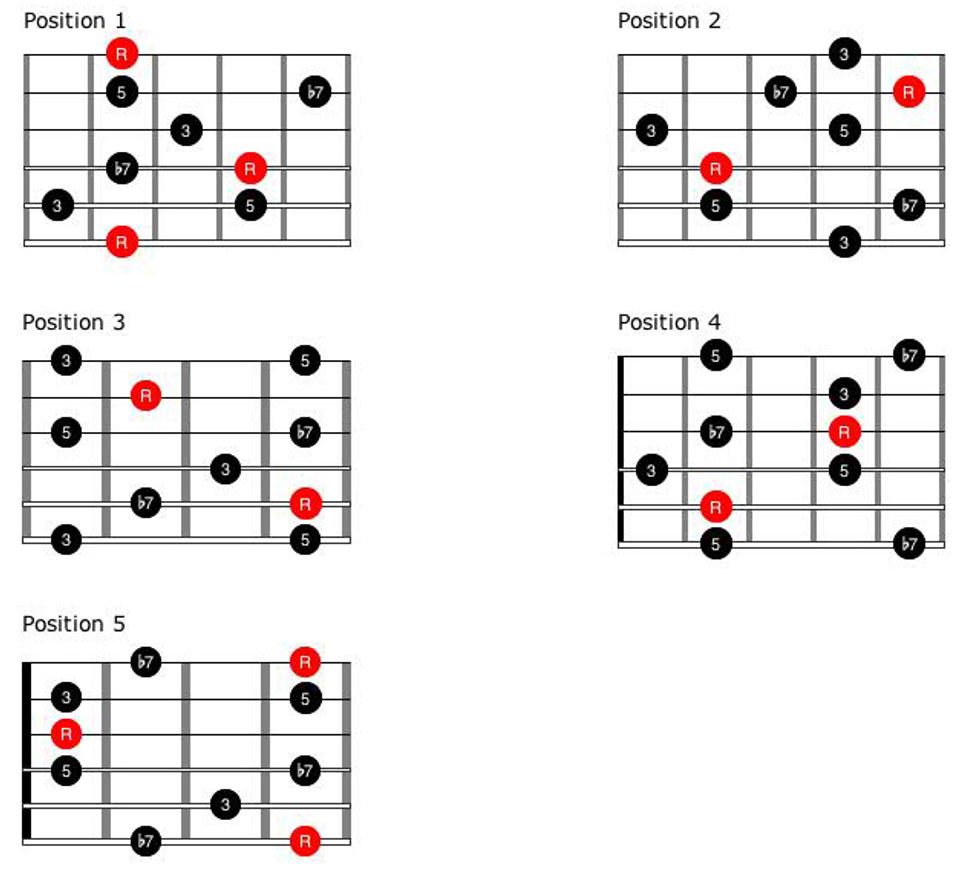
It’s worth pointing out that your long-term goal should be to have a firm understanding of where each interval lives in each shape. This may seem arbitrary at the moment, but when you need to play over an Eb9#5, its really useful to know which notes in the arpeggio are going to sound strongest so you can build your lines around those. (Though that’s a whole different subject!)
Now to the first real exercise: I’ve got a backing track that moves round the cycle of fifths starting on C7 with two measures on each chord. So every two measures we’ll be modulating (changing key). As shown in Fig. 3, the first exercise moves from the root of the arpeggio up to the highest note in that position, then rests for a whole bar to allow you time to visualize the root of the next arpeggio.
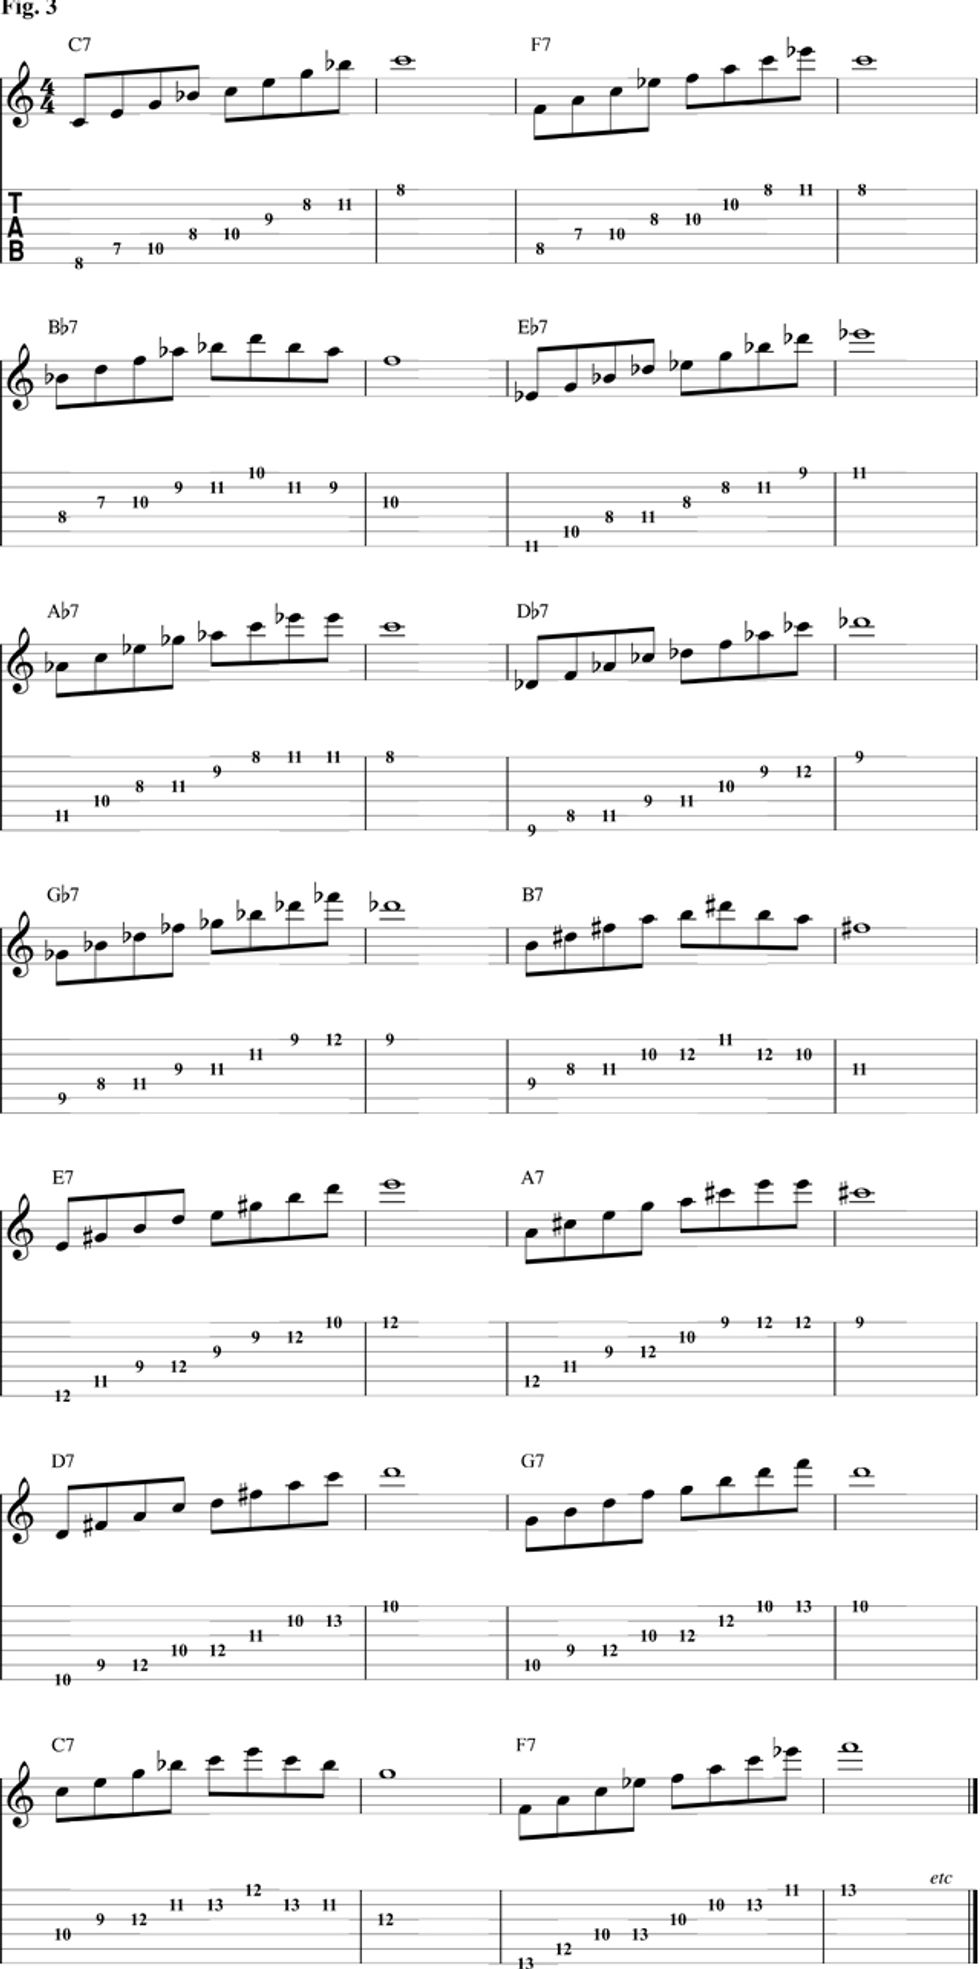
After 24 measures you can just go back to the start and repeat, or you could play C7 in the next position (as in the tab) and just continue on.
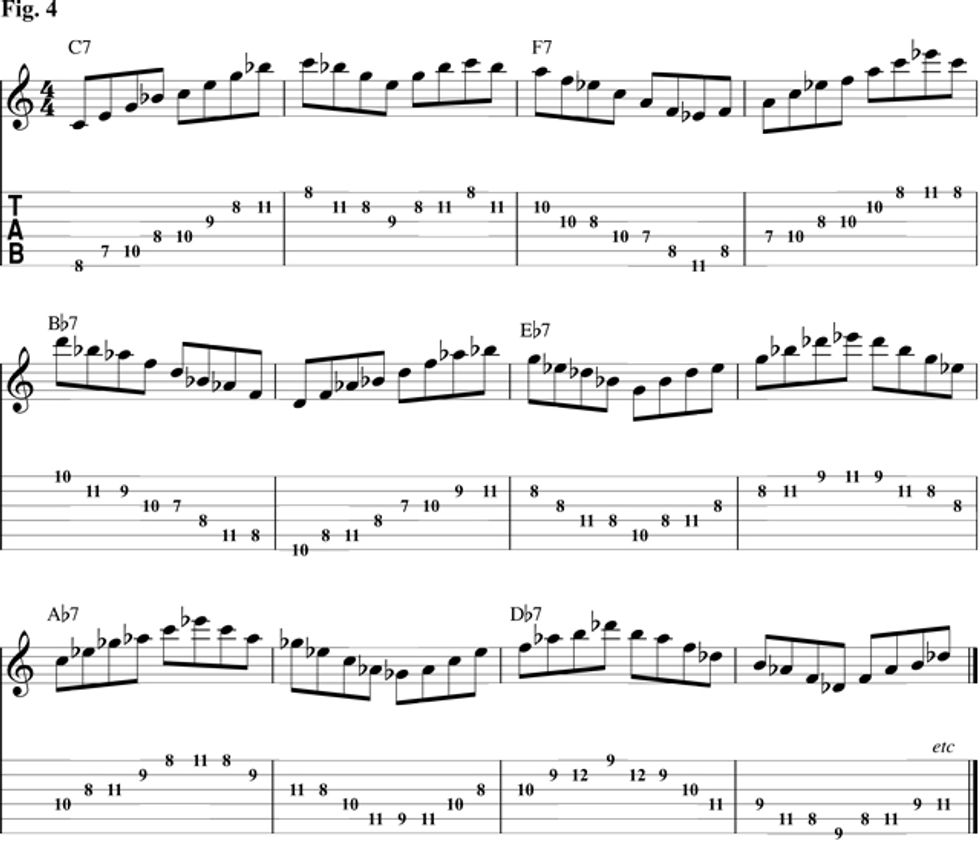
The next exercise in Fig. 4 is an “endless” loop, which will virtually never be played the same way twice. This is much harder than the previous exercise because we‘ll just be playing a constant stream of eighth-notes. When it comes time to move to a new key/chord, we’ll just move to the nearest available note and continue on our new pattern. The skill here is being able to “see” the chord you’re going to while forgetting about the one you’re on (though still being able to play on it). This is possibly an even harder mental exercise than a physical one.
The last exercise (Fig. 5) is a little longer. Instead of playing a stream of notes, I’ll break it up and try to play something more reminiscent of a solo, and then transcribe what I played. Obviously that’s hard on such a cold progression, but the idea is that I’m still using the arpeggios we’ve looked at as a framework, then creating a melody around that.

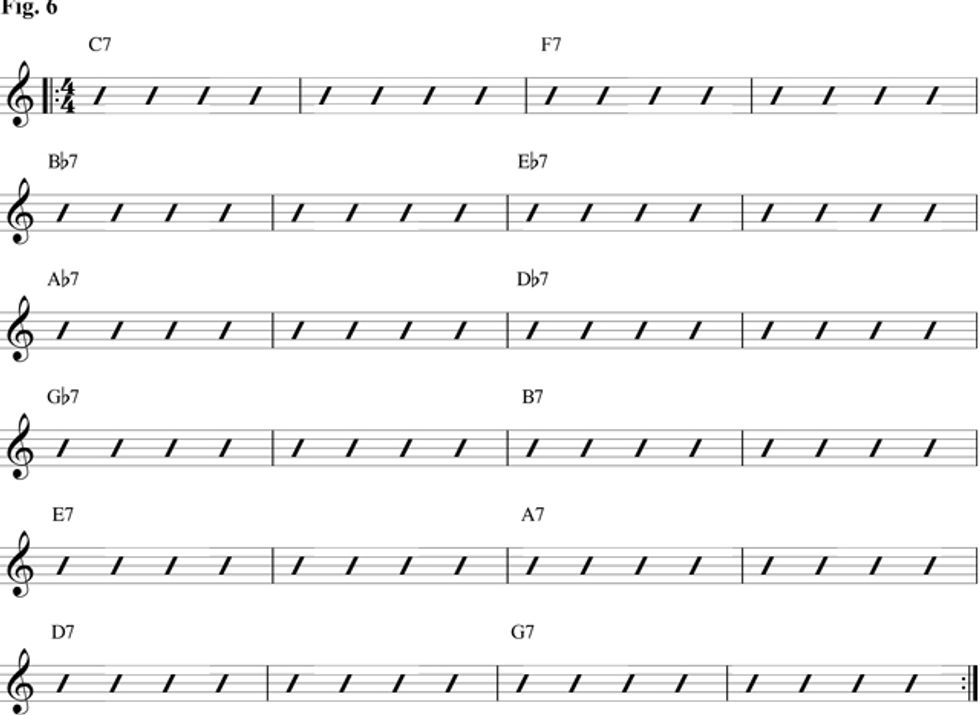
If you really look at the solo above, you’ll find a wealth of dominant-sounding phrases that outline a V7-I7 movement, and any one of these could be used when moving from the I to the IV chord in a standard blues. Use the backing track for Fig. 6 to work out all your new ideas.
So that’s it for this installment. There’s a serious amount of work here, as it’s not your goal to be able to play what I played, but instead be able to fluidly improvise your own ideas over this progression. Mastering this can take a lot of time, so focus on memorizing your dominant arpeggio shapes and try to use this method as a way of practicing them. You don’t have to devote two measures to each chord; it could be four or eight measures, one measure, or even just two beats!
 Levi Clay
 Levi Clay is a London-based guitar player, teacher, and transcriber. His unique approach to learning keeps him in constant demand from students the world over, and his expertise as a transcriber has introduced his work to a whole new audience. For more information, check out leviclay.com.