 We are back to it and at another stage of Restoring An Original on this ‘65 Gibson with a broken off headstock. We left off last month by completeing the installation of the two reinforcement splines, leveling and finalizing the prep work. We are now ready to do the finish touchup.
 Supplies
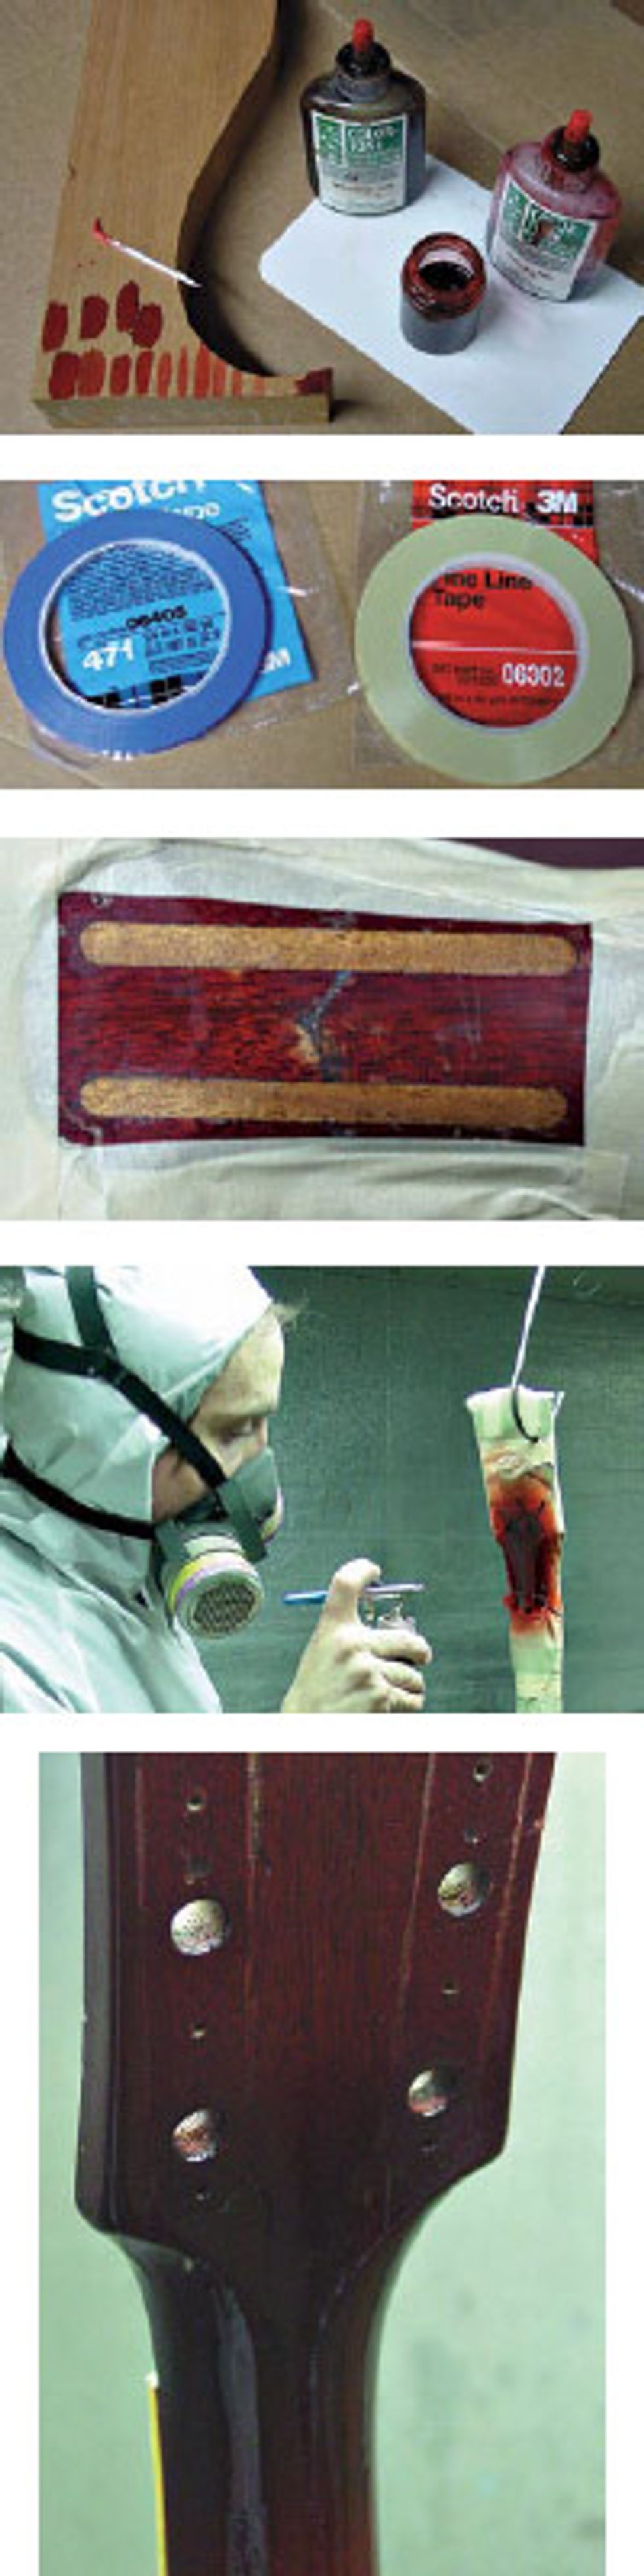
We will be using a Badger airbrush with 3/4 ounce paint jar, Devilbiss spray gun, ColorTone liquid stain (red mahogany and medium brown), Scotch 3M fine line tape (3/8” light green and 1/8” blue) and Evermask masking paper.
Color Mixing
I’ve found that mixing the ColorTone liquid stains in the 3/4 ounce glass paint jar with a third prefilled with lacquer thinner works well. I’m using the red mahogany and medium brown ColorTone stains to achieve the correct color. Testing your color on a scrap piece of mahogany is a must, before hitting that vintage instrument with stain. I’ll go back and forth, mixing stains and checking on the scrap of wood with my drop fill stick until I get it right. The final mix, before adding lacquer, ends up being slightly more intensified, as it will be cut when the nitrocellulose lacquer is added 50/50.
Paper/Masking
The very first step that we must do before spraying is to protect the guitar from any unwanted overspray. Evermask masking paper by Evercoat works well, as it dosen’t have any inks to it like newspaper does – paper print ink can bleed onto the original vintage finish, causing damage. At this stage I will be only spraying the splines with my airbrush and pre-color mixed nitrocellulose lacquer. Scotch 3M fine line tape works well for taping off the splines – use 3/8” light green tape for straight lines and 1/8” blue tape for tight curves, as the blue has more flexability.
I sprayed the splines with my mixed toner, achieving a match with the surrounding areas of the neck and removed the tape before the finish became too tacky. This reasures a nice, clean finish line without any breaks or tears. Airbrushing the splines with color overcoats before feathering in the complete damaged area will give us a better result in the final feathering process.
I then pulled the masking paper back down the neck to the sixth position and began feathering overcoats in the damaged area of the headstock break. This time I am looking for a shade darker color by gracefully spraying an extra coat of the same color that was originally used over the splines – this will give our SG a very natural and transparent look. Please keep in mind that every headstock break is not the same and our repair procedures will vary.
Clear Coats
There will be a total of eight coats of clear nitrocellulose finish sprayed with my Devilbiss spray gun, which features a onequart aluminum cup. We always have this filled with clear nitro and ready to go for daily use in our shop. It’s very important that before and after each coat of nitro to use butyl cellosolve. This will melt-in the old finish with the new finish and not leave any lacquer adhesion lines. With all of the coats applied, our newly repaired headstock will hang in our curing booth for two weeks.
That about does it. We’ll see ya next month!
John Brown
John Brown, of Brown''s Guitar Factory, is the inventor of the Fretted/Less bass. He owns and operates a full guitar manufacturing and repair/restoration facility, which is staffed by a team of talented luthiers. He is also the designer of guitar making/repair tools and accessories that are used today by instrument builders throughout the world.
www.brownsguitarfactory.com
info@brownsguitarfactory.com


 www.premierguitar.com