It’s always exciting when an unusual project lands on my bench. Recently, a client brought in a Tele Thinline he wanted to convert into a baritone, and I saw this as a great opportunity to turn an off-the-shelf guitar into a customized instrument. Having done baritone conversions in the past, I knew it’d be easy for things to go wrong, so I suggested we document the process to help others avoid a train wreck if they were to make their own bari. Before we dive into the details, let’s review what we’re dealing with here.
What’s a Baritone?
A baritone guitar has a longer scale length
and uses heavier strings to enable you to
a great opportunity to turn an off-the-shelf
if they were to make their own bari. Before
tune lower—usually a fourth (B-B) or fifth
(A-A)—than a standard guitar. Because the
intervals remain the same between the strings,
fingerings for all your favorite chord forms,
scale patterns, and licks remain the same—
everything simply sounds lower. Pitch-wise,
a baritone sits between a guitar and a bass.
(Some people refer to a guitar tuned an
octave below standard as a “baritone,” but
technically a sub-octave guitar is a “bass VI,”
which takes its name from the long-scale
Fender instrument introduced in 1961.)
On a baritone, the scale length—the distance from the string nut to the bridge saddles—typically falls between 27" and 29". String gauges range from .012 for the 1st string up to .072 for the 6th string. Several string manufacturers, including D’Addario, Ernie Ball, GHS, Elixir, and La Bella make baritone sets.
In the late 1950s, Danelectro unveiled the world’s first long-scale electric guitar and it quickly found a home in popular music. Once film and television composers heard Duane Eddy’s 1959 “Rebel Walk,” the Dano’s gnarly twang spread like wildfire. Even Wes Montgomery got into the act playing bass VI on his 1960 album Movin’ Along (check out “Sandu” and “Tune-Up” to hear some ripping drop-tuned bebop). The Beach Boys used the instrument to fatten up “Dance, Dance, Dance” and “Caroline, No” and Glen Campbell’s “Wichita Lineman” and “Galveston” featured gorgeous long-scale guitar solos. At the time, the available instruments were tuned an octave below guitar, but it wouldn’t be long before the baritone evolved as a unique 6-string pitched between the bass VI and standard guitar.
Over the years, the baritone’s popularity has grown from initially being considered a “color” instrument for studio musicians to now having a significant presence in country, jazz, metal, and—thanks to the Cure—alternative and indie rock. In fact, some contemporary guitarists consider the baritone’s growl essential to their sonic palette—and a few even make it their primary instrument.
Currently a number of manufacturers— such as Schecter, Music Man, Gibson, Taylor, Alvarez, PRS, Gretsch, Eastwood, and Fender—make baritone electric or acoustic guitars. But the project we’re about to undertake is appealing because the number of available off-the-shelf baritone guitars is miniscule relative to the number of standard-scale instruments on the market. What we’re about to show you can open up a world of tonal possibilities not currently available on production guitars, because this how-to reveals the crucial steps to follow in converting virtually any bolt-on electric into a baritone. That means you can now bring the taut snarl of baritone frequencies to guitars with the body styles, woods, pickup configurations, control schemes, and aesthetics of your choice.
Overview and Caveats
We began this project with a 2011 Fender
American Vintage ’69 Tele Thinline. The
owner had selected this specific model
because he wanted a Thinline with a 4-bolt
neck, and most Fender Thinlines (such as
the American Vintage ’72) have a 3-bolt
configuration. He’d also ordered a Warmoth
baritone neck (WD Music Products and
USA Custom Guitars also make bari necks),
and my job was to create a viable instrument
from these parts without making any
irreversible modifications. This meant he
could always take his Tele back to its original
form without devaluing it.
Be aware that this is not always possible with a baritone conversion. When installing a replacement neck, the most critical element is how well (or even if ) it fits the neck pocket. When retrofitting a neck, the two most common problems are the neck pocket being too loose or too tight, or the neck screws not lining up with the holes in the new neck. Solving either of these issues requires irreversible modifications to the neck or body—or both.
Without the proper tools and skills, this type of project can quickly turn into an absolute nightmare. If you’re thinking of doing a bari conversion on your own, I urge you to read this article from beginning to end so you understand the process and potential pitfalls, and can make a better judgment about whether you feel up to the task. When in doubt, consult a qualified luthier.
Preliminary Evaluation
Before I do any mods or repair work, I carefully
interrogate my clients about their playing
style, and take detailed measurements
to document how the guitar is currently set
up. This information establishes where we
are compared to where we are going, and
allows me to identify anything that may
be out of adjustment or unusual about the
guitar. It also helps me correctly set up the
guitar after I’m done with any mods.
Tip: Save yourself time and possible grief by carefully measuring pickup height, action, and neck relief before you begin modifying your guitar.
Prior to installing a new neck, I look it over and take note of all its features. For example, our maple, 28 5/8"-scale Warmoth neck had a rosewood fretboard. Warmoth offers many sizes of fretwire, and the owner had opted for 6230 vintage-style frets. He also specified a satin nitrocellulose finish.
Warmoth bari necks sport 24 frets, come standard with a 10"-16" compound radius, and have a dual-action truss rod that’s accessed at the heel and requires a 7/32" hex wrench. Because Warmoth necks are licensed by Fender, their headstocks have legit Fender profiles and the neck-screw holes are pre-drilled to Fender specs.
Before shipping a replacement neck, most makers ream the headstock for a buyer’s preferred tuners. Different tuner types (such as Kluson, Grover, Sperzel, and Planet Waves) require different size holes. In our case, the headstock was drilled for vintage-style Gotoh tuners. The owner had already tested these tuners to make sure they’d accommodate a .072" string—the size of the 6th string in an Ernie Ball Baritone Slinky set, which is what he uses. Incidentally, .072" is a tight fit. Anything thicker probably won’t fit in the shaft of a 6-on-a-side, Kluson-style tuner post.
Tip: Before having the tuner holes reamed, do your homework. Always check that the baritone 6th string will fit into the set of machines you plan to install.
Warmoth necks are available with preinstalled synthetic nuts, but the owner wanted me to install a bone nut, so he ordered the neck without a nut.
Tip: Shaping and fitting a nut is a tricky job. If you want to save yourself time and effort, consider ordering a bari neck with the nut already installed. Some companies— including Warmoth—offer synthetic nuts that are not only shaped, but pre-slotted at the factory to match your fretwire and fretboard radius.
STEP 1
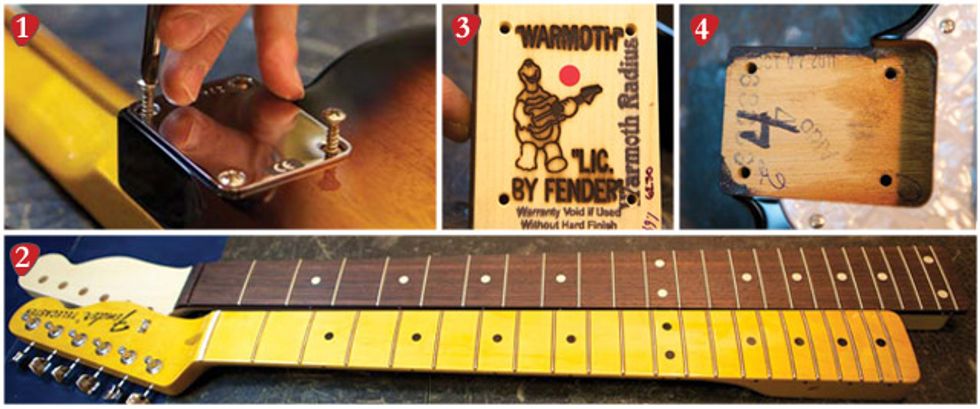 1. When removing the original neck, guide
the screwdriver shaft to prevent it from slipping
out of the screw and gouging your guitar.
2. Compare the baritone neck with the original
by aligning both necks at the 12th fret (the
octave). Here, you can see that the 24-fret
baritone neck extends both lower and higher
than the stock Tele neck. 3. Warmoth baritone
necks are licensed by Fender, so they sport
iconic Fender headstock shapes and the heel
is sized and drilled to Fender specs. To ensure
a snug fit, we’ll remove the red sticker before
installing the neck. 4. Before mounting the new
neck, remove any debris, stickers, or tape from
the neck pocket. This ensures a tight, secure
fit for optimal sustain.
1. When removing the original neck, guide
the screwdriver shaft to prevent it from slipping
out of the screw and gouging your guitar.
2. Compare the baritone neck with the original
by aligning both necks at the 12th fret (the
octave). Here, you can see that the 24-fret
baritone neck extends both lower and higher
than the stock Tele neck. 3. Warmoth baritone
necks are licensed by Fender, so they sport
iconic Fender headstock shapes and the heel
is sized and drilled to Fender specs. To ensure
a snug fit, we’ll remove the red sticker before
installing the neck. 4. Before mounting the new
neck, remove any debris, stickers, or tape from
the neck pocket. This ensures a tight, secure
fit for optimal sustain.
Disassembly
Disassembling a guitar can be fun, but
before you begin, be sure you have the correct
tools for the job—and always save all
the parts you remove. (An empty pickup
box is handy for collecting screws and
parts.) Here’s the process:
- Remove the strings.
- Unscrew (counterclockwise) the neck bolts, remove the original neck, and compare it to the replacement (Photos 1-3).
- Inspect the neck pocket and clean out any debris (Photo 4).
STEP 2
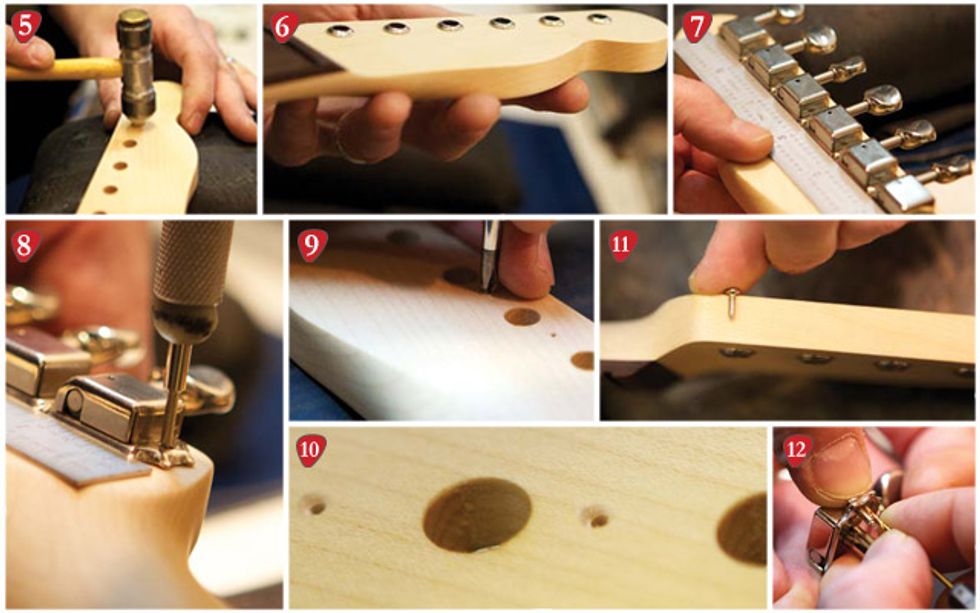 5. Use a nylon- or rubber-tipped hammer
to gently tap the tuner bushings into place.
6. Check that all the bushings sit flat against
the headstock. 7. Use a metal ruler to align
the tuner housings. 8. With a sharp-tipped
tool (I’m using a soldering iron tip), mark the
proper spot for a pilot hole for each tuner
mounting screw. 9. To prevent the drill bit
from splitting the headstock wood, countersink
the pilot holes with a small Phillips
screwdriver. 10. Check the countersink:
You should see a small cone at the lip of
each pilot hole. 11. Before drilling, check
screw length against the headstock depth.
12. Measure bit width against the screw
shaft and mark the bit to indicate
maximum drilling depth.
5. Use a nylon- or rubber-tipped hammer
to gently tap the tuner bushings into place.
6. Check that all the bushings sit flat against
the headstock. 7. Use a metal ruler to align
the tuner housings. 8. With a sharp-tipped
tool (I’m using a soldering iron tip), mark the
proper spot for a pilot hole for each tuner
mounting screw. 9. To prevent the drill bit
from splitting the headstock wood, countersink
the pilot holes with a small Phillips
screwdriver. 10. Check the countersink:
You should see a small cone at the lip of
each pilot hole. 11. Before drilling, check
screw length against the headstock depth.
12. Measure bit width against the screw
shaft and mark the bit to indicate
maximum drilling depth.
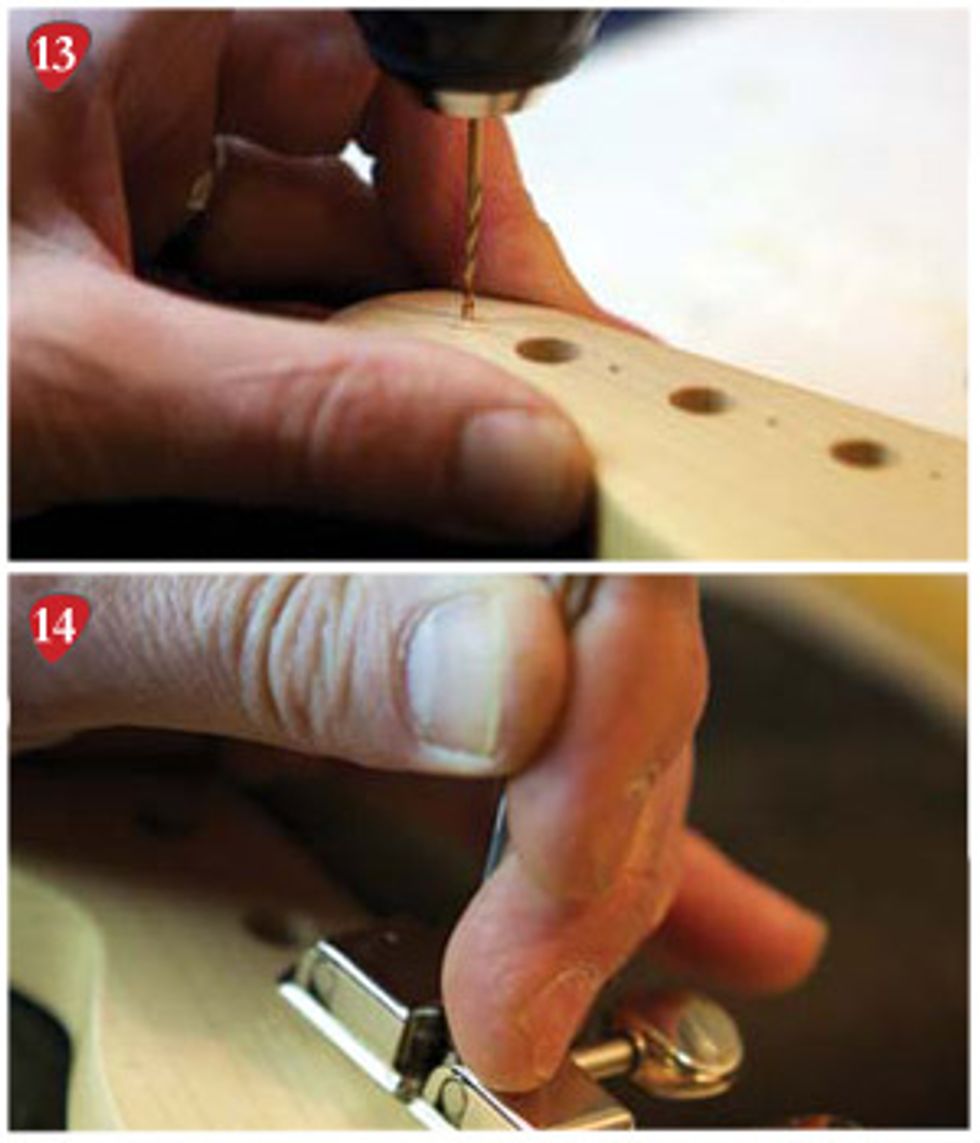
13. Drill slowly and carefully into the tunerscrew pilot holes. I’ve used a red Sharpie to mark maximum drilling depth. 14. When installing the tuner screws, be sure your screwdriver is the correct size so its tip doesn’t butcher the screw heads or slip off and hit the headstock.
Neck Prep
At this point, the new neck has no tuning
keys, string nut, or string trees, so we’ll add
these components next.
- Install the tuning keys. First, use a hammer
with a soft nylon or rubber head to
tap the tuner bushings into their holes
(Photos 5 and 6). Turn the neck over
and lay the tuners into their holes. With
a metal ruler as a guide, carefully align
the tuners in a straight line (Photo 7).
Still holding the tuners in alignment
against the ruler, use a sharp-tipped tool
to mark a spot for the pilot hole for
each tuner mounting screw (Photo 8).
Countersink the tuner-screw pilot holes using a small Phillips screwdriver to create a cone at the lip of each screw hole (Photos 9 and 10).
Tuner mounting screws vary in length from one brand to another. Before you drill any holes, always check the screw depth against the headstock (Photo 11). If the screws are too long, you risk drilling through the headstock face or splitting the wood with the screw tip.
Insert a screw into a tuner, then measure the screw’s length and width against your drill bit. Match the bit width to the screw’s main shaft—not its cutting threads—and mark the bit depth with a Sharpie or piece of masking tape (Photo 12).
With the neck resting on a padded, stable surface, drill the tuner screw holes into the back of the headstock. Work slowly and methodically (Photo 13).
Finally, attach the tuning machines, starting with the 6th or 1st and working sequentially along the headstock (Photo 14). - Temporarily install a pre-slotted string nut. This acts as a guide for aligning the neck. In our project, the temporary nut will be replaced by the finished bone nut later in the assembly process. (If you’ve ordered a neck with a pre-installed, pre-slotted nut, you’re already set and can skip to Step 3.)
Tip: If you don’t already have a used pre-slotted nut, synthetic pre-slotted and shaped nuts are available from such retailers as Guitar Center and Musician’s Friend. Stewart-MacDonald sells bone nuts that are cut, sized, and slotted for Fenders, and starting with one of these and then modifying it for baritone strings can be a real time-saver.
STEP 3
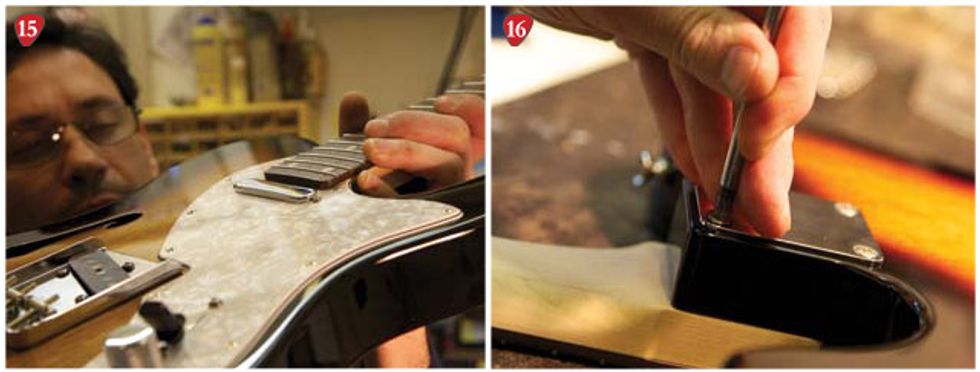 15. Check how the neck fits into the body. You want
to neck heel to fit securely into the pocket, and any
fretboard extension to sit just above the pickguard
so it’s not forced down against it. A miniscule gap
below the extension is good. 16. Attaching the
neck. Go around the neck plate tightening each
screw a little at a time.
15. Check how the neck fits into the body. You want
to neck heel to fit securely into the pocket, and any
fretboard extension to sit just above the pickguard
so it’s not forced down against it. A miniscule gap
below the extension is good. 16. Attaching the
neck. Go around the neck plate tightening each
screw a little at a time.
Attach the Bari Neck
Next we’ll bolt on the new neck, string up
the guitar, and check the neck alignment.
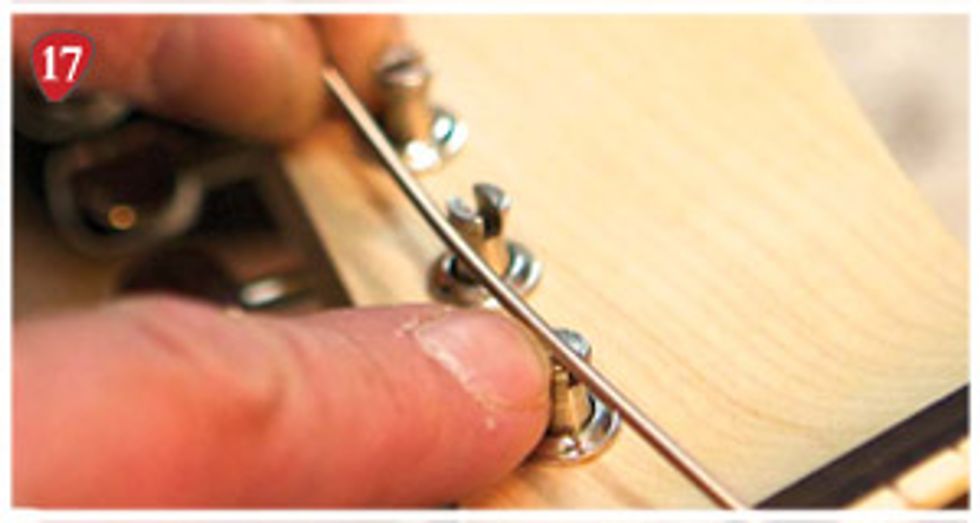
17. Getting ready to install the outer strings to check neck alignment.
- Place the baritone neck heel in the neck pocket to see if it fits properly. On this guitar, the fit was perfect— not too tight, not too loose—and the fretboard extension that includes the 24th fret cleared the top of the pickguard, exactly as it’s supposed to (Photo 15).
- With the guitar face down and the neck seated in the pocket, thread the original neck screws through the neck plate, work them down through the body, and gently introduce their tips into the screw holes of the replacement neck (Photo 16). During this phase, I was delighted to see that the Warmoth’s pre-drilled holes lined up perfectly with the holes in the body. If you’re installing a bari neck on a Fender guitar, this is a real benefit to buying a licensed Fender neck.
- Once the neck is attached, install the
1st and 6th strings and use them as
straightedges to check neck-to-body
alignment. I used the temporary, preslotted
nut to hold these strings in
place while measuring the distance
from the strings to the edge of the
fretboard. On a pre-slotted nut, you
have to widen the 6th string slot to
accommodate the low B.
This is also where you confirm that your 6th string fits the tuner (Photo 17). If you’ve done your homework, you’ll be good to go.
Again, we were lucky: The two strings lined up exactly where they should, and the distance from the edge of the fretboard to the strings was perfect. Could this project go any more smoothly?
Tip: Rather than fully tightening one screw and then another, I like to tighten all the screws a little at a time, moving in a crisscross pattern around the neck plate. This gradually joins the neck and body using even pressure. Make sure the screws are nice and snug, but resist the urge to over-tighten them—you don’t want to strip the screw holes in the neck.
STEP 4
 18. Bone nut blanks come bleached or unbleached, and also sport either radiused or flat bottoms
to match your fretboard’s nut slot. 19. Check the fit frequently as you shape the bone blank into a
nut. 20. Marking the nut where it extends past the fretboard. This material will be sanded off. 21.
Mark the overall height of the new nut with a mechanical pencil and machinist’s rule. 22. Using a
radius block and fine sandpaper to shape the top of the new nut. At this point, the blank has two
lines: One marks the top of the nut, the other marks where the fretboard meets the nut. 23. The
new nut is ready for string slots and final shaping and polishing. 24. Adding a drop of super glue to
secure the shaped nut. 25. Measuring the string spacing. The trick is to space the strings equally—
despite their different diameters—and this takes careful calculation.
18. Bone nut blanks come bleached or unbleached, and also sport either radiused or flat bottoms
to match your fretboard’s nut slot. 19. Check the fit frequently as you shape the bone blank into a
nut. 20. Marking the nut where it extends past the fretboard. This material will be sanded off. 21.
Mark the overall height of the new nut with a mechanical pencil and machinist’s rule. 22. Using a
radius block and fine sandpaper to shape the top of the new nut. At this point, the blank has two
lines: One marks the top of the nut, the other marks where the fretboard meets the nut. 23. The
new nut is ready for string slots and final shaping and polishing. 24. Adding a drop of super glue to
secure the shaped nut. 25. Measuring the string spacing. The trick is to space the strings equally—
despite their different diameters—and this takes careful calculation.
Carve the New Nut (Optional)
Now that the neck and body are in alignment,
the next is to carve a new string nut. (If
you order a neck with a pre-installed nut, you
may skip ahead to Step 5.) The owner of our
Tele requested a custom carved bone nut—a
great choice for the project, because bone will
give this instrument a wider dynamic range
and better sustain than typical synthetic materials.
However, carving a string nut is a very
painstaking process. One alternative is to buy
a pre-shaped and slotted bone nut from stewmac.
com or other luthier suppliers. This typically
saves many steps and requires only final
fitting and string-slot shaping (numbers 7-13
below). That said, the only way to guarantee
that a bone nut will fit a given neck is to carve
it from scratch. Here’s how I do it:
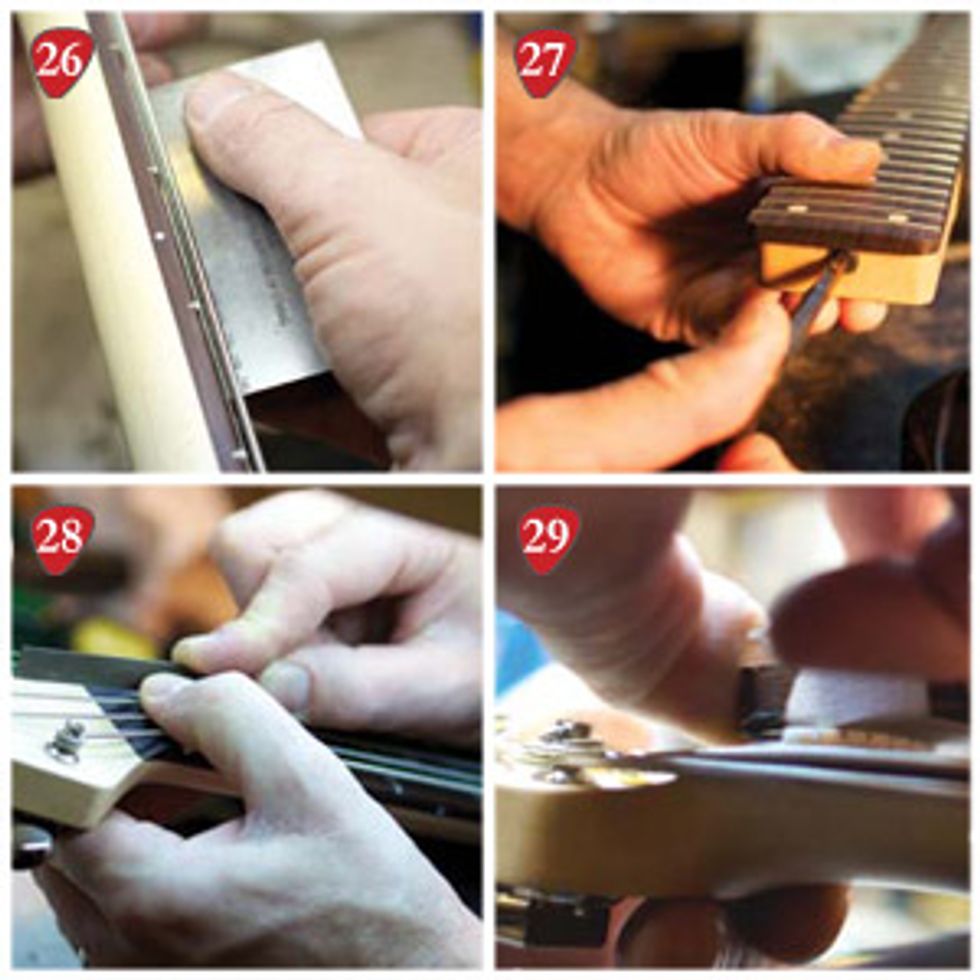
26. Measuring neck relief after the strings are tuned to pitch. 27. To adjust a vintage-style truss rod, you need to remove the neck. 28. When cutting nut slots, tilt your file down toward the headstock. 29. Using a radiused block to sand down the top of the nut.
- Sand a bone blank (Photo 18) to fit the width of the nut slot and to sit flush with its bottom. Some slot bottoms have a radius, while others are flat, so check your fretboard to be sure that you start with the correct bone blank. The goal is to achieve a snug fit with no visible gaps (Photo 19).
- Once the basic shaping is done, slip the nut into the slot and install the 6th and 1st strings. Tighten them just enough that they sit on the nut and hold it in place. Using a mechanical pencil, mark the ends of the blank where they extend beyond the edge of the fretboard (Photo 20).
- Remove the blank and sand the extended ends until the nut sits flush with the edges of the fretboard. Work slowly, and periodically reinsert the nut to check your progress. This can take several passes.
- Hold the blank in place again with the 6th and 1st strings, and use a mechanical pencil and machinist’s rule to mark the overall height for the nut. Lay the rule on top of the frets and slide it up to the nut blank. Then mark the blank along the top of the rule as you move it back and forth across the frets (Photo 21).
- Detune the strings and slide them aside. With the pencil, trace a second reference line along the edge of the fretboard where it meets the nut blank.
- Remove the nut and sand the top of the blank down to the first line you drew. Be sure you sand the top to match the fretboard radius. In this case, I used a 10" radius block to match Warmoth’s 10"-16" compound radius (Photo 22). When you’re done, the nut’s top will follow the fretboard curve that’s referenced by the lower line (Photo 23).
- Insert the nut back in the slot and tighten
the 6th and 1st strings to hold the nut
in place. At this point, when I’m sure the
nut is shaped and fitted correctly, I put
a tiny drop of super glue on the end of a
plain string and let the glue wick down
into the slot to hold the nut in place
(Photo 24). Blot any excess glue while
it’s still wet with a white paper towel.
Now use the pencil to mark the location of the 6th and 1st strings, paying close attention to the distance between their outer edge and the edge of the fretboard. Different players have different preferences here, but you want to avoid getting too close to the fretboard edge— you don’t want those strings sliding off. - With the outer strings marked, it’s time to calculate the locations of the remaining four strings. Use a fine ruler and take the width of each string into account. The goal is to create an equal space between all six strings. Mark these locations with pencil, as you may need to change them during this process (Photo 25).
- Install the remaining strings and tighten them up—but don’t tune them to pitch just yet. Recheck the strings to confirm they’re spaced equidistantly. Gently carve shallow reference slots into the blank using nut files (each file should match the gauge of the slot’s corresponding string). For now, these slots only need to hold the strings to check their spacing.
- When the spacing of each string is correct,
tune the guitar to pitch. Measure
the amount of relief in the neck (Photo
26). Before you finish cutting the nut
slots, make sure the neck doesn’t have too
much relief (forward bow). The final nut
slot depth depends on having the correct
amount of relief, which is approximately
.012" to .020", depending on a player’s
technique and string gauges.
Once the guitar is tuned to pitch, you can expect to adjust the truss rod to get the relief dialed in. On a vintage-style neck, you adjust the truss rod at the heel. This necessitates removing the neck (Photo 27). - Cut the string slots to the proper depth, beginning with the 1st string, which should have a distance of 1/64" (.015") from the top of the 1st fret to the bottom of the string. This height will gradually increase to just slightly over 1/32" (.032") for the 6th string. Go slowly! Remember, you can always deepen the slots, but you can’t undo what you’ve already cut.
- Sand the top of the new nut so that
the string slots aren’t surrounded by
too much material (Photo 29). But
don’t sand too much, otherwise the
strings may slip out of the nut when
you bend them or dig into the guitar.
Then polish the nut with 600-grit
paper, and finally buff the bone with
a polishing cloth.
With the mechanical pencil, color the inside of the string slots. This bit of graphite will prevent the strings from sticking in the slots.
Tip: When cutting the slots, tilt your file down toward the headstock (Photo 28). A gently angled slot keeps the strings seated firmly as they slope down toward the tuners.
STEP 5
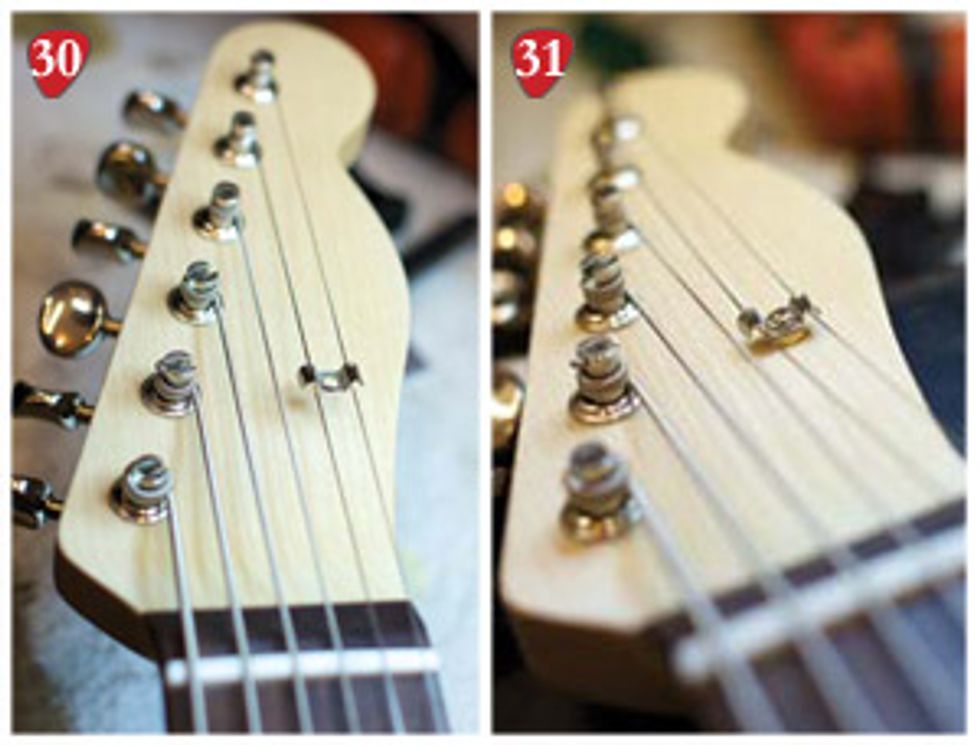
30. Determine the string location, then mark a pilot hole for the screw. 31. Use a stand-off to set the string tree height. If the slots are cut correctly, you only need to apply gentle downward pressure on the strings.
Add String Trees
Once the guitar is strung and the nut is
slotted, it’s time to install the string trees.
- Suspend the string tree over its corresponding pair of strings to determine where you want to position it (Photo 30). Typically, it’s midway between the tuner post and the nut.
- With a sharp-tipped tool, mark a pilot hole, countersink it, and drill the screw hole. Follow the procedures you used for drilling holes for the tuner mounting screws. Remember to measure screw depth and mark your drill bit so you don’t go too far into the headstock.
- Set string tree height. String trees only need to apply enough downward pressure to keep the high strings firmly in their slots as they stretch back toward the tuners. Stand-offs—washer-like cylinders that fit between the tree and the headstock—of different heights allow you to precisely adjust a tree’s downward pressure. To get the height I wanted, I clipped a brass ball-end from a bass string in half and use this as a stand-off (Photo 31).
Tip: Some necks require a pair of string trees—one on strings 1 and 2, and a second on strings 3 and 4—to keep the strings from buzzing in their slots. Other necks only need a tree on the top two strings. A sitar-like buzz or lack of sustain when you play an open string can indicate the need for a string tree.
STEP 6
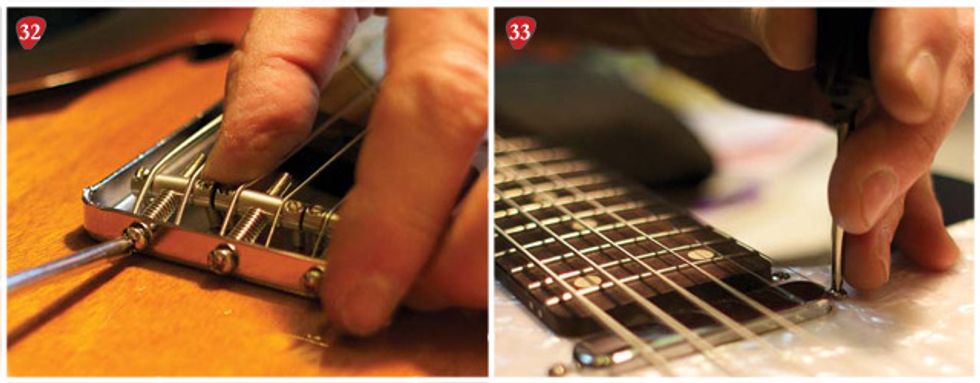 32. Adjust pickup height to maintain a good balance between the neck, middle, and bridge settings.
Because a baritone has thicker bass strings than a regular guitar, you may wind up with a larger gap between
lower strings and the pickups than you’re used to. 33. When adjusting intonation, always slacken
a string before moving its saddle forward or backward. You don’t want to fight string tension with your
screwdriver—it’s bad for the hardware and you risk slipping off the screw and nicking your guitar’s finish.
32. Adjust pickup height to maintain a good balance between the neck, middle, and bridge settings.
Because a baritone has thicker bass strings than a regular guitar, you may wind up with a larger gap between
lower strings and the pickups than you’re used to. 33. When adjusting intonation, always slacken
a string before moving its saddle forward or backward. You don’t want to fight string tension with your
screwdriver—it’s bad for the hardware and you risk slipping off the screw and nicking your guitar’s finish.
Final Setup
With the neck, tuners, nut, and string trees
installed, it’s time to make the final adjustments
and fine-tune the guitar’s playability.
Here’s the correct order for a setup:
- Tune to pitch. In this case, the owner’s preferred baritone tuning is B–E–A– D–F#–B, low to high.
- Adjust the truss rod, if necessary. After the strings have been tuned to pitch for a while, a truss rod may require one more adjustment.
- Adjust the height of the bridge saddles. Set the action based on the guitar’s original measurements, while taking into account the new, heavier baritone strings. The saddles should curve in an arc that mirrors the fretboard radius.
- Adjust the action at the string nut. You may have gotten it just right when you cut the nut slots, but it’s worth checking again. Sometimes a stroke or two with the nut file can settle a string in a perfect arc with its neighbors.
- Adjust pickup height (Photo 32). It’s imperative that the pickups are set to the correct height. Well-adjusted pickups deliver a consistent volume as you switch between pickup positions.
- Adjust intonation (Photo 33). This final part of the setup process involves moving the saddles either toward or away from the neck. With an electronic tuner, bring each string to pitch. Starting with the 1st string, play the 12th-fret harmonic and then fret the same note. If the fretted note is sharp, move the saddle away from the neck. Conversely, if the fretted note is flat, move the saddle toward the neck. Make small adjustments and retune each time you do. Repeat this process until the 12th-fret harmonics and fretted notes match on all six strings.
Tip: When you raise pickups too close to the strings—especially Fender-style single-coils with barrel-magnet pole pieces—the magnetic pull can interfere with a string’s vibrations and cause tuning problems. For vintage-style Tele pickups, Fender recommends a 6/64" space between the 6th string and its pole piece, and a 5/64" gap for the 1st string. Use this as a starting point, and then finetune the distance by ear.
Tip: Many Tele fanatics insist that, although a vintage 3-saddle bridge doesn’t intonate as well as a fully adjustable 6-saddle version, the vintage design offers more volume and sonic girth. To intonate a 3-saddle bridge, the trick is to find the saddle location that offers the best compromise for each pair of strings. For even better results, you can buy pre-compensated brass saddles that make it much easier to intonate a 3-saddle Tele bridge.
Out the Door
Compared to other baritone conversions I’ve done in the past, this one was hassle-free.
Kudos to Warmoth—they built an excellent neck for this conversion and made my
job easy. I was able to avoid any dreaded irreversible modifications, and the owner was
thrilled with his new, deep-twanging baritone Tele.