


| Luthier John Dick has been quietly building classical guitars with one of the most innovative top designs in modern luthiery. We get an exclusive look at John’s “sandwich top” process and discover the intersection of aerospace technology and building tradition. |
“Wow” was all I could say. “Holy...” “How did..?” and “What is that guitar?” are a few of the other typical reactions you’ll get from people hearing a John Dick classical guitar for the first time. Pat Smith, a jazz guitarist from California, said in his recent review for HarmonyCentral.com, “I have played it next to several of my friends’ classicals and it is like comparing a harpsichord to a grand piano.” The playing experience is equally remarkable. Swedish guitarist Jakob Henriques stated, “The John H. Dick guitar is the first guitar I have been able to really make music on. It also has the ability to make me feel that I am together with the instrument,” a true indication of the fulfillment of the bond between player and instrument. Guitarist and songwriter Rick McCarty may have summed it up best: “It’s a classical guitar that thinks it’s a steel string.”
|
John started as a cabinet maker, but became attracted to the idea of building guitars in 1993, initially spending time as an apprentice to Iowa instrument maker and repairman Harold Marling. From the beginning, John’s guitars were outstanding. However, his recent experiments have been extremely effective. Constantly experimenting, always inventive, John has pulled off the seemingly impossible – a nylon string guitar with the vibrancy, sustain and definition only thought possible with steel strings. These guitars are finding a home in many areas of music – classical players, folk artists, pop musicians and Atkins-style players are each discovering their incredible tone and playability.
 A big part of the secret to John’s amazing guitars is the top. The story began ten years ago as John started making classical guitars with a “sandwich” top featuring the high-tech aerospace material, “Nomex,” originally developed by German classical guitar builders Gernot Wagner and Matthias Dammann. Nomex is a super-lightweight, flexible fiber that when sandwiched between two solid materials such as wood, results in a strong and lightweight laminate. Commonly used in the aircraft industry and applications where its heat resistant characteristics are valued – firefighters and racecar drivers in particular – its resonant properties are only now beginning to be explored for use with musical instruments. Gernot Wagner was struck by the incredible tone produced when tapping the skin of a friend’s homemade aircraft, and immediately thought of incorporating this new material into a guitar top.
 John’s first exposure to the sandwich top was in 1997 when a friend purchased the first of Wagner’s guitars to come into the United States. Soon after, John heard classical guitarist David Russell in concert at the Guitar Foundations of America (GFA) conference in St. Louis, playing a Dammann guitar. John thought the guitar was being amplified, but it wasn’t – it was simply the sandwich top technology in action. He then decided to incorporate this technology into his instruments, and has been building nothing but sandwich tops since 1998.
John spent several years experimenting and perfecting his particular recipe for the sandwich top, and although Wagner, Dammann and Dick tried for many years to maintain a trade secret with this technology, several online communities have recently discovered and revealed their processes. Other builders have claimed to know the secret, and have produced guitars using sandwich tops with varying degrees of success. Outlined below is John’s process, straight from one of the originators. He has graciously agreed to share his process exclusively with the readers of Premier Guitar.
 Materials
 The top is made up of two .5 to .55 millimeter thick pieces of tonewood for the inside and outside of the sandwich. The core of the sandwich is the Nomex sheet, with a 95 millimeter wide piece of redwood running directly down the center. The rosette must be placed in the outside skin before thicknessing.
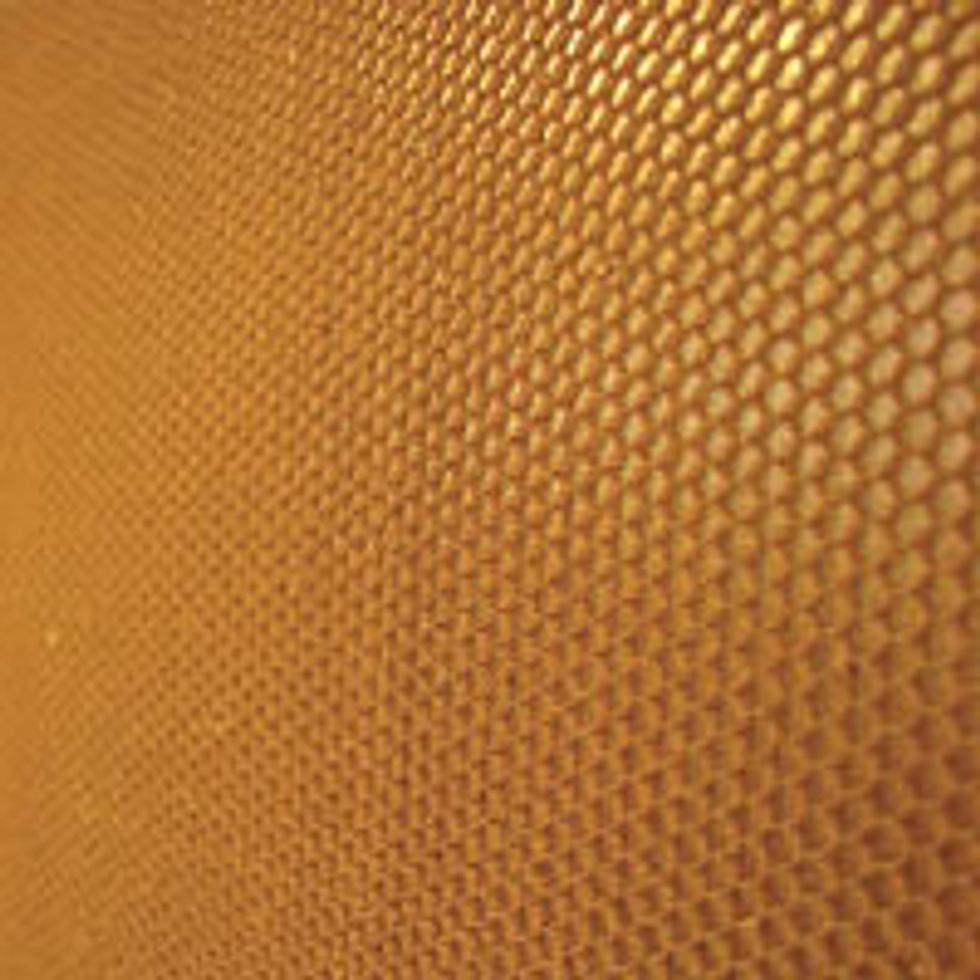
The Nomex can be ordered in several thicknesses from the supplier, Texas Almet (texasalmet.com). John orders his Nomex precut to .080 inches or 2 mm thick – the thinnest it can be cut. The sheet’s original size is 4’x8’, but John asks them to cut it down 2’x3’ sheets for ease of shipping and storage. The grade is 1.8 pounds per cubic foot with a 1/8” cell; however, steel string makers have found the three pound grade to work better for the higher tensions involved. It is approximately $150 per 4’x8’ sheet and can also be purchased through Luthier’s Mercantile if smaller quantities are desired.
The redwood core piece should also be 2 mm. John prefers the properties of redwood over a cedar core for a cedar top, or a spruce core for a spruce top. However, since that is a matter of preference you may find you like other woods. Note that the darkness of the redwood will show through very white spruce, such as Engelmann. However, if you use a spruce core the Nomex will show through. John prefers to use the darker Sitka spruce for his tops for that reason, but he most often uses cedar, which blends with the redwood perfectly.
Additionally, you’ll need Gorilla Glue; a long-acting, marine-quality epoxy to bond the pieces together; a rubber roller; woodworker’s masking tape, a veterinary syringe and a vacuum press.
Getting Started
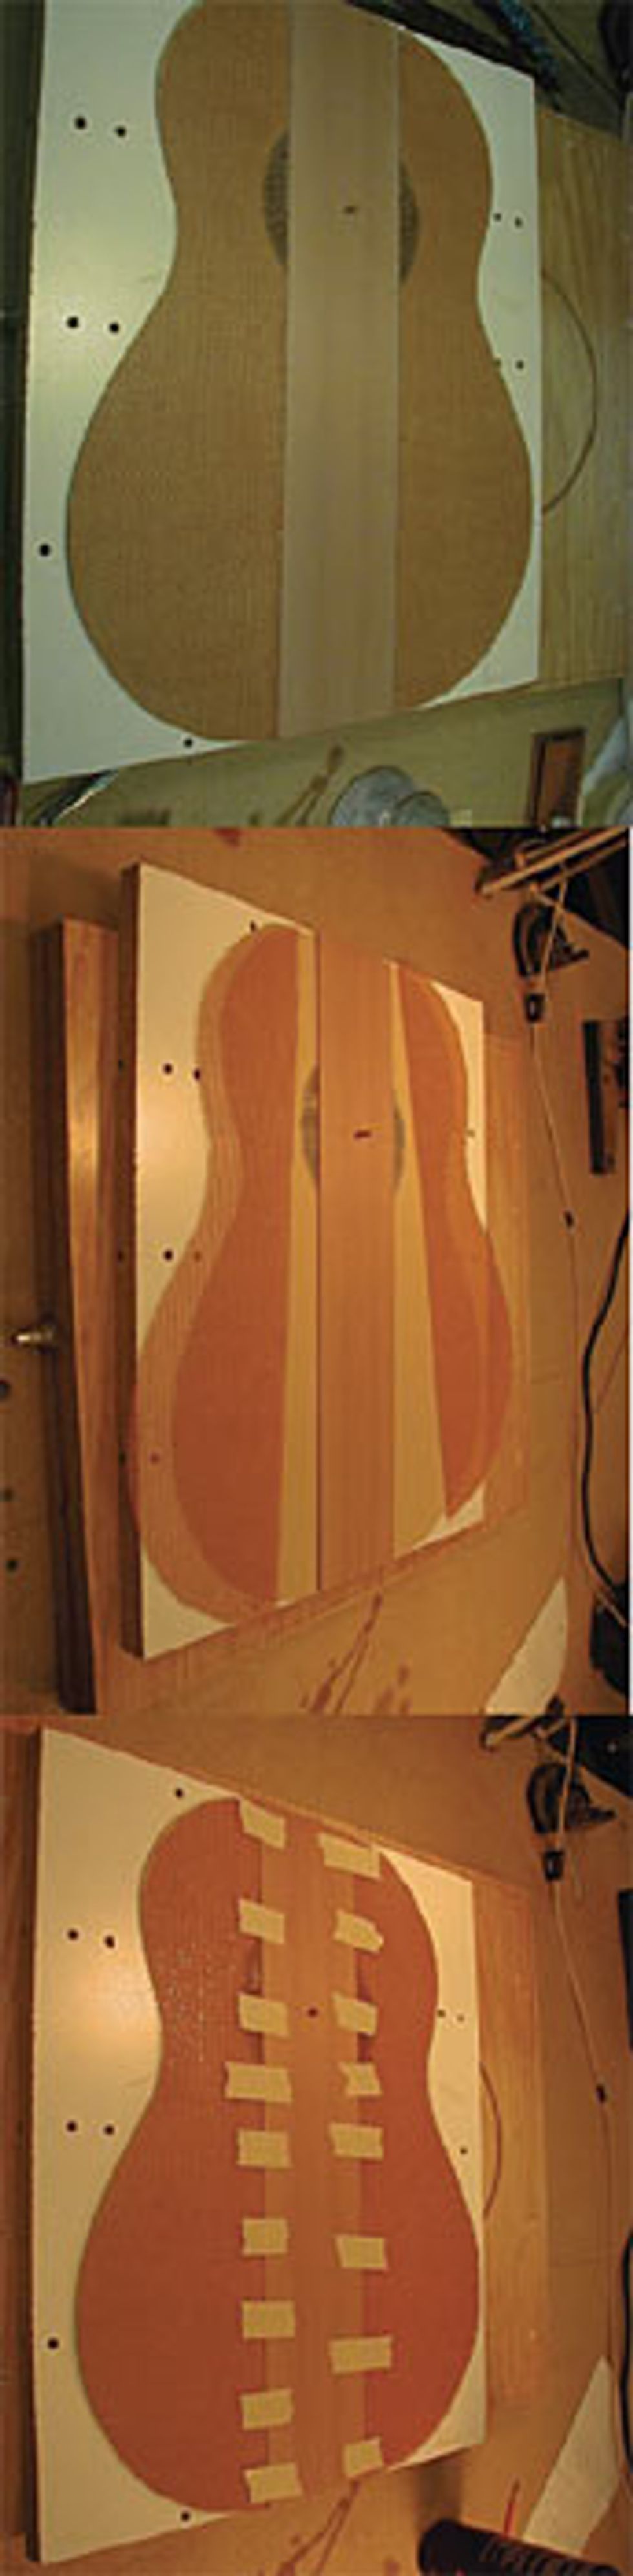
Lay the top half, rosette side down, on a perfectly flat surface. Carefully measure and mark a space for the redwood center strip exactly in the middle of the opposite side – the inner side of the top half of the sandwich. Make sure you will be able to see the markings clearly once the glue is applied.
The Nomex honeycomb needs to be cut to shape before gluing. Place the redwood core on the outside skin of the top (the top must be rosette side down), and tape it down with masking tape. Lay a rectangle of Nomex next to the core as close as possible and tape that to the center seam. With very sharp scissors, gently trim the Nomex to the shape of the top, using the top’s edges as a guide. Repeat this process for the other side. Try to keep the Nomex as still and stable as possible as you cut to keep the edges as clean and close as possible. Remove the masking tape and wipe any dust or fuzz off the top when you’re done.
On a piece of scrap wood or polyethylene, spread a small amount of Gorilla Glue, approximately three grams. Roll the glue evenly out on the scrap with a 1.5” rubber roller so it is spread evenly on the roller. Apply a thin film to the redwood core, just enough so the wood looks barely wet. Place the redwood core onto the top skin (with the rosette still facing down away from the gluing surface), and press it into place, carefully aligning with your marks. Spread more glue on the disposable piece so that it covers an area large enough to lay the honeycomb on it – approximately 21 grams, which will be thick enough to deposit a sufficient amount of glue on the edges of the Nomex. You won’t be applying glue to the top this time, but simply laying the Nomex in the glue on the scrap without mashing down any of the cells and putting it into position on the prepared top. Place the honeycomb so it butts against the redwood core, but do not press it down – you want the cell walls of the Nomex to be completely upright so they can bond with both sides of the sandwich. Using masking tape, secure the edge of the Nomex to the redwood core, making sure there are no gaps. Run a piece of tape down the entire seam, as it can shift in the vacuum press and create a gap. Repeat for the opposite side.
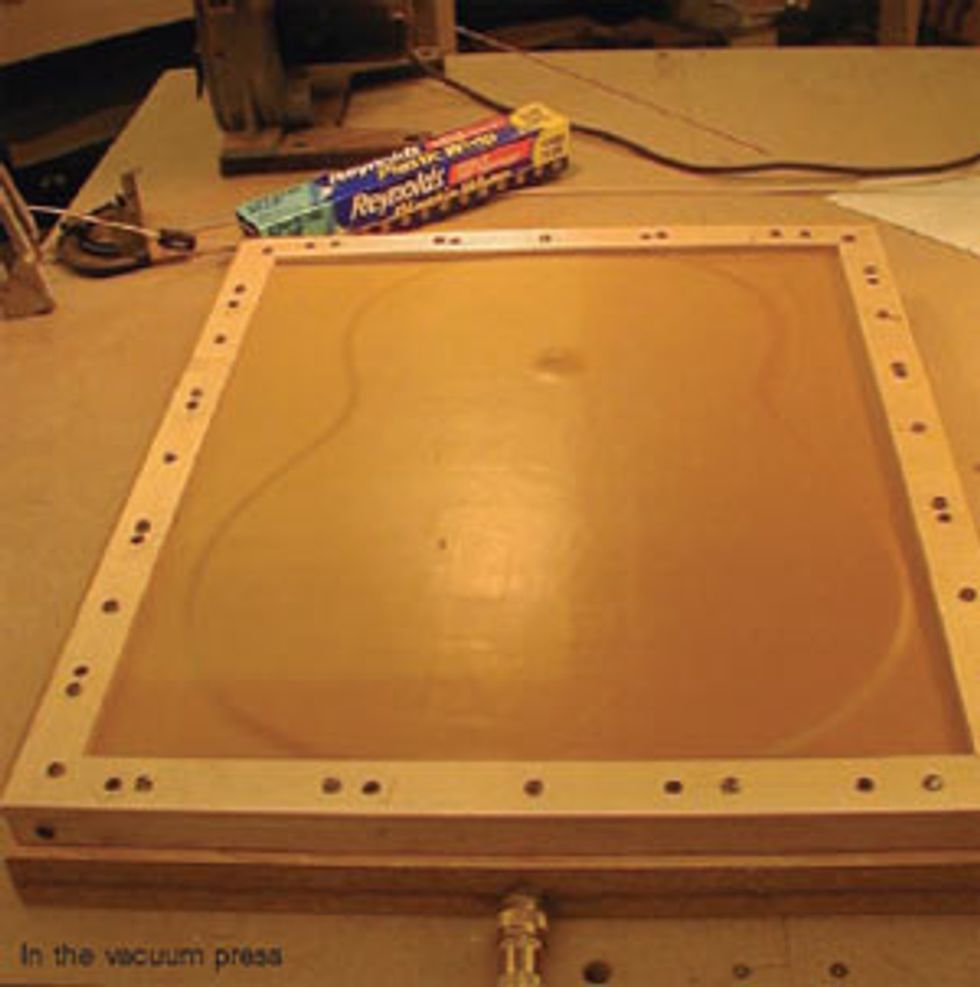
Place in a vacuum press, covering the wet surface with a black plastic trash bag (Gorilla Glue won’t stick to the bag) and allow it to set up. As the Gorilla Glue dries, it will expand to three or four times its original volume within the first 30 minutes. A small fillet should form between the glue and the honeycomb walls; if the fillet foams you have used too much glue (Gorilla Glue in a thin film shouldn’t foam). The top should stay in the press for approximately 90 minutes. Check the glue that was on your scrap piece for dryness. When it is dry, take the top out of the press. Once dry, any glue that has migrated to the top of the cell walls shouldn’t stick to the tape. If you can’t remove the tape, it isn’t dry enough.
The edge of the Nomex needs to be “tied” to the redwood using a very long-acting epoxy. John prefers epoxy for laminating carbon fiber and fiberglass (Silvertip Laminating Resin from systemthree.com). Use a veterinary syringe with a number 16 or 18 gauge needle with the sharp tip ground off. Mix the epoxy according to the package directions. Remove the plunger from the syringe and pour the liquid into the tube, being sure to tip the plunger back in and allow the liquid to drain backward so you can remove the air from the tube when you replace it without losing all the epoxy. Put the needle into the end, and use the syringe to fill the gap only between the edge of the honeycomb and the redwood core. Allow to dry overnight.
 The next day, run the half completed top through your drum sander to plane and level the core to your desired thickness. The total thickness of the finished top should be the same as you prefer for a solid top.
 Once the desired thickness is reached, carefully go over the Nomex side with an orbital sander to make sure there is no fuzz left by the thickness sanding belt. Be sure to blow or vacuum all dust out of the honeycomb.
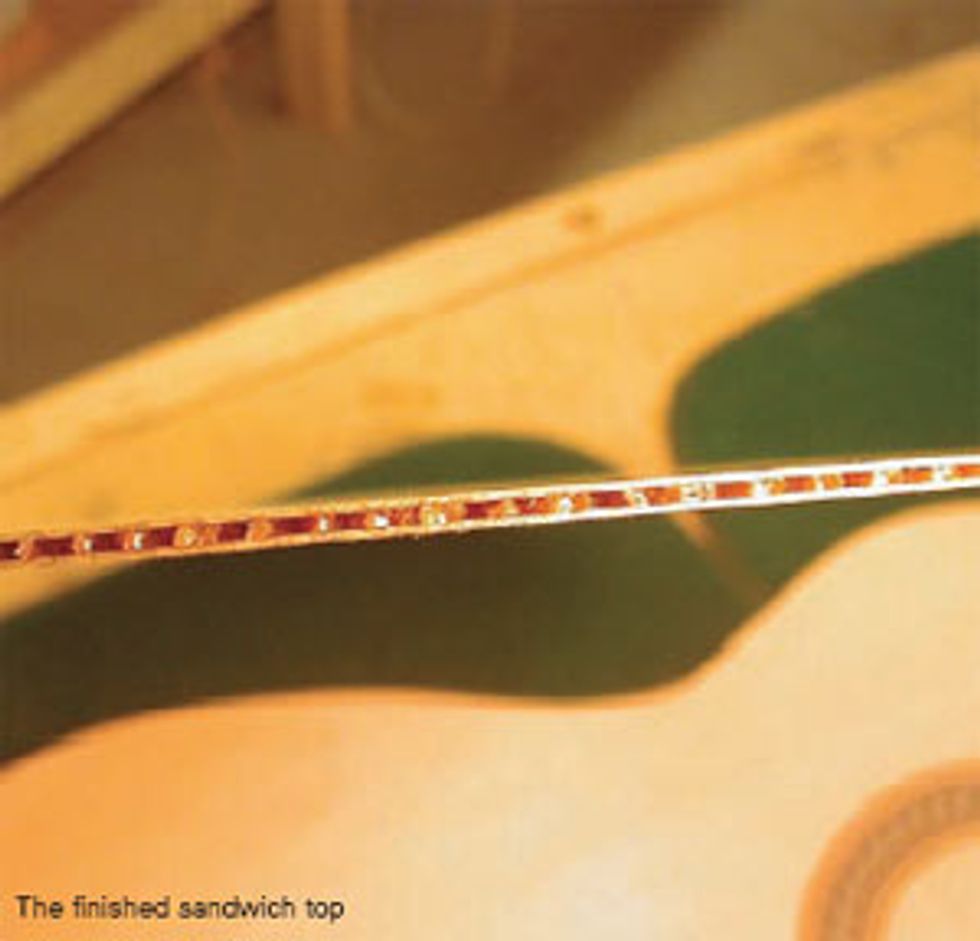
Take your inside skin, and apply as you did with the inner core, spreading a thin film of glue on the inside surface using your roller. Again, use only enough glue so that the surface just appears to be wet – approximately six grams of glue. Glue can be drawn from areas that appear to be wetter to dryer areas using the roller. You can use pieces of blue masking tape to secure the skin and the core together. After another 90 minutes in the vacuum press, you have a finished top. Don’t try to flex it just yet, but it can be tapped for tone. Allow another hour for it to dry before flexing. It will continue to stiffen for another 24 hours.
Finishing Up
Since the Nomex adds so much strength to the top, it can be braced significantly lighter for far freer vibration. The sandwich top is joined to the body just like any other guitar, and the binding and perfling can be applied just like on a solid top. John does a satin French polish to keep the finish as light as possible, in keeping with the ultra-light bracing.
 It seems like a lot of extra work and trouble; however, the added strength, stability, volume and sustain that these tops give a guitar is more than worth the effort. The beauty of the finished product is uncompromised and the tone is dramatically improved. The steel string makers who are adopting the sandwich top have had even more dramatic results. I played a dreadnaught made by guitar maker Curtis Paul for several days after it was made and was stunned by the clarity of the harmonics through the spectrum and by the additional tones it brought out. It usually takes a top several months to achieve maturity like that, but for this guitar it was literally hours – I am told that now after several years it is even richer. To my ear, the sound shimmered and soared like no guitar I’d ever heard, and it seemed remarkably stable through Iowa’s wild weather changes, too – always a plus for touring musicians.
 John left one of his guitars at my house for me to work with and get a feel for as I wrote this article. Since I am used to a typical steel string neck, he brought along a custom model with a narrower and more familiar feeling neck. Having it around has been a remarkable experience, and has made me even more fascinated by John Dick’s innovations. I constantly find myself playing complex chords just to listen to them ring; they sustain almost as long as with my finest steel string and are every bit as loud. This guitar responds to the player’s input much more intimately than most steel string guitars, especially to subtle vibrato. It’s a powerful and beautiful addition to the rich palette of guitar traditions.
| Hear the sandwich top guitar in action! "Blues for Felix" by Charlie Byrd performed by John Dowdall on a 2001 John Dick double top, cedar top guitar. Flash is Required to hear this track An original song from songwriter Rick McCarty played on a John Dick sandwich top. Flash is Required to hear this track Pat Smith, a guitarist/arranger hailing from Evanston, Illinois, plays a jazzy track with the sandwich top guitar. Flash is Required to hear this track |


