Build a mat that switches your mic on and off when you step on it.
Enough theory for a while, letās go build something! I always had a problem on stage because I didnāt have enough hands to play guitar and flip mic-muting switches, too. A microphone that sensed when I stepped up to it and activated it wouldāve been perfect for me. I finally came up with an add-on that does exactly that.
This is based on burglar-alarm pressure mats: plastic mats with built-in switches that connect when you step on them. All you need to do is put the mat in front of the mic stand and wire up your microphone so that stepping on the mat un-mutes the mic and stepping off the mat mutes it. There is a minor problem in that the mat switches are open when you step off and closed when you step on them. If we used the mat switch directly, the mic would mute when we stepped on it. So we need to make the mat control a switch that works the opposite directionāon when the mat switch is off.
We also need a switch that will not impair sound quality by adding noise, distortion or hum. Relays might work fine, but they eat a lot of power, too much for such a simple device. Luckily, there is a suitable solid-state device: the Fairchild H11F1M. This LED-to-PhotoFET optical switch is almost ideal, having no effect on the audio when itās open, and muting the signal when itās closed so that any non-ideal characteristics cannot come through. 
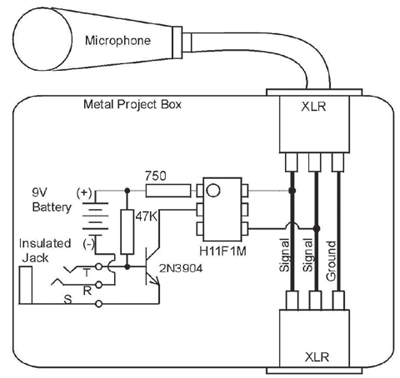
This is the kind of project that is most useful to an experienced hardware hacker, so Iām not going to provide āsolder wire C to contact 5ā kind of instructions. You advanced hackers wonāt need details except where to find an H11F1M. If you look at the schematic diagram, youāll see how to hook it up. The box is primarily a pass-through box for your mic cable, and probably ought to sit right at the base of the mic stand. Ground the box to the signal ground on the mic cables.
Use an insulated 1/4ā phone jack for the switch mat to plug into so that it cannot induce clicks and pops in the signal lines.
A 1/4ā phone plug from the normally-open switch mat comes into the box at the jack, where the sleeve of the mono plug connects the battery to the rest of the circuit, saving battery life when the plug is not there. The battery provides 9V to a 47K resistor to the base of the 2N3904 transistor. The transistor is therefore fully on whenever the switch mat is open. When you step on the switch mat, it shunts the base current away from the transistor and the transistor turns off.
The battery also provides current through the 750 ohm resistor to the anode of the LED in the H11F1M. The cathode of the LED is tied to the collector of the transistor, so when the transistor is on, the LED emits light and causes a low resistance between pins 4 and 6 of the H11F1M. The H11F1M then shunts the two signal lines together, effectively muting the mic whenever the LED current is on. When you step on the mat, the mat turns off the transistor and LED, letting the signal lines pass signal freely.
This is probably best built on a 1āx1ā bit of perfboard. Itās too simple to design up a PCB for, unless youāre making thousands of them. The resistors can be 1/4W or 1/2W, or even 5W if you want. Carbon composition mojo resistors will make absolutely no difference whatsoever here.
Iāve shown the setup for low impedance balanced mics. If you use high impedance unbalanced mics, wire the H11F1M to shunt the signal to ground. The connectors will be different, of course, to match the mic cables. Some low impedance mics will have a hot enough signal to bleed through even when the circuit is trying to mute them; however, they should have a very much reduced signal level even if theyāre not fully muted.
Suitable pressure switches are available in most large cities from suppliers of burglar-alarm equipment. If you canāt find them where you live, here are some web addresses for suppliers of suitable mats.
https://www.spytown.com/usp-usppressure-mats.html
https://www.alarmsuperstore.com/contacts/uspcomplete.htm
https://www.trossenrobotics.com/store/p/3508-Switch-Floor-Mat-14-x-30-.aspx
https://supersoda.com/detail.php?id=00000000036 (Make your own switch mat)
https://www.switchmat.com/OperatorControlMats.aspx
https://www.electronicplus.com/content/ProductPage.asp?maincat=SW&subcat=sfm
Hereās the H11F1 datasheet online:
https://www.fairchildsemi.com/ds/H1/H11F2M.pdf
There are actually three parts that may be used interchangeably in this circuit: the H11F1M, H11F2M, and H11F3M. They differ in certain specifications, which donāt matter for this application. As of this writing, Mouser Electronics has the H11F1M for $1.88, the H11F2M for $2.00 and the H11F3M for $1.75.
Once you get used to stepping away from the mic to mute, I think youāll find itās really handy!
R.G. Keen
Cheif Engineer
Visual Sound
www.visualsound.net
Framus Hootenanny Re-Issue Guitars: John Lennonās Favorite Reimagined | PG Plays
Join PG contributor Tom Butwin as he explores all-new versions of the Framus Hootenanny 12-string and 6-string acousticsāmade famous by John Lennon and now available with modern upgrades. From vintage-inspired tone to unique features, these guitars are built to spark creativity.
Neil Youngās ā70s hits are some of the most recognizable radio rock jams of all time. But Neilās guitar playing continued to grow over the ensuing decades, as he traversed styles from blues to country to electronic to rockabilly and beyond, eventually developing one of the most tonally decadent, fully formed improvisational voices in the entire guitar universe.
Like any discography thatās been growing over the course of more than half a century, it can be hard to decode Youngās work. And with such an adventurous spirit, it could be easy to make some missteps and miss out on his best guitar works. In this episode, Nick guides Jason through some of his heroās finest moments.
More news from Neil always seems to be on the horizon, so hereās your chance to catch up.
This episode is sponsored by Gibson.
This Japan-made Guyatone brings back memories of hitchinā rides around the U.S.
This oddball vintage Guyatone has a streak of Jack Kerouacās adventurous, thumbing spirit.
The other day, I saw something I hadnāt noticed in quite some time. Driving home from work, I saw an interesting-looking fellow hitchhiking. When I was a kid, āhitchersā seemed much more common, but, then again, the world didnāt seem as dangerous as today. Heck, I can remember hitching to my uncleās cabin in Bradford, Pennsylvaniaāhome of Zippo lightersāand riding almost 200 miles while I sat in a spare tire in the open bed of a pickup truck! Yes, safety wasnāt a big concern for kids back in the day.
So, as Iām prone to do, I started digging around hitchhiking culture and stories. Surprisingly, there are organized groups that embrace the hitching life, but the practice remains on the fringe in the U.S. Back in the 1950s, writer Jack Kerouac wrote the novel On the Road, which celebrated hitchhiking and exposed readers to the thrill of maverick travel. Heck, even Mike Dugan (the guitarist in all my videos) hitched his way to California in the 1960s. But seeing that fellow on the side of the road also sparked another image in my brain: Yep, it always comes back to guitars.
Let me present to you a guitar thatās ready to go hitching: the Guyatone LG-180T, hailing from 1966. The āthumbs-upā headstock and the big āthumbā on the upper bout always made me think of thumbing a ride, and I bought and sold this guitar so long ago that I had forgotten about it, until I saw that hitchhiking dude. Guyatone was an interesting Japanese company because they were primarily an electronics company, and most of their guitars had their wooden parts produced by other factories. In the case of the LG-180T, the bodies were made by Yamaha in Hamamatsu, Japan. At that time, Yamaha was arguably making the finest Japanese guitars, and the wood on this Guyatone model is outstanding. We donāt often see Guyatone-branded guitars here in the U.S., but a lot of players recognize the early ā60s label Kentāa brand name used by an American importer for Guyatone guitars.
With a bit of imagination, the LG-180Tās āthumbs upā headstock seems to be looking for a roadside ride.
Kent guitars were extremely popular from the early ā60s until around 1966. The U.S. importer B&J fed the American need for electric guitars with several nice Kent models, but when the Guyatone contract ended, so did most of the Kent guitars. After that, Guyatone primarily sold guitars in Japan, so this example is a rare model in the U.S.
āUnless you are a master at guitar setups, this would be a difficult player.ā
This headstock is either the ugliest or the coolest of the Guyatone designs. I canāt decide which. I will say, no other Japanese guitar company ever put out anything like this. You have to give the Guyatone designers a thumbs up for trying to stand out in the crowd! Guyatone decided to forgo an adjustable truss rod in this model, opting instead for a light alloy non-adjustable core to reinforce the neck. Speaking of the neck, this instrument features the most odd-feeling neck. Itās very thin but has a deep shoulder (if that makes any sense). Totally strange!
Another strange feature is the bridge, which offers very little adjustment because of the three large saddles, which sort of rock back and forth with the tremolo. Itās a shame because these pickups sound great! Theyāre very crisp and have plenty of zing, but unless you are a master at guitar set-ups, this would be a difficult player.
This could be why the LG-180T only appeared in the 1966 and 1967 catalogs. After that, it disappeared along with all the other Yamaha-made Guyatone electrics. By 1969, Guyatone had gone bankrupt for the first time, and thus ended guitar production for a few decades. At least we were blessed with some wacky guitar designs we can marvel at while remembering the days when you could play in the back end of an explosive 1973 AMC Gremlin while your mom raced around town. Two thumbs up for surviving our childhoods! PG
There's a lot of musical gold inside the scales.
Intermediate
Intermediate
ā¢ Develop a deeper improvisational vocabulary.
ā¢ Combine pentatonic scales to create new colors.
ā¢ Understand the beauty of diatonic harmony.Improvising over one chord for long stretches of time can be a musician's best friend or worst nightmare. With no harmonic variation, we are left to generate interest through our lines, phrasing, and creativity. When I started learning to improvise, a minor 7 chord and a Dorian mode were the only sounds that I wanted to hear at the time. I found it tremendously helpful to have the harmony stay in one spot while I mined for new ideas to play. Playing over a static chord was crucial in developing my sense of time and phrasing.
The following is the first improvisational device I ever came across. I want to say I got it from a Frank Gambale book. The idea is that there are three minor pentatonic scales "hiding" in any given major scale. If we're in the key of C (CāDāEāFāGāAāB) we can pluck out the D, E, and A minor pentatonic scales. If we frame them over a Dm7 chord, they give us different five-note combinations of the D Dorian mode. In short, we are building minor pentatonic scales off the 2, 3, and 6 of the C major scale.
Viewing this through the lens of D minor (a sibling of C major and the tonal center for this lesson), D minor pentatonic gives us the 1āb3ā4ā5āb7, E minor pentatonic gives us 2ā4ā5ā6ā1, and A minor pentatonic gives us 5āb7ā1ā2ā4. This means you can use your favorite pentatonic licks in three different locations and there are three different sounds we can tap into from the same structure.
If you smashed all of them together, you would get the D Dorian scale (DāEĀĀāFāGāAāBāC) with notes in common between the D, E, and A minor pentatonic scales. Ex. 1 uses all three scales, so you can hear the different colors each one creates over the chord.
Ex. 1
Ex. 2 is how I improvise with them, usually weaving in and out using different positional shapes.
Ex. 2
The next idea is one I stole from a guitarist who often came into a music store I worked at. On the surface, it's very easy: Just take two triads (in our example it will be Dm and C) and ping-pong between them. The D minor triad (DāFāA) gives us 1āb3ā5, which is very much rooted in the chord, and the C major triad (CāEāG) gives us the b7ā9ā4, which is much floatier. Also, if you smash these two triads together, you get 1ā2āb3ā4ā5āb7, which is a minor pentatonic scale with an added 2 (or 9). Eric Johnson uses this sound all the time. Ex. 3 is the lick I stole years ago.
Ex. 3
Ex. 4 is how I would improvise with this concept. Many different fingerings work with these, so experiment until you find a layout that's comfortable for your own playing.
Ex. 4
If two triads work, why not seven? This next approach will take all the triads in the key of C (CāDmāEmāFāGāAmāBdim) and use them over a Dm7 chord (Ex. 5). Each triad highlights different three-note combinations from the Dorian scale, and all of them sound different. Triads are clear structures that sound strong to our ears, and they can generate nice linear interest when played over one chord. Once again, all of this is 100% inside the scale. Ex. 5 is how each triad sounds over the track, and Ex. 6 is my attempt to improvise with them.
Ex. 5
Ex. 6
If we could find all these possibilities with triads, it's logical to make the structure a little bigger and take a similar approach with 7 chords, or in this case, arpeggios. Naturally, all the diatonic chords will work, but I'll limit this next idea to just Dm7, Fmaj7, Am7, and Cmaj7. I love this approach because as you move further away from the Dm7 shape, each new structure takes out a chord tone and replaces it with an extension. I notice that I usually come up with different lines when I'm thinking about different chord shapes, and this approach is a decent way to facilitate that. Ex. 7 is a good way to get these under your fingers. Just ascend one shape, shift into the next shape on the highest string, then descend and shift to the next on the lowest string.
Ex. 7
Ex. 8 is my improvisation using all four shapes and sounds, but I lean pretty heavily on the Am7.
Ex. 8
This last concept has kept me busy on the fretboard for the last five years or so. Check it out: You can take any idea that works over Dm7 and move the other diatonic chords. The result is six variations of your original lick. In Ex. 9 I play a line that is 4ā1āb3Āā5 over Dm7 and then walk it through the other chords in the key. These notes are still in the key of C, but it sounds drastically different from playing a scale.
Ex. 9
In Ex. 10, I try to think about the shapes from the previous example, but I break up the note order in a random but fun way. The ending line is random but felt good, so I left it in.
Ex. 10
While all these concepts have been presented over a minor chord, you can just as easily apply them to any chord quality, and they work just as well in harmonic or melodic minor. Rewarding sounds are available right inside the harmony, and I am still discovering new ideas through these concepts after many years.
Though the above ideas won't necessarily be appropriate for every style or situation, they will work in quite a few. Developing any approach to the point that it becomes a natural extension of your playing takes considerable work and patience, so just enjoy the process, experiment, and let your ear guide you to the sounds you like. Even over just one chord, there is always something new to find.