 Last month we created our headstock angle and installed our truss rod. This month, we will get the fretboard and headstock veneer glued in place.
 With set necks or neck-through designs, a back bowed neck with no room for adjustment can be one of the biggest headaches you’ll face. This is why many companies use a two-way or bi-flex truss rod, which allows for adjustment in both directions. Different rods come with different installation methods and design principles, which will alter your final tone, as well as how the neck reacts under tension. I personally love the tone of a single-piece, one bar rod, but this is the rod that has the most problems if your neck were to back bow under normal installation methods. To combat this, I build relief into my necks – roughly .030” at the center of the neck.
The Concept
I like to keep the neck relaxed and free of clamping stress during all machining operations. With many Fender-type necks (rosewood/ maple, for example) the fretboard thickness commonly tapers from fat at the nut area to thin at the 21st fret area – this isn’t a problem, as the board is actually maintaining a constant thickness at center. If you prefer a consistent fretboard thickness at the fret edge, the center of the fretboard would require a taper, being thickest at the 21st fret and thin at the nut to maintain a thickness of 3/16” at the fret edge.
I tackle this using a 1/2” end mill, machining a taper and an arc with .030” relief into our neck blank. This also cuts our truss rod fillet flush with the neck and gets us ready to glue the fretboard on. In my approach, the cutter machines a slight recess into our blank where the fretboard is to be placed. This aids in keeping the fretboard in the general area I want it – you could also shoot a short staple somewhere under the fretboard and cut the head off slightly proud of the surface to keep it from sliding around while clamping.
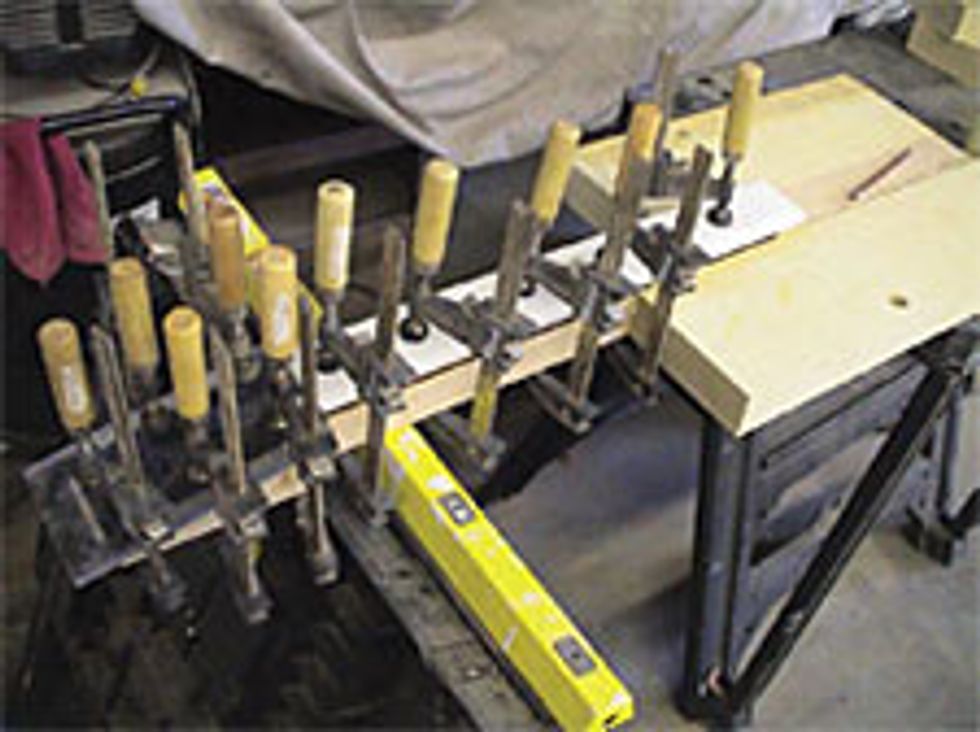
Gluing
We are now ready to glue on our fretboard. I order my boards from Luthiers Mercantile (lmii.com); your boards will come in surface sanded and well dried, ready for immediate use. For some, there are a few things that will need to be decided now – are you going to slot the fretboard before or after it’s glued into place? It may be easier to buy pre-slotted, pre-radiused fretboards or you can do it yourself with a table saw or radial arm saw and a few jigs.
If you do decide to do the slotting yourself, slotting on a table saw using two miter gauges and a long board to link them together can create a rigid miter to keep frets slots tight. Luthiers Mercantile sells fret slotting blades and templates that can be screwed or taped to the back side of your neck or board. The templates have a slot where you mount a pin of matching size into your miter gauge fence – do that and you’re in business.
For fretboards, I like to use Delrin or nylon for a gluing cawl; nothing sticks to them and they flex easily to adapt to your wood, versus forcing your wood into another shape. Long fretboard-size strips about 1/2” thick help spread the gluing pressure evenly along the neck, with the help of five bar clamps. For headstock veneers, I like to use 1/2” thick Lexan as a gluing cawl, which provides me with a clear window to see any alignment issues. I also cheat and bust out a staple gun, shooting staples into two corners of the headstock veneer to keep it from sliding during gluing. Place five bar clamps on the headstock and your veneer is ready to roll.
That’s it until our glue dries. We’ll see you next month.
Gene Baker
Any questions or comments visit
www.finetunedinstruments.com
www.meangene.org
email me at b3gene@verizon.net
Fine Tuned Instruments LLC, home of his “b3” instruments.