
We've got another chance to WIN form Revv Amplification! Enter below to win a G3.
Revv G3 - Preamp/Overdrive/Distortion Pedal
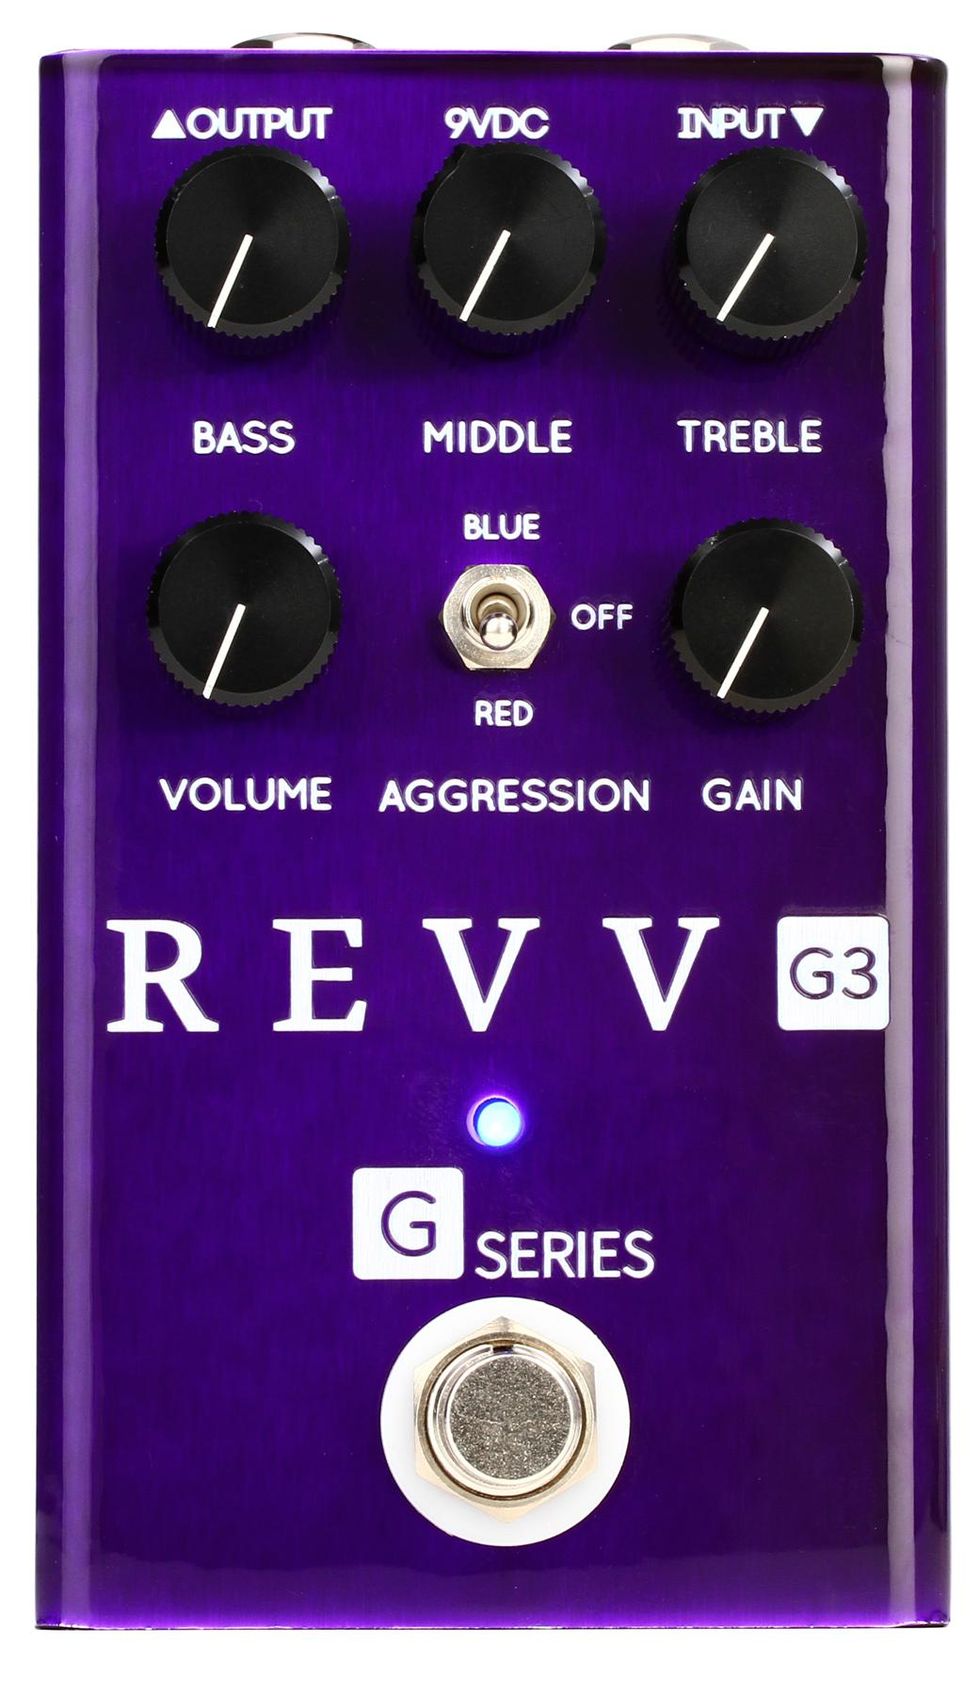
The Revv G3 distortion pedal with voicing based on Revv Amplification’s “Purple Channel” from Generator series of amplifiers. Clear, sustaining, amp-like tones under your foot.
Cut the cord! PG contributor Tom Butwin goes hands-on with three compact wireless guitar systems from Positive Grid, NUX, and Blackstar. From couch jams to club gigs, find the right unit for your rig and playing style.
Positive Grid Spark LINK Guitar Wireless System
Enjoy a stable, noiseless experience with a compact wireless unit design, ultra-low latency, and an extended range. Other features include 6 hours of playing time per charge and a secure 110-degree hinged input plug connection.
NUX B-8 Professional Wireless System - 2.4GHz
A pedal-style professional wireless system geared for electric guitars, acoustic-electric guitars, bass guitars, and even electronic instruments, and transmits 24-bit 48 kHz high-quality audio.
Blackstar Airwire i58 Wireless System
This professional wireless instrument system is designed for guitars, basses, and other instruments with 1/4" outputs. Operating in the 5.8 GHz frequency band, it avoids interference from crowded Wi-Fi signals while delivering authentic tone, ultra-low latency (<6 ms), and high-resolution sound with no treble loss.
Learn More:
https://www.positivegrid.com/
https://www.nuxaudio.com/home.html
https://blackstaramps.com/
The typical controls on a compressor can be confusing and often misunderstood. At the heart of the MXR Studio Compressor is the ratio control, which offers up four levels of squish.
Compression might be the most misunderstood effect on your board—until now.
I was recently listening to three accomplished guitar players discuss the how, when, and where to use compressors in their guitar rigs. All three players had wildly different views on all aspects of compressordom, from where they should be used in a signal chain to whether they are even worth the hardware that holds them together.
Their conversation made me reflect on compressors more generally, and their standing as probably the least understood guitar pedal effect. There is a long-running joke about the guitar player who spends 30 minutes dialing in his compressor before the sudden realization that, for all the knob twisting, the pedal itself has never turned on. Most players have put on the compressor dunce cap for at least 30 seconds—if not 30 minutes.
When compared to effects like distortion and delay, compression can be as esoteric, nuanced, and arcane as a clandestine funk-guitar society’s secret handshake. In my experience, a large swath of guitar players cannot even detect compression until they are sonically beaten over the head with it. And of those who can discern the bludgeoning, many don’t know which knob to turn to achieve a more subtle effect. We guitar players should have known we were in trouble when many professional compressors came with buttons labeled “auto.” If even our know-it-all, front-of-house cousins need a crutch, what hope do we have?
Compression originated in the recording studio, where professional engineers were both its inventors and primary users, so its controls tend to be more technical than your amp’s bass, middle, and treble knobs. Let’s break down some controls in the simplest terms possible.
Introduced in 1972, the Dyna Comp had two simple controls: output and sensitivity. It’s far from transparent, but added a musical coloration that made fans out of Bonnie Raitt and Lowell George.
Threshold: This setting determines what gets squished and what doesn’t. Everything below the threshold passes through unchanged. Everything above the threshold gets squished. This is often labeled “sustain” on many guitar pedals. Sometimes, as the sustain is turned up, the compressor’s threshold point goes down, lowering the bar for what gets compressed, and more effect gets applied to your dry signal.
Ratio: How much compression is applied to signals above the threshold. A 1:1 ratio would mean no compression. At 2:1, for every 2 dB over the threshold, the compressor will only let 1 dB through. Some classic compressors have a ratio around 30:1. This means that above the threshold, you can increase the input signal significantly but receive only a small increase in output. Boom, you’re chickin’ pickin’.
Attack: This adjusts how fast it takes the compressor to get to work. A shorter attack means the clamping action happens immediately, while a longer attack time lets a brief burst of signal through before they start applying the aforementioned compression ratio.
Release: After the signal drops below the threshold, the compressor takes a certain amount of time to stop compressing or release. A longer release lazily hangs on and stops compressing when it gets around to it. Shorter releases get out of the way faster, and the next transient can get through uncompressed before being re-attacked.
Makeup Gain (or Output Level): The compression process naturally limits gain. To match the energy level of your uncompressed signal, you may need to boost the compressor’s output. Compression evens out the peaks, and makeup gain can compensate for any perceived differences in level.
Threshold and ratio are the heart of the compressor’s function. Threshold decides what gets compressed and ratio determines how much it’s compressed. Attack and release are about how fast compression is applied and how quickly it stops being applied. By controlling these, you are controlling how quickly transients are attacked and how slowly transients are released. Every guitar compressor has an attack and release time, but many designs hide these controls via internal, fixed component values. The designer has benevolently dictated what setting you should use. Output level lets you make up for all that crushing by adding level to compensate.
This is just the beginning of compression. We’ve got the knobs, we know the function, and next time we’ll discuss how we can use this dynamic darling
The least exciting piece of your rig can impact your tone in a big way. Here’s what you need to know.
Hello, and welcome back to Mod Garage. This month, we will have a closer look at an often overlooked part of our guitar signal chain: the guitar cable. We’ll work out what really counts and how your cable’s tonal imprint differs from your guitar’s tone-control function.
Today, the choice of guitar cables is better than it’s ever been, and you can choose between countless options regarding color, stability, plug style, length, diameter, bending strength, shielding, etc. A lot of companies offer high-quality cables in any imaginable configuration, and there are also cables promising special advantages for specific instruments or music styles, from rock to blues to jazz.
Appearance, stability, longevity, bending stiffness, and plug configuration are matters of personal preference, and every guitarist has their own philosophy here, which I think is a great thing. While one player likes standard black soft cables with two straight plugs, their buddy prefers red cables that are stiff as hell with two angled plugs, and another friend swears by see-through coiled cables with golden plugs.
“We often want to come as close as possible to sounding like our personal heroes, but we fail because we’re using the wrong cable for a passive guitar.”
Regarding reliability, all these parameters are important. Who wants a guitar cable making problems every time you are on stage or in the studio? There are also technical parameters like resistance, capacitance, transfer resistance on the plugs, and more. Without making it too technical, we can summarize that, sound-wise, the only important technical parameter for a passive guitar circuit is the capacitance of the cable. Sadly, this information is often missing in the manufacturer’s description of a guitar cable, and there’s another thing we have to keep in mind: Most manufacturers try to offer cables with the smallest possible capacitance so the guitar can be heard “unaltered” and with a “pure” tone. While these are honourable intentions, they are self-defeating when it comes to making a guitar sound right.
Let’s take a trip back to the past and see what cables players used. Until the early 1980s, no one really cared about guitar cables—players simply used whatever was available. In the ’60s and ’70s, you could see a lot of ultra-long coiled cables on stage with players like Clapton, Hendrix, May, Townshend, Santana, and Knopfler, to name just a few. They used whatever was available, plugged in, and played without thinking about it. Ritchie Blackmore, for example, was famous for notoriously using incredibly long cables on stage so he could walk around. Joe Walsh and many other famous players did the same. Many of us have these players’ trademark sounds in our heads, and we often want to come as close as possible to sounding like our personal heroes, but we fail because we’re using the wrong cable for a passive guitar. So what are we talking about, technically?
It’s important not to look at the guitar cable, with its electrical parameters, as a stand-alone device. The guitar cable has to be seen as part of the passive signal chain together with the pickups, the resistance of the guitar’s pots (usually 250k or 500k), the capacitance of the wires inside the guitar, and, of course, the input impedance of the amp, which is usually 1M. The interaction of all these in a passive system results in the resonance frequency of your pickups. If you change one of the parameters, you are also changing the resonance frequency.
”Ritchie Blackmore, for example, was famous for notoriously using incredibly long cables on stage so he could walk around.“
You all know the basic formulation: The longer the cable, the warmer the tone, with “warmer” meaning less high-end frequencies. While this is true, in a few moments you will see that this is only half the truth. Modern guitar cables are sporting a capacitance of around 100 pF each meter, which is very low and allows for long cable runs without killing all the top end. Some ultra-low-capacitance cables even measure down to only 60 pF each meter or less.
Now let’s have a look at guitar cables of the past. Here, capacitances of up to 400 pF or more each meter were the standard, especially on the famous coiled cables. See the difference? No wonder it’s hard to nail an old-school sound from the past, or that sometimes guitars sound too trebly (especially Telecasters), with our modern guitar cables. This logic only applies to our standard passive guitar circuits, like those in our Strats, Teles, Les Pauls, SGs, and most other iconic guitar models. Active guitars are a completely different ballpark. With a guitar cable, you can fine-tune your tone, and tame a shrill-sounding guitar.
“No problem,” some will say. “I simply use my passive tone control to compensate, and that’s it. Come on, capacitance is capacitance!” While this logic seems solid, in reality this reaction produces a different tone. “Why is this?” you will ask. Thankfully, it’s simple to explain. You might be familiar with the typical diagrams showing a coordinate system with "Gain/dB" on the Y-axis and "Frequency/kHz" on the X-axis. Additional cable capacitance will shift the resonance frequency on the X-axis, with possible differences of more than one octave depending on the cable. A cable with a higher capacitance will shift the resonance frequency towards the left and vice versa.
Diagram courtesy Professor Manfred Zollner (https://www.gitarrenphysik.de)
Now let’s see what happens if you use your standard passive tone control. If you close the tone control, the resonance frequency will be shifted downwards mostly on the Y-axis, losing the resonance peak, which means the high frequencies are gone. This is a completely different effect compared to the additional cable capacitance.
Diagram courtesy Professor Manfred Zollner (https://www.gitarrenphysik.de)
To summarize, we can say that with different cable capacitances, you can mimic a lot of different pickups by simply shifting the resonance frequency on the X-axis. This is something our passive tone control can’t do, and that’s exactly the difference you will have to keep in mind.
So, let’s see what can be done and where you can add additional cable capacitance to your system to simulate longer guitar cables.
1. On the cable itself
2. Inside the guitar
3. Externally
In next month’s follow-up to this column, we will talk about different capacitances and how you can add them to your signal chain with some easy-to-moderate modding, so stay tuned!
Until then ... keep on modding!
Do you overuse vibrato? Could you survive without it?
Vibrato is a powerful tool, but it should be used intentionally. Different players have different styles—B.B. King’s shake, Clapton’s subtle touch—but the key is control. Tom Butwin suggests a few exercises to build awareness, tone, and touch.
The goal? Find a balance—don’t overdo it, but don’t avoid it completely. Try it out and see how it changes your playing!