Chops: Intermediate
Theory: Intermediate
Lesson Overview:
• Learn how to incorporate non-chord tones into your solos.
• Build scales using overlapping triad shapes.
• Understand major and minor triad shapes on the top four strings.
Click here to download a printable PDF of this lesson's notation.
In my last lesson [“Using Triads to Create A Solo,” July 2013], you learned how to construct a solo using only chord tones. If you've mastered the art of developing creative ideas within those strict guidelines, you’re ready for this lesson, which expands upon those ideas by incorporating non-chord tones.
The use of non-chord tones can be both freeing and overwhelming. There are 12 notes in the chromatic scale, and only three belong to any given triad. That leaves nine notes, the non-chord tones, to create dissonance against the existing chord! A great improviser understands how to use dissonance to create tension and release in solos, ultimately resolving on choice chord tones.
Triad Shapes
Let's review the root position, 1st inversion, and 2nd inversion shapes of the major and minor triads on the top four strings, as explored in the last
lesson.
Fig. 1 and Fig. 2 show the major triad shapes.
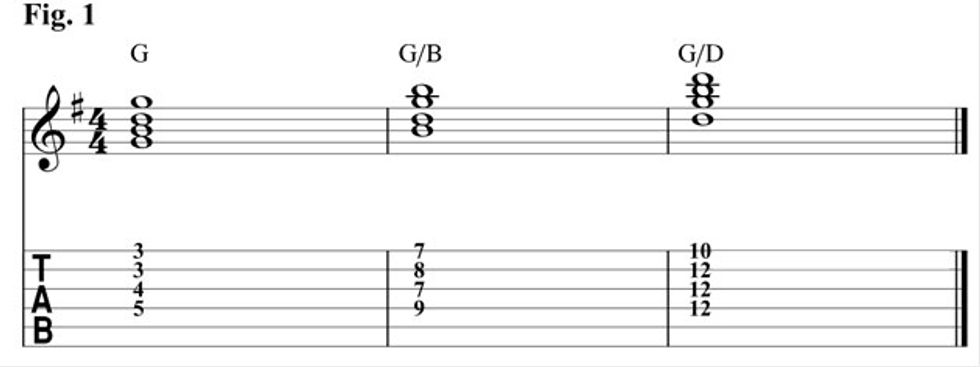
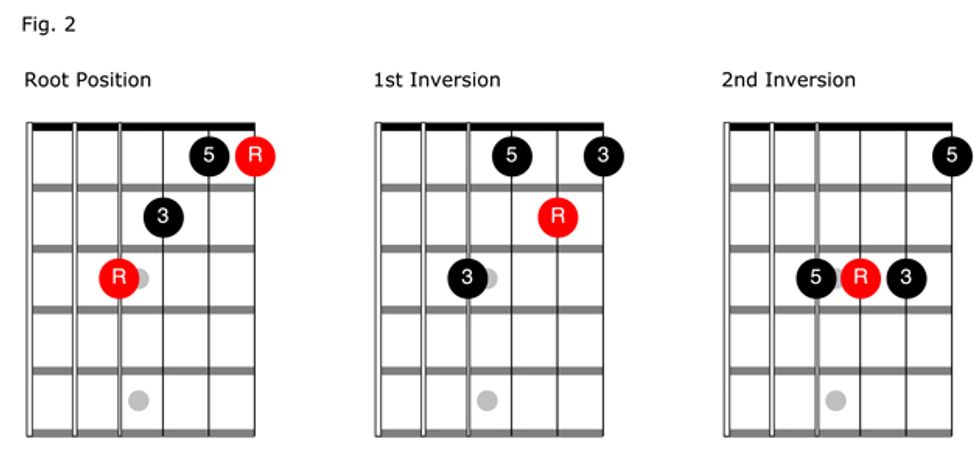
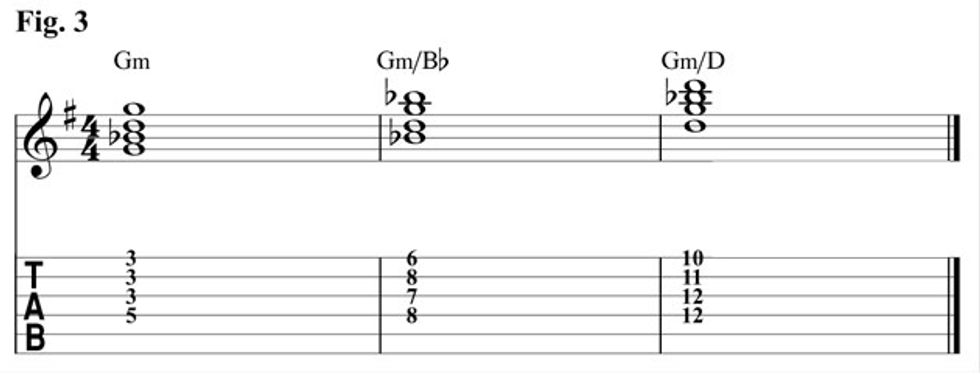
Fig. 3 and Fig. 4 show the minor triad shapes.
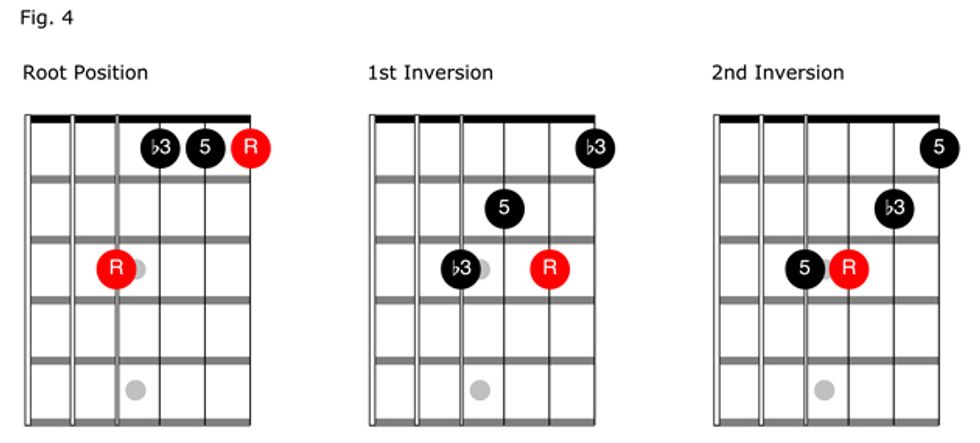
As you play these triad inversions up the neck, notice all the fretboard real estate you’re passing over. This is where the non-chord tones live.
Identifying Non-Chord Tones
Non-chord tones are categorized by how they interact with the existing harmony. Let’s play through a few simple examples.
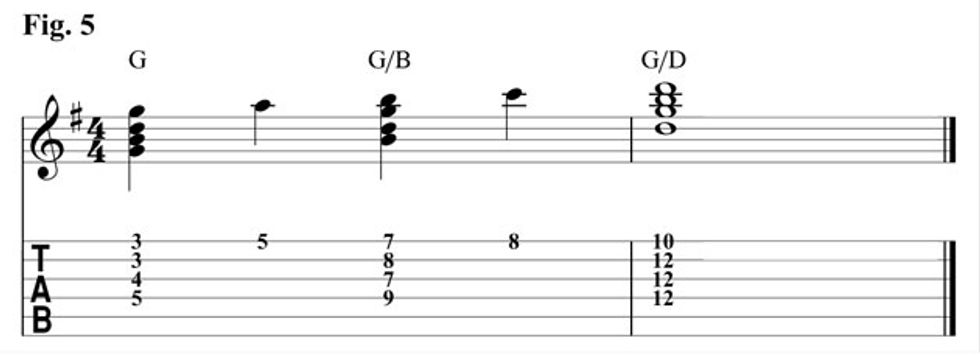
Passing tones are stepping-stones from one chord tone to another, moving in one direction. This can be as simple as a scale. In Fig. 5, we use passing tones to connect the three major triad shapes.
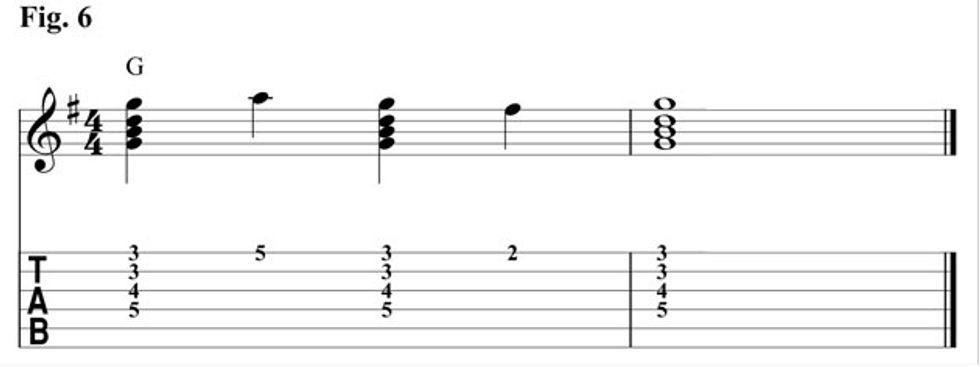
Neighbor tones step away from the harmony before retuning to it, as demonstrated in Fig. 6.
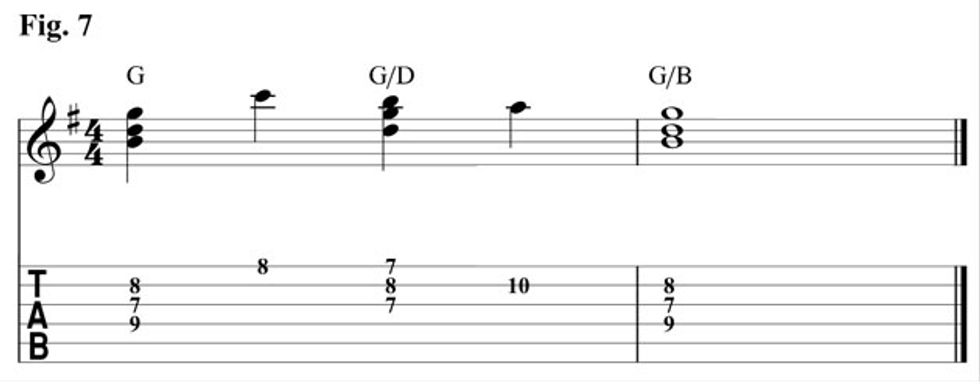
Appoggiaturas are similar to neighbor tones, but their first move is a larger interval. In Fig. 7 the first non-chord tone is an appoggiatura, and the second is a passing tone.
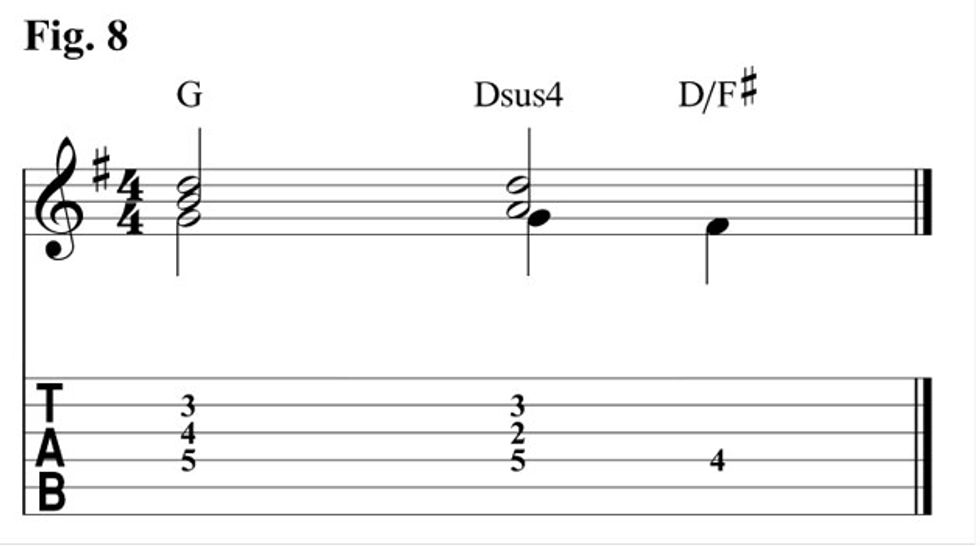
Suspensions are created when a note delays its resolution during a chord change. For example, in Fig. 8 the chord changes from G to D on beat three, but the G hangs around until beat four, briefly creating a suspension.
There are other names for non-chord tones, but they are basically variations on the four mentioned here. The names are not that important—composers have been doing this for centuries, and the names were applied much later—but what is important is that you learn how non-chord tones sound and how to resolve them to chord tones.
Triad Shapes + Non-Chord Tones = Scales
Now let's have some fun by combining triad shapes with non-chord tones and learning how they fit together to make scales.
We’re going to work with the same chord progression from our previous lesson: I-V-VIm-IV in G major. Fig. 9, taken from the last lesson, demonstrates how to play the progression in three different places on the fretboard using smooth voice leading.

This time, however, you won’t be restricted to playing chord tones exclusively. Any of the notes from all four triads are allowed. To make this work, you have to know how to resolve to them from the non-chord tones.
Let’s break that idea down into an example. Look back at the first four measures of Fig. 9. Now imagine the four triad shapes overlaying each other on your fretboard. Some of the notes overlap while others are exclusive to just one chord.
If we write these notes out like a scale, we get Fig. 10.

Let’s add one more note at the top and bottom of that scale so we cover all the notes in a G major scale in 2nd position on the top four strings ( Fig. 11).
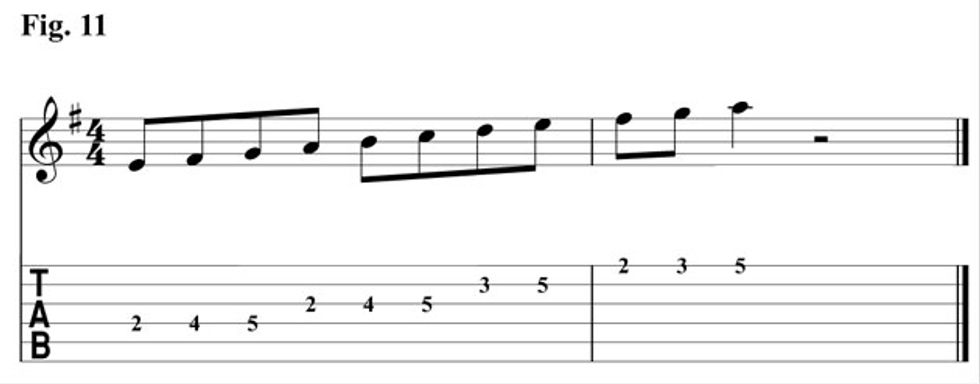
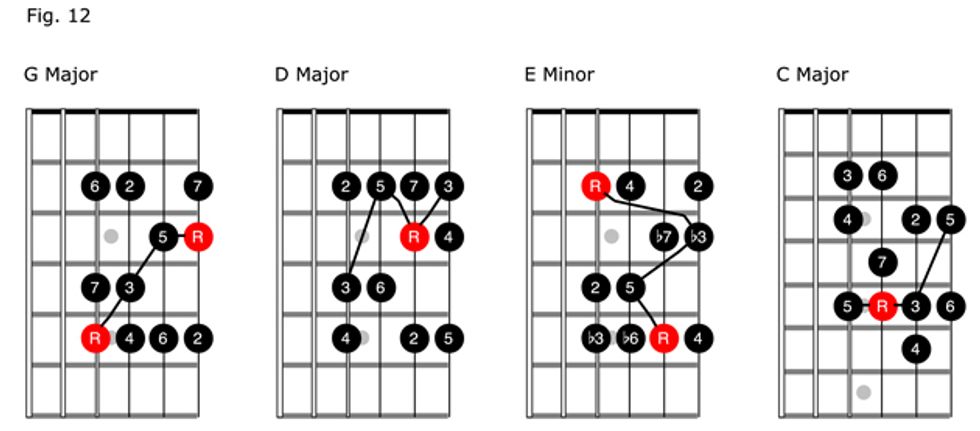
Fig. 12 shows four diagrams using the scale above, but with a black line connecting the chord tones for each chord in the progression. The other notes are your non-chord tones. Notice the chord tones that are shared from one chord to the next. Other chord tones become non-chord tones as the chord changes.
Resolving Non-Chord Tones
Now let’s examine only the G chord (the first fret diagram above) and play a few exercises to get a feel for how non-chord tones resolve to chord tones.
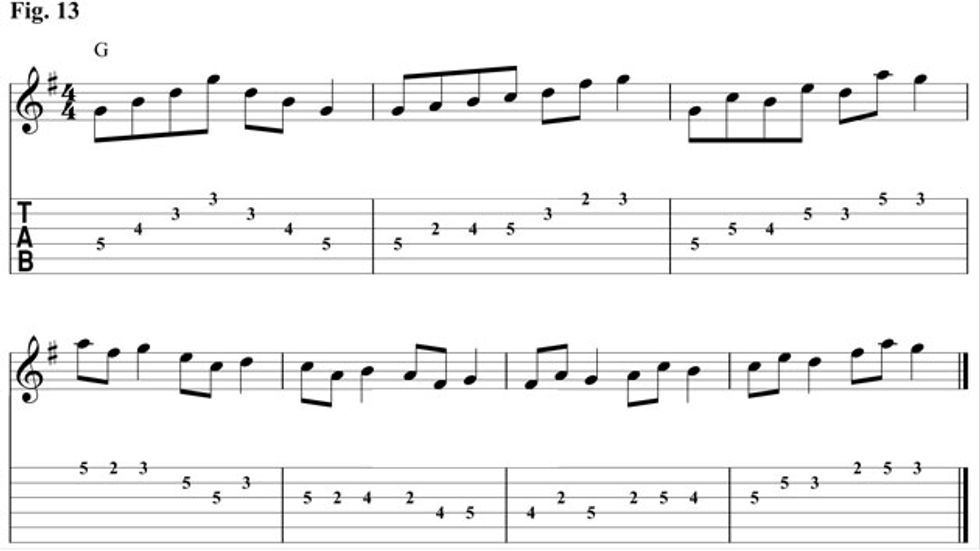
In Fig. 13, each measure explores a different method of approaching the chord tones of a G major triad.
- Measure one is simply an arpeggio in the 3rd position.
- Measure two approaches each chord tone from a step below while we approach the chord tones from a step above in the next measure. These are the appoggiaturas that we mentioned earlier.
- In measures four and five we are using enclosures to circle around the chord tone before the resolution.
- The directions of the enclosures are reversed for the final two measures.
As an aside, enclosures are a fantastic way to resolve to a chord tone. The name itself just sounds fitting. Non-chord tones circle around their target resolution before landing. You'll find enclosures in music by J.S. Bach, Charlie Parker, the Beach Boys, and beyond.
There are many more possible patterns. Exploring them on your own will solidify—in your hands, ears, and eyes—where the target chord tones are and how to resolve to them from non-chord tones. Do this exercise with the other three chords from Fig. 12, and then work your way up the neck to the other two positions found in Fig. 10 (measures 5-8 and 9-12).
When you’re creating a solo, you won’t necessarily play any of these patterns in a long enough sequence to recognize a pattern. Instead, you’d combine them into something like a descending approach to an arpeggio to an enclosure. That might look something like Fig. 14.
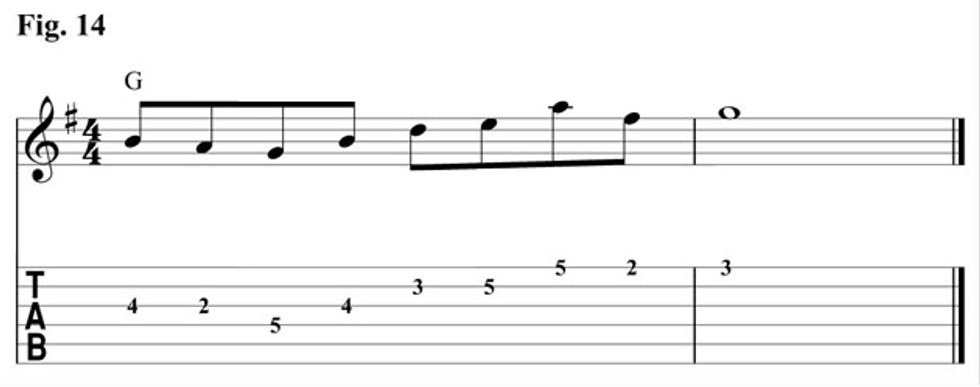
Notice how most of the notes outline a G major triad. The remaining notes connect and outline the harmony while creating small instances of tension and release.
Melodic Behavior
Fig. 14 also demonstrates three of the four possible behaviors of a melody. That is to say, as a single-note melody moves along, each note has four options for going to the next note.
- Step . This is simply moving up or down a scale, like the passing tones and neighbor tones we talked about earlier. This happens in the first three notes.
- Arpeggio . If the note is a chord tone, it could move up or down to the adjacent chord tone, as demonstrated in the G–B–D sequence that starts on beat two.
- Leap . Any time a note moves in an interval larger than a step, and is not an arpeggio, it is a leap, such as the E to A on the “and” of beat three. Appoggiaturas and escape tones, which are basically variations on the appoggiatura, fall under this category.
- Repeat . Although not demonstrated in Fig. 14, a note can repeat. We can also expand this idea and create repetition in groups of notes or phrases, sometimes making slight alterations to outline chord changes.
Let’s look at one more example (Fig. 15), this time over a four bar I–V–VIm–IV progression. Keep in mind that this passage is played using only the notes from Fig. 11 and Fig. 12 above!
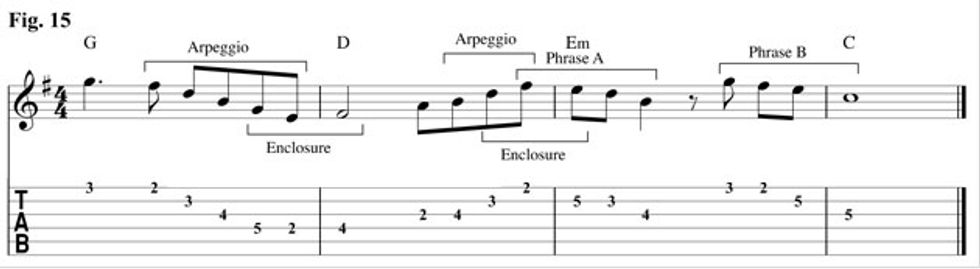
Notice how each bar primarily uses chord tones from the triad shapes we’ve been discussing, but a few non-chord tones are thrown in to make the melody more interesting.
The first measure is just a big arpeggio. But wait! The F# and E are not chord tones! Correct. However, the melody moves consistently in one direction as an arpeggio, so we’re going to include all of it. It's also worth noting that if we account for all the notes in the arpeggio, it’s an Em9 chord, which sounds great when played over a G major triad.
The end of the first measure uses an enclosure to resolve to the first beat of measure two. Check out how the enclosure starts over the G major chord, and resolves as the chord changes to D. When you solo, you should always be thinking about where you’re headed and set up resolutions before the chord changes. The second measure uses a similar arpeggio/enclosure approach, but in the opposite direction.
I also highlighted two sections as Phrase A and Phrase B. These phrases are similar in that they start with two descending steps followed by a descending leap. Phrase B mimics Phrase A, but is a step higher so the resolution lands on a C, highlight the chord change.
Phew! Analysis can be exhausting. But hopefully by this point you're beginning to see where these chord shapes and their adjacent non-chord tones lie on your fretboard. On your own, find similar patterns on the neck surrounding the 1st and 2nd inversions of the G triad, as shown in the second and third lines of Fig. 9, and following the same steps we took in Figures 10 through 13.
Triad Patterns
Finally, I’m going to introduce one more concept: how to use these triad shapes to get up and down the fretboard.
In the composed solo from my previous lesson, we shifted positions every four measures. This approach isn't used exclusively for the purpose of the exercise—it also adds excitement via ever-higher pitches. But sometimes you want to move up and down the neck throughout your solo, and we can use triads to create more interesting lines.
Let’s take a simple ascending line, Fig. 16, moving from a G chord to a D chord.
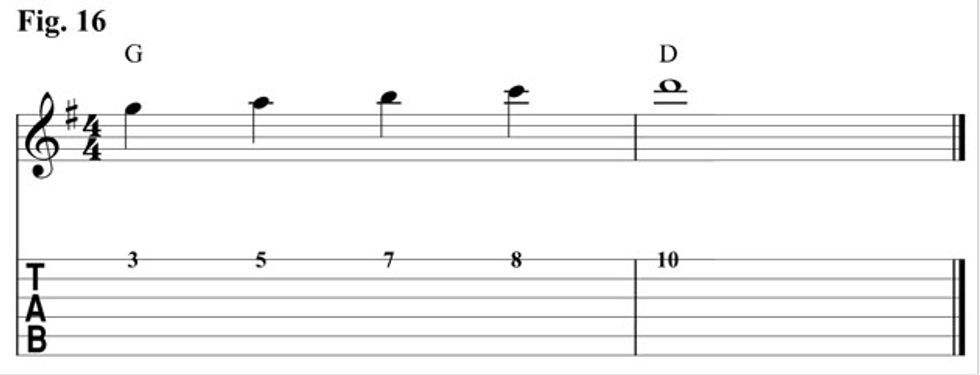
Now let’s harmonize each note with the other two notes of its triad, relative to the key of G major (Fig. 17). You end up with a series of 1st inversion triads on the top four strings.
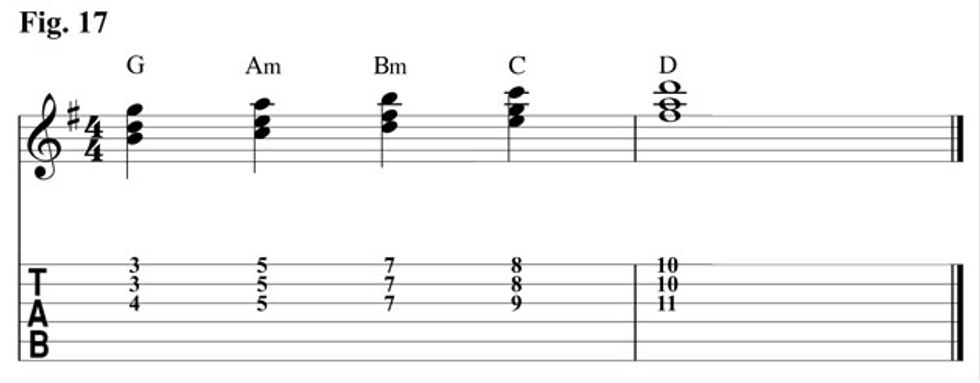
Finally, let’s play these triads with an arpeggio pattern moving up the neck (Fig. 18).
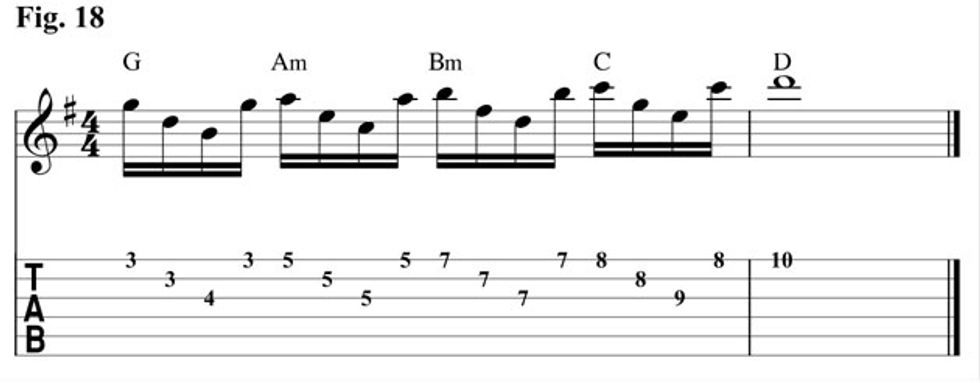
In these examples we simply used an ascending harmony: G-Am-Bm-C-D. It works perfectly well, though you can harmonize the top note with any triad in the key of G. For example, Fig. 19 uses G-D-Em-C-D.
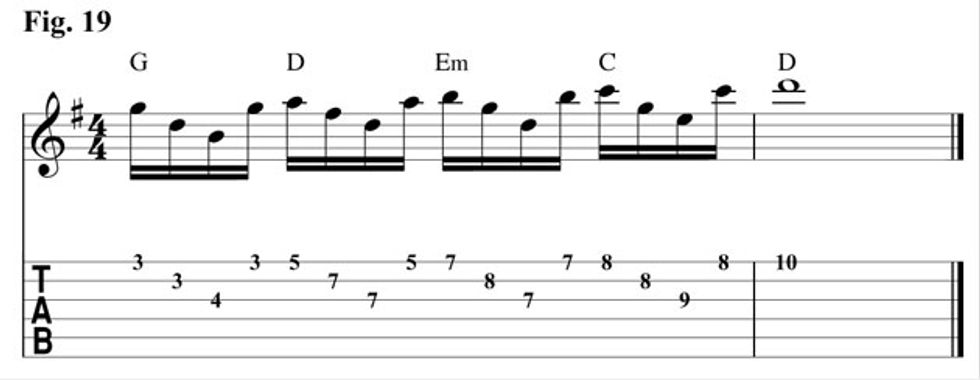
When I do things like this, I try to superimpose secondary chord progressions over the existing harmony. Fig. 19 suggests a I-V-VIm-IV progression over a G chord, kind of a nice way to allude to the form of the song in a melodic passage.
Applying This Lesson
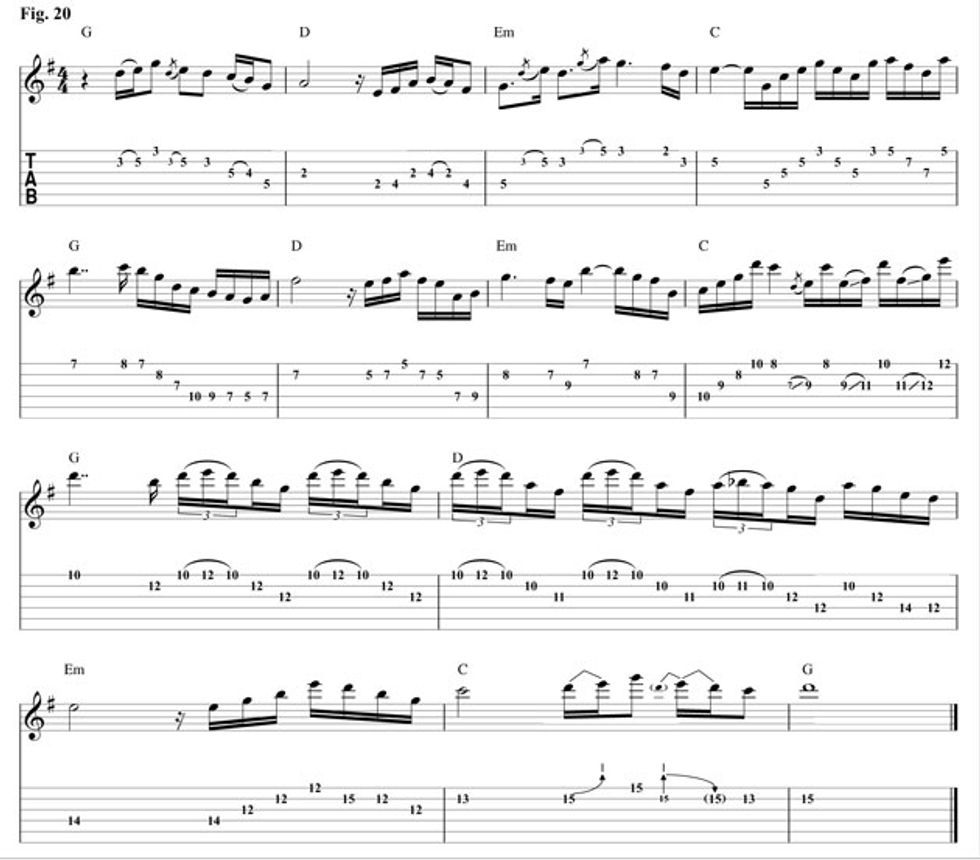
Now it’s time to tie this all together. Here is a solo using many of these concepts. If you use the tab to play each note as intended, you’ll see how each
phrase works around the triad shapes from Fig. 9. Learn to play this solo note for note, and then practice your own over the remainder of the track.
Hopefully these two lessons have given you a better understanding of how to outline chord changes in your solos using triad shapes up and down the neck. To further your studies, transfer the triad shapes from Figs. 1-4 to the other four string groups. (The shapes are similar, though altered slightly.) You'll probably recognize the chord shapes, especially if you are familiar with the CAGED system.
I also recommend transcribing other guitar solos to expand your improvisational vocabulary. As you transcribe great solos, you should start to recognize the concepts discussed here.