Although converting to a bari is a job just about any player can handle, there’s a lot more to it than just swapping the existing neck with a long-scale replacement. Here, ace Nashville repairman John LeVan walks you step-by-step through making yours sound spectacular and play like butter.
It’s always exciting when an unusual project lands on my bench. Recently, a client brought in a Tele Thinline he wanted to convert into a baritone, and I saw this as a great opportunity to turn an off-the-shelf guitar into a customized instrument. Having done baritone conversions in the past, I knew it’d be easy for things to go wrong, so I suggested we document the process to help others avoid a train wreck if they were to make their own bari. Before we dive into the details, let’s review what we’re dealing with here.
What’s a Baritone?
A baritone guitar has a longer scale length
and uses heavier strings to enable you to
a great opportunity to turn an off-the-shelf
if they were to make their own bari. Before
tune lower—usually a fourth (B-B) or fifth
(A-A)—than a standard guitar. Because the
intervals remain the same between the strings,
fingerings for all your favorite chord forms,
scale patterns, and licks remain the same—
everything simply sounds lower. Pitch-wise,
a baritone sits between a guitar and a bass.
(Some people refer to a guitar tuned an
octave below standard as a “baritone,” but
technically a sub-octave guitar is a “bass VI,”
which takes its name from the long-scale
Fender instrument introduced in 1961.)
On a baritone, the scale length—the distance from the string nut to the bridge saddles—typically falls between 27" and 29". String gauges range from .012 for the 1st string up to .072 for the 6th string. Several string manufacturers, including D’Addario, Ernie Ball, GHS, Elixir, and La Bella make baritone sets.
In the late 1950s, Danelectro unveiled the world’s first long-scale electric guitar and it quickly found a home in popular music. Once film and television composers heard Duane Eddy’s 1959 “Rebel Walk,” the Dano’s gnarly twang spread like wildfire. Even Wes Montgomery got into the act playing bass VI on his 1960 album Movin’ Along (check out “Sandu” and “Tune-Up” to hear some ripping drop-tuned bebop). The Beach Boys used the instrument to fatten up “Dance, Dance, Dance” and “Caroline, No” and Glen Campbell’s “Wichita Lineman” and “Galveston” featured gorgeous long-scale guitar solos. At the time, the available instruments were tuned an octave below guitar, but it wouldn’t be long before the baritone evolved as a unique 6-string pitched between the bass VI and standard guitar.
Over the years, the baritone’s popularity has grown from initially being considered a “color” instrument for studio musicians to now having a significant presence in country, jazz, metal, and—thanks to the Cure—alternative and indie rock. In fact, some contemporary guitarists consider the baritone’s growl essential to their sonic palette—and a few even make it their primary instrument.
Currently a number of manufacturers— such as Schecter, Music Man, Gibson, Taylor, Alvarez, PRS, Gretsch, Eastwood, and Fender—make baritone electric or acoustic guitars. But the project we’re about to undertake is appealing because the number of available off-the-shelf baritone guitars is miniscule relative to the number of standard-scale instruments on the market. What we’re about to show you can open up a world of tonal possibilities not currently available on production guitars, because this how-to reveals the crucial steps to follow in converting virtually any bolt-on electric into a baritone. That means you can now bring the taut snarl of baritone frequencies to guitars with the body styles, woods, pickup configurations, control schemes, and aesthetics of your choice.
Overview and Caveats
We began this project with a 2011 Fender
American Vintage ’69 Tele Thinline. The
owner had selected this specific model
because he wanted a Thinline with a 4-bolt
neck, and most Fender Thinlines (such as
the American Vintage ’72) have a 3-bolt
configuration. He’d also ordered a Warmoth
baritone neck (WD Music Products and
USA Custom Guitars also make bari necks),
and my job was to create a viable instrument
from these parts without making any
irreversible modifications. This meant he
could always take his Tele back to its original
form without devaluing it.
Be aware that this is not always possible with a baritone conversion. When installing a replacement neck, the most critical element is how well (or even if ) it fits the neck pocket. When retrofitting a neck, the two most common problems are the neck pocket being too loose or too tight, or the neck screws not lining up with the holes in the new neck. Solving either of these issues requires irreversible modifications to the neck or body—or both.
Without the proper tools and skills, this type of project can quickly turn into an absolute nightmare. If you’re thinking of doing a bari conversion on your own, I urge you to read this article from beginning to end so you understand the process and potential pitfalls, and can make a better judgment about whether you feel up to the task. When in doubt, consult a qualified luthier.
Preliminary Evaluation
Before I do any mods or repair work, I carefully
interrogate my clients about their playing
style, and take detailed measurements
to document how the guitar is currently set
up. This information establishes where we
are compared to where we are going, and
allows me to identify anything that may
be out of adjustment or unusual about the
guitar. It also helps me correctly set up the
guitar after I’m done with any mods.
Tip: Save yourself time and possible grief by carefully measuring pickup height, action, and neck relief before you begin modifying your guitar.
Prior to installing a new neck, I look it over and take note of all its features. For example, our maple, 28 5/8"-scale Warmoth neck had a rosewood fretboard. Warmoth offers many sizes of fretwire, and the owner had opted for 6230 vintage-style frets. He also specified a satin nitrocellulose finish.
Tools You Need for this Baritone Conversion Project
To replace the neck
and do a setup:
• Large and small Phillips screwdrivers
• Electric drill and small drill bits
• 6" precision metal ruler
• Rubber- or nylon-tipped hammer
• Soldering iron tip or round, sharp
pilot-hole starter
• Gauged nut slotting files
• Allen wrench set
• Truss rod wrench
• String action gauge
• String radius gauges
• String winder and cutter
• Sharpie
• Small towel or protective cloth
To cut a bone string nut
(optional):
• Bone saddle blank
• Precision shaping file
• Machinist rule
• Mechanical pencil
• Radius block
• 600-grit paper
• Super glue
Warmoth bari necks sport 24 frets, come standard with a 10"-16" compound radius, and have a dual-action truss rod that’s accessed at the heel and requires a 7/32" hex wrench. Because Warmoth necks are licensed by Fender, their headstocks have legit Fender profiles and the neck-screw holes are pre-drilled to Fender specs.
Before shipping a replacement neck, most makers ream the headstock for a buyer’s preferred tuners. Different tuner types (such as Kluson, Grover, Sperzel, and Planet Waves) require different size holes. In our case, the headstock was drilled for vintage-style Gotoh tuners. The owner had already tested these tuners to make sure they’d accommodate a .072" string—the size of the 6th string in an Ernie Ball Baritone Slinky set, which is what he uses. Incidentally, .072" is a tight fit. Anything thicker probably won’t fit in the shaft of a 6-on-a-side, Kluson-style tuner post.
Tip: Before having the tuner holes reamed, do your homework. Always check that the baritone 6th string will fit into the set of machines you plan to install.
Warmoth necks are available with preinstalled synthetic nuts, but the owner wanted me to install a bone nut, so he ordered the neck without a nut.
Tip: Shaping and fitting a nut is a tricky job. If you want to save yourself time and effort, consider ordering a bari neck with the nut already installed. Some companies— including Warmoth—offer synthetic nuts that are not only shaped, but pre-slotted at the factory to match your fretwire and fretboard radius.
STEP 1
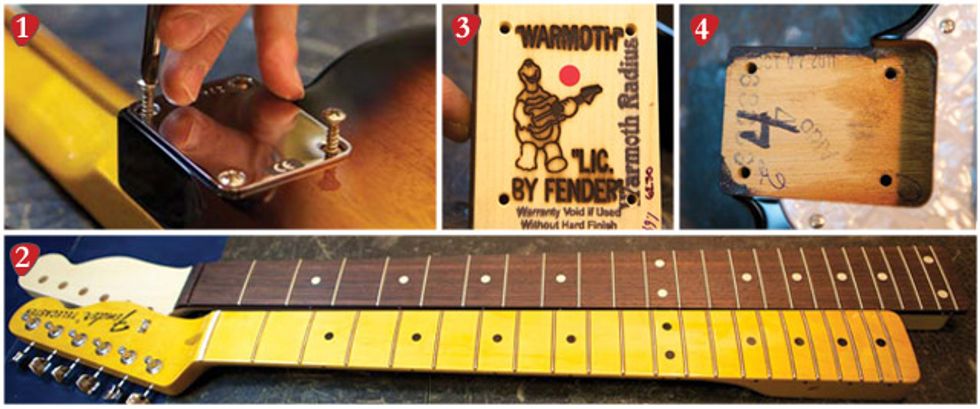
1. When removing the original neck, guide the screwdriver shaft to prevent it from slipping out of the screw and gouging your guitar. 2. Compare the baritone neck with the original by aligning both necks at the 12th fret (the octave). Here, you can see that the 24-fret baritone neck extends both lower and higher than the stock Tele neck. 3. Warmoth baritone necks are licensed by Fender, so they sport iconic Fender headstock shapes and the heel is sized and drilled to Fender specs. To ensure a snug fit, we’ll remove the red sticker before installing the neck. 4. Before mounting the new neck, remove any debris, stickers, or tape from the neck pocket. This ensures a tight, secure fit for optimal sustain.
Disassembly
Disassembling a guitar can be fun, but
before you begin, be sure you have the correct
tools for the job—and always save all
the parts you remove. (An empty pickup
box is handy for collecting screws and
parts.) Here’s the process:
- Remove the strings.
- Unscrew (counterclockwise) the neck bolts, remove the original neck, and compare it to the replacement (Photos 1-3).
- Inspect the neck pocket and clean out any debris (Photo 4).
STEP 2
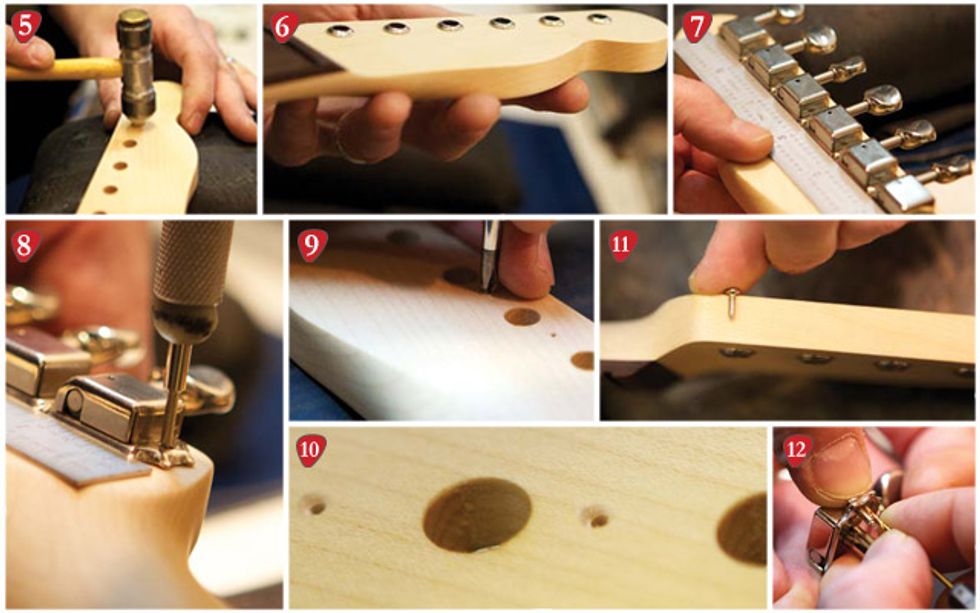
5. Use a nylon- or rubber-tipped hammer to gently tap the tuner bushings into place. 6. Check that all the bushings sit flat against the headstock. 7. Use a metal ruler to align the tuner housings. 8. With a sharp-tipped tool (I’m using a soldering iron tip), mark the proper spot for a pilot hole for each tuner mounting screw. 9. To prevent the drill bit from splitting the headstock wood, countersink the pilot holes with a small Phillips screwdriver. 10. Check the countersink: You should see a small cone at the lip of each pilot hole. 11. Before drilling, check screw length against the headstock depth. 12. Measure bit width against the screw shaft and mark the bit to indicate maximum drilling depth.
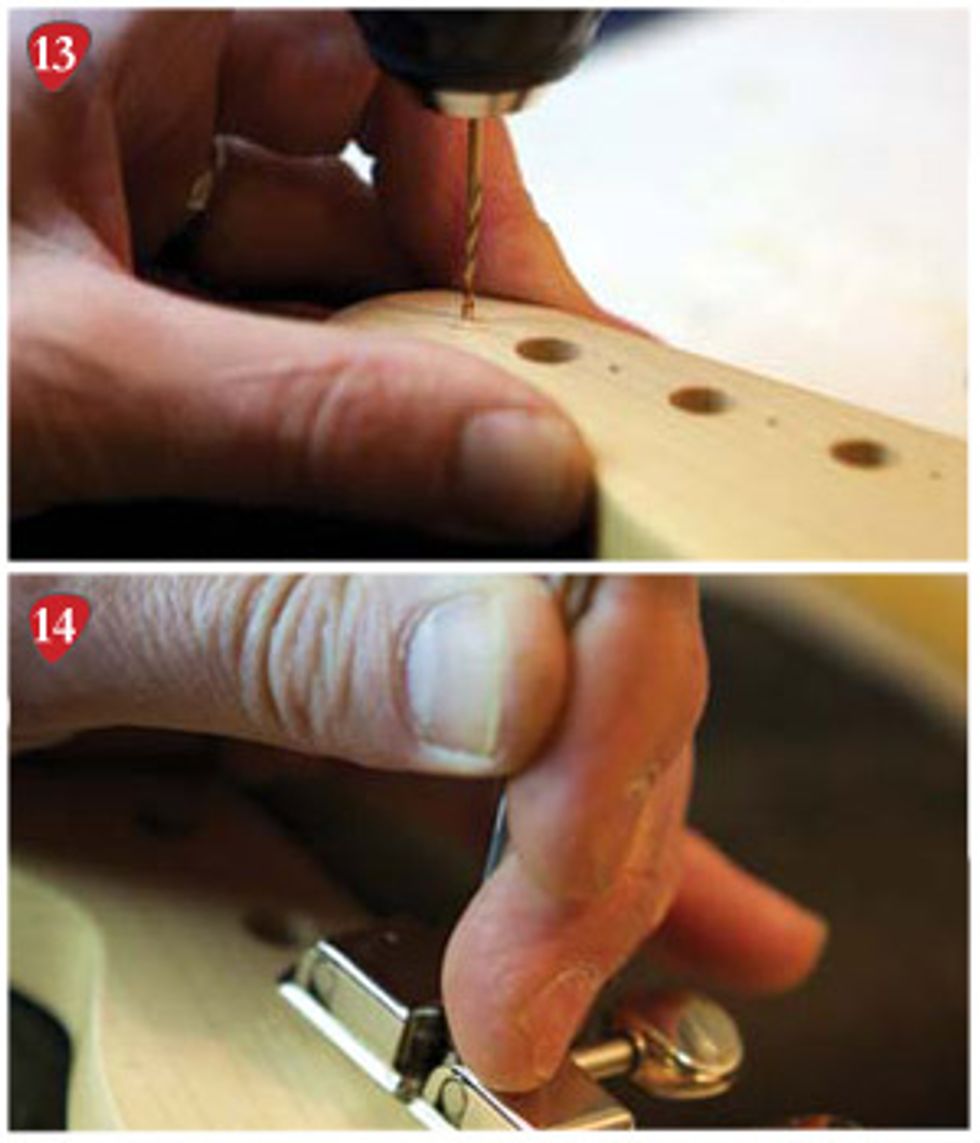
13. Drill slowly and carefully into the tunerscrew pilot holes. I’ve used a red Sharpie to mark maximum drilling depth. 14. When installing the tuner screws, be sure your screwdriver is the correct size so its tip doesn’t butcher the screw heads or slip off and hit the headstock.
Neck Prep
At this point, the new neck has no tuning
keys, string nut, or string trees, so we’ll add
these components next.
- Install the tuning keys. First, use a hammer
with a soft nylon or rubber head to
tap the tuner bushings into their holes
(Photos 5 and 6). Turn the neck over
and lay the tuners into their holes. With
a metal ruler as a guide, carefully align
the tuners in a straight line (Photo 7).
Still holding the tuners in alignment
against the ruler, use a sharp-tipped tool
to mark a spot for the pilot hole for
each tuner mounting screw (Photo 8).
Countersink the tuner-screw pilot holes using a small Phillips screwdriver to create a cone at the lip of each screw hole (Photos 9 and 10).
Tuner mounting screws vary in length from one brand to another. Before you drill any holes, always check the screw depth against the headstock (Photo 11). If the screws are too long, you risk drilling through the headstock face or splitting the wood with the screw tip.
Insert a screw into a tuner, then measure the screw’s length and width against your drill bit. Match the bit width to the screw’s main shaft—not its cutting threads—and mark the bit depth with a Sharpie or piece of masking tape (Photo 12).
With the neck resting on a padded, stable surface, drill the tuner screw holes into the back of the headstock. Work slowly and methodically (Photo 13).
Finally, attach the tuning machines, starting with the 6th or 1st and working sequentially along the headstock (Photo 14). - Temporarily install a pre-slotted string nut. This acts as a guide for aligning the neck. In our project, the temporary nut will be replaced by the finished bone nut later in the assembly process. (If you’ve ordered a neck with a pre-installed, pre-slotted nut, you’re already set and can skip to Step 3.)
Tip: If you don’t already have a used pre-slotted nut, synthetic pre-slotted and shaped nuts are available from such retailers as Guitar Center and Musician’s Friend. Stewart-MacDonald sells bone nuts that are cut, sized, and slotted for Fenders, and starting with one of these and then modifying it for baritone strings can be a real time-saver.
STEP 3
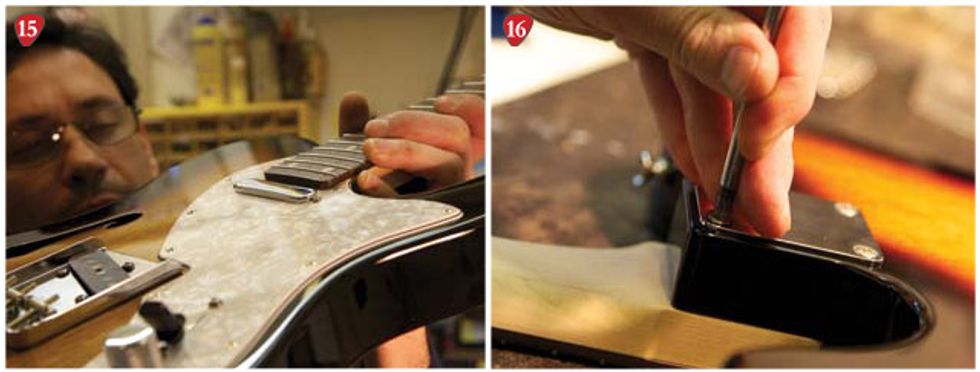
15. Check how the neck fits into the body. You want to neck heel to fit securely into the pocket, and any fretboard extension to sit just above the pickguard so it’s not forced down against it. A miniscule gap below the extension is good. 16. Attaching the neck. Go around the neck plate tightening each screw a little at a time.
Attach the Bari Neck
Next we’ll bolt on the new neck, string up
the guitar, and check the neck alignment.
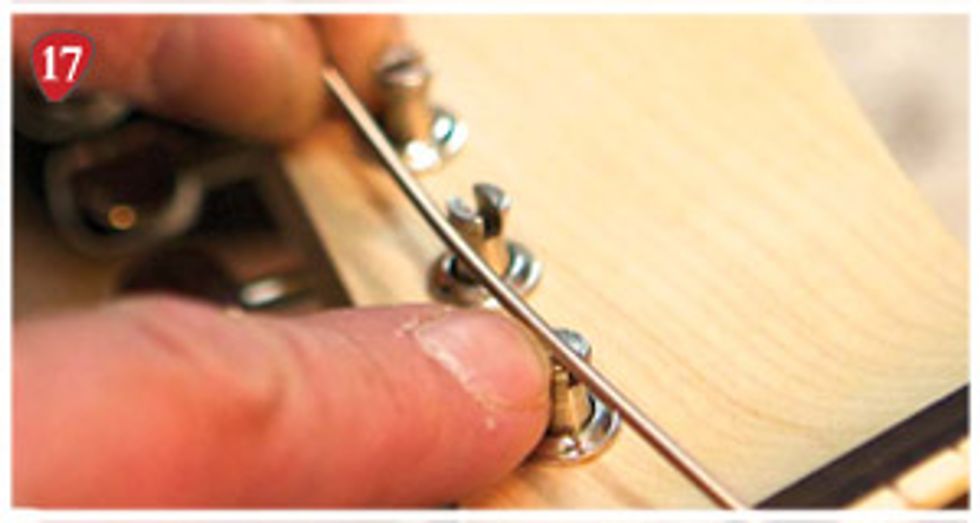
17. Getting ready to install the outer strings to check neck alignment.
- Place the baritone neck heel in the neck pocket to see if it fits properly. On this guitar, the fit was perfect— not too tight, not too loose—and the fretboard extension that includes the 24th fret cleared the top of the pickguard, exactly as it’s supposed to (Photo 15).
- With the guitar face down and the neck seated in the pocket, thread the original neck screws through the neck plate, work them down through the body, and gently introduce their tips into the screw holes of the replacement neck (Photo 16). During this phase, I was delighted to see that the Warmoth’s pre-drilled holes lined up perfectly with the holes in the body. If you’re installing a bari neck on a Fender guitar, this is a real benefit to buying a licensed Fender neck.
- Once the neck is attached, install the
1st and 6th strings and use them as
straightedges to check neck-to-body
alignment. I used the temporary, preslotted
nut to hold these strings in
place while measuring the distance
from the strings to the edge of the
fretboard. On a pre-slotted nut, you
have to widen the 6th string slot to
accommodate the low B.
This is also where you confirm that your 6th string fits the tuner (Photo 17). If you’ve done your homework, you’ll be good to go.
Again, we were lucky: The two strings lined up exactly where they should, and the distance from the edge of the fretboard to the strings was perfect. Could this project go any more smoothly?
Tip: Rather than fully tightening one screw and then another, I like to tighten all the screws a little at a time, moving in a crisscross pattern around the neck plate. This gradually joins the neck and body using even pressure. Make sure the screws are nice and snug, but resist the urge to over-tighten them—you don’t want to strip the screw holes in the neck.
STEP 4
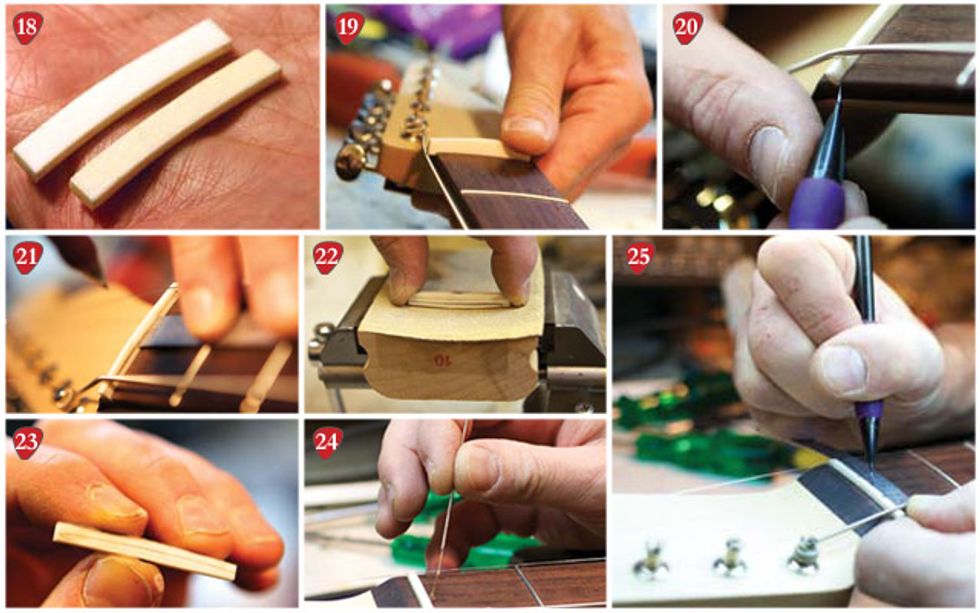
18. Bone nut blanks come bleached or unbleached, and also sport either radiused or flat bottoms to match your fretboard’s nut slot. 19. Check the fit frequently as you shape the bone blank into a nut. 20. Marking the nut where it extends past the fretboard. This material will be sanded off. 21. Mark the overall height of the new nut with a mechanical pencil and machinist’s rule. 22. Using a radius block and fine sandpaper to shape the top of the new nut. At this point, the blank has two lines: One marks the top of the nut, the other marks where the fretboard meets the nut. 23. The new nut is ready for string slots and final shaping and polishing. 24. Adding a drop of super glue to secure the shaped nut. 25. Measuring the string spacing. The trick is to space the strings equally— despite their different diameters—and this takes careful calculation.
Carve the New Nut (Optional)
Now that the neck and body are in alignment,
the next is to carve a new string nut. (If
you order a neck with a pre-installed nut, you
may skip ahead to Step 5.) The owner of our
Tele requested a custom carved bone nut—a
great choice for the project, because bone will
give this instrument a wider dynamic range
and better sustain than typical synthetic materials.
However, carving a string nut is a very
painstaking process. One alternative is to buy
a pre-shaped and slotted bone nut from stewmac.
com or other luthier suppliers. This typically
saves many steps and requires only final
fitting and string-slot shaping (numbers 7-13
below). That said, the only way to guarantee
that a bone nut will fit a given neck is to carve
it from scratch. Here’s how I do it:
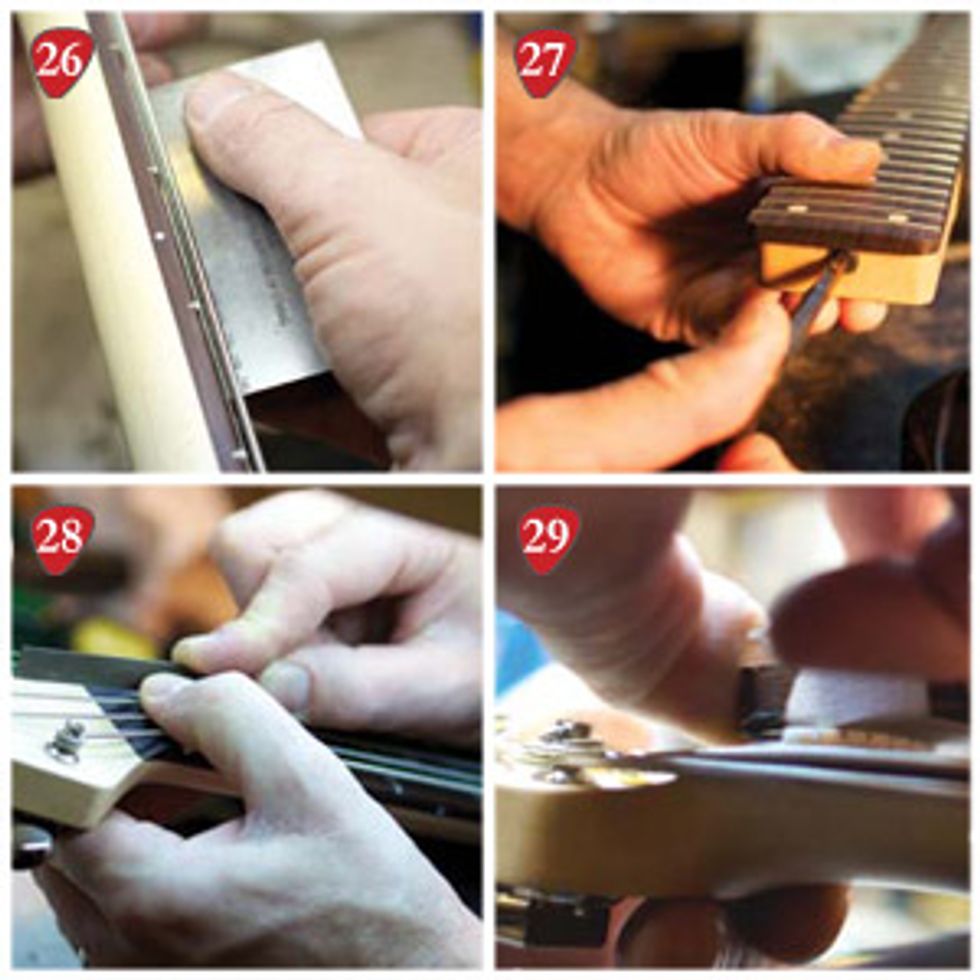
26. Measuring neck relief after the strings are tuned to pitch. 27. To adjust a vintage-style truss rod, you need to remove the neck. 28. When cutting nut slots, tilt your file down toward the headstock. 29. Using a radiused block to sand down the top of the nut.
- Sand a bone blank (Photo 18) to fit the width of the nut slot and to sit flush with its bottom. Some slot bottoms have a radius, while others are flat, so check your fretboard to be sure that you start with the correct bone blank. The goal is to achieve a snug fit with no visible gaps (Photo 19).
- Once the basic shaping is done, slip the nut into the slot and install the 6th and 1st strings. Tighten them just enough that they sit on the nut and hold it in place. Using a mechanical pencil, mark the ends of the blank where they extend beyond the edge of the fretboard (Photo 20).
- Remove the blank and sand the extended ends until the nut sits flush with the edges of the fretboard. Work slowly, and periodically reinsert the nut to check your progress. This can take several passes.
- Hold the blank in place again with the 6th and 1st strings, and use a mechanical pencil and machinist’s rule to mark the overall height for the nut. Lay the rule on top of the frets and slide it up to the nut blank. Then mark the blank along the top of the rule as you move it back and forth across the frets (Photo 21).
- Detune the strings and slide them aside. With the pencil, trace a second reference line along the edge of the fretboard where it meets the nut blank.
- Remove the nut and sand the top of the blank down to the first line you drew. Be sure you sand the top to match the fretboard radius. In this case, I used a 10" radius block to match Warmoth’s 10"-16" compound radius (Photo 22). When you’re done, the nut’s top will follow the fretboard curve that’s referenced by the lower line (Photo 23).
- Insert the nut back in the slot and tighten
the 6th and 1st strings to hold the nut
in place. At this point, when I’m sure the
nut is shaped and fitted correctly, I put
a tiny drop of super glue on the end of a
plain string and let the glue wick down
into the slot to hold the nut in place
(Photo 24). Blot any excess glue while
it’s still wet with a white paper towel.
Now use the pencil to mark the location of the 6th and 1st strings, paying close attention to the distance between their outer edge and the edge of the fretboard. Different players have different preferences here, but you want to avoid getting too close to the fretboard edge— you don’t want those strings sliding off. - With the outer strings marked, it’s time to calculate the locations of the remaining four strings. Use a fine ruler and take the width of each string into account. The goal is to create an equal space between all six strings. Mark these locations with pencil, as you may need to change them during this process (Photo 25).
- Install the remaining strings and tighten them up—but don’t tune them to pitch just yet. Recheck the strings to confirm they’re spaced equidistantly. Gently carve shallow reference slots into the blank using nut files (each file should match the gauge of the slot’s corresponding string). For now, these slots only need to hold the strings to check their spacing.
- When the spacing of each string is correct,
tune the guitar to pitch. Measure
the amount of relief in the neck (Photo
26). Before you finish cutting the nut
slots, make sure the neck doesn’t have too
much relief (forward bow). The final nut
slot depth depends on having the correct
amount of relief, which is approximately
.012" to .020", depending on a player’s
technique and string gauges.
Once the guitar is tuned to pitch, you can expect to adjust the truss rod to get the relief dialed in. On a vintage-style neck, you adjust the truss rod at the heel. This necessitates removing the neck (Photo 27). - Cut the string slots to the proper depth, beginning with the 1st string, which should have a distance of 1/64" (.015") from the top of the 1st fret to the bottom of the string. This height will gradually increase to just slightly over 1/32" (.032") for the 6th string. Go slowly! Remember, you can always deepen the slots, but you can’t undo what you’ve already cut.
- Sand the top of the new nut so that
the string slots aren’t surrounded by
too much material (Photo 29). But
don’t sand too much, otherwise the
strings may slip out of the nut when
you bend them or dig into the guitar.
Then polish the nut with 600-grit
paper, and finally buff the bone with
a polishing cloth.
With the mechanical pencil, color the inside of the string slots. This bit of graphite will prevent the strings from sticking in the slots.
Tip: When cutting the slots, tilt your file down toward the headstock (Photo 28). A gently angled slot keeps the strings seated firmly as they slope down toward the tuners.
STEP 5
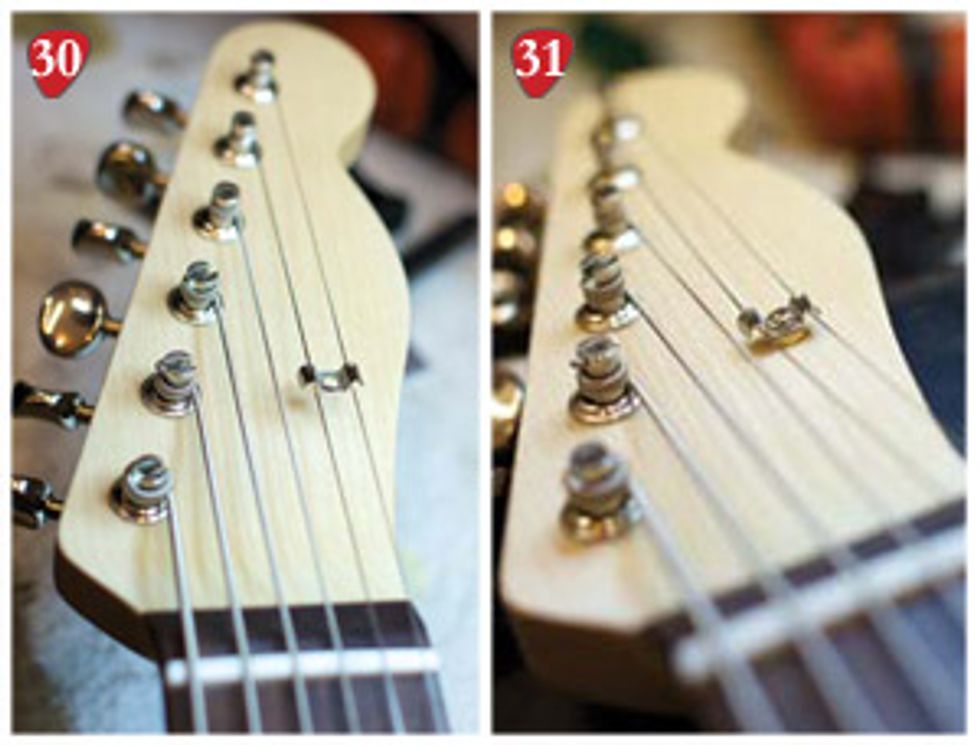
30. Determine the string location, then mark a pilot hole for the screw. 31. Use a stand-off to set the string tree height. If the slots are cut correctly, you only need to apply gentle downward pressure on the strings.
Add String Trees
Once the guitar is strung and the nut is
slotted, it’s time to install the string trees.
- Suspend the string tree over its corresponding pair of strings to determine where you want to position it (Photo 30). Typically, it’s midway between the tuner post and the nut.
- With a sharp-tipped tool, mark a pilot hole, countersink it, and drill the screw hole. Follow the procedures you used for drilling holes for the tuner mounting screws. Remember to measure screw depth and mark your drill bit so you don’t go too far into the headstock.
- Set string tree height. String trees only need to apply enough downward pressure to keep the high strings firmly in their slots as they stretch back toward the tuners. Stand-offs—washer-like cylinders that fit between the tree and the headstock—of different heights allow you to precisely adjust a tree’s downward pressure. To get the height I wanted, I clipped a brass ball-end from a bass string in half and use this as a stand-off (Photo 31).
Tip: Some necks require a pair of string trees—one on strings 1 and 2, and a second on strings 3 and 4—to keep the strings from buzzing in their slots. Other necks only need a tree on the top two strings. A sitar-like buzz or lack of sustain when you play an open string can indicate the need for a string tree.
STEP 6
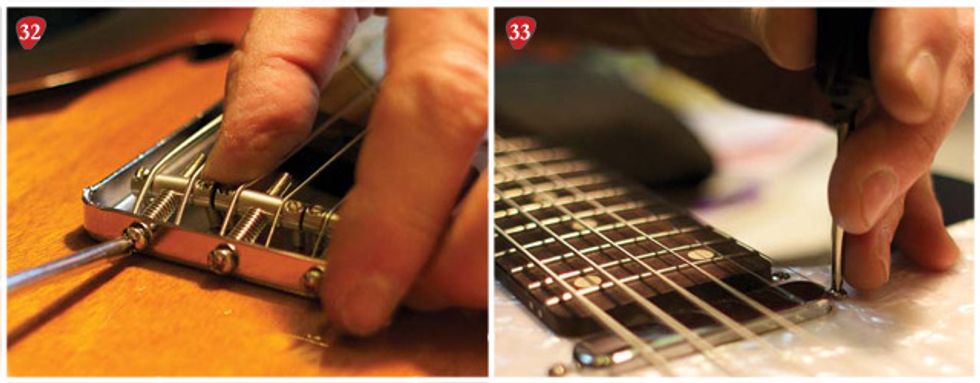
32. Adjust pickup height to maintain a good balance between the neck, middle, and bridge settings. Because a baritone has thicker bass strings than a regular guitar, you may wind up with a larger gap between lower strings and the pickups than you’re used to. 33. When adjusting intonation, always slacken a string before moving its saddle forward or backward. You don’t want to fight string tension with your screwdriver—it’s bad for the hardware and you risk slipping off the screw and nicking your guitar’s finish.
Final Setup
With the neck, tuners, nut, and string trees
installed, it’s time to make the final adjustments
and fine-tune the guitar’s playability.
Here’s the correct order for a setup:
- Tune to pitch. In this case, the owner’s preferred baritone tuning is B–E–A– D–F#–B, low to high.
- Adjust the truss rod, if necessary. After the strings have been tuned to pitch for a while, a truss rod may require one more adjustment.
- Adjust the height of the bridge saddles. Set the action based on the guitar’s original measurements, while taking into account the new, heavier baritone strings. The saddles should curve in an arc that mirrors the fretboard radius.
- Adjust the action at the string nut. You may have gotten it just right when you cut the nut slots, but it’s worth checking again. Sometimes a stroke or two with the nut file can settle a string in a perfect arc with its neighbors.
- Adjust pickup height (Photo 32). It’s imperative that the pickups are set to the correct height. Well-adjusted pickups deliver a consistent volume as you switch between pickup positions.
- Adjust intonation (Photo 33). This final part of the setup process involves moving the saddles either toward or away from the neck. With an electronic tuner, bring each string to pitch. Starting with the 1st string, play the 12th-fret harmonic and then fret the same note. If the fretted note is sharp, move the saddle away from the neck. Conversely, if the fretted note is flat, move the saddle toward the neck. Make small adjustments and retune each time you do. Repeat this process until the 12th-fret harmonics and fretted notes match on all six strings.
Tip: When you raise pickups too close to the strings—especially Fender-style single-coils with barrel-magnet pole pieces—the magnetic pull can interfere with a string’s vibrations and cause tuning problems. For vintage-style Tele pickups, Fender recommends a 6/64" space between the 6th string and its pole piece, and a 5/64" gap for the 1st string. Use this as a starting point, and then finetune the distance by ear.
Tip: Many Tele fanatics insist that, although a vintage 3-saddle bridge doesn’t intonate as well as a fully adjustable 6-saddle version, the vintage design offers more volume and sonic girth. To intonate a 3-saddle bridge, the trick is to find the saddle location that offers the best compromise for each pair of strings. For even better results, you can buy pre-compensated brass saddles that make it much easier to intonate a 3-saddle Tele bridge.
Out the Door
Compared to other baritone conversions I’ve done in the past, this one was hassle-free.
Kudos to Warmoth—they built an excellent neck for this conversion and made my
job easy. I was able to avoid any dreaded irreversible modifications, and the owner was
thrilled with his new, deep-twanging baritone Tele.
Jeff "Skunk" Baxter expands his acclaimed first-ever solo album, Speed of Heat, with a brand new Storytellers Edition, featuring brand-new commentary tracks.
For over five decades, audiences worldwide have marveled at Baxter’s inimitable and instantly recognizable guitar playing and generational songcraft. His output spans classic records as a founding member of Steely Dan and member of the Doobie Brothers in addition to hundreds of recordings with the likes of Donna Summer, Cher, Joni Mitchell, Rod Stewart, Dolly Parton, and many more. During 2022, he initially unveiled Speed of Heat, showcasing yet another side of his creative identity and introducing himself as a solo artist.
On the Storytellers Edition, his fascinating commentary pulls the curtain back on both the process and the message of the music. This version traces the journey to Speed of Heat and its core inspirations as shared directly by Baxter in the form of detailed anecdotes, candid stories, and insightful commentary on every track.
The 12-songalbum, co-produced by Baxter and CJ Vanston, is a riveting and rewarding musical experience that features a host of brilliantly crafted originals co-written by the guitarist and Vanston, as well as inspired versions of some of the great classics. Along the way, Baxter is joined by guest vocalists and songwriters Michael McDonald, Clint Black, Jonny Lang and Rick Livingstone. Baxter notably handled lead vocals on his rendition of Steely Dan’s “My Old School.” Other standouts include "Bad Move" co-written by Baxter, Clint Black, and CJ Vanston, and “My Place In The Sun”, sung by Michael McDonald and co-authored by McDonald, Baxter and Vanston.
As one of the most recorded guitarists of his generation, Baxter’s creative and versatile playing has been heard on some of the most iconic songs in music history, including “9 to 5” by Dolly Parton and “Hot Stuff” by Donna Summer.
The stunningly diverse collection of material on Speed of Heat presents a 360-degree view of the uniquely gifted musician.
STREAM / SHARE / PURCHASE HERE.
Beauty and sweet sonority elevate a simple-to-use, streamlined acoustic and vocal amplifier.
An EQ curve that trades accuracy for warmth. Easy-to-learn, simple-to-use controls. It’s pretty!
Still exhibits some classic acoustic-amplification problems, like brash, unforgiving midrange if you’re not careful.
$1,199
Taylor Circa 74
taylorguitars.com
Save for a few notable (usually expensive) exceptions, acoustic amplifiers are rarely beautiful in a way that matches the intrinsic loveliness of an acoustic flattop. I’ve certainly seen companies try—usually by using brown-colored vinyl to convey … earthiness? Don’t get me wrong, a lot of these amps sound great and even look okay. But the bar for aesthetics, in my admittedly snotty opinion, remains rather low. So, my hat’s off to Taylor for clearing that bar so decisively and with such style. The Circa 74 is, indeed, a pretty piece of work that’s forgiving to work with, ease to use, streamlined, and sharp.
Boxing Beyond Utility
Any discussion of trees or wood with Bob Taylor is a gas, and highly instructive. He loves the stuff and has dabbled before in amplifier designs that made wood an integral feature, rather than just trim. But the Circa 74 is more than just an aesthetic exercise. Because the Taylor gang started to think in a relatively unorthodox way about acoustic sound amplification—eschewing the notion that flat frequency response is the only path to attractive acoustic tone.
I completely get this. I kind of hate flat-response speakers. I hate nice monitors. We used to have a joke at a studio I frequented about a pair of monitors that often made us feel angry and agitated. Except that they really did. Flat sound can be flat-out exhausting and lame. What brings me happiness is listening to Lee “Scratch” Perry—loud—on a lazy Sunday on my secondhand ’70s Klipsch speakers. One kind of listening is like staring at a sun-dappled summer garden gone to riot with flowers. The other sometimes feels like a stale cheese sandwich delivered by robot.
The idea that live acoustic music—and all its best, earthy nuances—can be successfully communicated via a system that imparts its own color is naturally at odds with acoustic culture’s ethos of organic-ness, authenticity, and directness. But where does purity end and begin in an amplified acoustic signal? An undersaddle pickup isn’t made of wood. A PA with flat-response speakers didn’t grow in a forest. So why not build an amp with color—the kind of color that makes listening to music a pleasure and not a chore?
To some extent, that question became the design brief that drove the evolution of the Circa 74. Not coincidentally, the Circa 74 feels as effortless to use as a familiar old hi-fi. It has none of the little buttons for phase correction that make me anxious every time I see one. There’s two channels: one with an XLR/1/4" combo input, which serves as the vocal channel if you are a singer; another with a 1/4" input for your instrument. Each channel consists of just five controls—level, bass, middle, and treble EQ, and a reverb. An 11th chickenhead knob just beneath the jewel lamp governs the master output. That’s it, if you don’t include the Bluetooth pairing button and 1/8" jacks for auxiliary sound sources and headphones. Power, by the way, is rated at 150 watts. That pours forth through a 10" speaker.Pretty in Practice
I don’t want to get carried away with the experiential and aesthetic aspects of the Circa 74. It’s an amplifier with a job to do, after all. But I had fun setting it up—finding a visually harmonious place among a few old black-panel Fender amps and tweed cabinets, where it looked very much at home, and in many respects equally timeless.
Plugging in a vocal mic and getting a balance with my guitar happened in what felt like 60 seconds. Better still, the sound that came from the Circa 74, including an exceedingly croaky, flu-addled human voice, sounded natural and un-abrasive. The Circa 74 isn’t beyond needing an assist. Getting the most accurate picture of a J-45 with a dual-source pickup meant using both the treble and midrange in the lower third of their range. Anything brighter sounded brash. A darker, all-mahogany 00, however, preferred a scooped EQ profile with the treble well into the middle of its range. You still have to do the work of overcoming classic amplification problems like extra-present high mids and boxiness. But the fixes come fast, easily, and intuitively. The sound may not suggest listening to an audiophile copy of Abbey Road, as some discussions of the amp would lead you to expect. But there is a cohesiveness, particularly in the low midrange, that does give it the feel of something mixed, even produced, but still quite organic.
The Verdict
Taylor got one thing right: The aesthetic appeal of the Circa 74 has a way of compelling you to play and sing. Well, actually, they got a bunch of things right. The EQ is responsive and makes it easy to achieve a warm representation of your acoustic, no matter what its tone signature. It’s also genuinely attractive. It’s not perfectly accurate. Instead, it’s rich in low-mid resonance and responsive to treble-frequency tweaks—lending a glow not a million miles away from a soothing home stereo. I think that approach to acoustic amplification is as valid as the quest for transparency. I’m excited to see how that thinking evolves, and how Taylor responds to their discoveries.
The evolution of Electro-Harmonix’s very first effect yields a powerful boost and equalization machine at a rock-bottom price.
A handy and versatile preamp/booster that goes well beyond the average basic booster’s range. Powerful EQ section.
Can sound a little harsh at more extreme EQ ranges.
$129
Electro-Harmonix LPB-3
ehx.com
Descended from the first Electro-Harmonix pedal ever released, the LPB-1 Linear Power Booster, the new LPB-3 has come a long way from the simple, one-knob unit in a folded-metal enclosure that plugged straight into your amplifier. Now living in Electro-Harmonix’s compact Nano chassis, the LPB-3 Linear Power Booster and EQ boasts six control knobs, two switches, and more gain than ever before.
If 3 Were 6
With six times the controls found on the 1 and 2 versions (if you discount the original’s on/off slider switch,) the LPB-3’s control complement offers pre-gain, boost, mid freq, bass, treble, and mid knobs, with a center detent on the latter three so you can find the midpoint easily. A mini-toggle labeled “max” selects between 20 dB and 33 dB of maximum gain, and another labeled “Q” flips the resonance of the mid EQ between high and low. Obviously, this represents a significant expansion of the LPB’s capabilities.
More than just a booster with a passive tone, the LPB-3 boasts a genuine active EQ stage plus parametric midrange section, comprising the two knobs with shaded legends, mid freq and mid level. The gain stages have also been reimagined to include a pre-gain stage before the EQ, which enables up to 20 dB of input gain. The boost stage that follows the EQ is essentially a level control with gain to allow for up to 33 dB of gain through the LPB-3 when the “max” mini toggle is set to 33dB
A slider switch accessible inside the pedal selects between buffered or true bypass for the hard-latch footswitch. An AC adapter is included, which supplies 200mA of DC at 9.6 volts to the center-negative power input, and EHX specifies that nothing supplying less than 120mA or more than 12 volts should be used. There’s no space for an internal battery.
Power-Boosted
The LPB-3 reveals boatloads of range that betters many linear boosts on the market. There’s lots of tone-shaping power here. Uncolored boost is available when you want it, and the preamp gain knob colors and fattens your signal as you crank it up—even before you tap into the massive flexibility in the EQ stage.
“The preamp gain knob colors and fattens your signal as you crank it up—even before you tap into the massive flexibility in the EQ stage.”
I found the two mid controls work best when used judiciously, and my guitars and amps preferred subtle changes pretty close to the midpoint on each. However, there are still tremendous variations in your mid boost (or scoop, for that matter) within just 15 or 20 percent range in either direction from the center detent. Pushing the boost and pre-gain too far, particularly with the 33 dB setting engaged, can lead to some harsh sounds, but they are easy to avoid and might even be desirable for some users that like to work at more creative extremes.
The Verdict
The new LPB-3 has much, much more range than its predecessors, providing flexible preamp, boost, and overdrive sounds that can be reshaped in significant ways via the powerful EQ. It gives precise tone-tuning flexibility to sticklers that like to match a guitar and amp to a song in a very precise way, but also opens up more radical paths for experimentalists. That it does all this at a $129 price is beyond reasonable.
Electro-Harmonix Lpb-3 Linear Power Booster & Eq Effect Pedal Silver And Blue
Intermediate
Intermediate
• Learn classic turnarounds.
• Add depth and interest to common progressions.
• Stretch out harmonically with hip substitutions.
Get back to center in musical and ear-catching ways.
A turnaround chord progression has one mission: It allows the music to continue seamlessly back to the beginning of the form while reinforcing the key center in a musically interesting way. Consider the last four measures of a 12-bar blues in F, where the bare-bones harmony would be C7-Bb7-F7-F7 (one chord per measure). With no turn around in the last two measures, you would go back to the top of the form, landing on another F7. That’s a lot of F7, both at the end of the form, and then again in the first four bars of the blues. Without a turnaround, you run the risk of obscuring the form of the song. It would be like writing a novel without using paragraphs or punctuation.
The most common turnaround is the I-VI-ii-V chord progression, which can be applied to the end of the blues and is frequently used when playing jazz standards. Our first four turnarounds are based on this chord progression. Furthermore, by using substitutions and chord quality changes, you get more mileage out of the I-VI-ii-V without changing the basic functionality of the turnaround itself. The second group of four turnarounds features unique progressions that have been borrowed from songs or were created from a theoretical idea.
In each example, I added extensions and alterations to each chord and stayed away from the pure R-3-5-7 voicings. This will give each chord sequence more color and interesting voice leading. Each turnaround has a companion solo line that reflects the sound of the changes. Shell voicings (root, 3rd, 7th) are played underneath so that the line carries the sound of the written chord changes, making it easier to hear the sound of the extensions and alterations. All examples are in the key of C. Let’s hit it.
The first turnaround is the tried and true I-VI-ii-V progression, played as Cmaj7-A7-Dm7-G7. Ex. 1 begins with C6/9, to A7(#5), to Dm9, to G7(#5), and resolves to Cmaj7(#11). By using these extensions and alterations, I get a smoother, mostly chromatic melodic line at the top of the chord progression.
Ex. 2 shows one possible line that you can create. As for scale choices, I used C major pentatonic over C6/9, A whole tone for A7(#5), D Dorian for Dm9, G whole tone for G7(#5), and C Lydian for Cmaj7(#11) to get a more modern sound.
The next turnaround is the iii-VI-ii-V progression, played as Em7-A7-Dm7-G7 where the Em7 is substituted for Cmaj7. The more elaborate version in Ex. 3 shows Em9 to A7(#9)/C#, to Dm6/9, to G9/B, resolving to Cmaj7(add6). A common way to substitute chords is to use the diatonic chord that is a 3rd above the written chord. So, to sub out the I chord (Cmaj7) you would use the iii chord (Em7). By spelling Cmaj7 = C-E-G-B and Em7 = E-G-B-D, you can see that these two chords have three notes in common, and will sound similar over the fundamental bass note, C. The dominant 7ths are in first inversion, but serve the same function while having a more interesting bass line.
The line in Ex. 4 uses E Dorian over Em9, A half-whole diminished over A7(#9)/C#, D Dorian over Dm6/9, G Mixolydian over G9/B, and C major pentatonic over Cmaj7(add6). The chord qualities we deal with most are major 7, dominant 7, and minor 7. A quality change is just that… changing the quality of the written chord to another one. You could take a major 7 and change it to a dominant 7, or even a minor 7. Hence the III-VI-II-V turnaround, where the III and the VI have both been changed to a dominant 7, and the basic changes would be E7-A7-D7-G7.
See Ex. 5, where E7(b9) moves to A7(#11), to D7(#9) to G7(#5) to Cmaj9. My scale choices for the line in Ex. 6 are E half-whole diminished over E7(#9), A Lydian Dominant for A7(#11), D half-whole diminished for D7(#9), G whole tone for G7(#5), and C Ionian for Cmaj9.
Ex. 7 is last example in the I-VI-ii-V category. Here, the VI and V are replaced with their tritone substitutes. Specifically, A7 is replaced with Eb7, and G7 is replaced with Db7, and the basic progression becomes Cmaj7-Eb7-Dm7-Db7. Instead of altering the tritone subs, I used a suspended 4th sound that helped to achieve a diatonic, step-wise melody in the top voice of the chord progression.
The usual scales can be found an Ex. 8, where are use a C major pentatonic over C6/9, Eb Mixolydian over Eb7sus4, D Dorian over Dm11, Db Mixolydian over Db7sus4, and once again, C Lydian over Cmaj7(#11). You might notice that the shapes created by the two Mixolydian modes look eerily similar to minor pentatonic shapes. That is by design, since a Bb minor pentatonic contains the notes of an Eb7sus4 chord. Similarly, you would use an Ab minor pentatonic for Db7sus4.
The next four turnarounds are not based on the I-VI-ii-V chord progression, but have been adapted from other songs or theoretical ideas. Ex. 9 is called the “Backdoor” turnaround, and uses a iv-bVII-I chord progression, played as Fm7-Bb7-Cmaj7. In order to keep the two-bar phrase intact, a full measure of C precedes the actual turnaround. I was able to compose a descending whole-step melodic line in the top voice by using Cmaj13 and Cadd9/E in the first bar, Fm6 and Ab/Bb in the second bar, and then resolving to G/C. The slash chords have a more open sound, and are being used as substitutes for the original changes. They have the same function, and they share notes with their full 7th chord counterparts.
Creating the line in Ex. 10 is no more complicated than the other examples since the function of the chords determines which mode or scale to use. The first measure employs the C Ionian mode over the two Cmaj chord sounds. F Dorian is used over Fm6 in bar two. Since Ab/Bb is a substitute for Bb7, I used Bb Mixolydian. In the last measure, C Ionian is used over the top of G/C.
The progression in Ex. 11 is the called the “Lady Bird” turnaround because it is lifted verbatim from the Tadd Dameron song of the same name. It is a I-bIII-bVI-bII chord progression usually played as Cmaj7-Eb7-Abmaj7-Db7. Depending on the recording or the book that you check out, there are slight variations in the last chord but Db7 seems to be the most used. Dressing up this progression, I started with a different G/C voicing, to Eb9(#11), to Eb/Ab (subbing for Abmaj7), to Db9(#11), resolving to C(add#11). In this example, the slash chords are functioning as major seventh chords.
As a result, my scale choices for the line in Ex. 12 are C Ionian over G/C, Eb Lydian Dominant over Eb9(#11), Ab Ionian over Eb/Ab, Db Lydian Dominant over Db9(#11), and C Lydian over C(add#11).
The progression in Ex. 13 is called an “equal interval” turnaround, where the interval between the chords is the same in each measure. Here, the interval is a descending major 3rd that creates a I-bVI-IV-bII sequence, played as Cmaj7-Abmaj7-Fmaj7-Dbmaj7, and will resolve a half-step down to Cmaj7 at the top of the form. Since the interval structure and chord type is the same in both measures, it’s easy to plane sets of voicings up or down the neck. I chose to plane up the neck by using G/C to Abmaj13, then C/F to Dbmaj13, resolving on Cmaj7/E.
The line in Ex. 14 was composed by using the notes of the triad for the slash chord and the Lydian mode for the maj13 chords. For G/C, the notes of the G triad (G-B-D) were used to get an angular line that moves to Ab Lydian over Abmaj13. In the next measure, C/F is represented by the notes of the C triad (C-E-G) along with the root note, F. Db Lydian was used over Dbmaj13, finally resolving to C Ionian over Cmaj7/E. Since this chord progression is not considered “functional” and all the chord sounds are essentially the same, you could use Lydian over each chord as a way to tie the sound of the line together. So, use C Lydian, Ab Lydian, F Lydian, Db Lydian, resolving back to C Lydian.
The last example is the “Radiohead” turnaround since it is based off the chord progression from their song “Creep.” This would be a I-III-IV-iv progression, and played Cmaj7-E7-Fmaj7-Fm7. Dressing this one up, I use a couple of voicings that had an hourglass shape, where close intervals were in the middle of the stack.
In Ex. 15 C6/9 moves to E7(#5), then to Fmaj13, to Fm6 and resolving to G/C. Another potential name for the Fmaj13 would be Fmaj7(add6) since the note D is within the first octave. This chord would function the same way, regardless of which name you used.
Soloing over this progression in Ex. 16, I used the C major pentatonic over C6/9, E whole tone over E7(#5), F Lydian over Fmaj13, and F Dorian over Fm6. Again, for G/C, the notes of the G triad were used with the note E, the 3rd of a Cmaj7 chord.
The main thing to remember about the I-VI-ii-V turnaround is that it is very adaptable. If you learn how to use extensions and alterations, chord substitutions, and quality changes, you can create some fairly unique chord progressions. It may seem like there are many different turnarounds, but they’re really just an adaptation of the basic I-VI-ii-V progression.
Regarding other types of turnarounds, see if you can steal a short chord progression from a pop tune and make it work. Or, experiment with other types of intervals that would move the chord changes further apart, or even closer together. Could you create a turnaround that uses all minor seventh chords? There are plenty of crazy ideas out there to work with, and if it sounds good to you, use it!