
Slinky playability, snappy sounds, and elegant, comfortable proportions distinguish an affordable 0-bodied flattop.
Satisfying, slinky playability. Nice string-to-string balance. Beautiful, comfortable proportions.
Cocobolo-patterned HPL back looks plasticky.
$699
Martin 0-X2E
martinguitar.com
Embracing the idea of an acoustic flattop made with anything other than wood can, understandably, be tricky stuff. There’s a lot of precedent for excellent-sounding acoustics built with alternative materials, though. Carbon-fiber flattops can sound amazing and I’ve been hooked by the sound and playability of Ovation and Adamas instruments many times.
High-pressure laminate, which is paper and resin pressed and covered by the image of wood grain, is another widely used alternative material. It certainly doesn’t sound glamorous. But as a construction material, it’s consistent and enables guitar companies to build more affordable instruments. It also minimizes the cost to the Earth’s forests—particularly where exotic hardwoods are concerned.
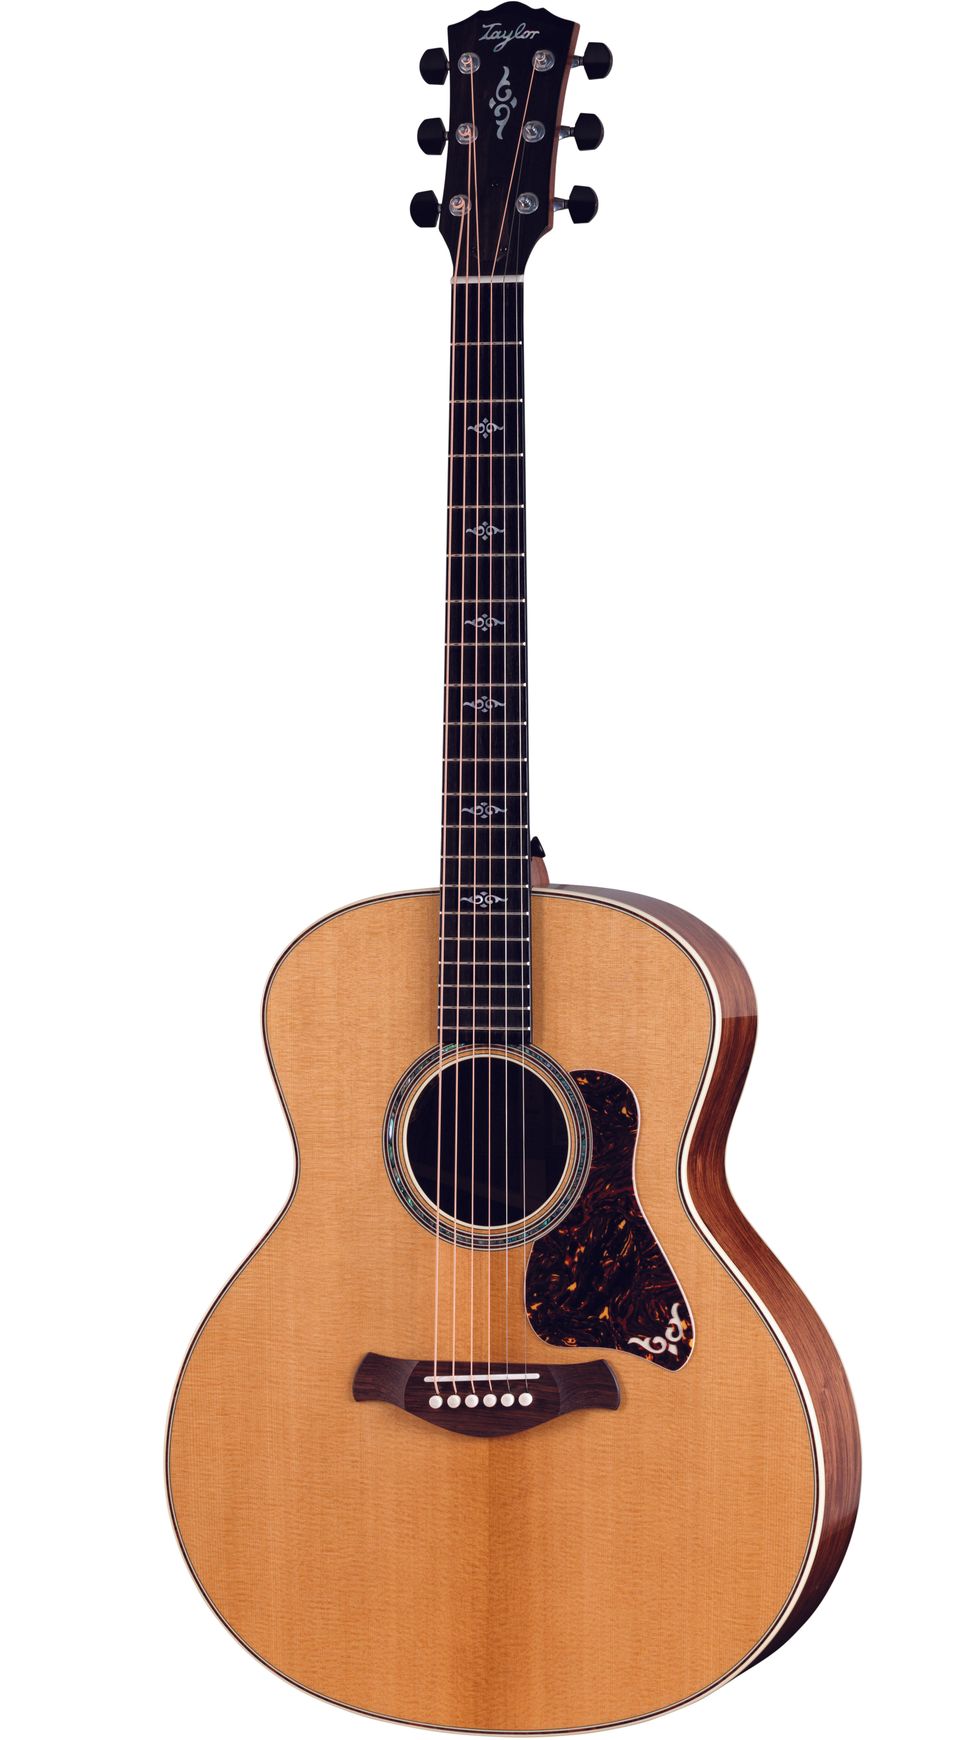
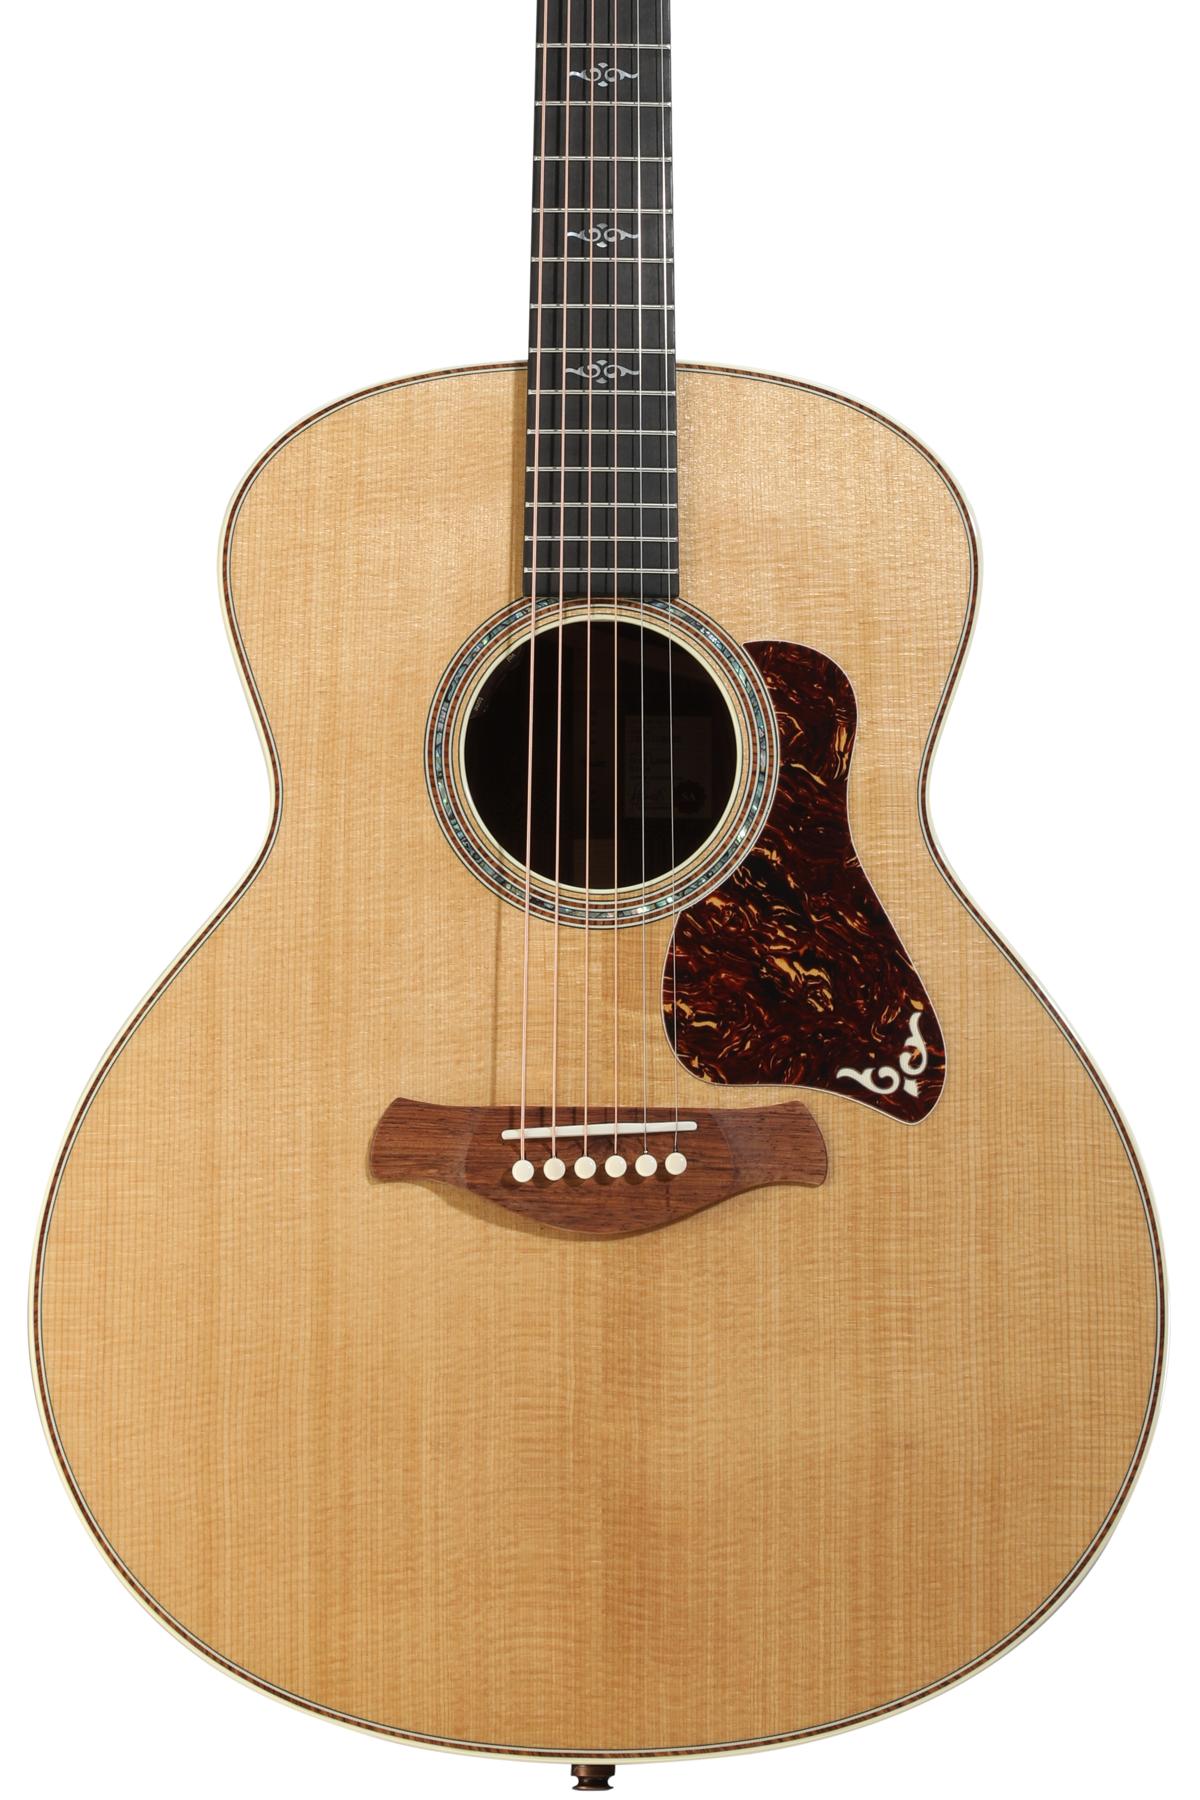
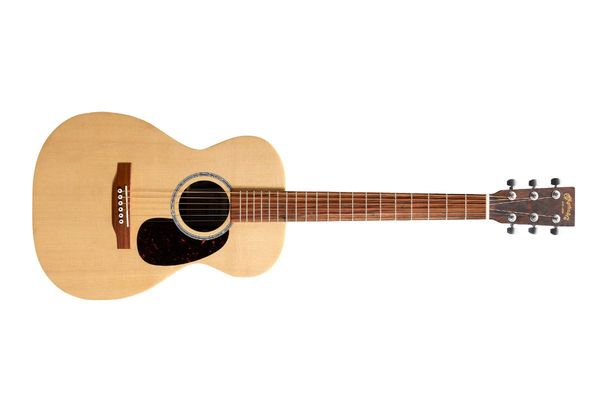
On the Mexico-made $699 Martin 0-X2E, the HPL back-and-sides are newly styled to look like cocobolo. But the big news is that the 0-X2E body uses a solid spruce top in place of the HPL tops on previous 0-X models. I can’t say I’ve been over the moon for most HPL- guitars I’ve played. But most of those have been dreadnoughts and didn’t have wood tops. Spending time with the 0-X2E made me a lot more enthusiastic about HPL as a back and sides material. It also made me wonder if a small-bodied guitar like a Martin 0 is better suited for the material. It sounded lively and felt fast, fun, and comfortable
Hybrid Evolution
The 0-X2E’s satin spruce top makes the guitar sound much cooler, but it also looks organic, understated, and pretty. That’s a good thing because the HPL representation of cocobolo looks pretty plasticky up close. Real cocobolo backs can be aesthetically polarizing, even in their most expensive incarnations. But the complexity, depth, and contrast of the real thing is rendered very two-dimensional here.
The “select hardwood” neck, bridge, and fretboard look a lot like sapele on our review guitar, but could also be utile or cedar, depending on what Martin has on hand in quantity at the time of manufacture. Like the spruce top, they lend a businesslike but pretty simplicity to the already lovely proportions of the 0-sized body. The guitar is conventionally braced on the back (should the use of HPL leave anyone wondering), uses scalloped X braces on the top, and save for the first and second frets, which could stand a little more shaping at the edges, fit and finish are very nice.Get with the Compact Act
While this may not be a universal sentiment, it would be hard to find a flattop body profile more comfortable than a Martin 0. It’s easy to imagine players that primarily play electric gravitating to the 0-X2E’s diminutive dimensions. But it’s also the kind of guitar that makes most playing—and fingerstyle in particular—a lot less fatiguing. Spending long hours working on technique or songwriting is a lot more effortless and inviting. The 0-X2E is a nice player, too, and would qualify as such in a higher price category. Fingerstylists will also enjoy the wider string spacing afforded by the 1 3/4" nut width.
“It’s easy to imagine players that primarily play electric gravitating to its diminutive dimensions.”
Sonically speaking, the 0-X2E is heavy on the midrange, and there are some bright overtones that verge on strident when you strum hard. That said, the guitar never sounds like it’s swimming in a mud of sloppy overtones. String-to-string volume is pretty even and it makes the guitar feel balanced, dynamic in terms of quiet-to-loud range, and detailed at the bass and treble side of the spectrum. And while the 0-X2E is not what the average player would call rich with bass, the 6th string has ample resonance, which underscores the guitar’s surprising and pleasing sustain. That encourages more spacious phrasing (if you’re into that sort of thing) and makes the 0-X2E a cool vehicle for lower alternate tunings.
The Verdict
Martin’s 0-sized, X-series guitars have, to date, each cost around 500 bucks. Is the spruce top, hardwood neck, fretboard, and bridge worth the extra $200? In a purely sonic sense, I would say yes. The 0-X2E has real character and is a pleasure to play. Plus, you get a pretty nice electronics package in the form of the Martin E1, a system that includes a tone control and a very convenient and clever tuner with a readout mounted inconspicuously just inside the soundhole, with an easy-to-read display that faces up toward the player.
There are a number of small guitar alternatives in the affordable sphere. Many of these are “mini” guitars of one kind or another, or inexpensive parlors. There aren’t a lot of inexpensive 0-bodied guitars out there in the strictest sense, though, and even solid-wood versions made in Asia often push past the $1K mark. It’s hard to match the elegant proportions and tone magic that happens in a Martin 0-body, and the 0-X2E serves up a fair bit of that. Whether you’re willing to pay almost 700 bucks for an 0-bodied instrument with a back that looks less-than-authentically wood-like will be a very personal aesthetic decision. But if you let your ears be the guide, the snappy, super-playable, and ultra-comfortable 0-X2E may well surprise.
- Martin Guitars Announces Ed Sheeran X Signature Edition ›
- Decoding the Not-So-Secret Language of Acoustic Guitar Tone ›
- Last Call: The Ghost in the Guitar ›
Reader: Federico Novelli
Hometown: Genoa, Italy
Guitar: The Italian Hybrid
Reader Federico Novelli constructed this hybrid guitar from three layers of pine, courtesy of some old shelves he had laying around.
Through a momentary flash, an amateur Italian luthier envisioned a hybrid design that borrowed elements from his favorite models.
A few years ago, at the beginning of Covid, an idea for a new guitar flashed through my mind. It was a semi-acoustic model with both magnetic and piezo pickups that were mounted on a soundboard that could resonate. It was a nice idea, but I also had to think about how to make it in my tiny cellar without many power tools and using old solid-wood shelves I had available.
I have been playing guitar for 50 years, and I also dabble in luthiery for fun. I have owned a classical guitar, an acoustic guitar, and a Stratocaster, but a jazz guitar was missing from the list. I wanted something that would have more versatility, so the idea of a hybrid semi-acoustic guitar was born.
I started to sketch something on computer-aided design (CAD) software, thinking of a hollowbody design without a center block or sides that needed to be hot-worked with a bending machine. I thought of a construction made of three layers of solid pine wood, individually worked and then glued together in layers, with a single-cutaway body and a glued-in neck.
For the soundboard and back, I used a piece of ash and hand-cut it with a Japanese saw to the proper thickness, so I had two sheets to fit together. Next, I sanded the soundboard and bottom using two striker profiles as sleds and an aluminum box covered in sandpaper to achieve a uniform 3 mm thickness. A huge amount of work, but it didn't cost anything.
“It was a nice idea, but I also had to think about how to make it in my tiny cellar without many electric tools and out of old solid-wood shelves I had available.”
The soundboard has simplified X-bracing, a soundhole with a rosewood edge profile, and an acoustic-style rosewood bridge. For the neck, I used a piece of old furniture with straight grain, shaped it to a Les Paul profile, and added a single-action truss rod. The only new purchase: a cheap Chinese rosewood fretboard.
Then, there was lots of sanding. I worked up to 400-grit, added filler, primer, and transparent nitro varnish, worked the sandpaper up to 1,500-grit, and finally polished.
Our reader and his “Italian job.”
For electronics, I used a Tonerider alnico 2 humbucker pickup and a piezo undersaddle pickup, combined with a modified Shadow preamp that also includes a magnetic pickup input, so you can mix the two sources on a single output. I also installed a bypass switch for power on/off and a direct passive output.
I have to say that I am proud and moderately satisfied both aesthetically and with the sounds it produces, which range from jazz to acoustic and even gypsy jazz. However, I think I will replace the electronics and piezo with Fishman hardware in the future.
Billy Corgan and The Machines of God announce 'A Return to Zero Tour' kicking off on June 7th, featuring classic tracks and deep cuts from iconic albums. Tickets available for presale on April 1st. Don't miss this unforgettable experience! Tour dates include Baltimore, Boston, New York, and more.
Today, Billy Corgan, the frontman of the iconic rock band, The Smashing Pumpkins, has announced a new solo project titled ‘Billy Corgan and The Machines of God’ who will commemorate the anniversaries of the legendary albums with sets drawn from Mellon Collie and The Infinite Sadness and the double album Machina/The Machines of God & Machina II/The Friends & Enemies of Modern Music as well as the 2024 release, Aghori Mhori Mei with a national US tour set to kick off this summer. The tour, titled A Return To Zero, will launch on June 7th and feature the four piece group also embarking on previously-confirmed festival shows.
The A Return to Zero Tour will reintroduce a four-piece, two set guitar lineup in which music from these seminal Pumpkins albums were created. The shows will feature classic tracks and deep cuts from the highly acclaimed records. In addition to Corgan, The Machines of God will feature recently recruited Smashing Pumpkins guitarist Kiki Wong, drummer Jake Hayden and bassist Kid Tigrrr (Jenna Fournier).
Tickets for the upcoming tour will be available for artist presale beginning Tuesday, April 1st at 10:00AM local time through Thursday, April 3rd at 10:00PM local time. Following the presale, the general onsale will begin Friday, April 4th at 10:00AM local time. Please see tour dates below and purchase tickets at ticketmaster.com.
Along with this touring announcement, The Smashing Pumpkins have revealed the details of the long-awaited and reconstituted release of the 2000 concept albums Machina/The Machines of God and its companion Machina II/The Friends & Enemies of Modern Music which have been extensively remixed and remastered. Corgan's Madame Zuzu’s tea shop in Highland Park, IL will exclusively offer this expansive 80-song box set; featuring a 48-track ‘MACHINA’ plus an additional 32 bonus tracks of demos, outtakes, and live performances, marking the first time these two records will officially be united. Additionally, the rock band will release a 16-song reissue of the original Machina/The Machines of God vinyl on August 22nd, and pre-orders will begin on June 27th.
This year will also celebrate the 30th anniversary of The Smashing Pumpkins era-defining acclaimed album, Mellon Collie and The Infinite Sadnesswhich set the sound for a generation. To commemorate the album, Corgan has partnered with Chicago’s Lyric Opera to world-premiere A Night of Mellon Collie and Infinite Sadness, a seven series performance taking place November 21–30, 2025.
These noteworthy music announcements follow on the heels of an already exciting 2025 for Billy Corgan; earlier this year the rock legend also launched his applauded podcast series “The Magnificent Others.”
Beyond these accomplishments, the GRAMMY® Award-winning musician, versatile producer, songwriter, poet, also serves as the President of the National Wrestling Alliance, owns Madame Zuzu’s, a beloved tea shop in Highland, IL, and remains a devout philanthropist through varying initiatives focusing on animal advocacy and NO KILL shelters.
Billy Corgan and The Machines of God - YouTube
Enjoy the videos and music you love, upload original content, and share it all with friends, family, and the world on YouTube.Tour Dates
- June 7 - Baltimore, MD // Baltimore Soundstage
- June 9 - Boston, MA // Paradise Rock Club
- June 11 - Muskoka, ON // Kee to Bala
- June 12 - Toronto, ON // HISTORY
- June 13 - Montreal QC // Beanfield Theatre
- June 15 - New York, NY // Irving Plaza
- June 16 - Philadelphia, PA // Theatre of Living Arts
- June 17 - Allentown, PA // Archer Music Hall
- June 19 - Detroit, MI // St. Andrew’s Hall
- June 20 - Joliet, IL // Taste of Joliet (Festival Performance)
- June 21 - Grand Rapids, MI // Intersection
- June 23 - Pittsburgh, PA // Roxian Theatre
- June 25 - Cleveland, OH // House of Blues Cleveland
- June 26 - Cincinnati, OH // Bogart’s
- June 27 - Milwaukee, WI // Summerfest*
- June 29 - Minneapolis, MN // Varsity Theater
Cut the cord! PG contributor Tom Butwin goes hands-on with three compact wireless guitar systems from Positive Grid, NUX, and Blackstar. From couch jams to club gigs, find the right unit for your rig and playing style.
Positive Grid Spark LINK Guitar Wireless System
Enjoy a stable, noiseless experience with a compact wireless unit design, ultra-low latency, and an extended range. Other features include 6 hours of playing time per charge and a secure 110-degree hinged input plug connection.
NUX B-8 Professional Wireless System - 2.4GHz
A pedal-style professional wireless system geared for electric guitars, acoustic-electric guitars, bass guitars, and even electronic instruments, and transmits 24-bit 48 kHz high-quality audio.
Blackstar Airwire i58 Wireless System
This professional wireless instrument system is designed for guitars, basses, and other instruments with 1/4" outputs. Operating in the 5.8 GHz frequency band, it avoids interference from crowded Wi-Fi signals while delivering authentic tone, ultra-low latency (<6 ms), and high-resolution sound with no treble loss.
Learn More:
https://www.positivegrid.com/
https://www.nuxaudio.com/home.html
https://blackstaramps.com/
An easy guide to re-anchoring a loose tuning machine, restoring a “lost” input jack, refinishing dinged frets, and staunching a dinged surface. Result: no repair fees!
Pardon my French, but I’m about to misethe hell out of some en scenein this article about do-it-yourself guitar repair. Buckle-vous up.
The Guitarist is in the middle of double-tracking a solo. It’s not quite right. Creative juices are flowing, but at any moment, the gate could slam shut. Their social media feed is stagnant, and the algorithm thirsts for content. The studio is 80 bucks an hour. That new boutique fuzz pedal would sound great on this track, surely? It would, of course, as these things are the cure for all problems, but it rests just out of reach.
Desperate for a solution, the Guitarist rests their perfect new guitar against the warm tube amp–only for a moment … but a horrible amplified bwaang from wood, string, and concrete’s violent meeting breaks the temporary silence as gravity muscles potential into the kinetic. The Guitarist breathes a defeated “aw, man,” like a loosened balloon farting hopelessly across an empty room. The gate closes, juices no longer loose, locked, impenetrable by any transistor-based effect. And it’s time to assess the damage.”
I bet you saw yourself in the opening scene of Twenty-Four-and-Three-Quarter-Inches of Woe, which may be the title of the screenplay I just started to write, most likely due to the fact that you’ve made a similarly boneheaded mistake with your instrument.
Unfortunately, my storytelling skills didn’t save a nice new Epiphone Casino from sliding off my amp, meeting the floor, and earning some damage on the way down. Yeah, that’s a true story, and I’m sure something similar has happened to you as well. It can happen to anyone who plays guitar for long enough, but there’s no need for despair yet.
If you’ve been victimized by gravity like I have, as long as the damage isn’t major, you can fix a lot of things yourself. I’ll use my felled Casino as an example. It suffered a loosened tuner, an input jack that fell inside the guitar, a damaged fret, and a few dents in the finish. While I work, I’ll provide some suggestions for supplies and tools to keep in your home repair kit, just in case you ever need them.
Tools for the Tasks
We ordered all of the tools we used in these repairs, excluding the painter’s tape and the toothpicks, which we picked up during lunch at Jack’s Bar-B-Que, from StewMac.
The essentials:
• ESP Multi Spanner
• Archtop Guitar Helping Hand
• Guitar Tech Screwdriver Set
• 3 Corner Fret Dressing Files
• Ultra Thin Master Glue
• GluBoost Fill n’ Finish
• Rectangular Sanding Kit
Can’t Tune It like That
First, let’s take care of the loose tuner, since it’s currently in no shape to reliably hold string tension. The tumble knocked it sideways, which loosened the screws holding in the key, which caused the wood around the screws to strip. It’s alarming to see, but this is a very simple fix.
Add to Repair Kit: Round toothpicks, water-thin CA glue, glue applicator tips, safety goggles
[Note: For the unfamiliar, CA is short for cyanoacrylate. It’s commonly referred to as “Super Glue,” but since that is a brand name, not the generic, I’ll refer to it here as “CA glue.”]
First, remove the tuner by backing the screws out, then pull the tuner from the headstock. My Casino’s tuning keys use a press-in bushing to hold the post straight in the headstock, so no further disassembly is required. However, if you experience this issue with a guitar with more modern-styled tuning keys, you’ll need to use an appropriately sized wrench or socket to remove the screw-in bushing before removing the key.
Next, break a toothpick in half, insert the thicker end into the hole where your mounting screw used to be. Break it off flush with the surface, and repeat the process with the other hole.
Safety goggles on: It’s CA glue time. Trust me, you do not want to squirt this stuff into your eye. Fit an applicator tip to the glue bottle and practice your squeeze on a scrap piece of paper or wood, far away from anything you don’t want glued to your guitar or yourself. This stuff is magic—it will bond things you never intended if you aren’t careful.
All you need is a very small drop, so practice until you can confidently flow out just a small controlled amount. Once you’ve mastered that, drop a small amount of water-thin CA glue into each filled hole. It will soak through the toothpick into the surrounding wood just enough for this quick fix. Let it cure for at least 15 minutes, but longer is even better.
Pop the tuner back in and drive the screws straight into the toothpick-filled holes. The screw will compress the toothpick into the existing wood and create new threads strong enough to hold your tuner in place.
Congratulations! You fixed it well enough to at least make it through a session. I’ve done this on several guitars that lasted years with no issues, so you should be confident in your work.
Hit the Road, Jack
Look, there’s no way to sugarcoat this. Fishing an output jack out of a hollowbody guitar is a pain. You can do this. All you need is patience and a few handy gadgets.
Add to Repair Kit: flashlight, multi-spanner, small drywall anchor, “helping hand,” small screwdriver
Your first task is to locate the jack inside the guitar. Odds are it didn’t fall far away from where it needs to be, since it’s probably wired to one of your control potentiometers. Use your flashlight to shine some light inside the f-hole to help find it.
I found mine wedged against the treble side of the rim, a little farther away than I can reach with my fingers. This is not zesty. I am unhappy but equipped and determined.
The tool I described as a “helping hand” becomes useful here. It’s essentially just a bent hook at the end of a handle made out of pliable heavy wire. Several guitar parts suppliers sell something similar. I got mine from StewMac for a reasonable price, but if you want to be thrifty about it, there’s no reason why you can’t cut and bend a wire coat hanger.
Take a few deep breaths, and working through the f-hole, use the hook end of your helping hand to gently pull the output jack back toward where it was mounted. Bend the helping hand however needed to reach the jack as easily as possible.
I managed to pull the jack back enough to put a small screwdriver through the jack’s mounting hole and then through the jack itself. That screwdriver will act as a guide while I lift the jack back into place with the helping hand.
You should expect this will take several attempts. Try not to get frustrated. With enough patience, you’ll be able to get the jack back where it belongs. Once you have the jack in place, carefully thread the washer and nut back onto the jack. It shouldn’t take much effort to thread it back on. Just be careful not to cross-thread the nut.
Now that the nut is threaded on enough so it won’t fall back in, the challenge is to tighten it without twisting the jack itself to avoid breaking any wires. I’ve seen and used a few different methods to accomplish this, but I came across one recently that I really like.
This is where you’ll use your drywall anchor. Get one small enough to fit inside the jack without using too much force, then tighten the screw in the anchor so that it spreads to fit tightly inside the jack. This will hold it steady enough to tighten the nut with a multi-spanner tool or an appropriately-sized wrench.
I like a multi-spanner for this job, because it’s always the right size and is slim enough to not be clumsy for operations like this. Like the helping hand, lots of suppliers sell something similar using different names. Mine is made by ESP and also arrived in my StewMac tool box. I use it all the time for all sorts of tasks.
Once the nut is tightened, unscrew the drywall anchor, remove it, and test the jack for sound by plugging your guitar into an amp. A positive result should be obvious at this point, but if you don’t hear any signal, or an excessive consistent buzz, get in touch with your local repair tech.
Got a Dent In My Fret, Man
Honestly, face-first is probably the best way a guitar like my Casino could have hit the ground. The damage could’ve been far worse. Check any forum for endless complaints about Gibson/Epiphone headstock breaks. But I do need to address some damage to a fret caused during the fall.
The issue here is that plain steel electric guitar strings—like your G, B, and E strings—are considerably harder than most frets (my stainless steel fret contingency, put your hands down and let me finish), so it’s possible for a string to leave a small sharp dent in a fret if you hit it with enough force. This specific issue might go unnoticed until it’s time to bend a note at that fret, then you’ll feel and hear the string catch it. No good.
Before we get started: Having allof your frets carefully levelled, recrowned, and polished is alwaysa better solution than partially levelling just a few frets. But considering the entire premise we’ve constructed, which is a situation where we just want the guitar back in action relatively quickly, a partial fret level on the upper frets is perfectly fine as long as it’s done carefully.
Add to Repair Kit: Crowning file (three-corner or rounded), assortment of sandpaper (400 grit to 800 should be fine), 0000 extra-fine steel wool (optional), fretboard conditioner, permanent marker.
First thing we need to do is identify which frets need the work. Let’s say you have a nick in your 17th fret on the treble side under the B string. The goal is to bring the height of that damaged fret and all the frets past it down until the nick disappears. After that, remove the strings before you begin working.
To accomplish this, mark the damaged frets and all frets past it with a permanent marker. A trusty black Sharpie works great for this, but any darker color works fine. For this repair, we only need to work on the treble side of the frets, so that’s all you need to focus on. Also, use some blue painter’s marking tape to protect the area of the guitar near where you will be working. Small slips of a file or sandpaper can cause some nasty injuries to the guitar’s surface.
Next, level the damaged fret and all frets past it (moving toward the bridge) with something stiff enough to not flex under pressure. I keep an old credit card—a nice sturdy one—with a bit of 400-grit sandpaper glued to one side along the shorter edge, 800 grit on the other side. Start with the 400 and work your way down, being careful not to use too much pressure. Let the sandpaper do the work.
You’ll notice the ink is removed as you sand. The way to make sure you’re keeping everything level is to stop frequently and observe the new clean areas on top of each fret. Each one should be about the same width.
This will take a while. A 400-grit sandpaper does not remove material quickly, 800 grit even less so. I’m suggesting this technique because working slowly makes it more difficult to get yourself in trouble. Several suppliers sell mini files for spot leveling, but I don’t recommend starting there because they remove fret material pretty aggressively.
Eventually you’ll notice the little divot in your 17th fret is almost gone. Now’s time to switch to 800 grit to finish the job. You guessed correctly: This will take even longer, but it’ll leave a nice finish without removing any more material than necessary.
Great! Now you have five flat-topped frets. That won’t sound very good, so now you need to re-crown them, giving them a rounded profile to match the other frets. I like to use a 3-corner file to slowly round over each side of the fret, working from the fretboard up, but if you feel like dropping some serious flow on a specialized crowning file, this job can be a lot easier. Be sure to get the marker back out, ink up each fret, and stop filing when just a tiny sliver of ink is left on top of each fret.
Use a piece of 800 grit paper to remove any file marks and smooth out each fret. If you have finer grits, you could work your way up to 1200 or so, but don’t go too hard or you could undo your work. You just want the frets clean and smooth. At this point, I like the way frets feel after a quick buff with 0000 steel wool, but the mess left behind does rightfully deter a lot of repair techs. If you opt in for this, be sure to tape off your pickups and consider finding a second location for this step.
Work in some fretboard conditioner if you like (skip it if you have a maple or synthetic board; no need for that here), put some new strings on, and check your work. Play every note on these frets, to make sure they ring out without any buzzes. It may not look perfect, but as long as the guitar sounds good, you’re okay until it’s time for a full level/crown/polish job.
Not Finished Until It’s, Uh, Finished
Now for the last souvenir from my Casino’s short journey to the floor. I noticed a few spots along the rim of the guitar where the finish was damaged. Specifically, it looks like the guitar hit something with an edge on the way down hard enough to put a couple of jagged dents in it, right along the binding.
Funny, that’s actually what binding is intended for–protecting edges and corners from damage. Anyway, we need to discuss a few things about guitar finishes.
For the purpose of this article, I’m only going to discuss repairs to the clear coat, since that’s where my damage is. Most guitars now are finished using polyurethane or lacquer for the top clear-coat layer.
Speaking verygenerally, lacquer finishes are softer and less durable, which makes hiding repairs a lot easier if you have the skills and patience. Polyurethane finishes are hard and tough in every way: hard to damage and tough to hide repairs regardless of skills or patience.
I happen to know that my formerly mint-condition Casino has a polyurethane finish, which means I’m going to lower my expectations with this repair. Instead of trying to make it look like it never happened, which will take a lot of work, I’ll just try to keep it from getting worse over time, which will take considerably less work.
It also means I won’t be discussing how to repair lacquer finishes, which is a bit more in-depth, requires a lot more patience and practice, and is therefore not really recommended for the average DIY’er—at least not in the scope of this piece. So if your guitar has a lacquer finish, I don’t think this part applies. Let someone else take care of it, or maybe skip this part and learn to love your guitar as is. The latter is still an admirable move.
Add to Repair Kit: Nothing! You already have what you need from the previous repairs. Feel good about that.
Since the damage is a pronounced dent with sharp edges in the clear coat, all I really need to do is seal it with an appropriate material. And the material appropriate for repairing polyurethane finishes is—you guessed it—CA glue, because it dries hard, clear, and quickly, much like polyurethane.
Step one: Use painter’s masking tape around the area of the damage, just in case the glue runs when applied. Step two: Put glue on the dented finish. CA glue will fill in all the small cracks within the damage and seal the existing finish. Be careful; use the smallest-drop-possible technique you perfected when fixing the tuning peg, and give it plenty of time to dry.
That’s it. That’s all I need to keep the finish from continuing to chip the more I play it. Yes, I saved the easiest one for last, as a little treat.
Obviously, this isn’t a particularly beautiful repair, so I could go above and beyond by using thicker CA glue—for example, GluBoost Fill n’ Finish—to fill it in completely, sand it level, and polish the area back to the original mirror gloss. Dan Erlewine has a few excellent YouTube videos outlining this exact method that are easy to find, and I encourage you to try if you’re so inclined. But for my purposes, this will do.
Accidents will happen if you’re actually playing your guitar, but they’re no cause for panic when they do. Even though the guitar isn’t perfect anymore, it’s perfectly playable, and I can get by with it for now. I broke it, so I fixed it, which is something I hope you feel empowered to do should you break yours.
Next time, I’ll use a good guitar stand.