

Over the course of my career messing with guitars, I’ve learned a few things. Among them—for some reason, one day, you’ll look at one of your guitars and wish it were different. I don’t know why this happens, but it does.
Maybe you need multiple sounds for a gig but only want to carry one instrument. You might love your guitar as is but want to ensure its longevity. Or maybe your dissatisfaction with something else in your life is manifesting in strange ways—I’m not a therapist.
But if you need help solving the problem, I can suggest three modifications to augment your axe. Best of all, you can do them yourself.
Have Bigsby, Will Wobble
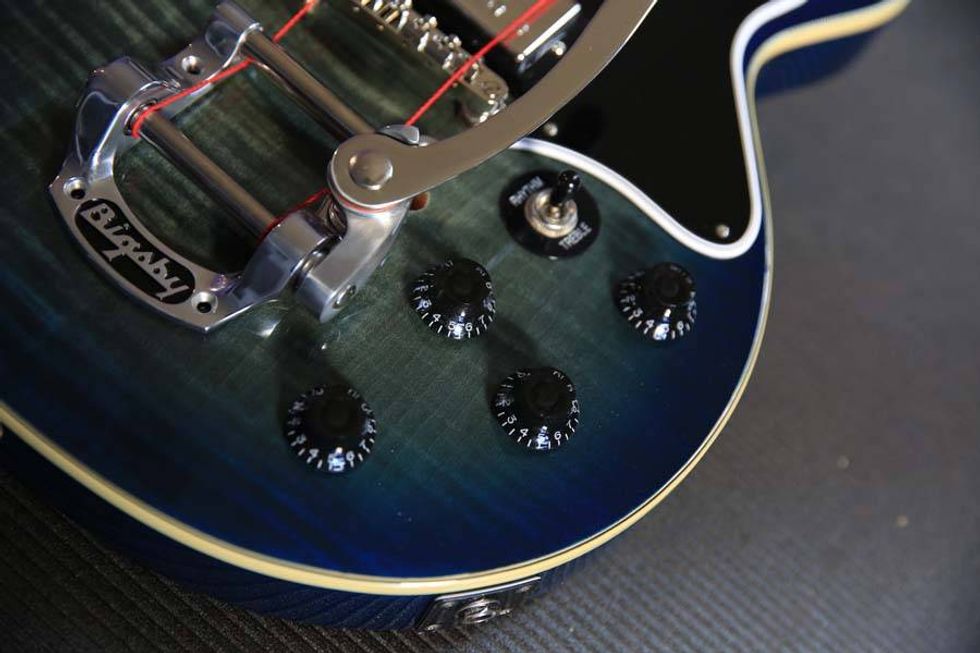
If you’ve ever been interested in adding a vibrato to your hardtail guitar, here’s some good news: It’s easier than you’d think. For this project, I have an ultra-cool Epiphone Inspired by Gibson Custom 1960 Les Paul Special Double Cut, and in my opinion, nothing goes better with a Gibson than a Bigsby vibrato.
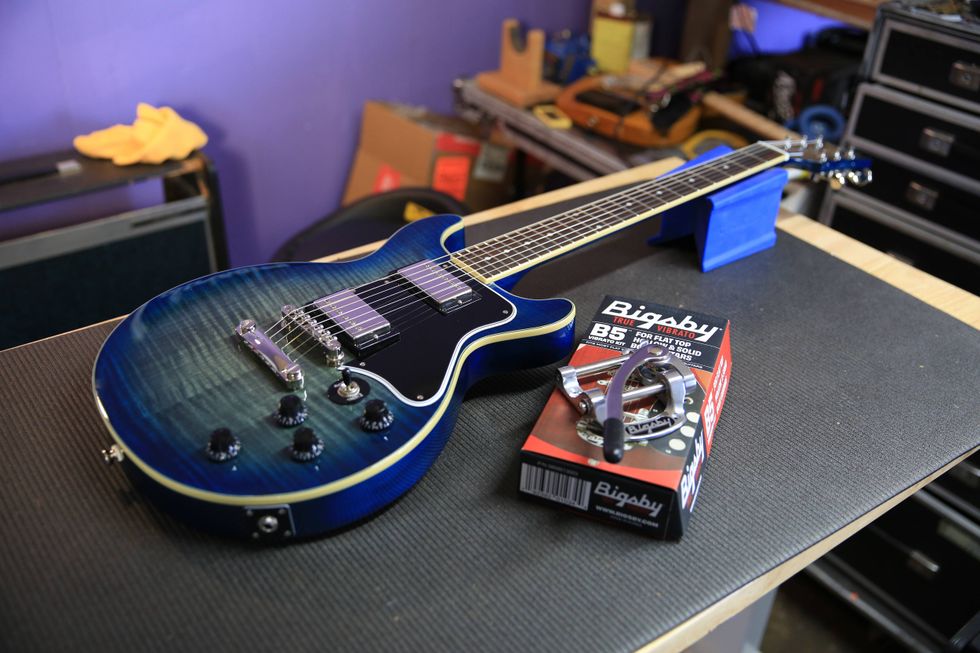
Bigsby makes several different tailpieces that allow for the addition of a vibrato system to just about any electric guitar. For the Epiphone, I chose a B5, which is designed to install directly onto a flattop guitar with a tension bar to preserve string break angle behind the bridge.
According to the provided instructions in the package and online, the job requires a 3/32" drill bit, a drill in which to put the drill bit, and a Phillips head screwdriver. Additionally, I’ll use an awl, a claw hammer, a small piece of scrap wood, a candle (seriously), and a pencil.
There are three things to consider when mounting a Bigsby. First, the vibrato needs to be aligned side-to-side well enough to keep the strings from catching in your saddles. This doesn’t have to be perfect, just do the best you can.
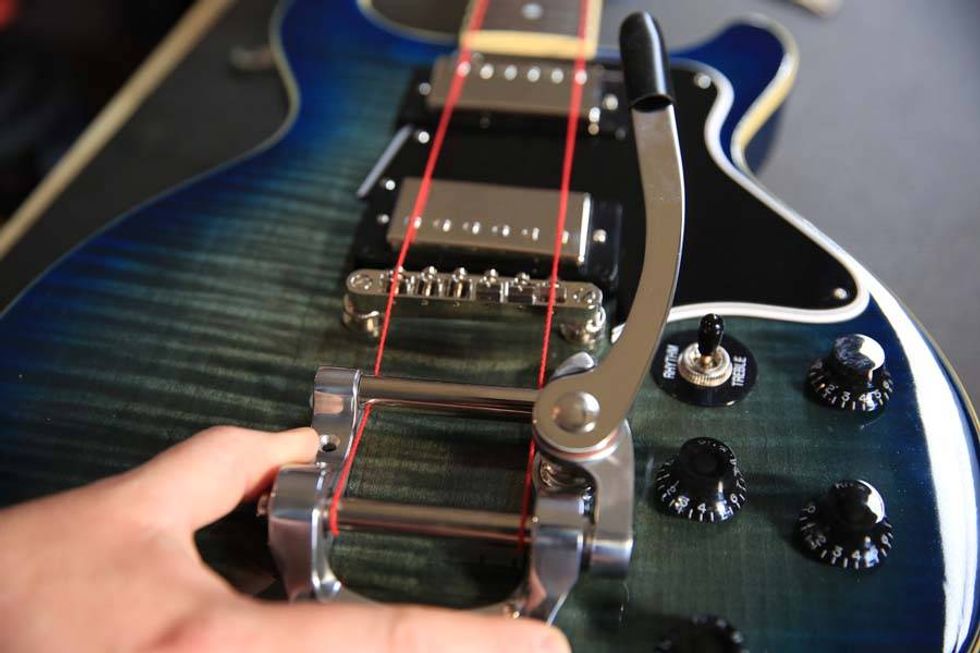
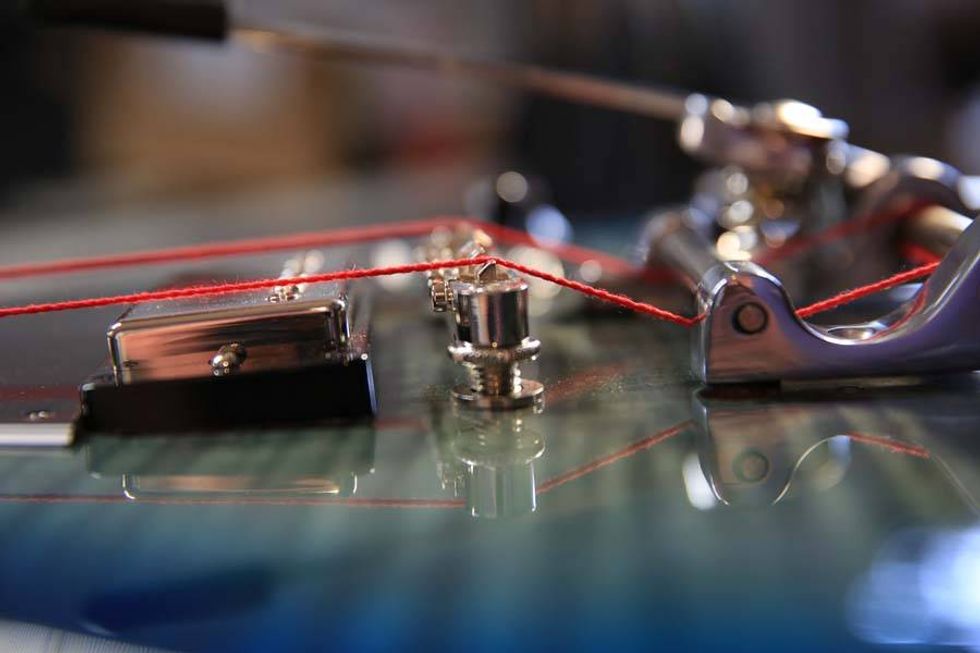
Then, make sure the vibrato location allows for proper string break angle behind the bridge. The strings should only touch the saddles, not the bridge itself. Bigsby’s instructions suggest placing the tension bar where the stop tailpiece was located, and moving back as needed from there.
Finally, make sure the vibrato arm and your controls don’t interfere with each other—it may not be perfect depending on your guitar, but that’s part of the compromise.
“Next time you feel restless with your guitar, one of these ideas might be just the ticket.”
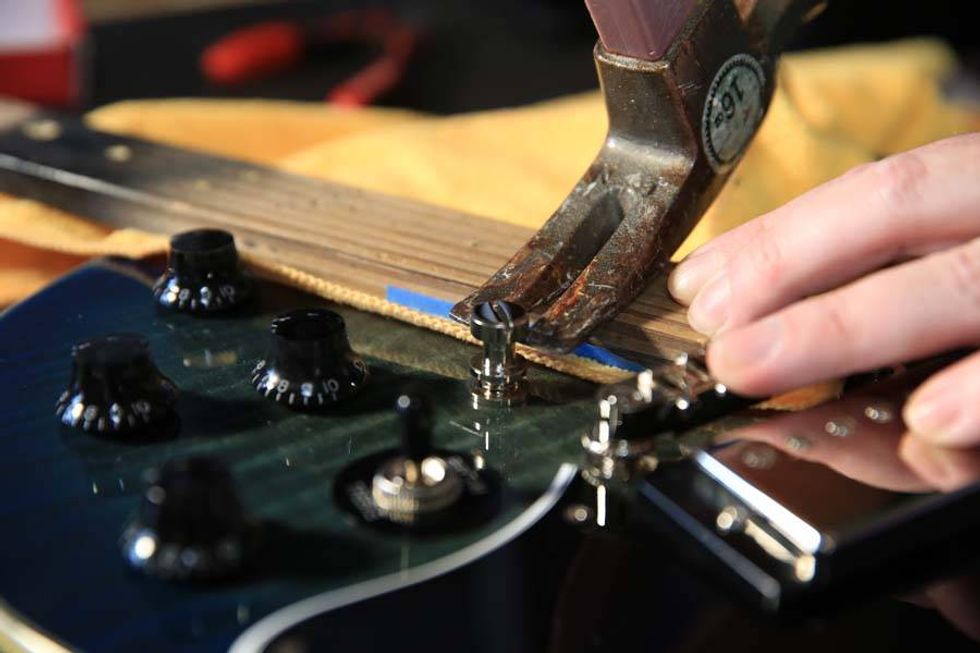
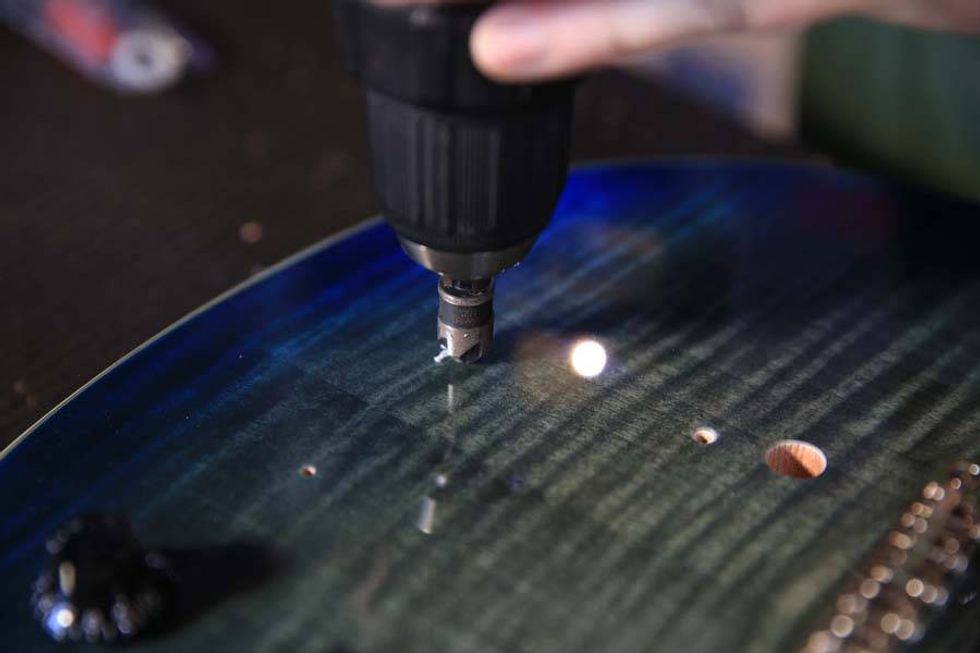
As long as all three criteria are met well enough, mark where to drill with an awl by poking into the finish enough to keep the drill bit from wandering. Using the 3/32" bit, only drill as deep as needed to seat the Bigsby flush with the top.
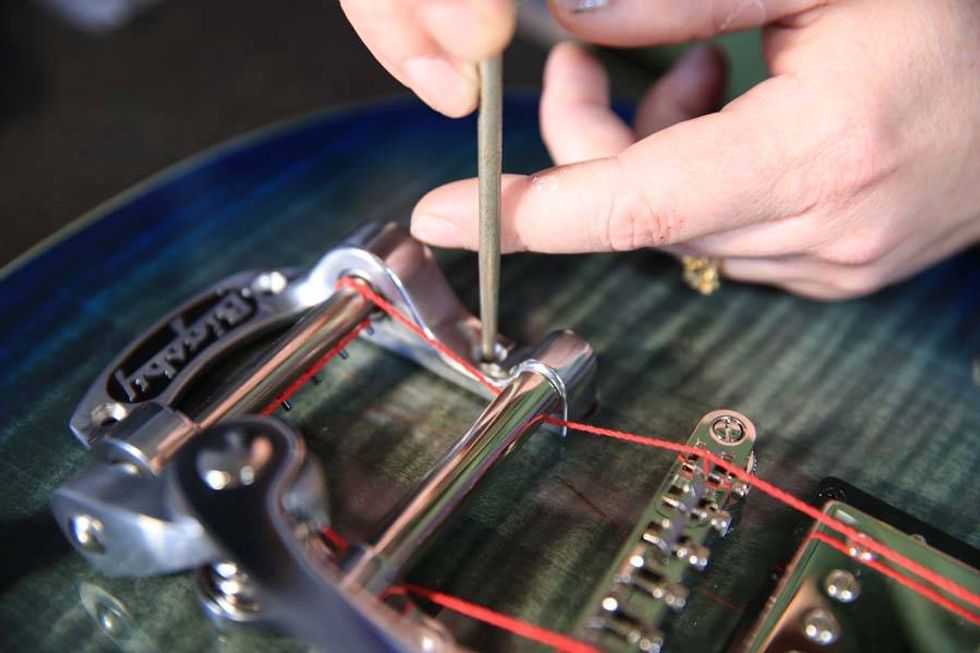
Next, use a countersink on each hole, just enough to break the edges of the finish. This will prevent cracking and help the Bigsby to sit flush. Then, mount the vibrato using candle wax to lubricate each screw. This makes installation easier and avoids stripping the heads or, even worse, breaking the screw.
On guitars like this Epiphone, there is a wire that grounds one of the stop bar posts to your electronics. Since the Bigsby replaces the stop bar, we need a new ground wire connected to either the Bigsby or the bridge. I chose to remove the treble side bridge post ferrule, carefully prying it out with a claw hammer braced on a piece of wood. Next, drill a small hole into the bridge pickup cavity, and run a new ground wire from there. Make sure the new ground wire is contacting the bridge post ferrule when driven back in, and double check continuity with a multimeter.

What about the holes left open from the removed stop bar? There’s no right answer here. You can use headless studs for a smooth finished look, or one of those custom-made plastic plaques if there’s room. In this case, I won’t do anything at all, because I like the rough-and-tumble look of the holes. It proudly announces, “I did this myself!”

Rub a little graphite into the nut slots and saddles with the pencil, spend plenty of time stretching in your strings, and wiggle loose your next song.
“I like the rough-and-tumble look of the holes from the removed stop bar. It proudly announces, ‘I did this myself!’”
Love Will Wear Out Some Pots
One of my favorite ways to make a guitar feel more special and personalized is to upgrade with more robust electronics, even if you don’t swap out pickups.
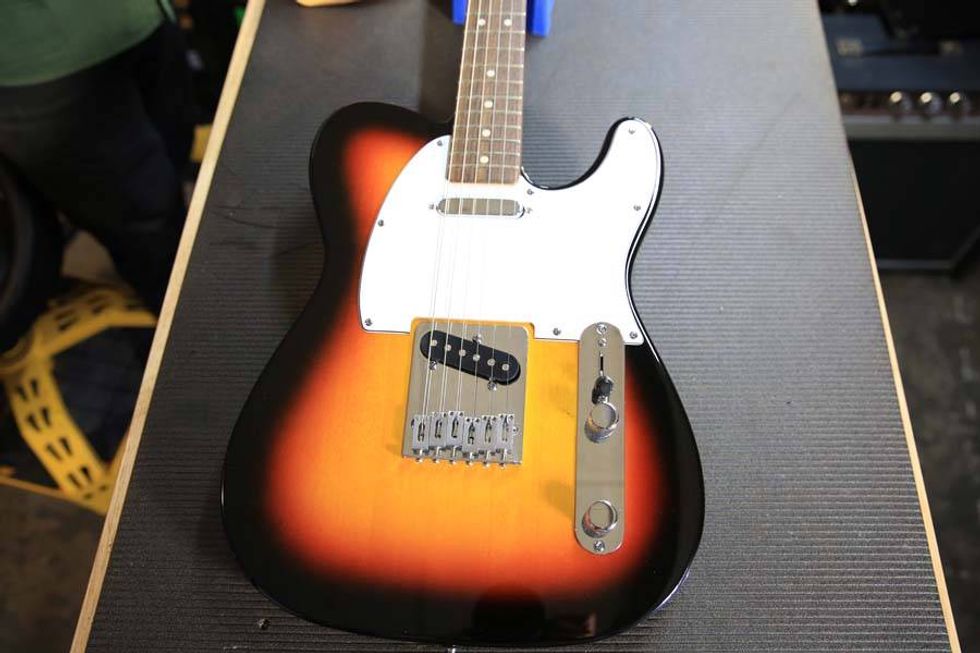
For this project I have a new Indonesian-made Fender Standard Telecaster. It’s a nice instrument, reminiscent of the prior Mexican-made Standard-series guitars. I always loved those, and this particular one is giving similar energy.
Before getting started we should probably discuss why I, or anyone, might take a brand-new, well-designed guitar and immediately replace the electronics in it. Nothing’s wrong with it as is, and I wouldn’t describe the existing electronics as low-quality.
Although great sound is obviously important, I approach jobs like this less as some kind of tone cleric and more as a working musician—or maybe as a tech for said musician, who needs their guitar to work every time, no matter what. From that perspective, I prioritize durability and consider it a long-term investment in the life of the instrument.
If you’re looking to beef up your guitar’s electronics without starting from scratch, a pre-wired harness might be a good option. For this job, I’m using a pre-wired Golden Age rig from StewMac, which includes high-quality CTS potentiometers, a CRL switch, Orange Drop capacitors, and a Switchcraft output jack, all hand-soldered together using old-school cloth wire. Dead simple, durable, easy.
“In my opinion, nothing goes better with a Gibson than a Bigsby vibrato.”

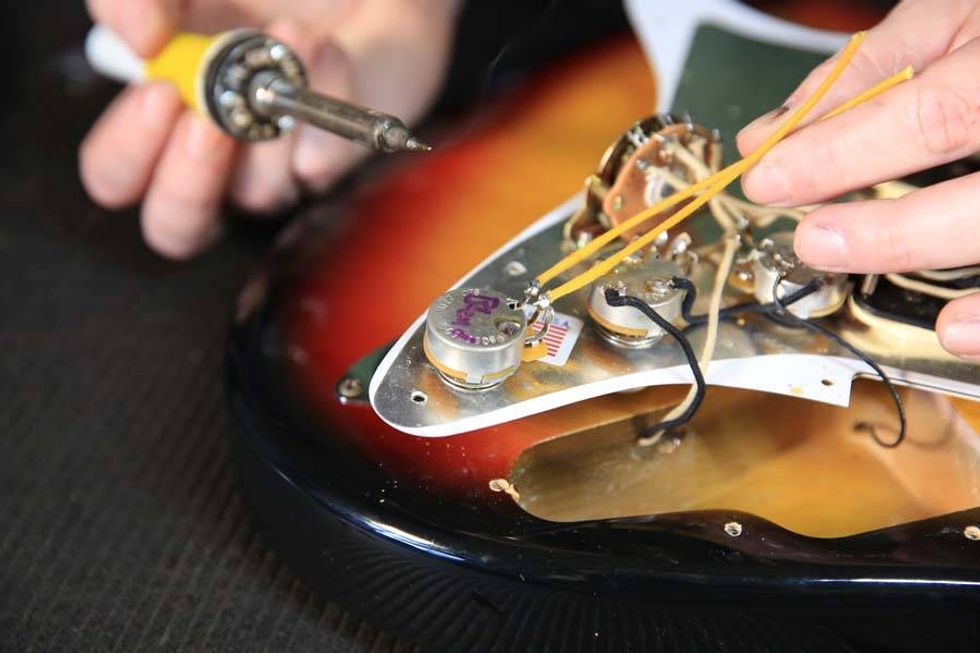
From here, it’s really not any more complicated than removing the old stuff and putting in the new. Gather up your electronics kit—I keep solder, flush-cut clippers, a simple wire stripper, a solder remover, and a few species of needle-nose pliers in mine—as well as a Phillips screwdriver, a small flathead screwdriver, and wrenches to remove and install the new parts.
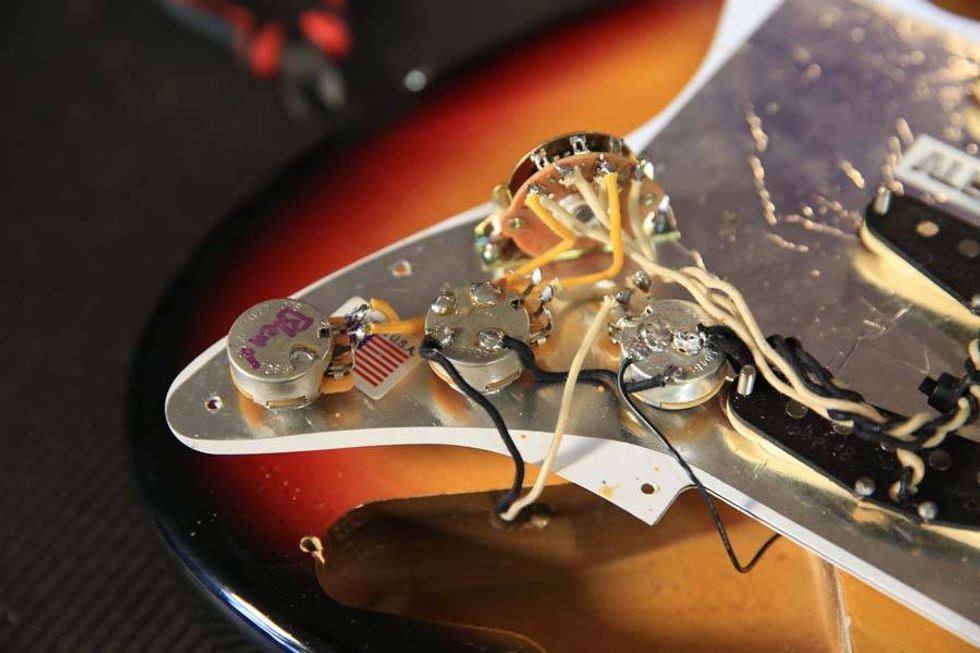
Remove the knobs and take off the control plate to reveal the existing electronics. Desolder any ground wires that connect the electronics to the pickups, the bridge, or the body cavity. These are usually soldered directly to the back of the volume potentiometer in one or two big globs.
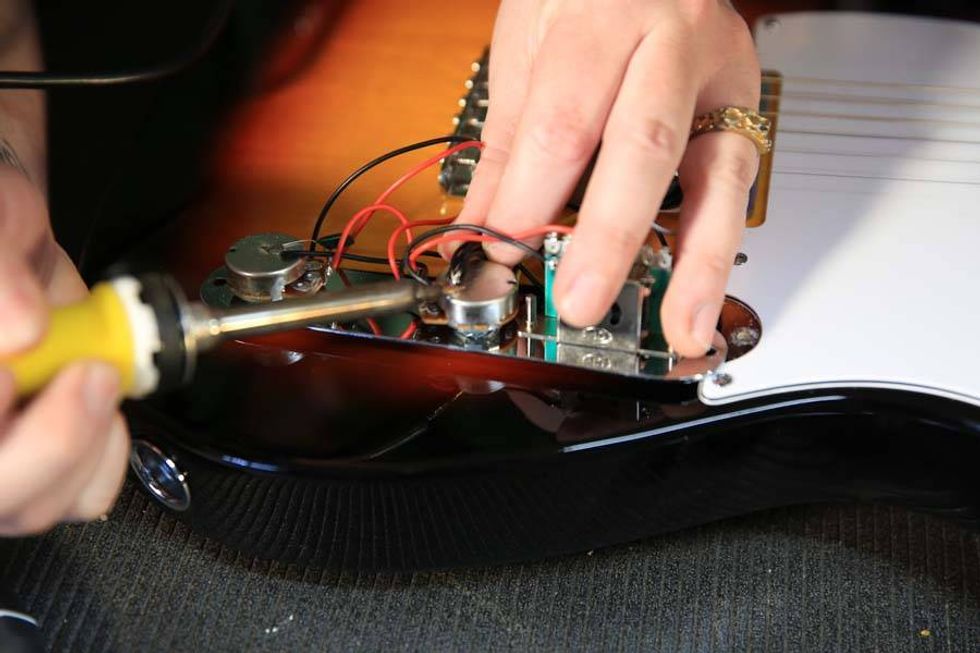
Make a note of where your pickup lead wires are soldered to the switch, and if you’re easily confused like I am, label each with some masking tape and a marker. All you need to know is which one comes from the neck pickup and which one comes from the bridge. Desolder these wires from the existing switch.

Use a wrench to remove the existing output jack, and now you can pull the whole control plate assembly out of the guitar. You should be able to use the same wrench to undo the nuts holding the potentiometers from the control plate, and a Phillips driver should free the switch.
“If you’re looking to beef up your guitar’s electronics without starting from scratch, a pre-wired harness might be a good option.”
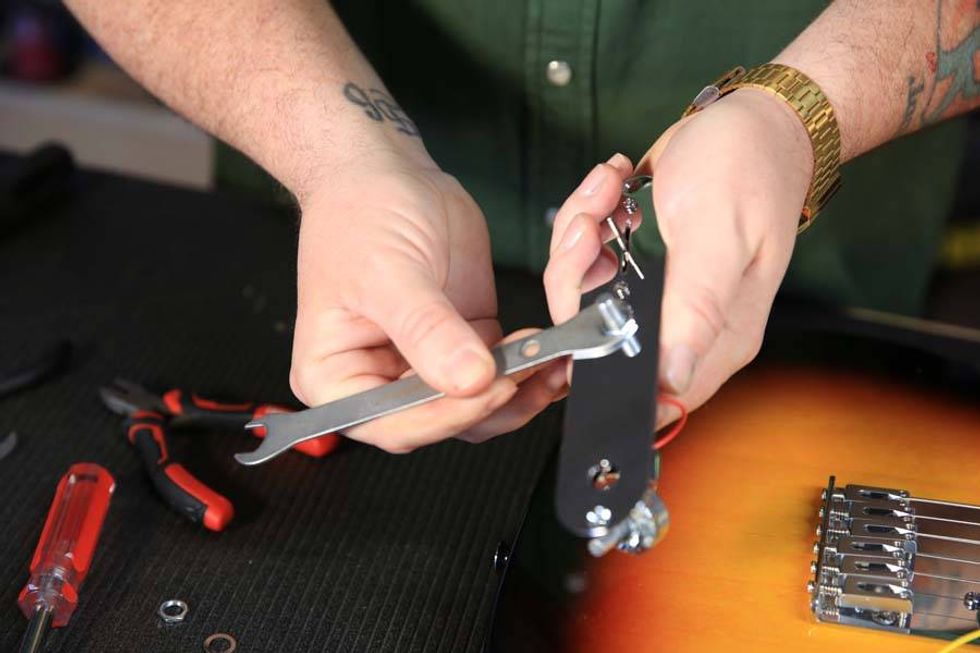
Now, with your new parts, do these steps in reverse. Be aware that some imported models may not have holes big enough to accept the new electronics. In this case, you can use a tapered reamer or a step drill bit—if you’re brave—to slightly enlarge the holes.
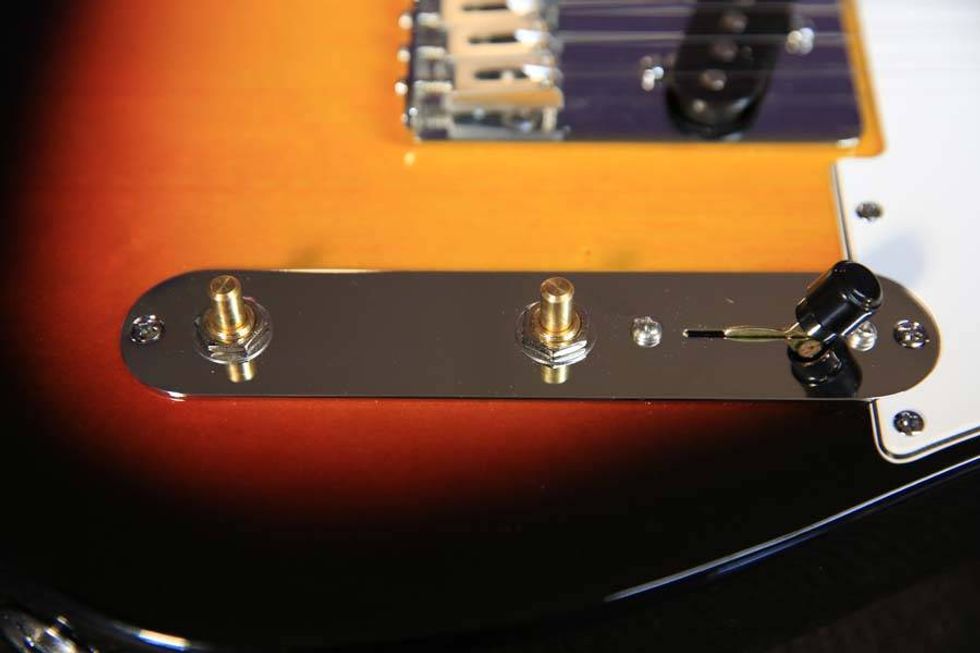
Once you have everything screwed in, bolted on, and tightened up, re-solder the wires you removed to their appropriate locations. All ground wires can go directly to the back of the new volume pot, and the neck and bridge pickup leads go to their respective locations on the new switch. If you aren’t sure where that is, there are plenty of resources online for Telecaster wiring, which is about as simple as it gets.

Put the control plate back on, pop on the new switch tip, and replace your knobs. Now, check your work through an amp. Listen to how your new electronics respond when turned up or down. The switch should solidly clunk into each of the three positions. Volume and tone controls should be nice and smooth to turn. Your guitar cable should snap into the jack securely and firmly without much effort.
The feeling you’re now likely experiencing: That’s the good stuff. Go forth and gig confidently, knowing that if your guitar’s electronics have anything to do with it, you’re going to be okay for a long, long time.
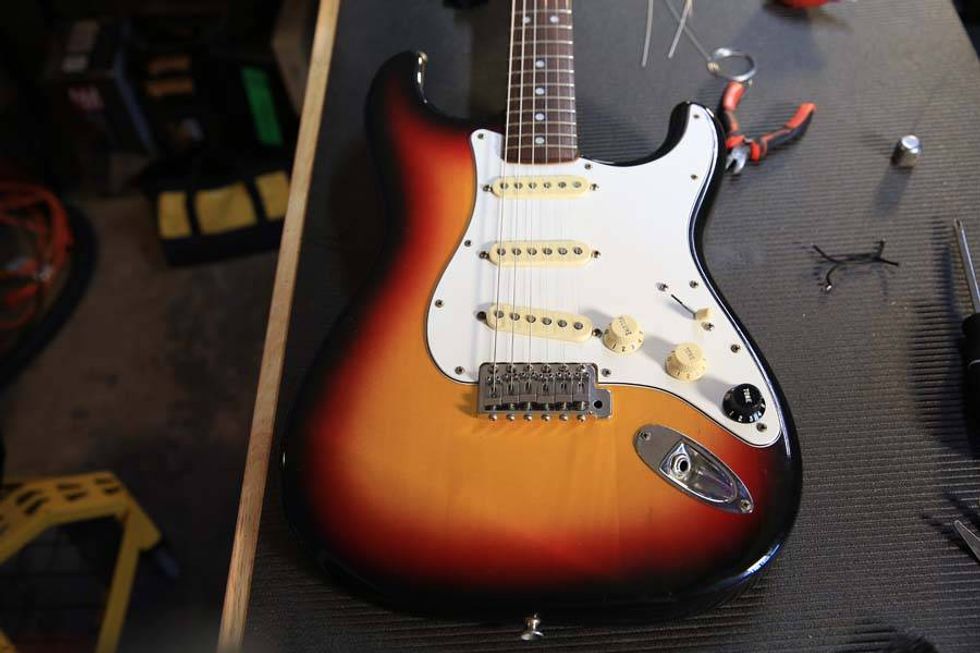
Blend It, Blend It, Just a Little Bit
Stratocaster aficionados, enthusiasts, owner-operators: behold, a variation of the Seven Sound Strat modification that requires nothing more than what’s already inside your instrument. Go put the drill back, we won’t need it.
If you are unaware of the Seven Sound configuration, it’s a modification that allows either the neck or bridge pickup to engage regardless of how the 5-way selector is set. This provides two additional pickup combinations—neck plus bridge, or all three pickups together—usually via a mini switch mounted to the pickguard.
Now, this modification is nothing new, but it’s a fun way to expand both your skills and the sound of your Strat. While it does require the modification of one potentiometer, it’s much sneakier than adding a switch. And therefore, more fun.
Here’s the game plan: reconfigure the existing control layout, disassemble and modify one of the former tone controls, then add two wires. That’s it.
First, convert your Strat control layout to a master volume and a single master tone. This isn’t overly complicated—just find a good Telecaster wiring diagram from an online resource and copy how the volume and tone controls are wired onto your guitar. Disconnect and remove the two leads from the switch to the tone controls—you won’t need them.

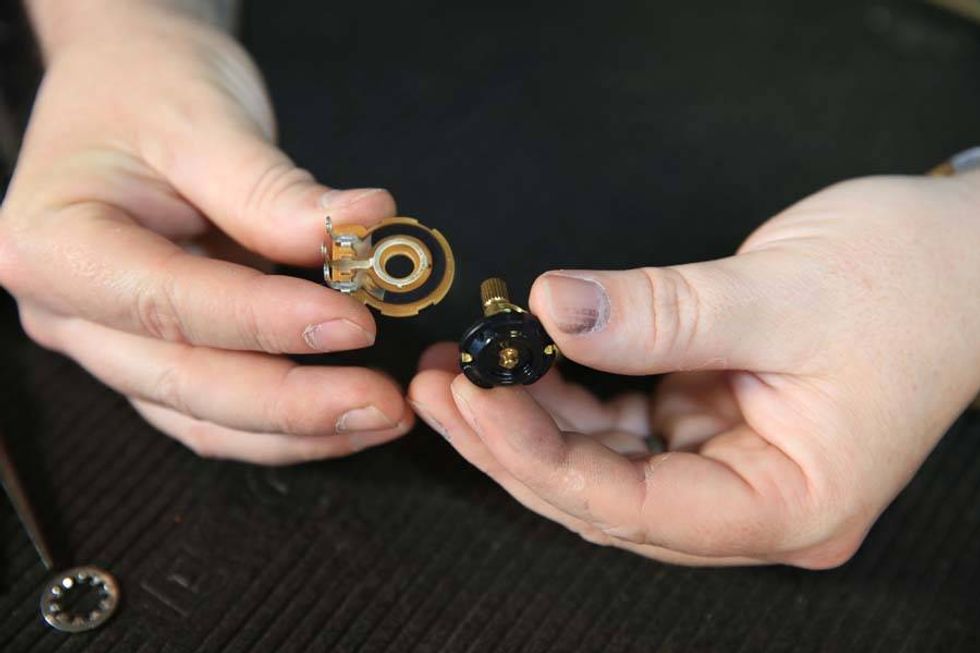
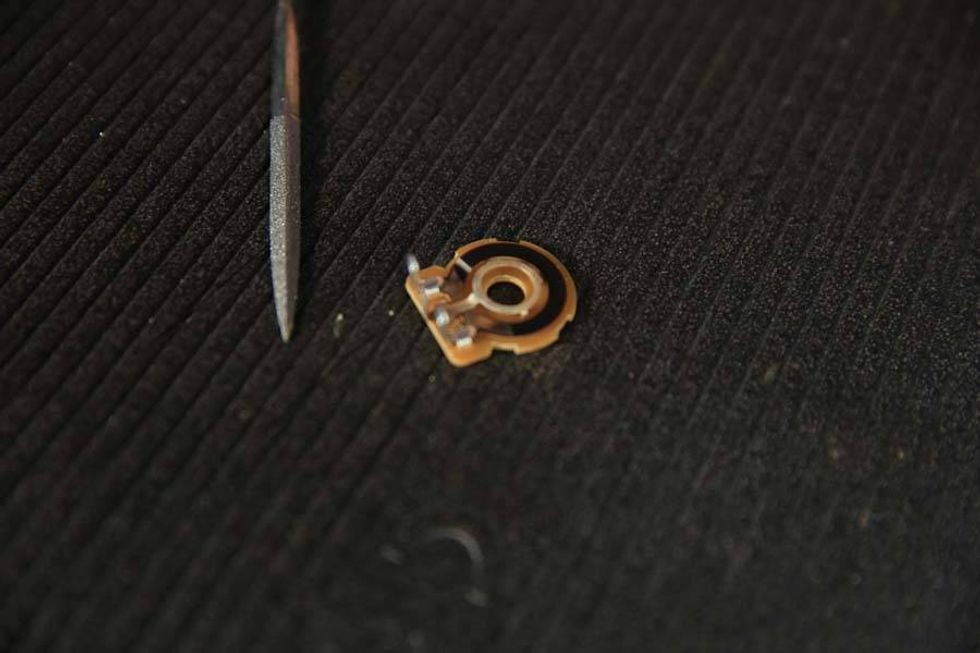
Now you should have a single, unused potentiometer left over. Remove it from the pickguard and disassemble it by prying up the four metal tabs holding the back cover onto the housing, removing the cover, and pushing the shaft out of the housing. Now we can access the carbon resistive strip, the kind of horseshoe-shaped piece that allows your potentiometer to function.
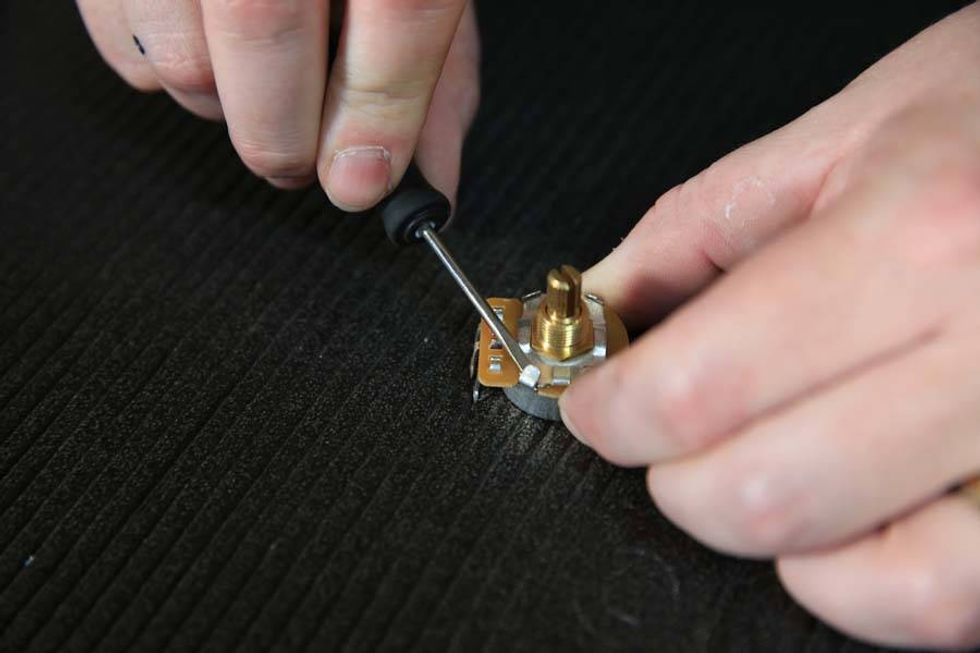
The goal is to convert it into a “no-load” potentiometer in which the resistance is removed from the circuit when the potentiometer is all the way up. We have two options here: Either coat the furthest counterclockwise end (viewed with the terminals facing upwards) of the resistive strip in superglue to isolate the wiper from the strip at full blast, or use a razor or a small file to cut a small groove through the strip to break continuity when wide open.
I think the latter option feels better, but it’s also more challenging, with greater opportunity for error. If you’re worried about messing up your guitar’s original parts, you can use any old potentiometer you have lying around for this modification and swap it in. I recommend a higher-quality, full-size part, as it’s easier to modify.
Now, carefully reassemble the potentiometer, and bend the four tabs back down. Check resistance with a potentiometer—you should see a number increasing as the pot is turned up, but all the way up, the number should disappear.
Mount it to the pickguard and add two wires—one from the center lug to the switch where your bridge pickup lead is soldered, and another from the right-most lug to where your bridge pickup lead is connected. Check by tapping your pickups—with the blend control rolled back a bit, you should have the neck pickup added to both the bridge pickup and bridge-and-neck pickup selections. With the blend pot all the way up, it should function like a normal Strat.
If that worked, string the guitar back up and enjoy all seven sounds. Engaging all three pickups together is fun—it’s like a Strat running through a Strat Simulator—but my favorite is the neck and bridge together.
Next time you feel restless with your guitar, one of these ideas might be just the ticket. And remember: These aren’t just useful for the guitars I worked on—they’re skills you can apply to many different instruments, no specialized tools required.