Luthier Dave Helmer shows you how to cure buzzy strings, bad intonation, gnarly frets, high action, and other common troubles with off-the-shelf axes.
Guitars are the best. We love them. It’s fun to fall in love with a guitar at a store, buy it, and proudly bring it home. But we’ve all been there … where after a month that new guitar is just not playing as good as it was before. As guitar players, we know what feels good and what feels bad when it comes to playability. Maybe you have setup preferences that you like on all your guitars, or maybe you want to experiment with changes to your setup?
With a few tools, you can perform a handful of tasks that will make your new axe play better and stay in tune. This article is for folks who already know how to tighten loose parts, raise and lower string saddles or bridges, and adjust their truss rods—though I’ll share a tip on how to check it with even more accuracy.
Is that big bulky stock nut uncomfortable on your hand? Let’s trim it down and reshape it. If the action feels high and the neck looks straight, I’ll show you how to lower the action. And haven’t we all swapped out pickups and wondered, “Do they really sound better, or do I think that just because they’re new?” Before you swap your pickups, I’ll share some pickup-height measurements that might make you change your mind.
But wait! There’s more. With everything feeling and playing great, does moving into the upper register start to sound out of tune? Intonation is very easy to check and adjust. When you go to vibrato or hold a note, do the frets feel “sandy”? Are the fret ends rubbing against your hand while you play? Let’s flush and polish those up.
To be clear, we’re not swapping out anything on your new guitar: We’re simply refining the setup. Be sure to go online to see eight videos I made showing various processes covered in this story.
Begin the Beguine
There is an order of operations for best results. Neck relief is the first item to dial in, followed by getting the nut slots cut to the proper depth. After that, setting your string and pickup heights is in order. The final step is setting intonation.
Fret polishing is its own event and can happen anytime between string changes. Getting the frets feeling comfortable and well-polished will take some time and attention. You’ll also need some specialized tools as well as some that can be found in most households. Check the box for my list.
Tools You’ll Need
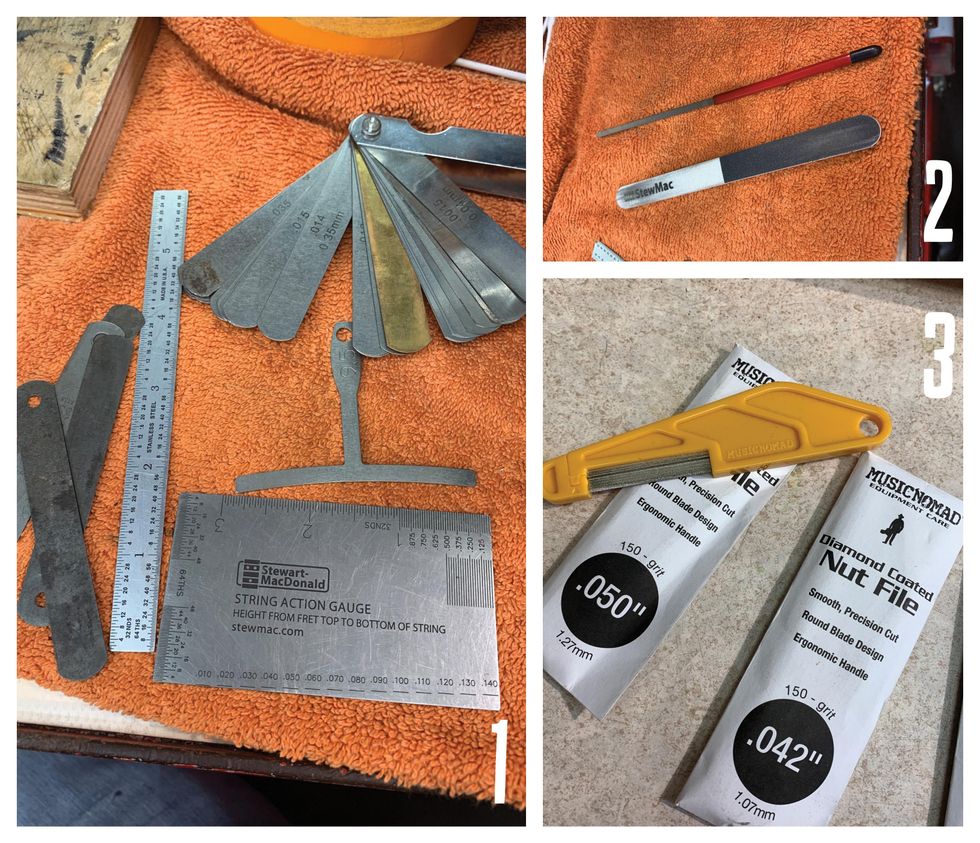
All of the specialized tools in this list are available through online suppliers, including StewMac and Amazon.
- 6" Ruler with measures in 64ths
- String action gauge [Photo 1]
- Miscellaneous screwdrivers
- Allen wrenches
- Radius blocks
- Understring radius gauges (with the radius on the bottom and the top)
- Fret-end dressing file
- Micro-Mesh sticks [Photo 2]
- Tape (low tack)
- Cotton swabs
- Paper towels (blue shop towels preferred)
- Clean cotton rags
- Nut files [Photo 3]
- Stikit sandpaper
- Tri-Flow lubricant
- Capo
- Feeler gauges
- Simichrome polish
Polishing the Frets
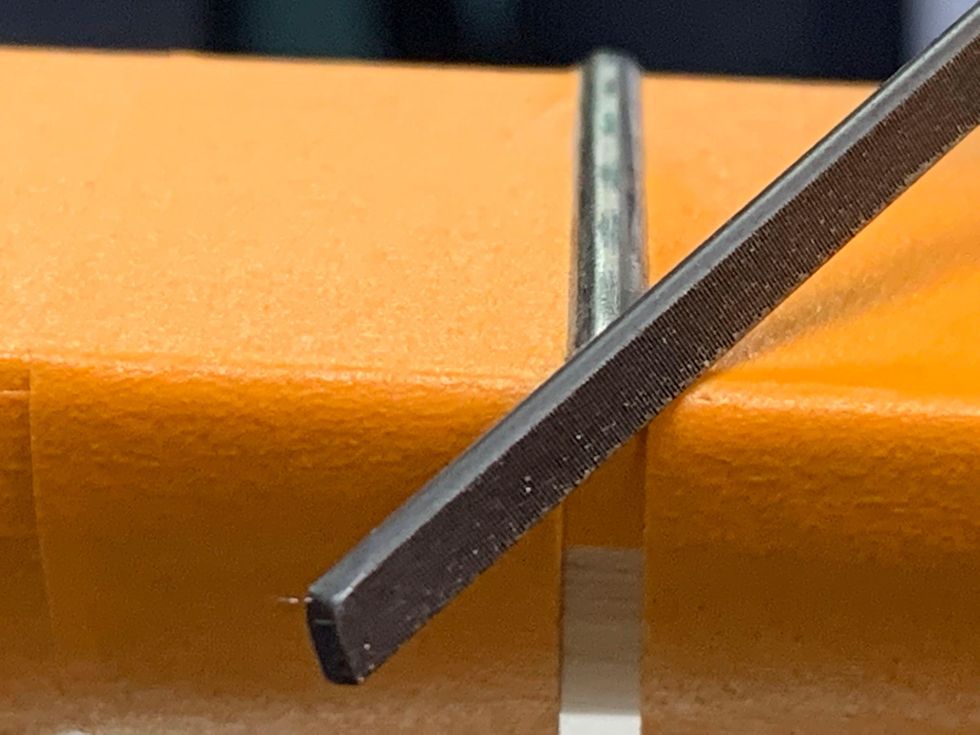
Photo 4
Let’s start with the most Zen of these tasks: fret polishing.
Tape off the fretboard using low-tack tape, exposing only the frets. De-tack each piece of tape on your clothing or maybe a rag—I use my jeans or my sweatshirt. Making it less sticky helps prevent pulling finish off a maple fretboard or the neck. Taping the fretboard also prevents putting any cross-grain scratches into it while you file and polish. You can choose to tape off the entire fretboard or work your way down one fret at a time. Dealer’s choice.
One thing to note about tape, any tape: Even when you de-tack it, you do not want to leave it on overnight. If that happens, rub the tape with your finger, which will break the surface tension. Then carefully pull the tape off from a corner, making sure you’re pulling it off at an angle and not at a straight line with the fretboard edge.
Every fret end has a small burr on the corner from the initial fret job. The fret-end dressing file has a non-marring smooth side for rounding the fret end, and a safe square edge for getting into the corner of the fret end. So, take the fret-end dressing file, use the squared off-side, and file both corners of the fret end [Photo 4].
How to Polish Frets
Here’s how easy it is to polish and smooth frets.
One or two strokes is all you’ll need. Then, using the non-marring side of the file, slightly round off the fret ends.
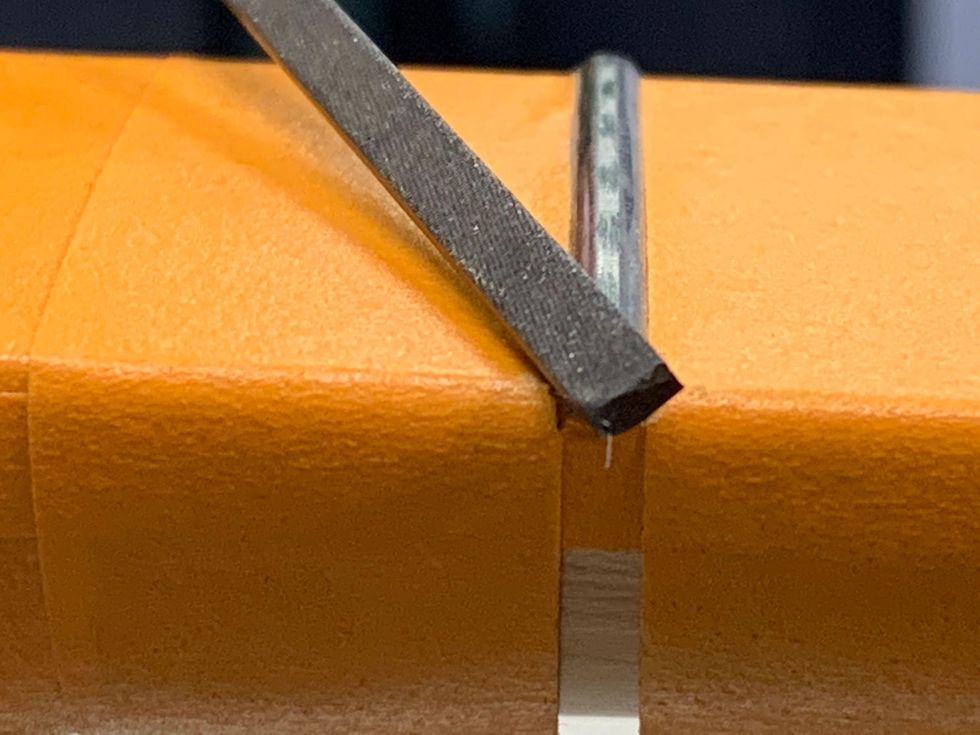
Photo 5
With the file positioned vertically, file downward to make the fret end flush with the edge of the fretboard.
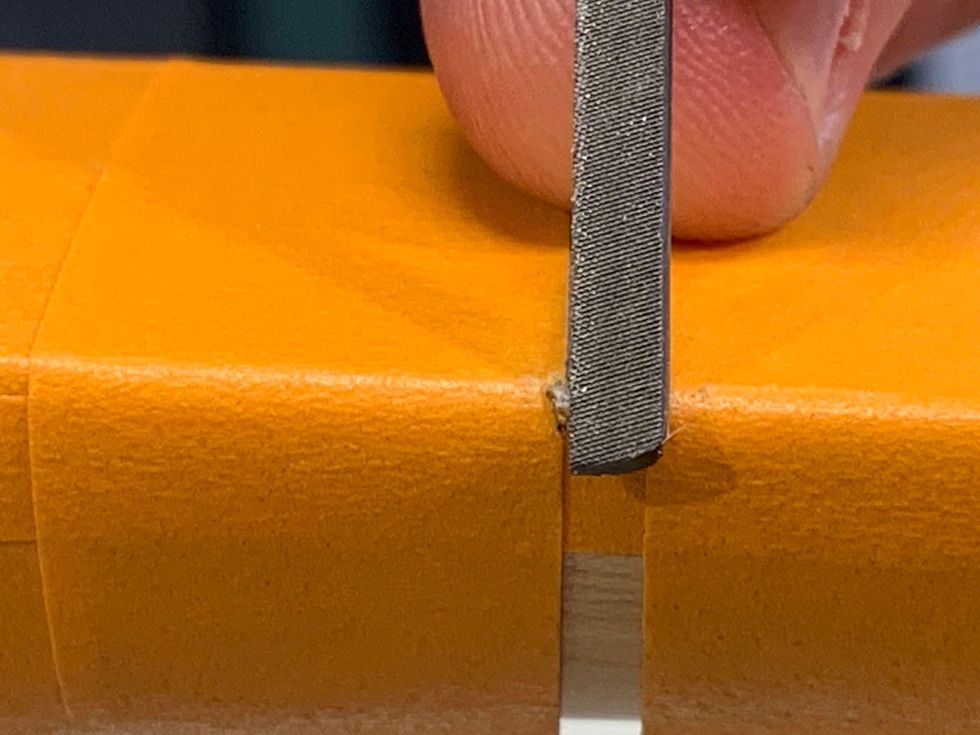
Photo 6
For a nice, rounded-off look, polish the frets using the same rounding motion from the previous step, working through all three grits of the Micro-Mesh stick.
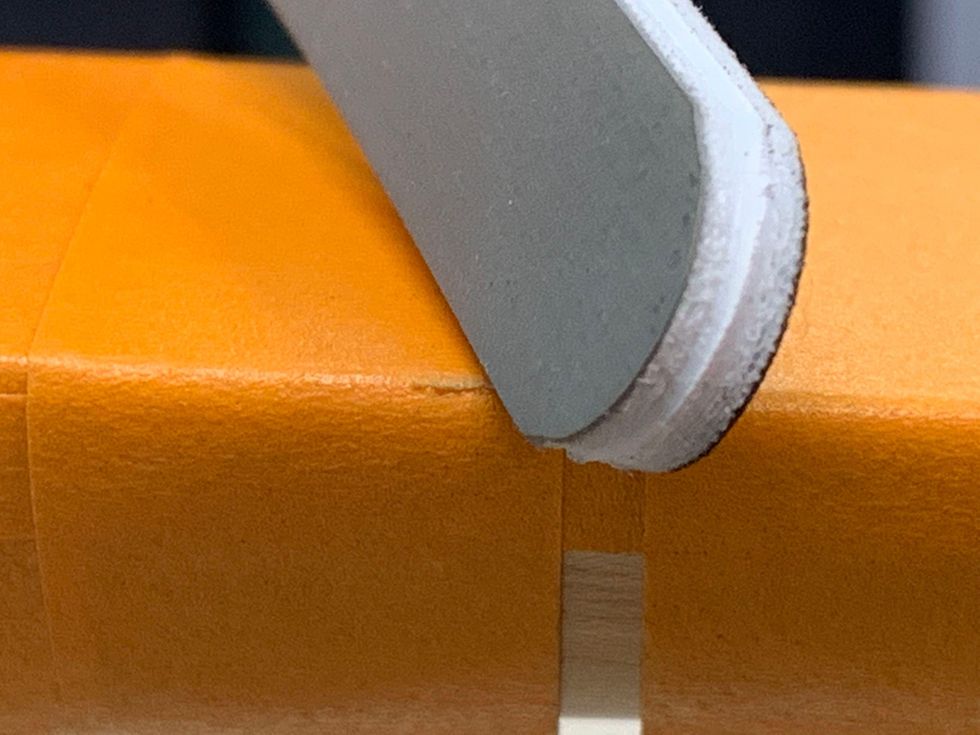
Photo 7
Then, polish both the sides and the top of the frets.
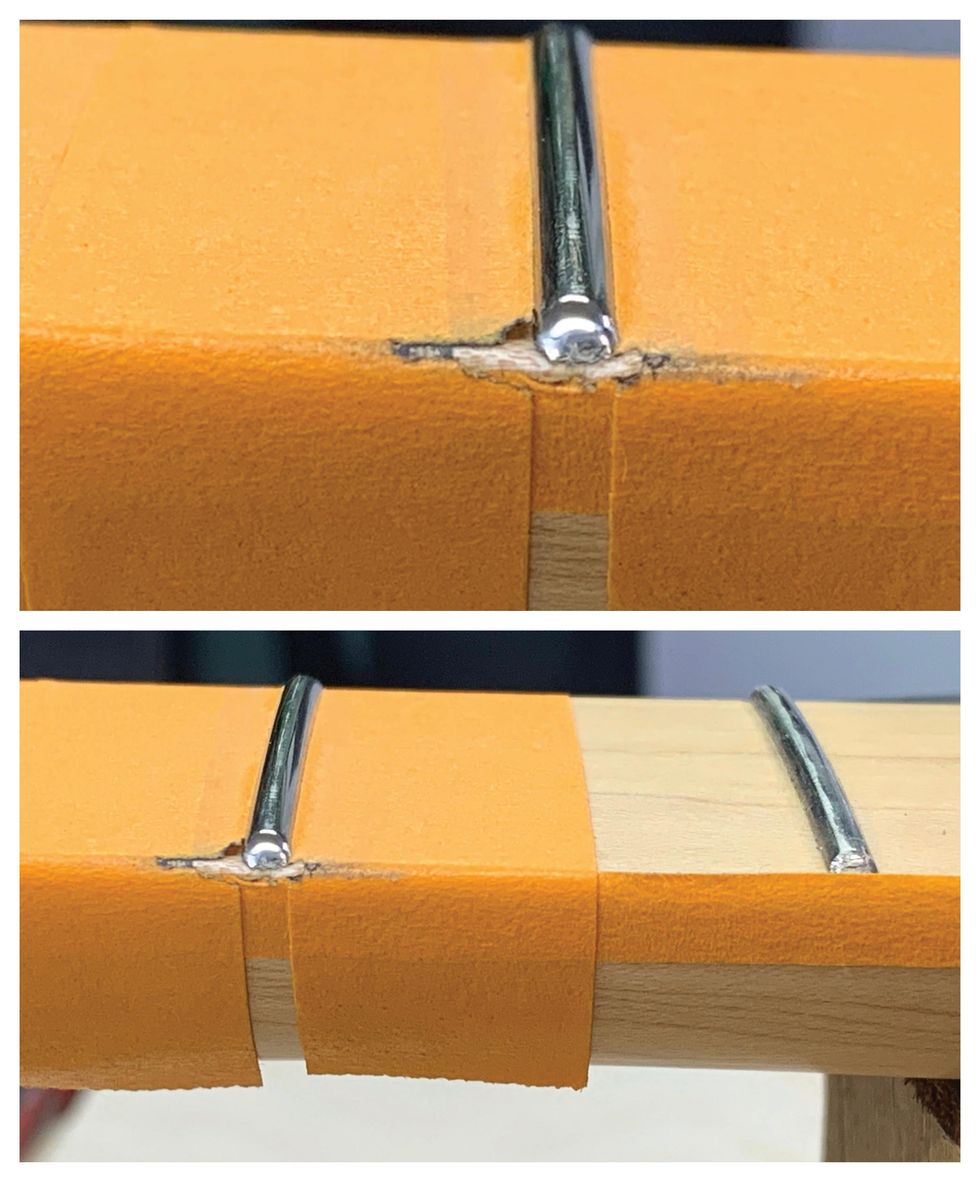
Photos 8 (top) & 9 (bottom)
Using a soft cloth and Simichrome, buff every fret. This will give you a great shine and help prevent oxidation. Now it’s time to remove the tape and condition the fingerboard if it needs it.
Note: Every fret has two fret ends to clean up and polish along with the fret itself. This is a fair amount of handwork. If you’ve never done it, you will get tired and need a break. Take that break. Take multiple breaks. Let the process take however long it requires without rushing. If you’re new, do all the fret polishing over a weekend or a few days. It should be fun, not painful. If it is difficult, call your local luthier and hire them to do it for you.
Adjusting Neck Relief
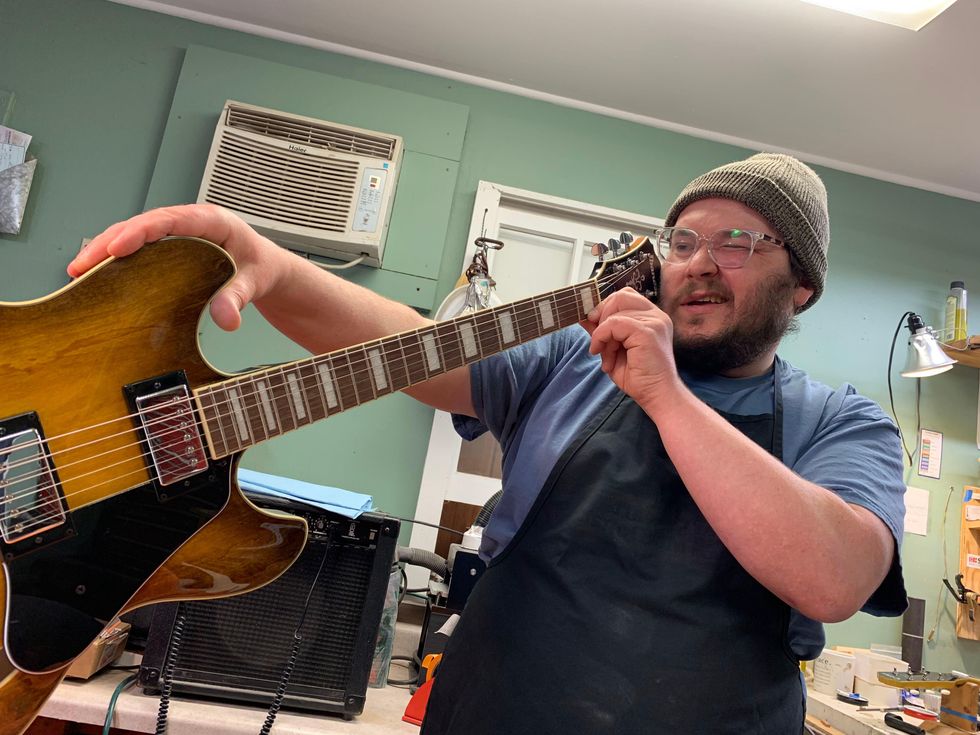
Photo 10
Neck relief refers to the slight amount of concave bowing intentionally created in the neck of a guitar or bass by adjusting the truss rod. For the safety of the guitar, be sure to slack the strings before doing any adjustments to the truss rod. Neither you nor your guitar needs to be tense during this process.
Before whipping out an Allen wrench for the truss rod, start by sight-checking the neck’s straightness. You can sight the neck with the guitar on its back, but I like to put it on edge and look at it that way. It’s easier to see how much curve there is when the guitar is on its side. I feel like gravity plays tricks on my eyes when I sight the neck with the guitar on its back. When I play the guitar, it’s on its side anyway, so looking at it from this vantage point is best.
Tune the guitar to pitch, put a capo on the first fret, and press fret 15 with your left hand.
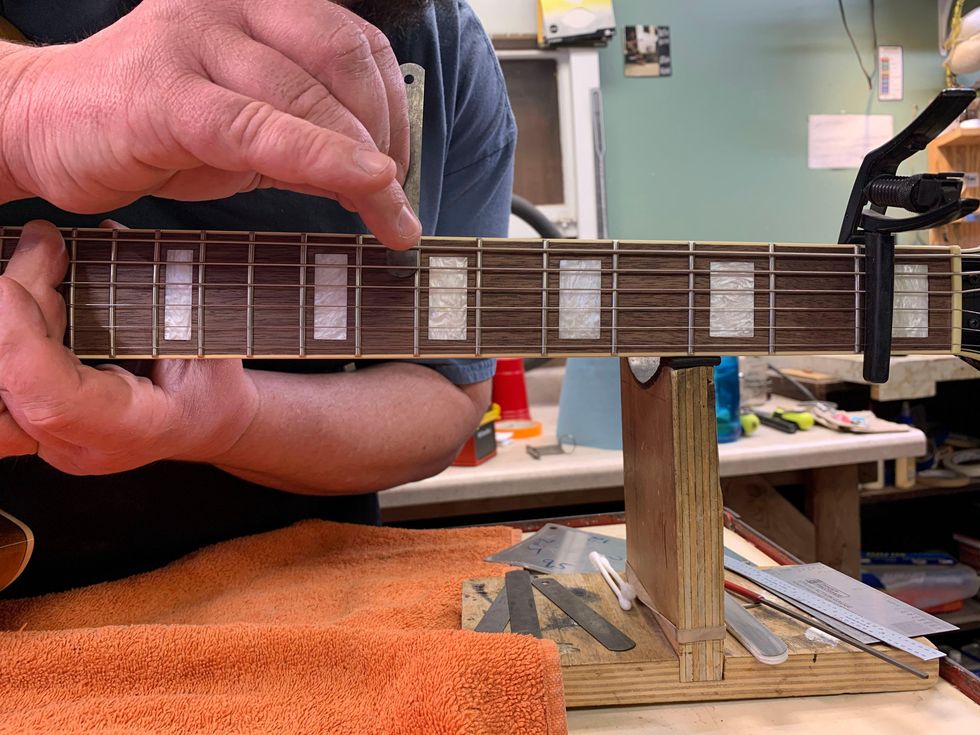
Photo 11
With your right hand, take a feeler gauge and check the gap at frets 7 through 9 (left-handed players, flip your hands around) [Photo 11].
From the top of the fret to the bottom of the string, the gap is usually anywhere from .003" to .012", depending on the feel you are going for. The feeler gauge should fit just between the top of the fret and the bottom of the string. The string shouldn’t move. This will tell you how much “relief” is in the neck. If you find this challenging, keep going—this will take some practice.
When dialing in the relief, I go back and forth between adjusting the truss rod and the string action. Getting the strings low and playing clean on a budget axe can be a challenge. Usually the fretwork isn’t that great, and in the upper register the frets can be unlevel, causing buzzes and clanks. If you need to raise the string action to get the notes to play clean, some fret leveling may be in order. (For more on fret leveling, go online to our article “About Fret Leveling,” from the December 2007 issue.) For good energy transfer, the neck should be as straight as possible. If the neck is straight and the frets are not level, the strings will buzz with low action.
In general, the flatter the radius on the fretboard, the straighter you can get the neck with the truss rod adjustment. On a fretboard with a 12" radius, you should be able to get .005" relief, and on a vintage 7.25" radius board you may need as much as .014" relief. The only way to get better at checking and setting relief is practice.
Refining the Nut
String buzzes, pinging noises when you tune, strings sticking in the slots, and too much string motion in the nut slots are all indicators of trouble. Before getting out the sandpaper and Micro-Mesh sticks, be sure you know if your guitar’s nut is TUSQ or bone. TUSQ is softer, so you should leave TUSQ nut slots a little higher. This leaves room for the TUSQ to wear without causing buzzing on the first fret. With bone, you can cut the slots lower, because it holds up to string wear.
How to Shape Your Guitar's Nut
Watch as Dave Helmer sands down the back half of a nut and creates a smooth finish.
The back side of the nut is usually very bulky and could often stand to lose some material to be more comfortable on your hand. So, let’s start there. Tape off the neck and headstock around the nut using a few layers of tape to protect the headstock face and fretboard. Then, slack the strings and pull them to either side of the nut.
Sand a bevel into the backside—the side closest to the headstock—of the nut using P320 and P400 grit Stikit sandpaper on a flat sanding stick.
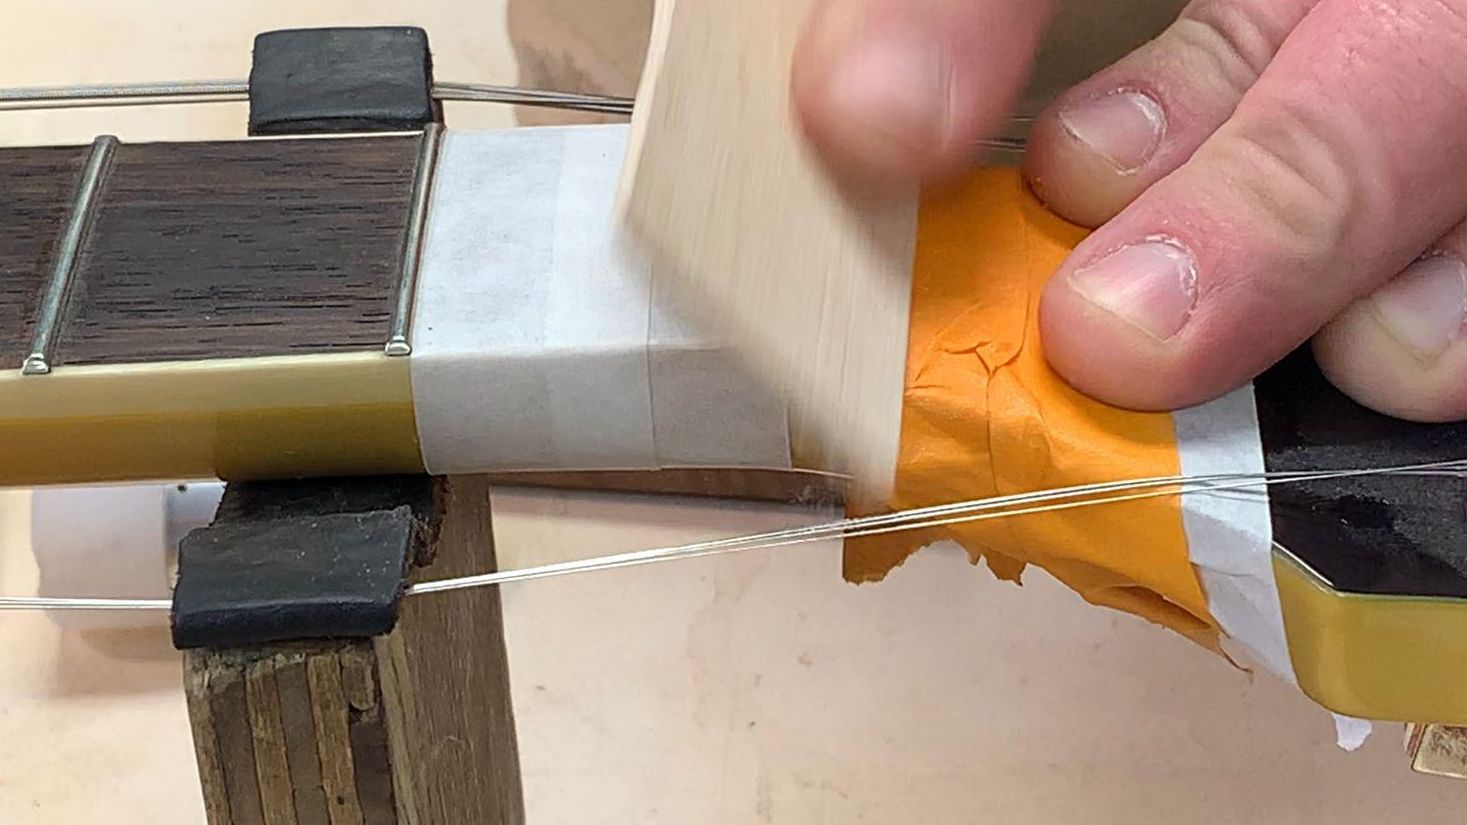
Photo 12
The bevel should start at the back of the nut and come forward about one-third to one-half the thickness of the nut [Photo 12]. Use P320 for most of the sanding and switch to P400 for the last 5 to 10 strokes.
Next, take a fresh Micro-Mesh stick and work through the various grits to buff/round over the bevel you’ve sanded into back of the nut, so it looks and feels good.
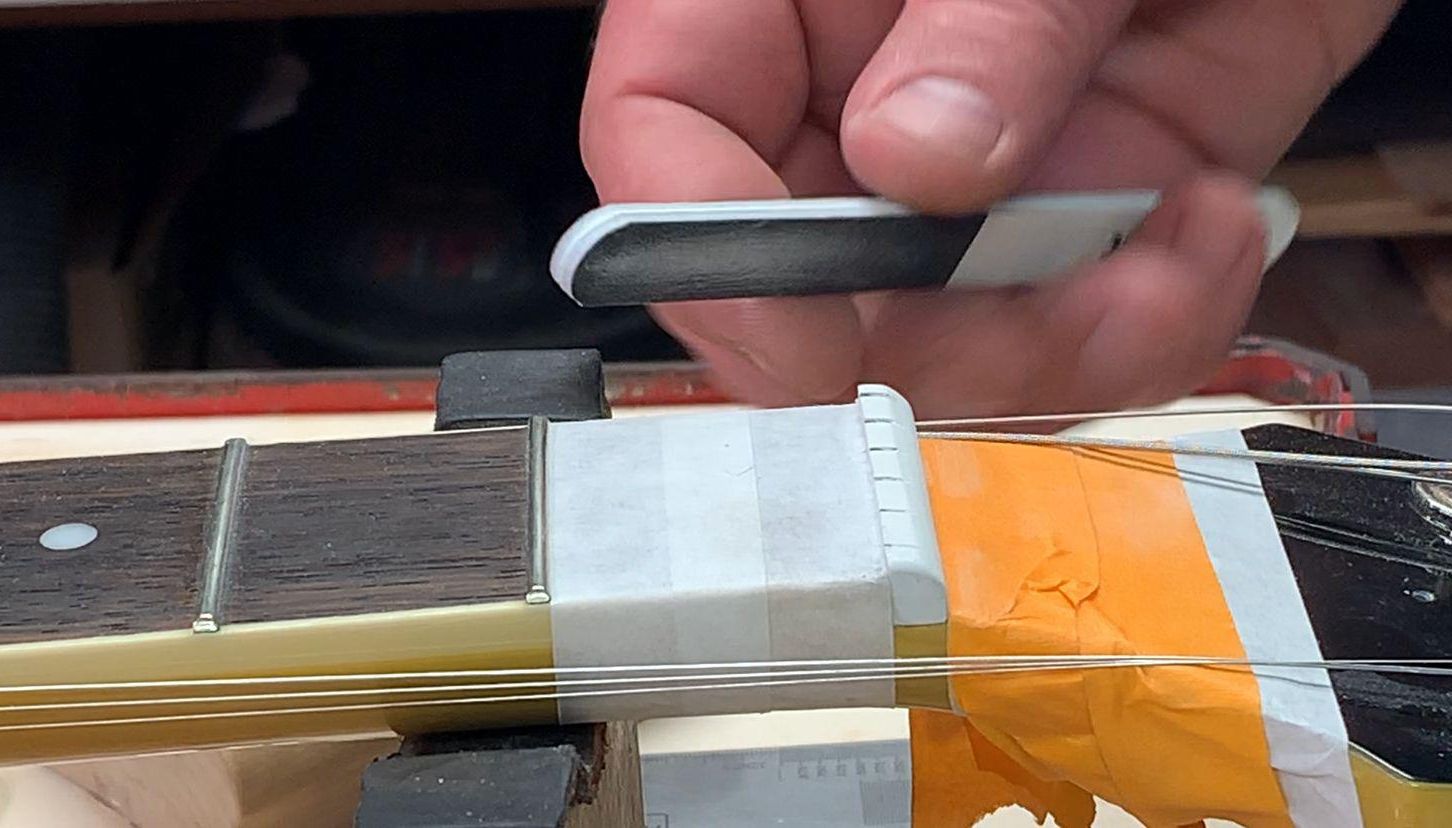
Photo 13
TUSQ nuts are often tall, and the strings sit deep in the slots.
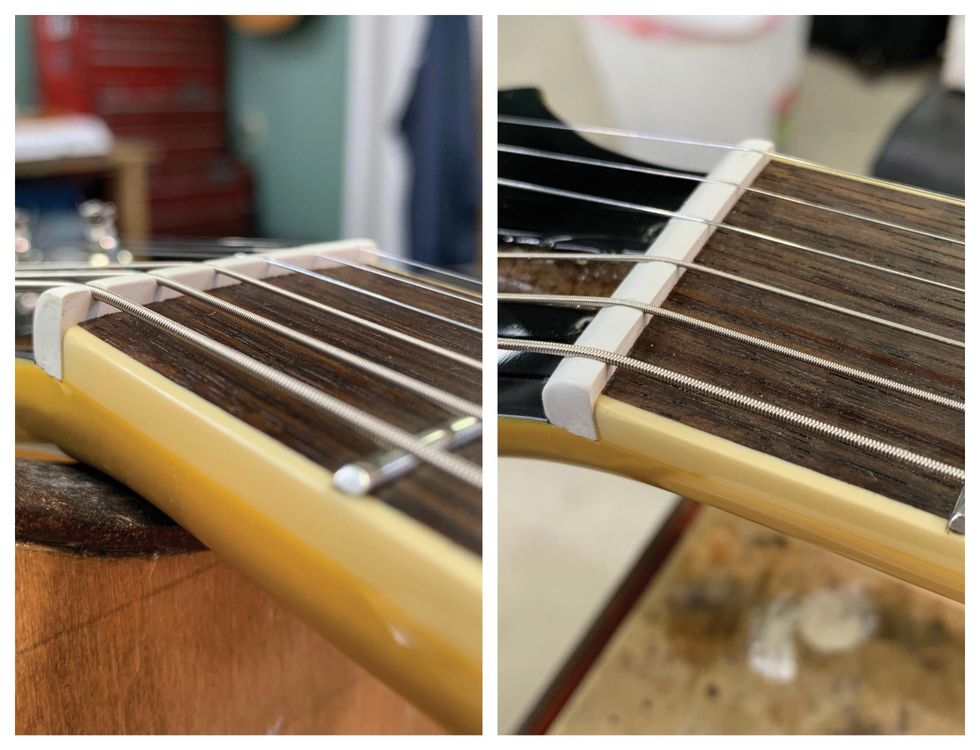
Photos 14 (left) & 15 (right)
Wound strings require 50 percent of the diameter of the string to sit in the nut slot, with the other 50 percent above the top of the nut surface. The plain strings should be flush with the top of the nut. Take a look at the wrong appearance [Photo 14] and the correct look [Photo 15] for properly seated strings.
How to Sand Your Guitar's Nut
Our luthier shows you how to use a radius block and sand down a nut.
Use a radius block that matches the radius of your fretboard.
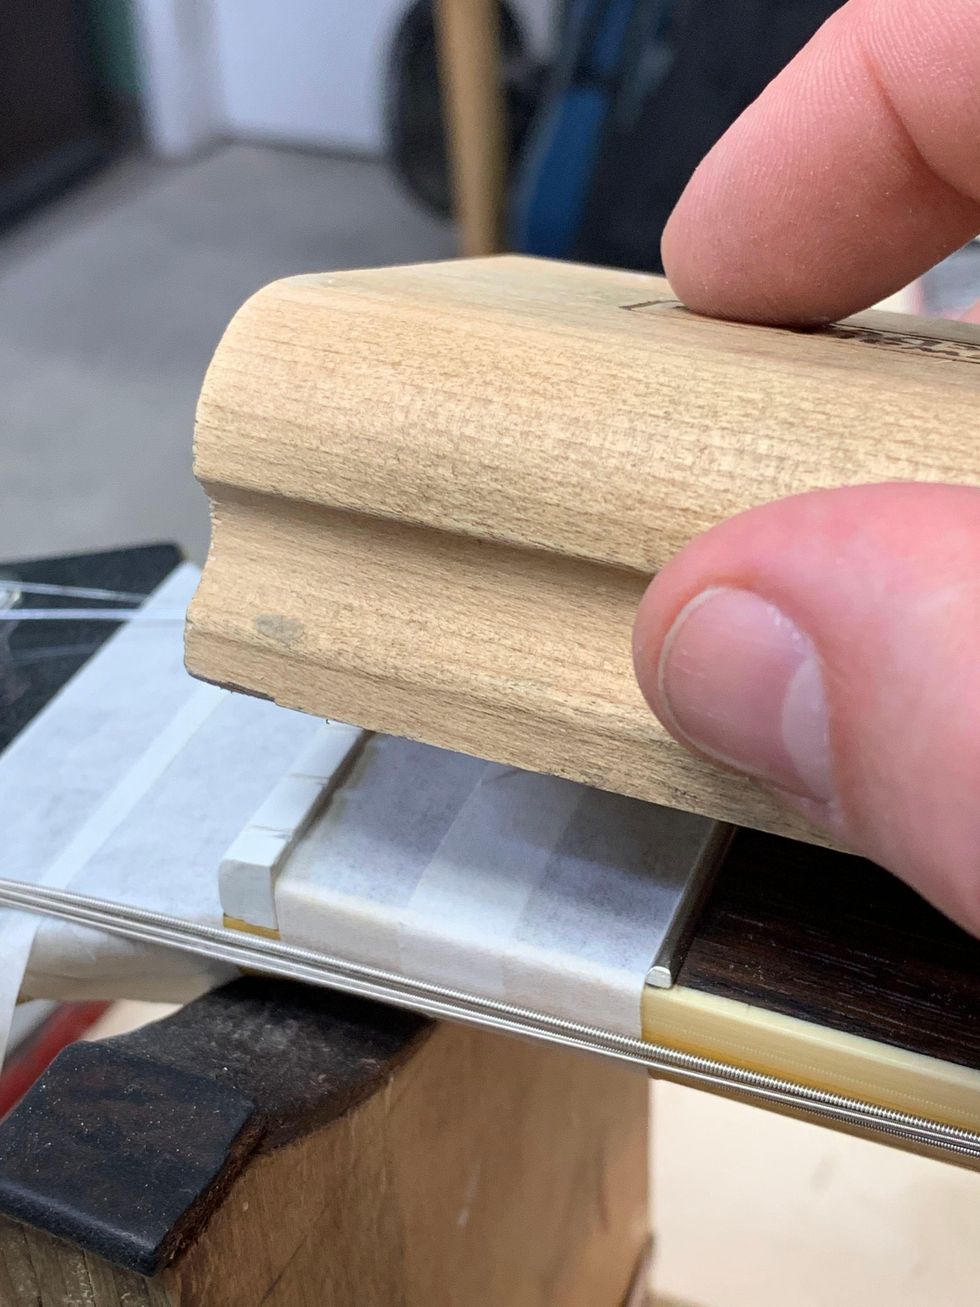
Photo 16
With P320 and P400 grit Stikit sandpapers, use mild pressure to sand down the top of the nut. Sand a bit and check your progress by setting the strings in the slots and putting a little tension on them. Tuning to pitch isn’t necessary. Use the P320 for most of the sanding, and switch to P400 when you are close to the 50/50 height for the wound strings. The radius block sanding will leave a flat, sharp edge on each side of the TUSQ nut [Photo 16]. To round over the sharp edge, use the sanding block and Micro-Mesh stick.
Use the coarse grit of a Micro-Mesh stick to round over and blend the bevel from the back into the top of the nut. Work through the grit gauges until it’s smooth. There is a fine balance between the bevel at the back of the nut and the top radius of the nut. Go back and forth between the two steps to get a nice, finished look and a nut that functions at optimal levels.
… And Refining the Nut Slots
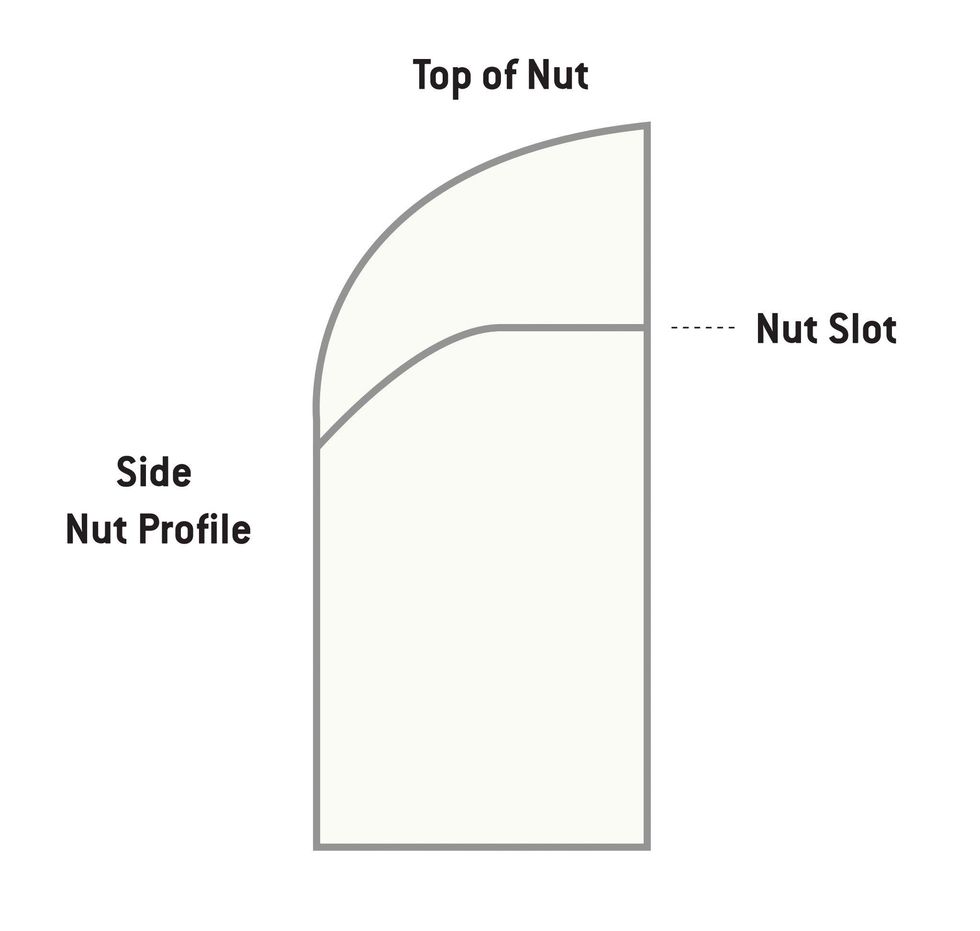
Photo 17
Nut height is the distance from the top of the first fret to the bottom of the string. A good height on the wound strings is about .020", and for the plain strings about .015". Measuring this gap with a feeler gauge can be tricky because of the fretboard radius. Many repair folks do this by eye and feel, based on experience. It takes some practice. A good check: At pitch, fret the third fret and check for a small gap between the string and the top of the first fret.
How to Widen Your Guitar's Nut Slots
A diamond file can make quick work of deepening and widening nut slots.
The bottom of the string should be sitting on the bottom of the front half of the nut slot [Photo 17]. File down each nut slot to its proper depth using the corresponding nut file. There are diamond nut files on the market in multiple sizes to accommodate many string gauges. Make sure to keep your strokes straight. The standard-toothed files have less sizes and usually require rolling them from side to side to get a well-fit string.
Next, using a proper-sized file, round over the bottom back half of the nut slots down, toward the face of the headstock and away from the strings. This will allow the strings to move freely during tuning or bending, while still having support from the front half of the slot.
How to File D and G String Slots on Guitar
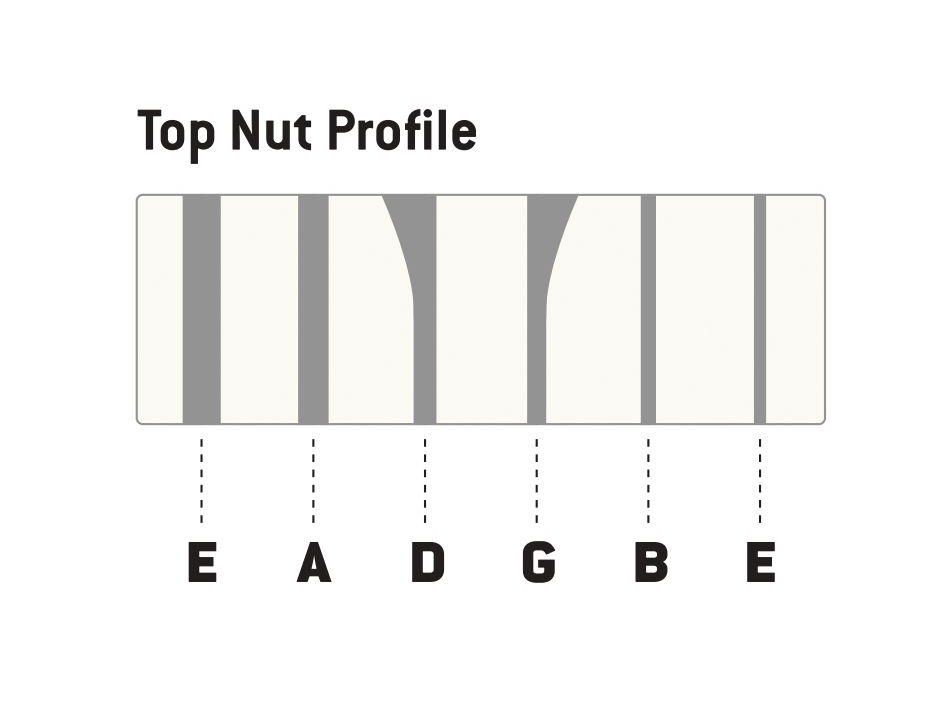
Photo 18
On guitars with 3x3 headstock configurations, the D and G strings need the back half of the slots feathered out away from the center, so the string has a direct path to the tuner post. Using a file that is one size bigger than the string and rolling it side to side on the back of the nut slot will give the string a straight path to the tuner post. Photo 18 is my illustration showing which slots need feathering.
Watch How to File D and G String Slots on Guitar
The D and G nut slots require special attention on 3x3-style headstock configurations.
Additionally, use pencil lead to lubricate the slots. Just get in there with the point of a pencil and mark the slot with its graphite. You might also put a drop of Tri-Flow on the front of the string tree. Tri-Flow will run down the string, so take a cotton swab or cloth to clean up any excess. Tri-Flow has Teflon in it, so you don’t need much.
Adjusting String Action
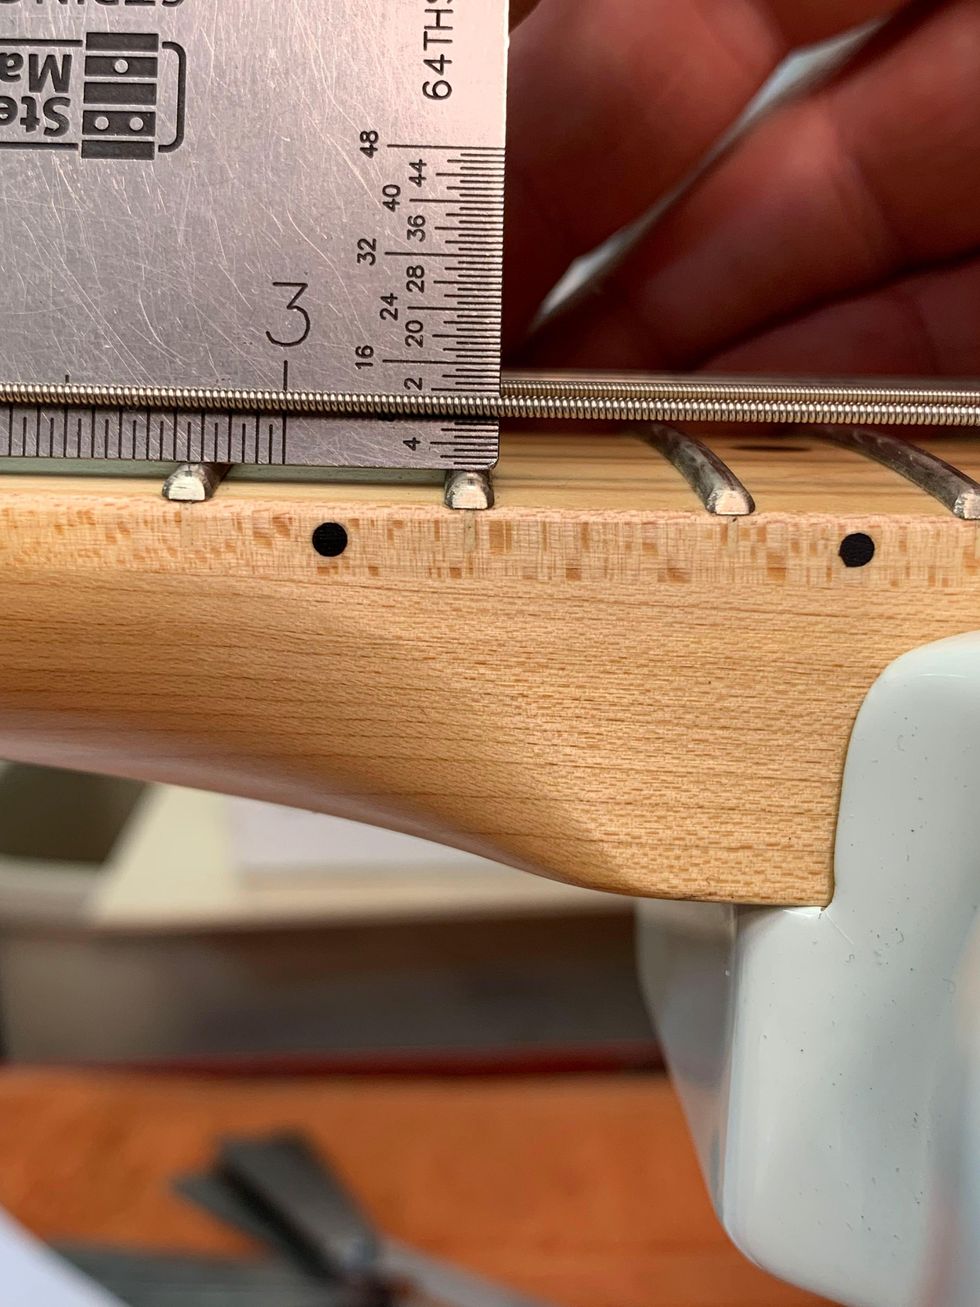
Photo 19
First, find your string height by measuring the string action at the 17th fret on a Fender-style guitar and at the 15th fret on a Gibson-style instrument.On electric guitars, action can range from 3/64" to 3/32", depending on the player’s comfort. My preferences are 1/16" on the treble side and 5/64"on the bass side on both Fender- and Gibson-style guitars measured at the appropriate fret.
How to Adjust Guitar Action
Here’s a look at how our author adjusts the action.
Always loosen the string tension before making action adjustments. This will save wear and tear on the small bridge components. Take either a 6" ruler or a string action gauge and set it on the frets. Measure from the top of the fret to the bottom of the string [Photo 19].
If the action is high, you will lower that string’s saddle or that side of the bridge. If it is low, you will raise it. Make sure the individual saddles are sitting square and upright to the face of the bridge. You do not want them sitting at an angle or leaning over. This will cause buzzing.
The bottom of the strings should match the radius of the fretboard when measured with an understring radius gauge.
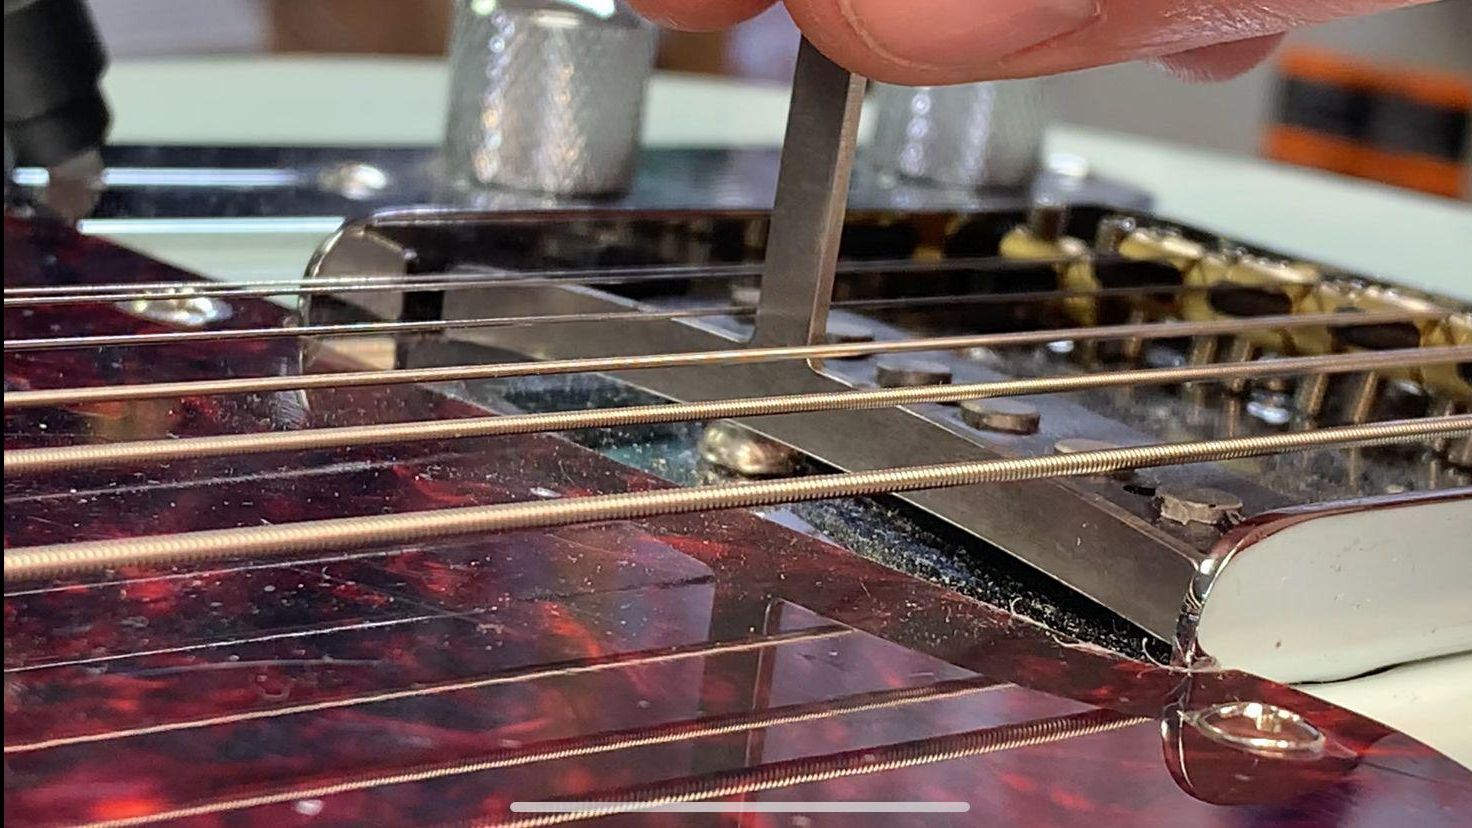
Photo 20
Start your adjustment with the outside strings, working toward the center. On Fender-style guitars, set the two outside strings to the height you want and have the middle four strings a bit higher than that. Bring the gauge up from underneath and just touch the two outside strings. Then, bring the strings down a little at a time until the radius matches.
On a Gibson-style Tune-o-matic, the saddles are not individually adjustable. So, if the radius doesn’t match, the saddles will need to be filed. To do this, I recommend using toothed nut files and a rolling side-to-side motion. Do a little work and check your progress. Remember to slack your strings when adjusting the saddle or bridge up or down.
Changing Pickup Height
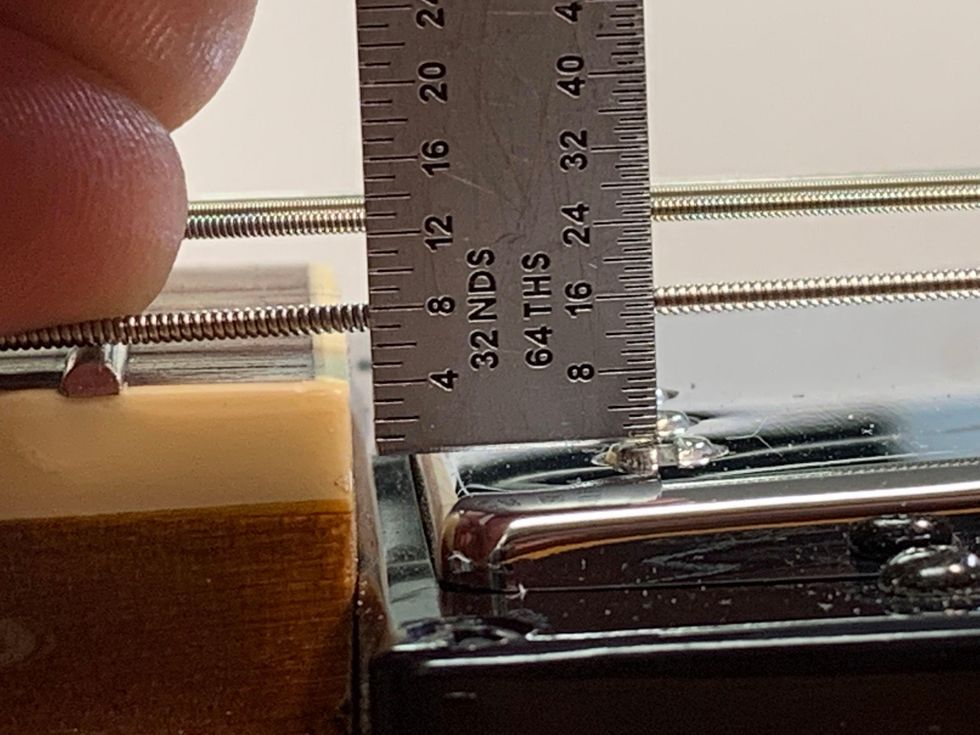
Photo 21
Finally, let’s take a look at pickup-height adjustment. First, to check pickup height, use the two outside strings again. Press the top wound string on the last fret and measure the distance from the top of the pole piece to the bottom of the string [Photo 21]. This distance can range from 3/64" to 1/8". My preferences are 1/16" on the treble side and 5/64" on the bass side.
Adjusting Guitar Pickup Height
Dave Helmer walks you through the process of adjusting the height of your guitar’s pickups.
On most styles of pickups, there are height adjustment screws on either side of the pickup to raise or lower it. The closer the pickup gets to the strings, the more present string frequencies become. If you get too close, the magnetic pull can affect the string’s vibration and you may hear some strange sounds as you go into the upper register.
On Strats, the neck pickup is regularly set too close, and at the 12th fret and above, the low E and A can sound choked, honky, and not clear. Lowering the neck pickup with a screwdriver usually solves this issue.
Setting Intonation
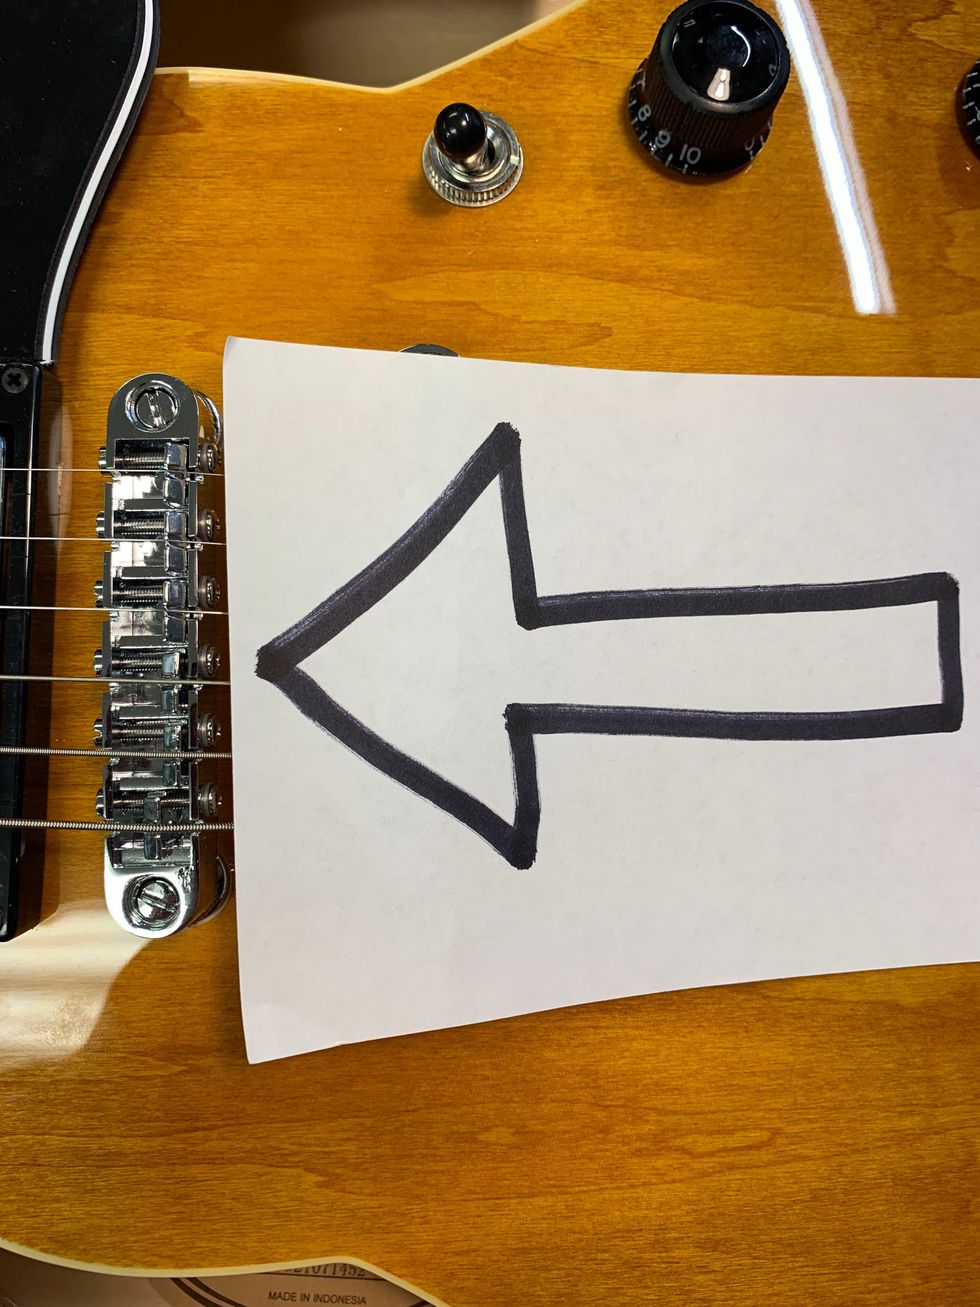
Photo 22
If you can’t get your guitar accurately in tune, you might need to check its intonation. Adjust all saddles as far back as possible so every string will play flat at the 12th fret. You will adjust the saddles forward, gradually making the octave play sharper until it’s in tune with the open string [Photo 22].
Adjust Your Guitar's Intonation
With a tuner and a screwdriver, Dave Helmer shows you how to adjust your guitar’s intonation.
Depending on your vibrato style, experiment with intonating the plain strings slightly flat. Use your ear and do what sounds good. Sometimes, the plain strings can have perfect intonation, but playing with vibrato can make them sound sharp.
To fine-tune intonation, the individual bridge saddles must be adjustable. Once the intonation is set, recheck the string radius using the understring radius gauge and adjust as needed. The radius can change as the saddles come forward during intonation.
Tri-Flow is great for lubricating saddle parts. Put a small drop on the saddle-height adjustment screws and capillary action will suck it in. Adjust the saddle up and down a few times to coat the threads. Clean up any excess with a cotton swab or cloth. Put a drop or two onto a cotton swab and apply the Tri-Flow to the top of each saddle where the string rests. This will help strings move freely during tuning and after any bends or vibrato.
And that’s it! For a relatively small investment in tools and time, you’re now ready to supercharge your new guitar—and maybe your long-treasured axes, too.
- DIY: How to Set Up a Fender Stratocaster - Premier Guitar ›
- 12-String Setup Secrets - Premier Guitar ›
- DIY: How to Set Up and Intonate an Acoustic Guitar - Premier Guitar ›
- Reader Guitar of the Month—Pickups and Finishes - Premier Guitar ›
- DIY Guitar: 7 Cool Reader Mods - Premier Guitar ›
While the pedal builders at Sehat Effectors are in the game for their love of the 6-string, they’ve since begun exploring what effects pedals mean to other kinds of instrumentalists.
This time, I’d like to share my perspective as a pedal builder on how our effects pedals—originally crafted with guitarists in mind—are experiencing an exciting evolution in use. Our customer base spans around the globe, and as it turns out, many of them aren’t guitarists. Instead, our pedals are finding their way into the hands of non-guitarist musicians like DJs, synth players, movie sound directors, and even drummers. Yes, a drummer once used one of my fuzz pedals in a drum miking setup—quite an extreme yet bold experiment! This made me wonder: How did such a phenomenon come about?
Most of the pedals I build are fuzz effects and other experimental types, all primarily tested within guitar setups. But then I visited a friend’s studio; he goes by “Balance” onstage. He’s a well-known musician and producer here in Indonesia, and a member of the hip-hop group JHF (Jogja Hip Hop Foundation). Now, here’s the kicker—Balance doesn’t play guitar! Yet, he’s one of my customers, having asked for a fuzz and modulation pedal for his modular synthesizer rig. Initially, I was skeptical when he mentioned his plans. Neither my team nor I are familiar with synthesizers, let alone Eurorack or modular formats. I know guitars and, at best, bass guitar. My colleague has dabbled with effects experimentation, but only within the guitar framework.
So, my visit to his studio was a chance to study and research how guitar effects pedals could be adapted to a fundamentally different instrument ecosystem. The following is an interview I did with Balance to get a deeper understanding of his perspective.
As a modular synthesizer user, aren’t all kinds of sounds already achievable with a synth? Why mix one with guitar effects?
Balance: Some unique sounds, like those from Hologram Effects’ Microcosm or the eccentric pedals from Sehat Effectors, are hard to replicate with just a synth. Also, for sound design, I find it more intuitive to tweak knobs in real-time than rely on a computer—direct knob control feels more human for me.
Are there challenges in integrating guitar pedals with a modular synthesizer setup? After all, their ecosystems are quite different.
Balance: There are indeed significant differences, like jack types, power supplies, and physical format. Modular synthesizers are designed to sit on a table or stand, while guitar pedals are meant for the floor and foot control. However, they share a common thread in the goal of manipulating signals, eventually amplified through a mixing board and amplifier. The workaround is using converters/adapters to bridge the connection.“If you’re a saxophonist who buys a guitar pedal, it’s yours to use however you like.”
Are you the only modular synth user combining them with guitar pedals?
Balance: Actually, I got the idea after seeing other musicians experiment this way. Effects like fuzz or distortion are iconic to guitar but absent in synthesizer sound options. I believe signal manipulation with fuzz or distortion is a universal idea that appeals to musicians creating music, regardless of their instrument.
This brief chat gave me new insight and sparked my curiosity about different frameworks in music-making. While I’m not yet tempted to dive into modular synths myself, I now have a clearer picture of how fuzz and distortion transcend guitar. Imagine a saxophonist at a live show using a pedalboard with a DigiTech Whammy and Boss Metal Zone—absurd, maybe, but why not? If you’re a saxophonist who buys a guitar pedal, it’s yours to use however you like. Because, in the end, all musicians create music based on their inner concerns—whether it’s about romance, friendship, political situations, war, or anger. Eventually, they will explore how best to express those concerns from many angles, and of course, “sound” and “tone” are fundamental aspects of the music itself. Good thing my partner and I named our company Sehat Effectors and not Sehat Guitar Works. Haha!
Reverend Jetstream 390 Solidbody Electric Guitar - Midnight Black
Jetstream 390 Midnight BlackReverend Contender 290 Solidbody Electric Guitar - Midnight Black
Contender 290, Midnight BlackSingle-coils and humbuckers aren’t the only game in town anymore. From hybrid to hexaphonic, Joe Naylor, Pete Roe, and Chris Mills are thinking outside the bobbin to bring guitarists new sonic possibilities.
Electric guitar pickups weren’t necessarily supposed to turn out the way they did. We know the dominant models of single-coils and humbuckers—from P-90s to PAFs—as the natural and correct forms of the technology. But the history of the 6-string pickup tells a different story. They were mostly experiments gone right, executed with whatever materials were cheapest and closest at hand. Wartime embargos had as much influence on the development of the electric guitar pickup as did any ideas of function, tone, or sonic quality—maybe more so.
Still, we think we know what pickups should sound and look like. Lucky for us, there have always been plenty of pickup builders who aren’t so convinced. These are the makers who devised the ceramic-magnet pickup, gold-foils, and active, high-gain pickups. In 2025, nearly 100 years after the first pickup bestowed upon a humble lap-steel guitar the power to blast our ears with soundwaves, there’s no shortage of free-thinking, independent wire-winders coming up with new ways to translate vibrating steel strings into thrilling music.
Joe Naylor, Chris Mills, and Pete Roe are three of them. As the creative mind behind Reverend Guitars, Naylor developed the Railhammer pickup, which combines both rail and pole-piece design. Mills, in Pennsylvania, builds his own ZUZU guitars with wildly shaped, custom-designed pickups. And in the U.K., Roe developed his own line of hexaphonic pickups to achieve the ultimate in string separation and note definition. All three of them told us how they created their novel noisemakers.
Joe Naylor - Railhammer Pickups
Joe Naylor, pictured here, started designing Railhammers out of personal necessity: He needed a pickup that could handle both pristine cleans and crushing distortion back to back.
Like virtually all guitar players, Joe Naylor was on a personal tone quest. Based in Troy, Michigan, Naylor helped launch Reverend Guitars in 1996, and in the late ’90s, he was writing and playing music that involved both clean and distorted movements in one song. He liked his neck pickup for the clean parts, but it was too muddy for high-gain playing. He didn’t want to switch pickups, which would change the sound altogether.
He set out to design a neck pickup that could represent both ends of the spectrum with even fidelity. That led him to a unique design concept: a thin, steel rail under the three thicker, low-end strings, and three traditional pole pieces for the higher strings, both working with a bar magnet underneath. At just about a millimeter thick, rails, Naylor explains, only interact with a narrow section of the thicker strings, eliminating excess low-end information. Pole pieces, at about six millimeters in diameter, pick up a much wider and less focused window of the higher strings, which works to keep them fat and full. “If you go back and look at some of the early rail pickups—Bill Lawrence’s and things like that—the low end is very tight,” says Naylor. “It’s almost like your tone is being EQ’d perfectly, but it’s being done by the pickup itself.”
That idea formed the basis for Railhammer Pickups, which began official operations in 2012. Naylor built the first prototype in his basement, and it sounded great from the start, so he expanded the format to a bridge pickup. That worked out, too. “I decided, ‘Maybe I’m onto something here,’” says Naylor. Despite the additional engineering, Railhammers have remained passive pickups, with fairly conventional magnets—including alnico 5s and ceramics—wires, and structures. Naylor says this combines the clarity of active pickups with the “thick, organic tone” of passive pickups.
“It’s almost like your tone is being EQ’d perfectly, but it’s being done by the pickup itself.” —Joe Naylor
The biggest difficulty Naylor faced was in the physical construction of the pickups. He designed and ordered custom molds for the pickup’s bobbins, which cost a good chunk of money. But once those were in hand, the Railhammers didn’t need much fiddling. Despite their size differences, the rail and pole pieces produce level volume outputs for balanced response across all six strings.
Naylor’s formula has built a significant following among heavy-music players. Smashing Pumpkins’ Billy Corgan is a Railhammer player with several signature models; ditto Reeves Gabrels, the Cure guitarist and David Bowie collaborator. Bob Balch from Fu Manchu and Kyle Shutt from the Sword have signatures, too, and other players include Code Orange’s Reba Meyers, Gogol Bordello’s Boris Pelekh, and Voivod’s Dan “Chewy” Mongrain.
Chris Mills - ZUZU Pickups
When Chris Mills started building his own electric guitars, he decided to build his own components for them, too. He suspected that in the course of the market’s natural thinning of the product herd, plenty of exciting options had been left unrealized. He started working with non-traditional components and winding in non-traditional ways, which turned him on to the idea that things could be done differently. “I learned early on that there are all kinds of sonic worlds out there to be discovered,” says Mills.
Eventually, he zeroed in on the particular sound of a 5-way-switch Stratocaster in positions two and four: Something glassy and clear, but fatter and more dimensional. In Mills’ practice, “dimensional” refers to the varying and sometimes simultaneous sound qualities attained from, say, a finger pad versus a fingernail. “I didn’t want just one thing,” says Mills. “I wanted multiple things happening at once.”
Mills wanted something that split the difference between a humbucker’s fullness and the Strat’s plucky verve, all in clean contexts. But he didn’t want an active pickup; he wanted a passive, drop-in solution to maximize appeal. To achieve the end tone, Mills wired his bobbins in parallel to create “interposed signal processing,” a key piece of his patented design. “I found that when I [signal processed] both of them, I got too much of one particular quality, and I wanted that dimensionality that comes with two qualities simultaneously, so that was essential,” explains Mills.
Mills loved the sound of alnico 5 blade magnets, so he worked with a 3D modeling engineer to design plastic bobbins that could accommodate both the blades and the number of turns of wire he desired. This got granular—a millimeter taller, a millimeter wider—until they came out exactly right. Then came the struggle of fitting them into a humbucker cover. Some key advice from experts helped Mills save on space to make the squeeze happen.
Mills’ ZUZUbuckers don’t have the traditional pole pieces and screws of most humbuckers, so he uses the screw holes on the cover as “portholes” looking in on a luxe abalone design. And his patented “curved-coil” pickups feature a unique winding method to mix up the tonal profile while maintaining presence across all frequencies.
“I learned early on that there are all kinds of sonic worlds out there to be discovered.” —Chris Mills
Mills has also patented a single-coil pickup with a curved coil, which he developed to get a different tonal quality by changing the relative location of the poles to one another and to the bridge. Within that design is another patented design feature: reducing the number of turns at the bass end of the coil. “Pretty much every pickup maker suggests that you lower the bass end [of the pickup] to compensate for the fact that it's louder than the treble end,” says Mills. “That'll work, but doing so alters the quality and clarity of the bass end. My innovation enables you to keep the bass end up high toward the strings.”
Even Mills’ drop-in pickups tend to look fairly distinct, but his more custom designs, like his curved-coil pickup, are downright baroque. Because his designs don’t rely on typical pickup construction, there aren’t the usual visual cues, like screws popping out of a humbucker cover, or pole pieces on a single-coil pickup. (Mills does preserve a whiff of these ideals with “portholes” on his pickup covers that reveal that pickup below.) Currently, he’s excited by the abalone-shell finish inserts he’s loading on top of his ZUZUbuckers, which peek through the aforementioned portholes.
“It all comes down to the challenge that we face in this industry of having something that’s original and distinctive, and also knowing that with every choice you make, you risk alienating those who prefer a more traditional and familiar look,” says Mills.
Pete Roe - Submarine Pickups
Roe’s stick-on Submarine pickups give individual strings their own miniature pickup, each with discrete, siloed signals that can be manipulated on their own. Ever wanted to have a fuzz only on the treble strings, or an echo applied just to the low-register strings? Submarine can achieve that.
Pete Roe says that at the start, his limited amount of knowledge about guitar pickups was a kind of superpower. If he had known how hard it would be to get to where he is now, he likely wouldn’t have started. He also would’ve worked in a totally different way. But hindsight is 20/20.
Roe was working in singer-songwriter territory and looking to add some bass to his sound. He didn’t want to go down the looping path, so he stuck with octave pedals, but even these weren’t satisfactory for him. He started winding his own basic pickups, using drills, spools of wire, and magnets he’d bought off the internet. Like most other builders, he wanted to make passive pickups—he played lots of acoustic guitar, and his experiences trying to find last-minute replacement batteries for most acoustic pickups left him scarred.
Roe started building a multiphonic pickup: a unit with multiple discrete “pickups” within one housing. In traditional pickups, the vibration from the strings is converted into a voltage in the 6-string-wide coils of wire within the pickup. In multiphonic pickups, there are individual coils beneath each string. That means they’re quite tiny—Roe likens each coil to the size of a Tylenol pill. “Because you’re making stuff small, it actually works better because it’s not picking up signals from adjacent strings,” says Roe. “If you’ve got it set up correctly, there’s very, very little crosstalk.”
With his Submarine Pickups, Roe began by creating the flagship Submarine: a quick-stick pickup designed to isolate and enhance the signals of two strings. The SubPro and SubSix expanded the concept to true hexaphonic capability. Each string has a designated coil, which on the SubPro combine into four separate switchable outputs; the SubSix counts six outputs. The pickups use two mini output jacks, with triple-band male connectors to carry three signals each. Explains Roe: “If you had a two-channel output setup, you could have E, A, and D strings going to one side, and G, B, and E to the other. Or you could have E and A going to one, the middle two strings muted, and the B and E going to a different channel.” Each output has a 3-position switch, which toggles between one of two channels, or mute.
“I’m just saying there’s some unexplored territory at the beginning of the signal chain. If you start looking inside your guitar, then it opens up a world of opportunities.” —Pete Roe
This all might seem a little overly complicated, but Roe sees it as a simplification. He says when most people think about their sound, they see its origin in the guitar as fixed, only manipulatable later in the chain via pedals, amp settings, or speaker decisions. “I’m not saying that’s wrong,” says Roe. “I’m just saying there’s some unexplored territory at the beginning of the signal chain. If you start looking inside your guitar, then it opens up a world of opportunities which may or may not be useful to you. Our customers tend to be the ones who are curious and looking for something new that they can’t achieve in a different way.
“If each string has its own channel, you can start to get some really surprising effects by using those six channels as a group,” continues Roe. “You could pan the strings across the stereo field, which as an effect is really powerful. You suddenly have this really wide, panoramic guitar sound. But then when you start applying familiar effects to the strings in isolation, you can end up with some really surprising textural sounds that you just can’t achieve in any other way. You can get some very different sounds if you’re applying these distortions to strings in isolation. You can get that kind of lead guitar sound that sort of cuts through everything, this really pure, monophonic sound. That sounds very different because what you don’t get is this thing called intermodulation distortion, which is the muddiness, essentially, that you get from playing chords that are more complex than roots and fifths with a load of distortion.” And despite the powerful hardware, the pickups don’t require any soldering or labor. Using a “nanosuction” technology similar to what geckos possess, the pickups simply adhere to the guitar’s body. Submarine’s manuals provide clear instruction on how to rig up the pickups.
“An analogy I like to use is: Say you’re remixing a track,” explains Roe. “If you get the stems, you can actually do a much better job, because you can dig inside and see how the thing is put together. Essentially, Submarine is doing that to guitars. It’s allowing guitarists and producers to look inside the instrument and rebuild it from its constituent parts in new and exciting ways.”
Metalocalypse creator Brendon Small has been a lifetime devotee and thrash-metal expert, so we invited him to help us break down what makes Slayer so great.
Slayer guitarists Kerry King and Jeff Hanneman formed the original searing 6-string front line of the most brutal band in the land. Together, they created an aggressive mood of malcontent with high-velocity thrash riffs and screeching solos that’ll slice your speaker cones. The only way to create a band more brutal than Slayer would be to animate them, and that’s exactly what Metalocalypse (and Home Movies) creator Brendon Small did.
From his first listen, Small has been a lifetime devotee and thrash-metal expert, so we invited him to help us break down what makes Slayer so great. Together, we dissect King and Hanneman’s guitar styles and list their angriest, most brutal songs, as well as those that create a mood of general horribleness.