
Recently, one of my clients brought in an American-made 1990 Fender Strat hot-rodded with a custom pickguard, Fender-branded Schaller locking tuners, a set of Lindy Fralin single-coils, and a passive, 16-step ToneStyler tone pot. It was a workhorse guitar—and it was in desperate need of a custom setup.
Most guitars come from the store with a generic factory setup. Many players are satisfied with this, but the key to having a great guitar is to personalize the setup for your specific needs. This includes a number of details, including optimizing the instrument for your preferred string gauges, tweaking the action for your fretting and picking style, and if the guitar has a tremolo system, getting it to respond correctly to your wang-bar technique.
Strats can be tricky to set up, because many of the adjustments are interactive. In other words, when you change one element, it can affect others. In large part, this is due to the tremolo system. The trick is to approach the steps in a logical sequence, and in this article I'll explain exactly how to do this. Although your string gauges, action, and trem response may differ from those described here, the step-by-step process and the tools and techniques apply to virtually all Strat-style guitars equipped with a standard, nonlocking tremolo system and three single-coils.
So settle in for a good read as I take you through the process of setting up a Strat to play like a dream—your dream.
Project Overview

Structurally, the Corona-built Strat on my bench was in excellent condition, but my client had several special requests. First, he wanted to tune the guitar down a whole-step. Low to high, that's D–G–C–F–A–D. [This is often referred to as "D standard."]
To accommodate this dropped tuning, the owner specified a hybrid string set gauged .012, .016, .019, .032, .044, and .056. As with a typical .010 set, the bottom three strings are wound and the top three are plain. He arrived at these particular gauges by studying Ernie Ball, D'Addario, and GHS sets that were either considered jazz medium gauge or designed for dropped tunings. So, if you're considering tuning one of your solidbody electrics to D standard, these gauges are a good starting point.
He also asked for a floating tremolo, meaning he wanted to lower and raise the pitch of his strings to add gentle vibrato to chords, intervals, and single notes. He wasn't concerned about raising the pitch any more than, say, a quarter-tone—just enough to create a "shimmer." But in his initial attempts to set up this guitar himself, he ran into tuning issues caused by the trem not returning to pitch. As we'll discover in a moment, there was a reason for this. Fortunately, I was able to fix the problem, but it required some ingenuity.
Preliminary Survey
Before I grab any tools, I always ask my clients several questions about their technique. After I've completed repairs or modifications, this background info helps me dial-in the custom setup. For example, I'll ask: What tuning do you use? What styles of music do you play? What gauge strings do you use? How hard do you pick and strum, and do you play with a light, medium, or heavy fretting-hand touch? Do you use a flatpick? If so, what size and thickness? If you play fingerstyle, do you attack the strings with your nails, fingerpicks, or fingertips? Do you use a capo?
In this case, the owner had already answered the tuning and string questions, but the answers he gave to the other questions helped guide me through each stage of the setup process.
Evaluate the Guitar
The owner had already installed fresh strings, so after my initial survey I tuned it to D–G–C–F–A–D and began taking measurements. This information serves as a baseline for subsequent adjustments and also helps pinpoint any problems.
Here are the four primary measurements you want to take. Write these measurements down, so you can refer to them at any time during the setup process:
- Action at the 12th fret
- Neck relief
- Action at the 1st fret
- Intonation
Step 1: Measure the Action
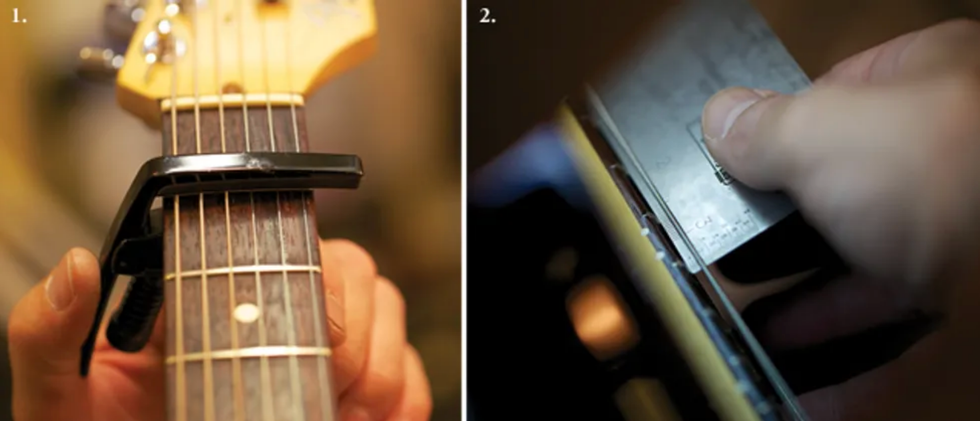
1. Before measuring action and neck relief, clamp a capo over the 1st fret. This temporarily removes the nut from the action equation. 2. Using a string action gauge to measure the action at the 12th fret.
1. Tune the guitar. Usually that's standard E tuning, but as we've discussed, for this setup it was a whole-step below that.
2. Clamp a capo on top of—not behind—the 1st fret (Photo 1). This creates a "zero" fret and temporarily removes the nut from the action equation, allowing you to initially focus on neck relief (the amount of forward or backward bowing in the neck itself ) and bridge and saddle height.
3. Use a string action gauge (available from stewmac.com) or precision metal ruler to individually measure the string height at the 12th fret (Photo 2) for all six strings. The distance you're measuring lies between the bottom of the string and top of the fret.
On this Strat, the distance from the 1st string to the 12th fret was 6/64", and the 6th-string gap was also 6/64". This is very high action!
Step 2: Measure Neck Relief
It's important to determine if the neck has forward (concave) or backward (convex) bow. Along with saddle height, neck relief also affects the guitar's action. Here's the process:
1. With the capo still clamped on top of the 1st fret, hold down the 6th string at the last fret.
2. Using your action gauge or metal ruler, measure the greatest distance between the bottom of the 6th string and the top of the frets. The largest gap typically occurs somewhere between the 7th and 9th frets—essentially in the middle of the neck.
3. Measure the relief at the 1st string.
On this Strat, the relief was .022"—a little more than necessary.
Step 3: Measure Action at the 1st Fret

Photo 3 — Measuring the distance between the bottom of the 1st string and the top of the 1st fret.
Playability is also affected by how high the strings sit in their nut slots. The guitar feels stiff when the strings are too high. Conversely, if they sit too low, you'll get a buzz when you play the open strings.
1. Remove the capo and measure the distance between the bottom of the 1st string and the top of the 1st fret (Photo 3).
2. Repeat the process for all six strings. When the guitar is set up properly, the gap should incrementally increase from the 1st to the 6th string to accommodate their progressively thicker gauges.
At the 1st fret, I measured a 2/64" gap between the fret and string, and for the 6th string, the gap was just over 2/64". Again, this is rather high, especially on the treble strings. Overall, this meant I needed to slightly tighten the truss rod (i.e., turn it clockwise) to reduce neck relief, lower the bridge saddles, and re-cut the slots in the string nut.
While taking these preliminary measurements, I noticed that the custom pickguard butted up against the tremolo base plate. This prevented the tremolo from moving smoothly when tipping forward to slacken the strings. When the trem arm was depressed, the base plate would get hung up on the pickguard—that's what was causing the tuning issues the client was having with the trem! Before proceeding, I made a note that I'd have to trim the pickguard before completing the setup.
Armed with the information gathered in the previous steps, now we're ready to begin the process of adjusting the action.
Step 4: Adjust the Truss Rod
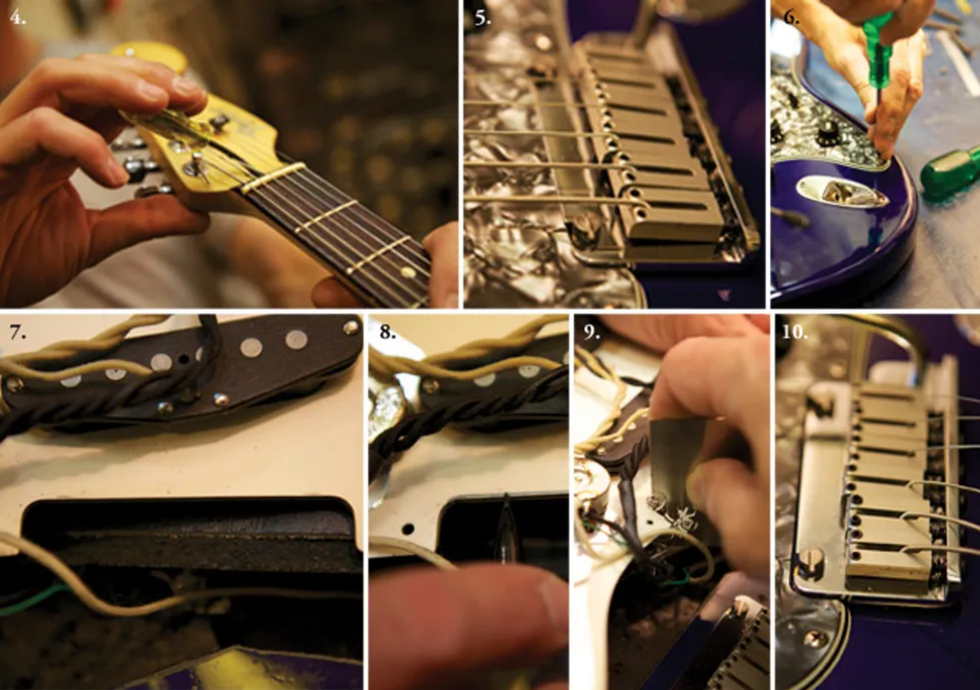
4. When tightening or loosening the truss rod to control neck relief, go slowly and make very small adjustments. 5. Because it's butting up against the tremolo base plate, the custom pickguard is obstructing trem action and needs to be removed and trimmed. 6. To prevent a screwdriver from slipping out of the screw head and scratching the finish, use your free hand to guide and secure its tip. 7. If you look closely, you'll see two indentations at the edge of the pickguard where it was pressing against the trem posts. 8. Using a mechanical pencil to mark about 1/8" of material to remove from the pickguard. 9. Scraping the pickguard to create a space between it and the trem assembly. 10. Now the trem can tilt forward without hitting the pickguard.
With the guitar strung to the client's specs and tuned to D standard, I was ready to tackle the neck relief.
1. Locate the correct tool for your guitar's truss rod (the size and type of nut can vary according to Strat model, year, and manufacturing origin) and insert it into the truss-rod nut (Photo 4).
2. Adjust the truss rod. Turn the wrench clockwise to tighten the rod and reduce forward bowing, or counterclockwise to loosen the rod and reduce back bow. Go slowly, making very small adjustments (1/8 to 1/4 a turn at a time). Check the results each time you move the rod—and be patient.
By tightening the truss rod, I reduced relief from .022" to .015". This was the proper amount of relief for the owner's playing style. Any less relief and the strings would be likely to rattle against the frets.
Earlier, I mentioned that the custom pickguard was obstructing the tremolo (Photo 5). This is one of those little "surprises" that can and will occur with any guitar. To allow the trem to tilt forward, there needs to be a small space between the trem base plate and pickguard. To create this clearance, I determined that the guard had to be trimmed by about 1/8".
The process involved removing the pickguard (Photo 6), examining the plastic to see where it was contacting the trem (Photo 7), using a mechanical pencil to mark the material I wanted to remove (Photo 8), and carefully scraping away the unwanted plastic with a precision tool (Photo 9).
For this type of job, I use stainless-steel scraper blades (available from stewmac.com) that are designed to smooth plastic bindings and contour wood surfaces. Scraping takes time and a lot of patience. If you're not confident in your ability to do this, consult an expert. Even with more than 25 years of experience, it still took me three tries to get it right. Ultimately, I was satisfied that there was sufficient space between the base plate and guard to allow the trem to tilt forward freely (Photo 10).
Step 5: Adjust the Tremolo Spring Tension

11. Adjusting the spring tension to allow the tremolo to float parallel to the body. 12. A floating trem has sufficient clearance from the body to both lower and slightly raise string pitch.
Now it's time to adjust the trem unit. I noticed the tremolo claw held five springs, and their tension was holding the bridge base flush to the body. Before going any further, I needed to adjust the springs and claw to allow the trem assembly to float. Here's the process:
1. Tune the guitar to pitch, then check the tremolo base plate to see if it's floating, flush against the body, or lifting up too much at the rear.
2. Turn the guitar over and rest it on a soft surface, such as a towel. Remove the trem cavity cover.
3. Using a medium Phillips screwdriver, equally adjust the two screws holding the claw to the guitar body (Photo 11). Loosen the claw to create more "float" on the tremolo. Tighten the screws to pull the tremolo closer to the body.
Always retune after every adjustment and check your progress frequently. This process is very painstaking and will require at least several attempts to get the trem adjusted parallel to the body with the tension the way you like it.
I removed two springs from the claw and re-aligned the two outside springs to attach toward the center of the claw. After adjusting the claw several times—and always retuning whenever I tightened or loosened the springs—I finally got the tremolo floating parallel to the body with just enough clearance to pull the tremolo up a bit and raise the pitch slightly, as the owner requested (Photo 12).
Step 6: Adjust Basic Bridge Height

13. Adjusting the overall height of the bridge to allow the trem to move up and down, while also providing enough leeway to fine-tune string action by raising or lowering the individual saddles.
Once the trem base plate was parallel to the body, my next task was to adjust the overall bridge height by raising or lowering the two screws located on either side of the bridge (Photo 13). Note: Vintage Strats or vintage-style reissues use six screws, rather than the modern two-post system, but the principle of adjusting the bridge height remains the same.
1. Tune the guitar to pitch. Then using the appropriate screwdriver (this will be a Phillips or flathead, depending on the model), adjust the bridge plate to provide enough clearance to operate the tremolo.
This is a balancing act: In the next step, you'll adjust the six saddles to set the action. But if you raise the bridge too high at this point, even with the saddles set flush against the plate, the Strat won't be playable. But if the plate is too low, the trem will hit the body as you gently raise the strings' pitch. The trick is to find the sweet spot that allows a floating trem and gives you ample room to raise or lower the saddles to get the action the way you like it.
2. After adjusting the bridge height, retune the guitar and inspect the tremolo to determine if it needs more adjustment—it probably will. Again, the goal is to keep the trem parallel to the body. Tightening the springs pulls the trem tail down toward the body, loosening them allows the tail to lift up.
Step 7: Adjust Saddle Height

14. Setting individual string height by adjusting the saddles.
Next, set the action by adjusting the height of the saddles. Saddle screws can vary, so use the wrench that came with your guitar. For this Strat, I used a .050" hex key.
1. Tune the guitar to pitch.
2. Place a capo on top of the 1st fret.
3. Measure the action at the 12th fret using an action gauge or precision metal ruler as described in Step 1.
4. Beginning with the 1st string, turn the height adjustment screws located on either side of the saddle to raise or lower the string to your preferred height (Photo 14).
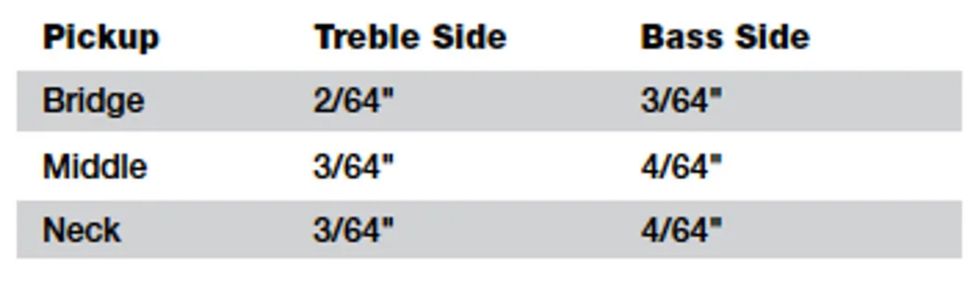
For a modern Strat fretboard with a radius of 9.5"–12", such as on this guitar, official Fender specs are 4/64" for both the 1st and 6th strings. However, string height is personal, so this measurement will vary according to your technique and string gauge. After each adjustment, retune the string you're working on and re-measure the action at the 12th fret.
5. Repeat this process for each string until you have the action where you want it. The goal is to keep an even arc across all six strings that matches the radius of your particular fretboard. (Many repairmen and players eyeball this, but if you want to be precise about matching the fretboard radius, stewmac.com sells metal radius gauges designed for this purpose.)
For this guitar, I set the action at the 12th fret to 3/64" for the 1st string, graduating to 4/64" for the 6th string. These measurements are a little higher than I typically use, but the action felt comfortable to the owner and worked perfectly for his beefy .012 gauge set.
Step 8: Adjust Action at the Nut
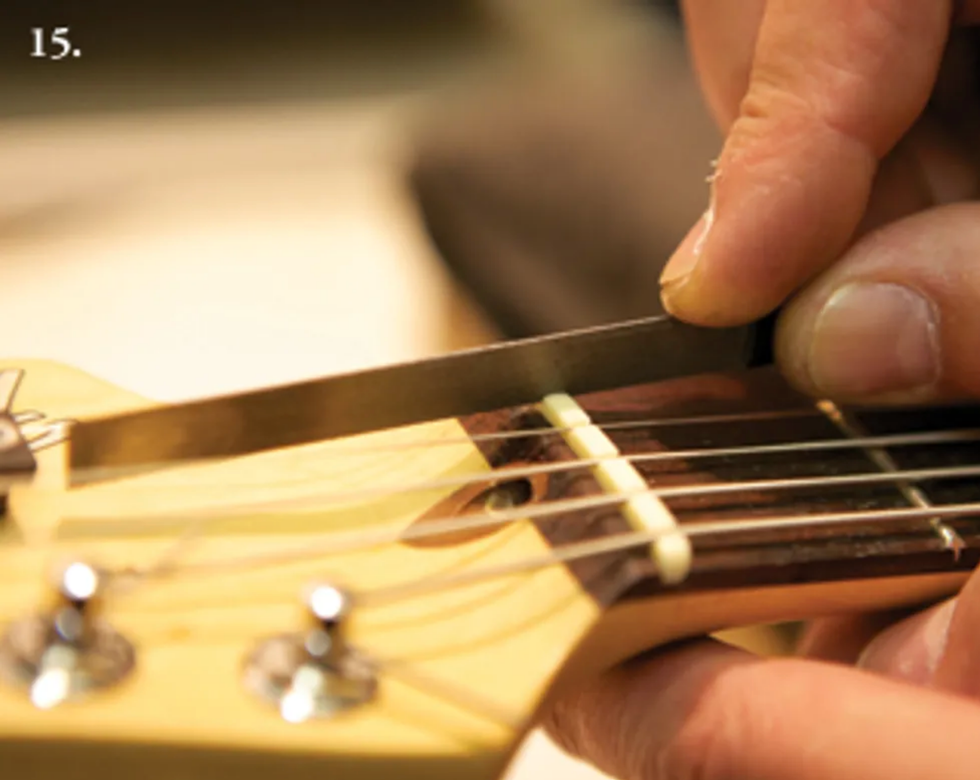
15. Deepening the 2nd-string nut slot with a properly gauged nut file. Notice how the file angle matches the string's descending angle toward the tuner post.
Okay—we're making progress! After setting the saddle height across all six strings, we shift our attention to the nut. It's important that the string height is correct here too. When the action is too high at the nut, the strings will go sharp when you fret them and the guitar will be hard to play.
1. Remove the capo.
2. Tune the guitar.
3. Beginning with the 1st string, measure the distance between the bottom of the string and the top of the 1st fret. The height should measure 1/64" for the 1st string and graduate to 2/64" for the 6th string. Each thicker string should be slightly higher than the one before it.
4. To lower a string, you'll need to cut its slot deeper in the nut (Photo 15). For this job, use a correctly sized nut file. (Nut-slotting files are available from online suppliers, including Luthiers Mercantile, Stewart-MacDonald, and even eBay.)
Slowly cut the slot, paying very close attention to the angle of the nut file. It should match the descending angle of the string, from the face of the nut to the post where the string attaches. If you cut too shallow or too steep of an angle, the string won't seat properly in the nut, causing both tuning and sonic problems.
Make sure the string doesn't stick in the slot. It should move in and out freely without binding. If it sticks, gently roll your file from side to side in the slot to open it up. After a few passes with the file, place the string back into the slot, retune, and again measure the action at the 1st fret.
5. Repeat this process for each string with the proper nut file for each gauge.
Because our bench Strat was now equipped with heavier strings than before, I needed to widen several nuts slots, but it didn't take long to get the strings to sit where I wanted them.
Step 9: Adjust Pickup Height
Pickup height is commonly overlooked during a setup. If the pickups are adjusted too close to the strings, they can cause string rattle and intonation problems. If the pickups are too low, you'll end up with a weak signal.
Here are the measurements I use for each pickup on a Strat:
And here's my system for proper pickup adjustment:
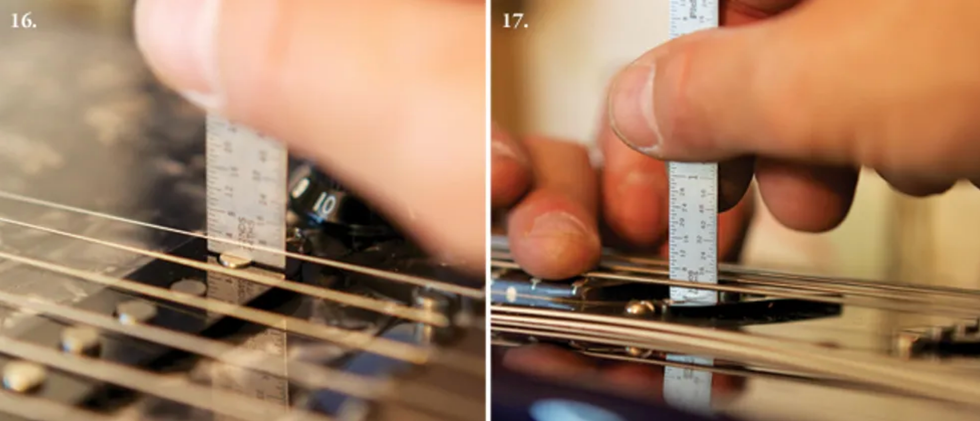
16. Measuring the distance between the pole piece and 1st string to determine the correct height for the bridge pickup. 17. Measuring neck pickup height.
1. Fret the 1st string at the last fret. Using a 6" machinist rule, measure from the top of the corresponding pole piece on the bridge pickup to the bottom of the string (Photo 16). Adjust the pickup height by turning the screw on the treble side of the pickup.
2. Fret the 6th string at the last fret, measure, and adjust the screw on the bass side of the pickup.
3. Repeat the process for the middle and neck pickups (Photo 17).
Step 10: Adjust Intonation
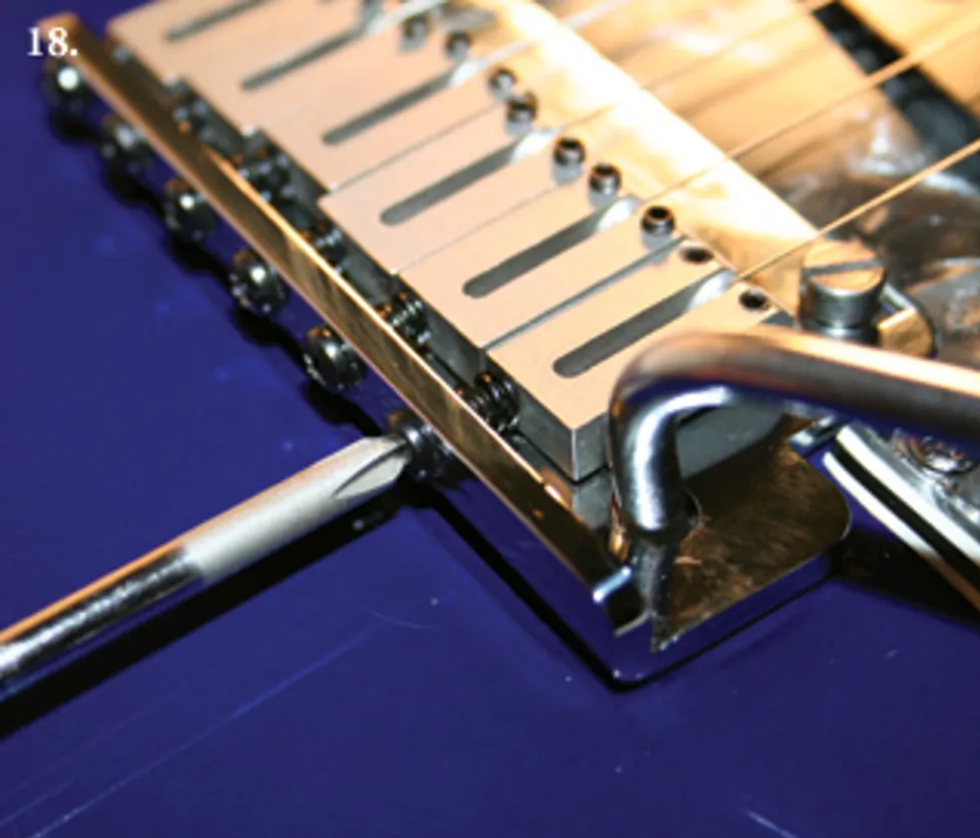
18. Moving the saddle to adjust the 1st string's intonation.
Once the pickups are at proper height, it's time to adjust intonation. Note: Unless the strings are fresh—as they were on this guitar when it arrived at the shop—install a new set before going any further.
This final setup step involves moving the saddles closer to or further away from the nut. The saddle-intonation adjustment screw is located at the rear of the trem assembly. Using a small Phillips screwdriver, move each saddle forward (by turning the screw counterclockwise) or backward (clockwise) to shorten or lengthen the vibrating portion of the string (Photo 18).
1. Armed with a high-quality electronic tuner, bring each string to pitch. But this time, instead of playing an open string and tuning it, strike the 12th-fret harmonic and tune it to pitch.
2. Starting with the 1st string, play the 12th-fret harmonic and then fret and pluck the same note. If the fretted note is sharp compared to the harmonic, move the saddle away from the neck. Conversely, if the fretted note is flat, move the saddle toward the neck. Make small adjustments— and retune the harmonic each time you make an adjustment . Continue comparing the 12th-fret note to its reference harmonic until the former matches the latter.
3. Repeat this process until all the 12th-fret notes on all six strings match their corresponding 12th-fret harmonics.
Rock Out!
At this point, the setup is complete and it's time to take your Strat for a test drive. After a few days, you may find you want to adjust something, such as the trem-spring tension, pickup height, neck relief, or saddle height. And that's great—the Strat is a supremely mechanical beast that will accommodate your tweaker's urges.
But as you dive into any re-adjustments, remember that changing one thing can affect something else in the setup equation. If you find yourself chasing an adjustment or discover that you've caused your Strat to drift out of whack, put it down, take a deep breath, and review the 10-step setup process outlined in this article. You can always start back at the beginning and confirm each adjustment as you move through the list.
In time, you'll develop a sixth sense for how all the elements interact, and this knowledge will allow you to continue to fine-tune your Strat for ultimate playability and tone. It's a skill worth developing!
[Updated 8/23/21]