Unravel the mysteries of series, parallel, and coil-splitting wiring schemes.
This month we're going to explore four ways to configure any humbucker that has 4-conductor wiring. (Note: These wiring schemes are not intended for an old-school humbucker with 2-conductor wiring, but rather the modern humbucker that allows coil-splitting and other wiring mods.)
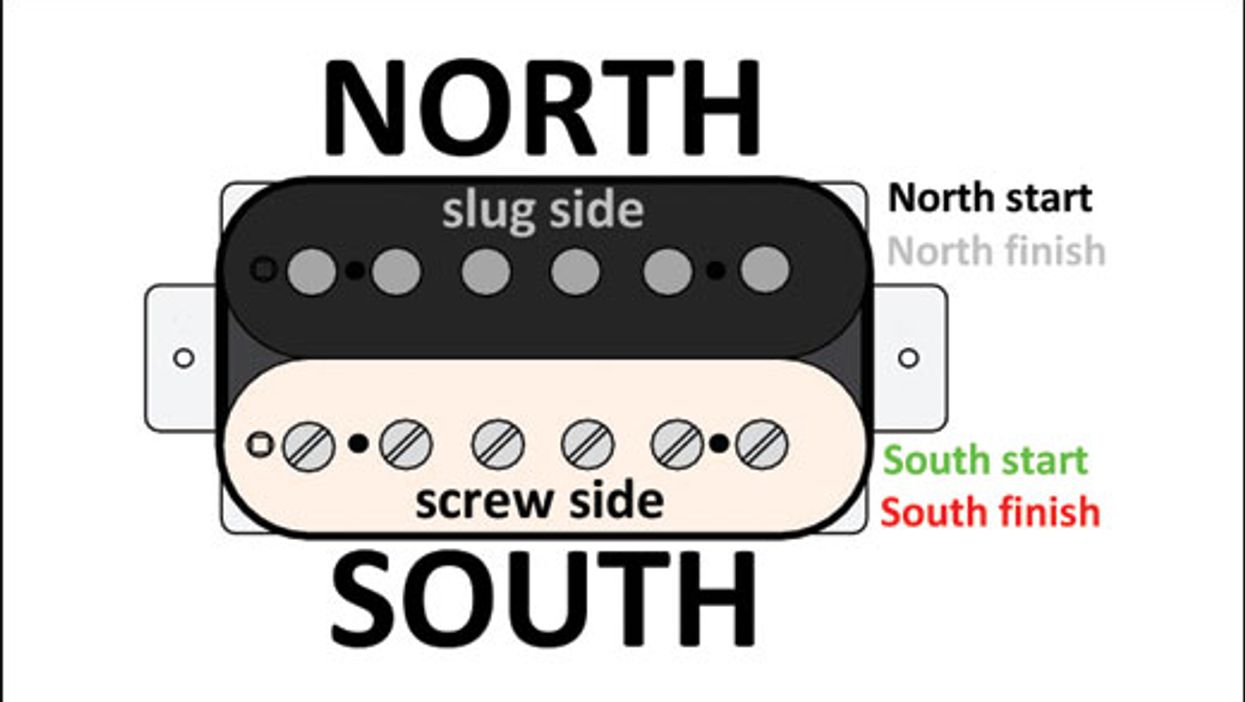
For starters, let's review our terminology. Looking at a humbucker from the front, we call the lower coil "south" and the upper coil "north." The south coil is always the "screw side," while the north coil is the "slug side." The latter is named for the type of magnetic material used on this coil. Each coil is wrapped with very fine wire, and this wire has a start and a finish. This results in a total of five wires coming from the humbucker:
- North coil start plus north coil finish.
- South coil start plus south coil finish.
- Ground.
The bare wire or braided shield always goes to ground—there's no exception—so that leaves us with four wires to play with. Having access to the start and finish of each coil wire not only makes it easy to solve potential out-of-phase issues (a subject we'll cover in another column), but it also gives you the option to wire up your humbucker in one of four different ways. If you're ambitious, you can use a switch to put several options at your fingertips.
The south coil is always the "screw side," while the north coil is the "slug side."
Every pickup company uses its own color-code scheme for these four wires. This makes discussing humbucker wiring a little more confusing than necessary, but that's the way it is. As usual, I'll use the Seymour Duncan color code as a quasi-standard. You should be able to get color-code information for your pickups from their maker, and there are several charts available on the internet that let you compare color-code schemes from different manufacturers. You can use such charts to translate the following wirings into whatever color code corresponds to your particular brand of humbucker. Fortunately that's not too hard—you only need to know which color wire on your pickup indicates the start or finish of which coil. Once you have that info, you can draw up a reference chart to decode this column's wirings.
Here's the Seymour Duncan 4-conductor humbucker color code:
- North coil start is black; north coil finish is white.
- South coil start is green; south coil finish is red.
- Ground is bare wire.
Fig. 1 sums up what we've covered so far in the Seymour Duncan format. Now let's walk through the four ways you can wire up a humbucker. Ready?
Standard humbucker wiring: both coils connected in series.
This is the default wiring in almost every guitar loaded with one or more humbuckers because it produces a warm, fat tone with maximum output while offering hum-cancelling capability. (It's also the factory standard for all humbuckers with 2-conductor wiring consisting of only hot and ground.)
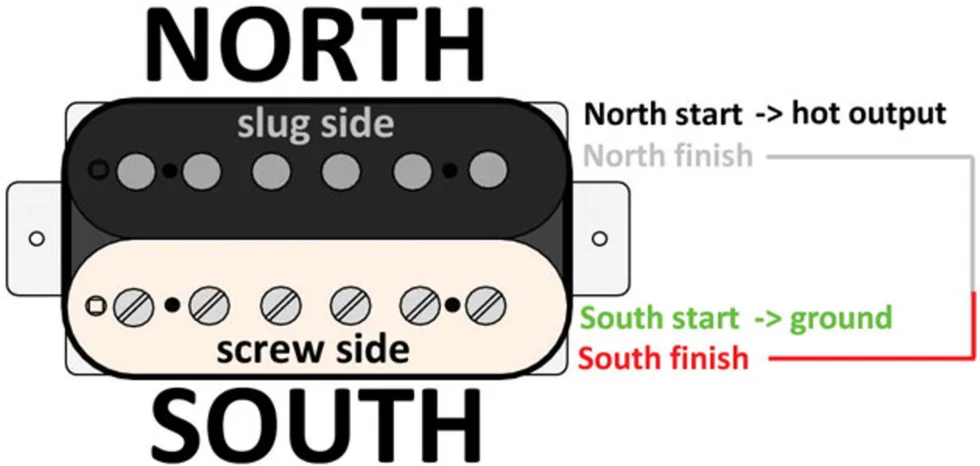
Fig. 2
illustration courtesy of singlecoil.com
Here are the connections for series wiring (Fig. 2):
- North coil start is the hot output.
- North coil finish and south coil finish are soldered together and taped off (this is the series link).
- South coil start is soldered together with the bare wire going to ground.
“Single-coil" humbucker wiring: both coils connected in parallel.
This option gives you a single-coil-like tone, but still retains hum-cancelling capability. It doesn't deliver a crystal-clear Strat or Tele tone, but to my ears it at least resembles a single-coil pickup—maybe closer to a P-90 than to a standard single-coil. Every type of humbucker sounds a little different when wired this way, so it's simply a matter of giving it a try to determine if you like the sound.
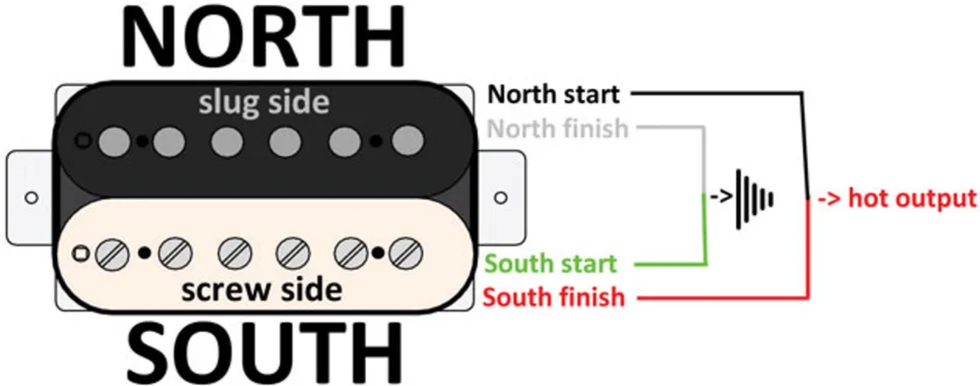
Fig. 3
illustration courtesy of singlecoil.com
Parallel wiring (Fig. 3) requires the following connections:
- North coil start and south coil finish are soldered together as the hot output.
- North coil finish and south coil start are soldered together with the bare ground wire.
Coil-splitting humbucker wiring #1: splitting to the south coil.
This wiring splits the humbucker in half, shunting one coil to ground and leaving the other coil engaged like a true single-coil pickup. In this mode, the hum-cancelling function is no longer active, so you'll get the hum and noise of any single-coil pickup. But don't expect a true Strat or Tele tone: If that's your goal, investigate the special breed of humbuckers that are made out of two real single-coil pickups. The downside of this type of pickup is that it doesn't sound great in full humbucker mode, so, as we're so often reminded, it's about compromise.
Splitting to the humbucker's south coil, which is the screw side, is only recommended for neck pickups. (You'll learn why we're excluding the bridge pickup when we get to our fourth wiring scheme.) Let's also remember that in most guitars with neck humbuckers, the south, screw-side coil lies closest to the neck.
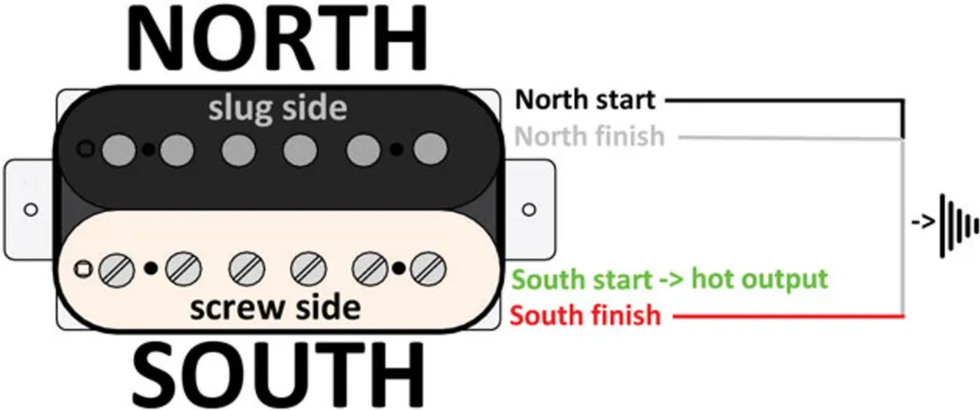
Fig. 4
illustration courtesy of singlecoil.com
For this coil-splitting wiring (Fig. 4), you need the following connections:
- South coil start is the hot output.
- North coil start, north coil finish, and south coil finish are soldered together with the bare ground wire.
Coil-splitting humbucker wiring #2: splitting to the north coil.
This wiring follows the same concept as our previous coil-splitting recipe, but leaves the north coil active—that's the slug side. This version is recommended for a bridge humbucker because pole-piece slugs deliver a fuller sound than pole-piece screws.
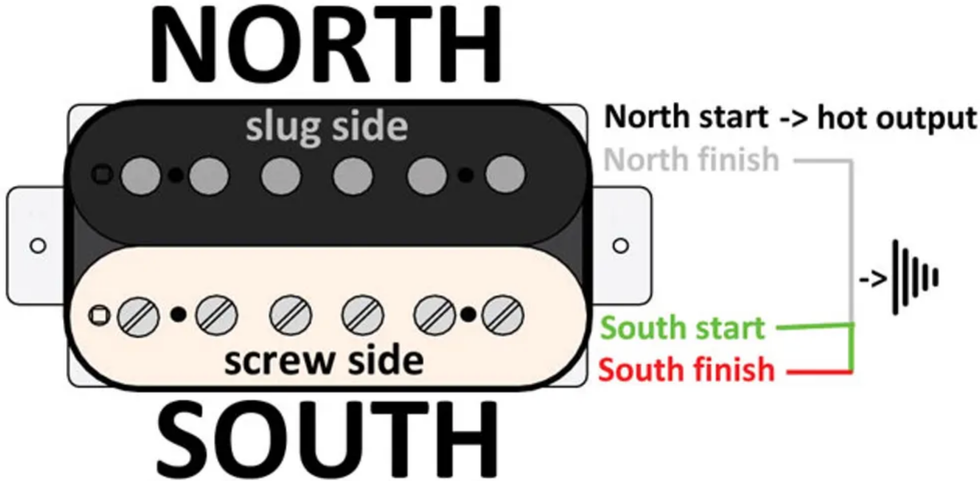
Fig. 5
illustration courtesy of singlecoil.com
Here are the connections for our second coil-splitting wiring (Fig. 5):
- North coil start is the hot output.
- North coil finish, south coil start, and south coil finish are soldered together with the bare ground wire.
Well, that's it. In a future column we'll explore how to integrate and control all these options with the help of a switching device. And, of course, we'll learn how to compensate for possible out-of-phase issues that can occur when you combine several humbuckers or a humbucker with a single-coil. But next month, we'll dig into a project designed to make a Telecaster more sonically flexible. Until then ... keep on modding!
[Updated 9/15/21]
- How to Get the Most out of Hum-Sing-Hum Wiring - Premier Guitar ›
- Mod Garage: Three Ways to Wire a Tone Pot - Premier Guitar ›
- Mod Garage: “Jimmy Page” Les Paul Wiring - Premier Guitar ›
- Adding Series Switching To Your Strat - Premier Guitar ›
- How to Change Pickup Wires (& Why) - Premier Guitar ›
From his first listen, Brendon Small has been a lifetime devotee and thrash-metal expert, so we invited him to help us break down what makes Slayer so great.
Slayer guitarists Kerry King and Jeff Hanneman formed the original searing 6-string front line of the most brutal band in the land. Together, they created an aggressive mood of malcontent with high-velocity thrash riffs and screeching solos that’ll slice your speaker cones. The only way to create a band more brutal than Slayer would be to animate them, and that’s exactly what Metalocalypse (and Home Movies) creator Brendon Small did.
From his first listen, Small has been a lifetime devotee and thrash-metal expert, so we invited him to help us break down what makes Slayer so great. Together, we dissect King and Hanneman’s guitar styles and list their angriest, most brutal songs, as well as those that create a mood of general horribleness.
This episode is sponsored by EMG Pickups.
Use code EMG100 for 15% off at checkout!
Learn more: emgpickups.com
Katana-Mini X is designed to deliver acclaimed Katana tones in a fun and inspiring amp for daily practice and jamming.
Evolving on the features of the popular Katana-Mini model, it offers six versatile analog sound options, two simultaneous effects, and a robust cabinet for a bigger and fuller guitar experience. Katana-Mini X also provides many enhancements to energize playing sessions, including an onboard tuner, front-facing panel controls, an internal rechargeable battery, and onboard Bluetooth for streaming music from a smartphone.
While its footprint is small, the Katana-Mini X sound is anything but. The multi-stage analog gain circuit features a sophisticated, detailed design that produces highly expressive tones with immersive depth and dimension, supported by a sturdy wood cabinet and custom 5-inch speaker for a satisfying feel and rich low-end response. The no-compromise BOSS Tube Logic design approach offers full-bodied sounds for every genre, including searing high-gain solo sounds and tight metal rhythm tones dripping with saturation and harmonic complexity.
Katana-Mini X features versatile amp characters derived from the stage-class Katana amp series. Clean, Crunch, and Brown amp types are available, each with a tonal variation accessible with a panel switch. One variation is an uncolored clean sound for using Katana-Mini X with an acoustic-electric guitar or bass. Katana-Mini X comes packed with powerful tools to take music sessions to the next level. The onboard rechargeable battery provides easy mobility, while built-in Bluetooth lets users jam with music from a mobile device and use the amp as a portable speaker for casual music playback.
For quiet playing, it’s possible to plug in headphones and enjoy high-quality tones with built-in cabinet simulation and stereo effects. Katana-Mini X features a traditional analog tone stack for natural sound shaping using familiar bass, mid, and treble controls. MOD/FX and REV/DLY sections are also on hand, each with a diverse range of Boss effects and fast sound tweaks via single-knob controls that adjust multiple parameters at once. Both sections can be used simultaneously, letting players create combinations such as tremolo and spring reverb, phaser and delay, and many others.
Availability & Pricing The new BOSS Katana-Mini X will be available for purchase at authorized U.S. Boss retailers in December for $149.99. For the full press kit, including hi-res images, specs, and more, click here. To learn more about the Katana-Mini X Guitar Amplifier, visit www.boss.info.
Snark releases its most compact model ever: the Crazy Little Thing rechargeable clip-on headstock tuner.
Offering precise tuning accuracy and a super bright display screen, the Crazy Little Thing is approximately the size of your guitar pick – easy to use, unobtrusive and utterly dependable.
Housed in a sturdy shell, the Crazy Little Thing can be rotated for easy viewing from any angle, and its amazingly bright display makes it perfect for the sunniest outdoor stages or the darkest indoor studios. You can clip it to the front of your headstock or on the back of your headstock for extra-discreet usage – and you can easily adjust the display to accommodate your preference.
As the newest addition to Snark’s innovative line of headstock tuners, the Crazy Little Thing is rechargeable (no batteries!) and comes with a USB-C cable/adapter for easy charging. Its display screen includes a battery gauge, so you can easily tell when it’s time to recharge.
The Crazy Little Thing’s highly responsive tuning sensor works great with a broad range of instruments, including electric and acoustic guitar, bass, ukulele, mandolin and more. It also offers adjustable pitch calibration: its default reference pitch is A440, but also offers pitch calibration at 432Hz and 442 Hz.
Snark’s Crazy Little Thing rechargeable headstock tuner carries a street price of $21.99. For more information visit snarktuners.com.
Trey Anastasio unveils plans for a special solo acoustic run starting in March, 2025.
The tour gets underway March 8, 2025 at Springfield, MA’s Symphony Hall and then visits US theatres and concert halls through early April. Real-time presales begin Wednesday, December 4 exclusively via treytickets.shop.ticketstoday.com. All remaining tickets will go on sale to the general public on Friday, December 6 – please check venues for on-sale times. For complete details, please see trey.com/tour.
TREY ANASTASIO - SOLO ACOUSTIC TOUR 2025
MARCH
8 – Springfield, MA – Symphony Hall
9 – Boston, MA – Wang Theatre at Boch Center
11 – Wilkes-Barre, PA – The F.M. Kirby Center
12 - Rochester, NY - Kodak Hall at Eastman Theatre
14 – Columbus, OH – Mershon Auditorium
15 – Milwaukee, WI – Riverside Theater
16 – Nashville, IN – Brown County Music Center
18 – Chicago, IL – Orchestra Hall
19 – Kansas City, MO – Uptown Theatre
21 – New Orleans, LA – Saenger Theatre
22 – Birmingham, AL – Alabama Theatre
23 – Nashville, TN – Ryman Auditorium
26 – Orlando, FL – Walt Disney Theater at Dr. Phillips Center for the Performing Arts
28 – Clearwater, FL – Ruth Eckerd Hall
29 – Savannah, GA – Johnny Mercer Theatre
30 – Charleston, SC – Gaillard Auditorium
APRIL
1 – Knoxville, TN – Tennessee Theatre
2 – Greenville, SC - Peace Concert Hall
4 – Washington, DC – Warner Theatre
5 - Red Bank, NJ - Count Basie Center for the Arts
More info: TREY.COM.