Many moons ago, I showed you how to coax seven sounds from a standard Stratocaster, rather than the five that are available with Fender's stock 5-way switch. (If you're curious about that mod, check out “The 7-Sound Stratocaster.") This month we'll investigate an even cooler version of the 7-sound mod. First, let's review:
The concept behind the 7-sound Strat wiring is that it lets you access the two “hidden sounds" you can't dial in with your regular Stratocaster's 5-way switch. These two sounds are:
• Bridge and neck pickup in parallel.
• All three pickups together in parallel.
For the original 7-sound mod, we wired the neck pickup to a second switch. This made it possible to engage the neck pickup with other settings of the 5-way switch that don't include it.
But with this new iteration, we'll replace the on/off switch with a blend pot that gives you the ability to control how much of the neck (or bridge) pickup you add to the mix. For example, you could warm up the biting sound of the bridge pickup by mixing in a little of the neck pickup. Just imagine: You can dial in any tonal shade you want without being limited to an on/off sound.
This mod doesn't require much in the way of parts, and it won't alter your Strat's appearance. As Fender buffs know, a standard Strat has three knobs—master volume plus two tone controls. We'll convert one of the tone knobs into a blend pot and then wire the guitar so it has a master volume, master tone, and a blend pot. (Most players are happy with a single master tone control—after all, it's how a Tele is configured—but if you can't live without two tone controls, you can replace one of the tone pots with a dual-concentric pot. This lets you stack two independent tone controls in the space of only one.)
The key to this mod is a special blend potentiometer, which is similar to a “no-load pot." When fully opened, it acts like a type of true bypass control, removing itself from the circuit.
It's easy to identify typical commercial no-load pots: They have a detent dimple on the back of the casing. Mechanically, this is the spot where the pot clicks and goes completely open, removing itself from the circuit. Blender pots usually don't have this click. That's the only difference.
A no-load pot isn't very expensive, but if you like the tone pot you already have and don't want to replace it with a new no-load version, it's not difficult to mod your existing pot to no-load specs. Of course, you won't have the detent function, but that's a bonus in this blender application.
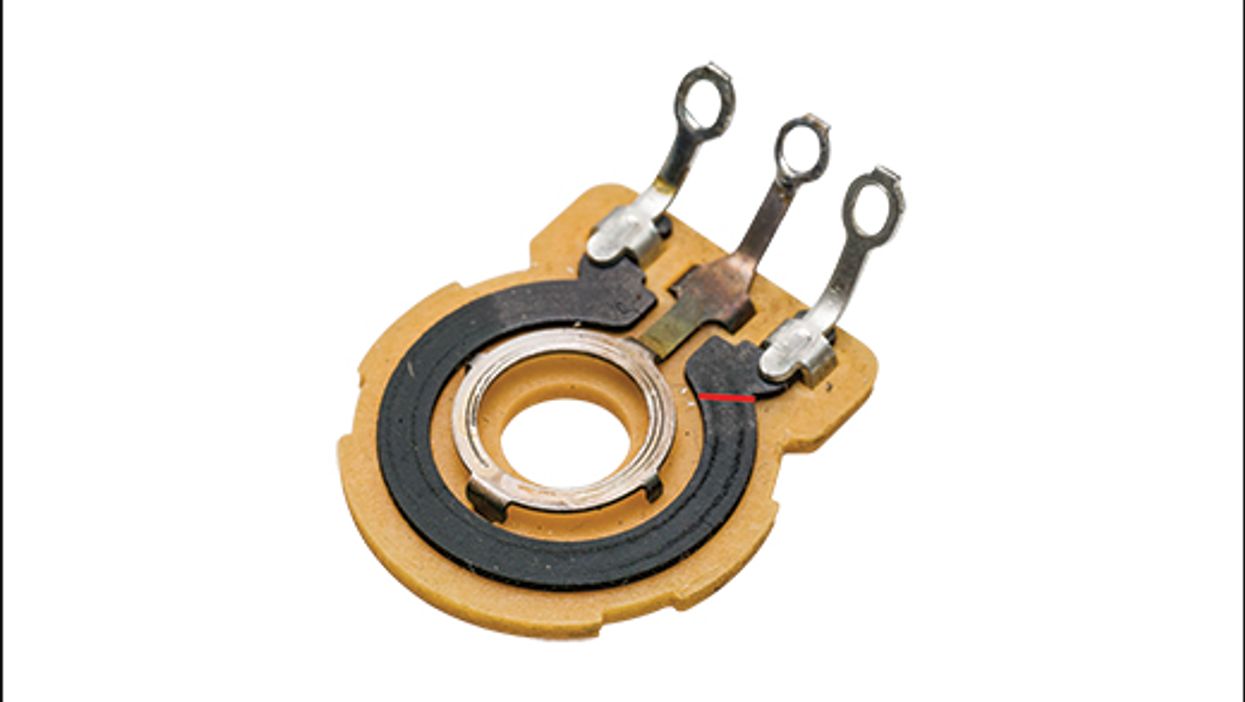
The first step is to unsolder and remove the pot you've chosen to mod. Next, you'll need to disassemble the pot. To do this, use a small pair of needle-nose pliers to pry the case tabs open. Remove the case and lift out the metal housing. Now lift off the carbon wiper tray with the soldering lugs. Place it in front of you exactly as shown in Fig. 1. It should look similar, depending on the make of the pot.
Now take a sharp tool—a razor blade, X-Acto knife, drill bit, Dremel tool, or a small needle file—and cut the trace where you see the red line. Next, scrape off approximately 1/8" of the carbon. I use a nut file to do this, but other scraping tools will work, as well. Finally, clean this area with a dust brush or something similar. Reassemble the pot and use the needle-nose pliers to push back each of the four case tabs. Et voilà! With the pot fully opened—cranked all the way clockwise—it will remove itself from the circuit. This gives you a no-load pot, but without the detent feature.
By the way, you may read that covering that area of the trace with nail polish will accomplish the same trick, but I don't recommend this. Why? Depending on the pot, the polish will not stick to the carbon taper. The “surgical method" I just described is the way to go.
To test your no-load pot, connect one lead of your digital multimeter (DMM) to the pot's middle lug and the other lead to the right lug. (This is with the pot shaft facing down and the lugs facing up.) Set your DMM to resistance.
Fig 2. — Photo courtesy singlecoil.com
Hold the pot so you're looking at the shaft: With it turned fully clockwise to the 10 position, you should receive an open or zero reading. As you start turning the shaft counterclockwise, the pot works as normal. At the 9 position, you should see readings close to the pot's values, and these will decrease now as you roll towards 0.
Put the pot back in the pickguard and resolder the wires.
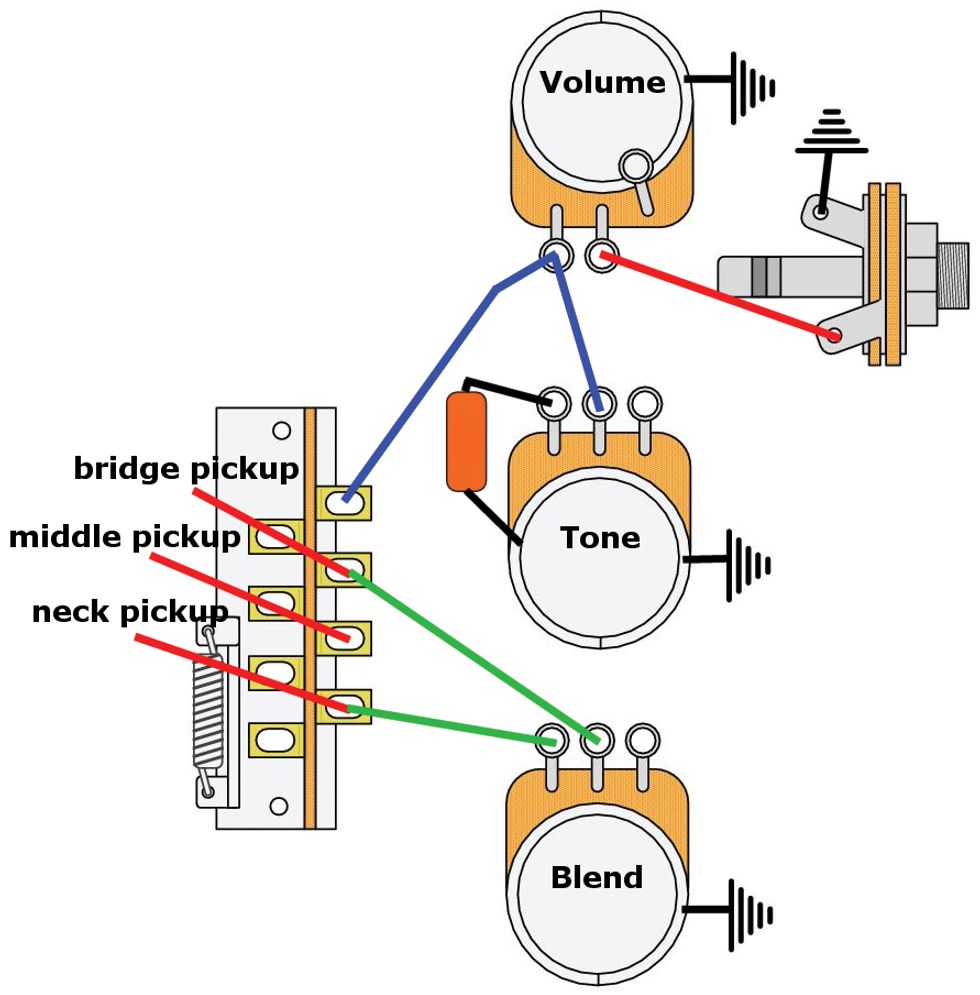
Once you've prepped and installed the blender pot, it's time to wire up your Strat with the new mod. Here's how it works:
• With the 5-way pickup selector switch in either the bridge or bridge-plus-middle positions, you can blend in the neck pickup.
• With the 5-way switch in either the neck or neck-plus-middle positions, it's the bridge pickup that gets blended.
• When the 5-way switch is in the middle position, the blender pot is non-functional.
Because you can dial in as much or as little of the “blend" pickup as you want, you have a huge palette of tonal options to experiment with.
So, begin by desoldering your existing Strat wiring and then follow the schematic (Fig. 2) to claim your new tones—sounds that will surely amaze your friends and bandmates. How cool is that? Incidentally, this mod works not only on Strats, but on all guitars that have three pickups and at least three controls.
Okay, that's it. Next month, we'll start rolling out two new series: One on handy DIY shop gadgets and gizmos, the other about DIY aging and relic techniques. Until then ... keep on modding!


