Having the ability to artfully add those "in-between" notes is a cornerstone of jazz guitar. Here’s how you do it.
Intermediate
Intermediate
• Understand the basic elements of the CAGED system.
• Learn the “rules” for adding outside notes.
• Expand your view of the fretboard in every key.
Have you ever asked yourself if you “know” all your scales? Well, one might answer that question with the chromatic scale. Simply put, the chromatic scale is all 12 notes. Chromaticism plays an important role in the construction of melodic lines in jazz, allowing dissonance to resolve into consonance. Jazz players are fond of a famous quote that basically states: No matter where you are on the neck, if you hit a “wrong” note you’re only a half-step away from a “right” one. This lesson will show how to integrate chromatics into major and minor CAGED scale forms, as well as provide examples of jazz lines. While this lesson centers around a major scale, this method of visualizing chromatic scales works with all scale types.
Let’s begin with a fingering for a chromatic scale. Ex. 1 shows an ascending and descending one-octave chromatic scale in open and first positions. We’re starting on C, so I used a Cmaj7 chord as the underlying harmony.
Ex. 1
Let’s expand that idea in Ex. 2. Here we are starting on F and playing a chromatic scale up to the A on the 1st string before descending to where we started. Because we aren’t using any open strings, this fingering can easily be moved up and down the neck.
Ex. 2
To clearly see how to integrate the chromatic scale into the major scale forms, I believe it’s best to start with one-octave major scale fingerings. Since we want these to be movable all over the fretboard, I’ve written them in 2nd position to avoid any open strings.
Ex. 3 is based on the “A” shape in the key of C.
Ex. 3
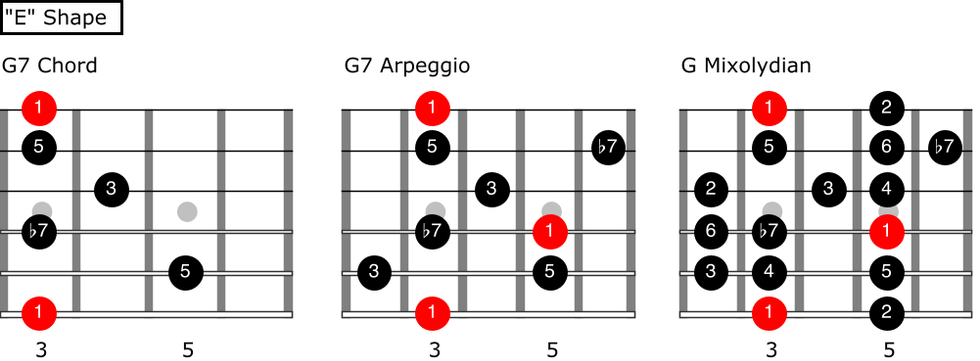
Ex. 4 is based on the “E” shape in the key of G.
Ex. 4
Ex. 5 is based on the “C” shape in the key of D.
Ex. 5
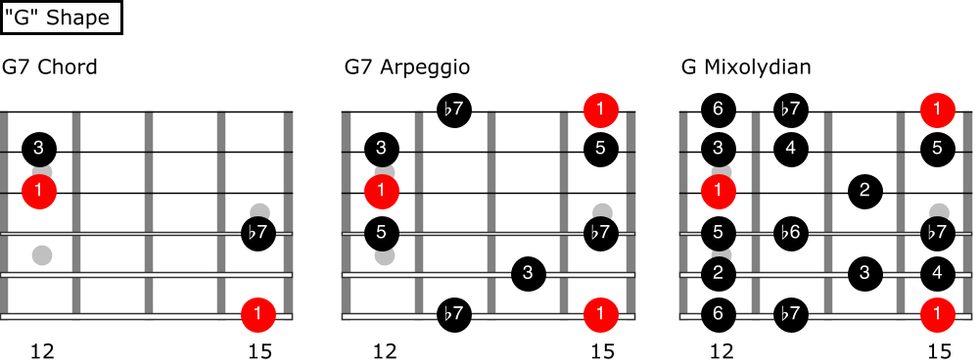
Ex. 6 is based on the “G” shape in the key of A.
Ex. 6
Finally, Ex. 7 is based on the “D” shape in the key of F.
Ex. 7
Now that we have our scale forms, let’s add in the chromatics by filling the spaces between the diatonic major scale tones. There are two possible fingerings for the chromatic scales derived from these forms, due to the guitar’s tuning. The following group of examples illustrates these fingerings.
Ex. 8 is based on the “A” shape in the key of C.
Ex. 8
Ex. 9 is based on the “E” shape in the key of G.
Ex. 10 is based on the “C” shape in the key of D.
Ex. 10
Ex. 11 is based on the “G” shape in the key of A.
Ex. 11
Finally, Ex. 12 is based on the “D” shape in the key of F.
Ex. 12
Generally, melodic lines are constructed using a balance of scalar and arpeggiated movement. Think of chord tones (root, 3, 5, 7) and the extensions (9, #11, 13) as areas of resolution. Chromatic passing tones are initially inserted between whole-steps, allowing connections and resolutions to chord and scale tones.
In measure one of Ex. 13, Ab is inserted between A and G, allowing a descending chromatic passage. Also, note the Eb inserted between E and D. Most of this example makes use of this device.
Ex. 13
In Ex. 14, I’m using mostly descending chromatic passing tones, but observe the ascending chromatics in measures one, two, and four. I briefly hit a C# in the first measure. Normally, I would resolve to D. Instead, I skip to E and then descend chromatically to D.
Ex. 14
By now, these chromatic devices should start to sound familiar to your ear. In Ex. 15, I’m pretty much sticking to ascending and descending chromatic movement.
Ex. 15
Ex. 16 balances the ascending and descending chromatic movement. Notice the four-note motivic sequence in measure two.
Ex. 16
Ex. 17 starts off with a very cool way to skip between two chord tones. In this case, we move from the root (F) to the 7 (E) and then descend chromatically to D. From there we skip up to the root and then leap down to A before approaching the root chromatically from G. When you start to isolate and analyze the nuances of these lines, they become easier to integrate into your own playing.
Ex. 17
Once you understand the basics of integrating chromatics into a one-octave major scale form, then you can apply those same principals to the full CAGED fingerings. Ex. 18 shows each fingering.
Ex. 18
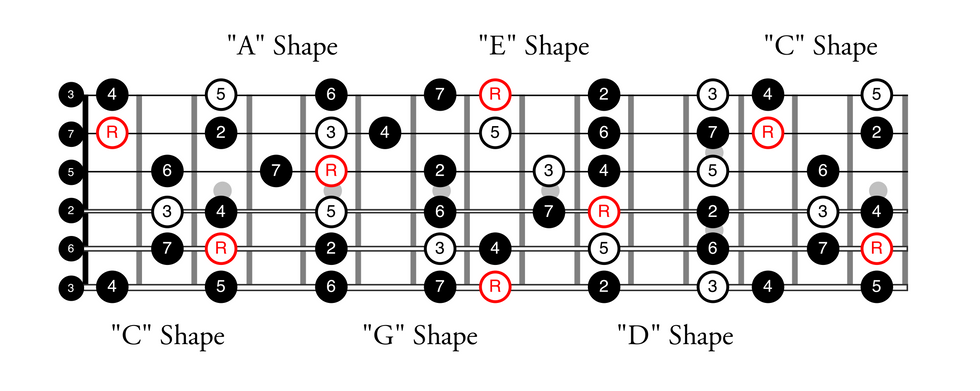
Ex. 19 illustrates how to expand the full “C” shape to include all the chromatic notes.
Ex. 19
Ex. 20 expands on the “A” shape.
Ex. 20
Ex. 21 expands on the “G” shape.
Ex. 21
Ex. 22 expands on the “E” shape.
Ex. 22
Ex. 23 expands on the “D” shape.
Ex. 23
Ex. 24 expands on the “C” shape in closed position.
Ex. 24
The following examples cover the full range of the scale forms. All of the examples are over a major 7 chord quality.
Ex. 25 makes a straight-ahead use of ascending and descending chromaticism. To avoid turning your line into a total chromatic passage with no whole-steps, it’s important to balance diatonic and chromatic movement. Of special interest in this line is measure four, which leaps from G to E to G and follows with an ascending chromatic approach to A.
Ex. 25
In measure one of Ex. 26, notice the chromatic descent from A to G. This is followed with an ascending Gmaj7 arpeggio. The rest of the line is made up of various ascending and descending chromatic movements. A special moment occurs in measure four, where D skips to Ab and then moves down to F# before resolving on G. The G is therefore approached chromatically from both above and below, which is called a double-chromatic approach.
Ex. 26
Ex. 27 kicks off with almost a boogie-woogie pattern. When it gets to A, a skip occurs from A to C# (root to 3) and then moves to a chromatic descent from B to A. Similarly, a skip in measure four moves from D to E before resolving chromatically to D.
Ex. 27
There’s more sequential writing in the first measure of Ex. 28. The first two beats establish a bit of a chromatic motif that catches the ear. Measure three uses one of my favorite chromatic devices, where on beat 3 you skip up from a root to a 5 and then drop to the 7 and descend chromatically as little or as much as you want. In this case, I went chromatically from G# to F#.
Ex. 28
Finally, we have Ex. 29. If you’ve made it this far you must really love chromatics! We kick off with a downward leap from the root to the 3 before ascending chromatically to the 5. Always try to keep chord tones on the strong beats, as this will help give your lines focus and direction.
Ex. 29
Greg Koch performing live.
The Gristle King himself, Greg Koch, joins reader Bret Boyer to discuss the one album that should be in everyone’s ears.
Question: What albums should every guitarist listen to and why?
Greg Koch - Guest Picker
Recorded in 1964, this album has been essential listening for generations of guitarists.
A: Going from the gut, I would say B.B. King’s Live at the Regal would be something every guitar player should listen to as it is the well from where every other electric blues guitar player drank from—whether they know it or not. Blues Is King is another one, but Live at the Regal is really the essence of what electric blues is all about.
Another worthy choice is this live album from 1966 which features an incredible take on Willie Nelson’s “Night Life.”
Obsession: I would say playing slide in open tunings. I have been playing mostly standard tuning for the simple convenience of it, but nothing is quite as filthy as playing slide in open G or open E. I’ve been bringing out two guitars specifically for those two tunings and it’s been a lot of fun.
Bret Boyer - Reader of the Month
Photo by Jamie Hicks
Recorded in a single take in 1971, Spence’s vocal style complemented his folky, angular guitar approach.
A: If you’ve never listened to the Bahamian guitarist Joseph Spence, you are in for a treat. Joseph is such a unique guitar player and singer, and his music is the purest expression of joy I’ve heard on an album. Start with Good Morning Mr. Walker; it’s a great reminder to have fun and be yourself.
Obsession: Hub Hildenbrand’s music is very personal and unlike anything I’ve heard on guitar. Check out the album When the Night Lost Its Stars. He even bows his 1953 Gibson archtop on two tracks. Hub draws deeply from non-Western music, with a strong influence from the oud tradition in his playing. His music is quiet, deeply reflective, and searching.
Nick Millevoi - Senior Editor
A: Steve Reich’s “Electric Counterpoint,” the original version performed by Pat Metheny. It shows that since the guitar is capable of anything, you might as well use it to do exactly what you want to do and have some fun. And for experimentalists, it’s a great reminder that there’s so much you can do using nice, tonal chords.
Obsession: The EHX Attack Decay has been delivering loads of inspiration lately. After buying one earlier this year, it hasn’t left my board. The premise is simple—create swells with controls for attack and decay speeds—which leaves so much to be discovered.
Ted Drozdowski - Editorial Director
A: Son House’s Father of the Delta Blues, because it’s a reminder that music is something elemental. It comes from the soil and is more deeply embedded in us than our own DNA. House’s performances are Heaven and Hell, doubt and surety, love and death. It’s that raw, true, and beautifully imperfect—poetry that breathes.
Obsession: Prog rock, thanks to recently experiencing the BEAT Tour and David Gilmour live in the same week. That reminded me of how sublime prog can be when it functions on an empathetic level first. My bedrock for prog remains In the Court of the Crimson King.
Ethnomusicologist Frances Densmore records the song of Mountain Chief, head of the Blackfeet Tribe, on a phonograph for the Bureau of American Ethnology in 1916.
Once used as a way to preserve American indigenous culture, field recording isn’t just for seasoned pros. Here, our columnist breaks down a few methods for you to try it yourself.
The picture associated with this month’s Dojo is one of my all-time favorites. Taken in 1916, it marks the collision of two diverging cultural epochs. Mountain Chief, the head of the Piegan Blackfeet Tribe, sings into a phonograph powered solely by spring-loaded tension outside the Smithsonian. Across from him sits whom I consider the patron saint of American ethnomusicologists—the great Frances Densmore.
You can feel the scope and weight of theancient culture of the indigenous American West, and the presence of the then-ongoing women’s suffrage movement, which was three years from succeeding at getting the 19th Amendment passed by Congress. That would later happen on June 4, 1919—the initiative towards granting all women of this country the right to vote. (All American citizens, including Black women, were not granted suffrage until 1965.)
Densmore traversed the entire breadth of the country, hauling her gramophone wax cylinder recorders into remote tribal lands, capturing songs by the Seminole in southern Florida, the Yuma in California, the Chippewa in Wisconsin, Quinailet songs in Northern Washington, and, of course, Mountain Chief outside the Smithsonian in Washington, D.C. Author of more than 20 books and 200 articles, she carefully preserved the rich cultural diversity of Native Americans with over 2,500 field recordings.
Why am I writing about this? Firstly, to pay homage! Secondly, because it serves as a great reminder to seek and cultivate sound outside the studio as well. We live in a time of great technological power and convenience. Every week a new sample pack, plugin, pedal, or software instrument hits the market. For all the joy that these offerings bring, they deprive us of the joy of creating our own instruments from scratch.
This month, I’m advocating for you to make some field recordings of your own—nature, urban, indoor, outdoor, specific locations, animals, or anything that piques your interest! Bring the material back to the studio and make music with it! I’ll show you how to make your own sample libraries to use in your music. Tighten up your belts, a multipart Dojo is now open.
What do you need to get started? Quite simply, you just need any device that is capable of recording. This can range from your cell phone to a dedicated field recorder. The real question is: Do you want to use mics housed in handheld units or have more robust mic pres with the ability to power larger live/studio microphones using XLR connectors found with the larger units? Let’s look at three scenarios.
The Cellular Approach
The absolute easiest way to get started is with your cell phone. Take advantage of a voice-memo recording app, or use an app that records multitrack audio like GarageBand on iOS. Phone recordings tend to sound very compressed and slightly lo-fi—which might be exactly what you want. However, the method can also introduce unwanted noise artifacts like low-end rumble (from handling the phone) and phasing (moving the mic while recording). I recommend using a tripod to hold your phone still while recording. You might also want to consider using an external mic and some software to edit your sample recordings on the phone. I like using a Koala Sampler ($4.99) on iOS devices.
Upgrade Me
The next step up is to use a portable recorder. These have much better mic pres, and offer true stereo recording with pivoting mic heads. This can give you the added benefit of controlling the width of your stereo image when recording or helping isolate two sound sources that are apart from each other. You sacrifice the ability to easily edit your recordings. You simply import them into your computer and edit the recording(s) from there.
Pro-Level Quality
I would recommend this scenario if you want to record multiple sources at once. These devices also have SMPTE time code, 60+ dB of gain, phantom power (+48 volts), advanced routing, and a 32-bit/192 kHz sampling rate, so you’ll never have a distorted recording even when the meter gets unexpectedly pegged into the red from a loud sound source. I recommend the Zoom F8n Pro ($1099). Now you can use your microphones!
Best Practices
Try to safely record as close to the sound source as you can to minimize ambient noise and really scrub through your recordings to find little snippets and sound “nuggets” that can make great material for creating your own instrument and sample library—which we’ll explore next month! Namaste.
Need more firepower? Here’s a collection of high-powered stomps that pack plenty of torque.
There’s a visceral feeling that goes along with really cranking the gain. Whether you’re using a clean amp or an already dirty setup, adding more gain can inspire you to play in an entirely different way. Below are a handful of pedals that can take you from classic crunch to death metal doom—and beyond.
Universal Audio UAFX Anti 1992 High Gain Amp Pedal
Early 1990s metal tones were iconic. The Anti 1992 offers that unique mix of overdrive and distortion in a feature-packed pedal. You get a 3-band EQ, noise gate, multiple cab and speaker combos, presets, and full control through the mobile app.
Revv G4 Red Channel Preamp/Overdrive/Distortion Pedal - Anniversary Edition
Based upon the red channel of the company’s Generator 120, this finely tuned circuit offers gain variation with its 3-position aggression switch.
MXR Yngwie Malmsteen Overdrive Pedal - Red
The Viking king of shred guitar has distilled his high-octane tone into a simple, two-knob overdrive. Designed for going into an already dirty amp, this stomp offers clarity, harmonics, and more.
Empress Effects Heavy Menace Distortion Pedal
Arguably the company’s most versatile dirt box, this iteration is all about EQ. It’s loaded with an immensely powerful 3-band EQ with a sweepable mid control, footswitchable noise gate, a low-end sculpting control, and three different distortion modes.
JHS Hard Drive Distortion Pedal - Tan
Designed by late JHS R&D engineer Cliff Smith, the Hard Drive is a powerful and heavy ode to the post-grunge sounds of the late ’90s and early ’00s. This original circuit takes inspiration from many places by including cascading gain stages and Baxandall bass and treble controls.
Boss HM-2W Waza Craft Heavy Metal Distortion Pedal
Few pedals captured the sound of Swedish death metal like the HM-2. The go-to setting is simple—all knobs maxed out. Flip over to the custom mode for more tonal range, higher gain, and thicker low end.
Electro-Harmonix Nano Metal Muff Distortion Pedal
Voiced with an aggressive, heavy tone with a tight low end, this pedal offers +/- 14 dB of bass, a powerful noise gate, and an LED to let you know when the gate is on.
Soldano Super Lead Overdrive Plus Pedal
Aimed to capture the sound of Mike Soldano’s flagship tube amp, the SLO uses the same cascading gain stages as the 100-watt head. It also has a side-mounted deep switch to add low-end punch.
We chat with Molly about Sister Rosetta’s “immediately impressive” playing, which blends jazz, gospel, chromaticism, and blues into an early rock ‘n’ roll style that was not only way ahead of its time but was also truly rockin’.
In the early ’60s, some of the British guitarists who would shape the direction of our instrument for decades to come all found themselves at a concert by Sister Rosetta Tharpe. What they heard from Tharpe and what made her performances so special—her sound, her energy—must have resonated. Back at home in the U.S., she was a captivating presence, wowing audiences going back to her early days in church through performing the first stadium rock ‘n’ roll concert—which was also one of her weddings—and beyond. Her guitar playing was incendiary, energetic, and a force to be reckoned with.
On this episode of 100 Guitarists, we’re joined by guitarist Molly Miller, who in addition to being a fantastic guitarist, educator, bandleader, and performing with Jason Mraz, is a bit of a Sister Rosetta scholar. We chat with Molly about Sister Rosetta’s “immediately impressive” playing, which blends jazz, gospel, chromaticism, and blues into an early rock ‘n’ roll style that was not only way ahead of its time but was also truly rockin’.